Page is loading ...

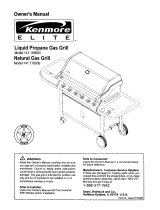
Use and Care Guide
E L I T E
_®
End Panel Module
Model 141.16730900
Serving Cart Module
Model 141.16732900
Outdoor Refrigerator Module Outdoor Sink Module
Model 141.16736900 Model 141.16737900
Note: All modules are sold separately.
• Safety
• Assembly
• Use and Care
Call us first if you have any problem with
this product. We can help you with ques-
tions about assembly and operation or if
there are damaged or missing parts when
you unpack this unit from the shipping box.
Please call before contacting your local
retailer.
1-888-317-7642
8am-8pm CST, Monday throu.qh Friday
NOTE TO ASSEMBLER/INSTALLER:
Leave this guide with the consumer.
NOTE TO CONSUMER:
Keep this guide for future reference.
• RECORD YOUR SERIAL #
(see silver CSA/serial label on main bodyof module)
Sears, Roebuck and Co., Hoffman Estates, IL 60179, USA www.sears.com
Guide # P80174008L - Date:2009/01/21

Primary Safety Warnings ............................... 2
Warranty Terms and Conditions ................... 2
Pre-Assembly Instructions ............................... 2
Part Diagrams and Lists ........................... 3-6
Assembly Instructions ................................. 7-11
Use and Care Instructions ......................... 12-13
Cleaning and Maintenance ...................... 13-14
Repair Protection Agreements ...................... 15
Kenmore Elite Full Warranty
If the module fails due to a defect in material or
workmanship within two years from the date of
purchase, call 1-800-4-MY-HOME'to arrange for
free repair (or replacement if repair proves im-
possible).
Limited Warranty on Selected Parts
For three years from the date of purchase, any
stainless or painted steel part will be replaced free
of charge if it rusts through. After the second year
from the date of purchase you must pay the labor
cost to have it installed.
All warranty coverage excludes part paint loss or
rusting (except for rust-through as specified above),
which are either expendable parts that can wear
out from normal use in less than a year, or are
conditions that can be the result of normal use,
accident or improper maintenance.
All warranty coverage is void if the module is ever
used for commercial or rental purposes.
All warranty coverage applies only if the product
is used in the United States.
This warranty gives you specific legal rights, and
you may have other rights which vary from state
to state.
Sears, Roebuck and Co., Hoffman Estates, IL
© Sears Brands, LLC
To expedite the assembly process follow these
general guidelines:
[] Tools Required forAssembly :
• protective work gloves
[]
[]
[]
For your safety, obtain assistance from another person
when assembling this product.
Use the Part Diagrams to ensure all items are included
and free of damage.
Do not assemble or operate the module if they appear
damaged. If there are damaged or missing parts when
you unpack the shipping box or you have questions dur-
ing the assembly process, call the:
Grill Information Center 1-888-317-7642
8am-8pm CST, Monday throuqh Friday
California Proposition 65 Warning
The Outdoor Sink Module is provided with a Faucet
Assembly. You can have the faucet plumbed directly
to your homes inside water supply line (supplies not
included) so your outdoor sink can be used for washing
food and dishes. However, if you elect to attach a
garden hose to your Faucet Assembly, be aware that
in some U.S. States water supplied through a garden
hose is regarded to be unfit for human consumption.
When using electrical appliances, basic safety
precautions should always be used.
This appliance, when installed, must be electri-
cally grounded in accordance with local codes
or, in the absence of local codes, with the
National Electrical Code, ANSI/NFPA 70, or the
Canadian Electrical Code, CSA C22. 1.
• Keep any electrical supply cord and the fuel
supply hose away from any heated surfaces.

5-.
6
-3
" " " -4
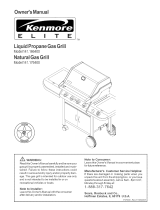
KEY DESCRI PTION 16730900 PART# QTY
1 Cart Panel, Top P07801072A 1
2 Cart Panel, Front P07621016D 1
3 Cart Panel, Frame P03344017D 2
4 Cart Panel, Rear P07702104M 1
5 Cart Panel, Left P07619003D 1
6 Decorative Bracket P03344018D 3
7 Level Adjuster P05322004A 4
Cover P07005011B 1
Wrench (Packed with the 16655900 Use and Care Guide) P05515017L 1
Use and Care Guide P80174008L 1
For the repair or replacement parts you need:
Calla rre 1-800-4-MY-HOME® (1-800-469-4663)
To obtain the correct replacement parts for your module, please refer to the part numbers in this parts
list. The following information is required to ensure you receive the correct parts:
1. Model and Serial Number
2. Part Number
3. Part Description
4. Quantity of parts needed
Important: Use only Kenmore replacement parts. The use of any part that is not a Kenmore replacement part
can be dangerous and will also void your product warranty. Keep this use and care guide for convenient referral
and for part replacement.

13
13a
11
® ........i2 15........._ _9
%'_16 _14a
4
2
_12
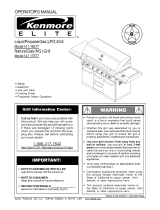
KEY DESCRI PTION 16732900 PART# QTY
1 Cart Panel, Top P07801073A 1
2 Cart Panel, Left/Right P07622001D 2
3 Cart Frame,Front P03344019D 1
4 Cart Frame, Rear P03344024D 1
5 Cart Frame Bracket P03303104D 2
6 Cart Panel, Front P07621017D 1
7 Level Adjuster P05322004A 4
8 Serving Cart Panel P07801074A 1
9 Serving Cart Panel Bracket, Left/Right P03327072D 2
10 Serving Cart Panel Bracket, Rear P03327071D 1
11 Serving Cart Leg Assembly P03334005D 2
12 End Cap P04523001A 4
13 Caster P05112002A 2
13a Caster/Rear P05112011A 2
14 Serving Cart Shelf, Upper P07512016B 1
14a Serving Cart Shelf, Lower P07512017B 1
15 Cart Handle Bracket P03303103D 2
16 Service Cart Handle P00212006A 1
17 Protective Pad, Left P055180193 1
18 Protective Pad, Right P055180203 1
Cover P07005009B 1
Wrench (Packed with the 16655900 Use and Care Guide) P05515017L 1
Use and Care Guide P80174008L 1
4

2 _
4_
\
11
9
6
lO
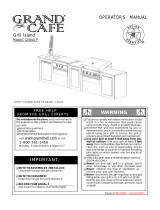
KEY DESCRI PTION 16736900 PART# QTY
1 Cart Panel, Top P07801075A 1
2 Cart Panel, Front P07621017D 1
3 Cart Frame, Front P03344019D 1
3a Cart Frame, Rear P03344023D 1
4 Cart Panel, Left/Right P07622001D 2
5 Cart Panel, Rear P07702105M 1
6 Trim Plate P07524001Q 1
7 Refrigerator Bracket, Left P03311032D 1
8 Refrigerator Bracket, Right P03311033D 1
9 Refrigerator Bracket, Rear P03311037D 1
10 Level Adjuster P05322004A 4
11 Refrigerator P05335022B 1
Cover P07005008B 1
Wrench (Packed with the 16655900 Use and Care Guide) P05515017L 1
Use and Care Guide P80174008L 1
5

2\
8\
4\
12
11\
10\\\
7 \-4
KEY DESCRI PTION 16737900 PART# QTY
1 Faucet Assembly P05513050M 1
2 Sink Frame P07801076A 1
3 Sink P0071342BC 1
4 Drain Assembly P05512090M 1
5 Drain Pipe P055120913 1
6 Cart Frame, Front P03344019D 1
6a Cart Frame, Rear P03344023D 1
7 Cart Panel, Front P07621017D 1
8 Cart Panel, Left/Right P07622001D 2
9 Door Trim Plate P07510003H 1
10 Door P04301043J 1
10a Door Bracket, Inner P03303128D 1
11 Door Handle P00213030M 1
12 Cart Panel, Rear P07702106M 1
13 Slide Set Bracket P03311034D 2
14 Cart Basket P05203007G 1
15 Slide Set P05516013C 1
16 Cart Basket Bottom P01001053L 1
17 L Bracket, Left P03301062C 1
18 L Bracket, Right P03301063C 1
19 Door Bracket, Left P033270694 1
20 Door Bracket, Right P033270704 1
21 Level Adjuster P05322004A 4
22 Sink Bracket, Left P03327079D 1
23 Sink Bracket, Right P03327080D 1
24 Pipe Bracket P05512016G 1
Cover P07005010B 1
Wrench (Packed with the 16655900 Use and Care Guide) P05515017L 1
Use and Care Guide P80174008L 1

- / \\\,
Wrench
Qty.1
Part # P05515017L
(The wrench is not provided, please find it from
16655900 grill pack)
To Level End Panel Module
[] Remove all packing materials.
[] Level Adjusters are located on the underside of the Module as shown.
[] Adjust the 4 preassembted Level Adjusters using the wrench provided.
- Turning adjusters clockwise raises the height.
- Turning adjusters counterclockwise lowers the height.
IMPORTANT: For illustration purpose the Module is shown on a tilted angle. FOR YOUR SAFETY-
DO NOT TILT your Module at any time. Top, Panel
/
j...... j_
V
/
/
/
/
/
/
/
/
/
/
/
/
/
/
/
/'
DO NOT lift Module from the Top Panel when moving
or assembling the unit.
I
/ j/
Level Adjuster _ f Wrench
Note: This Module ispre-assembted for use asa Left End Panel. Ifnecessary,
you can change it to the Right End Panel following these steps:
How to change the Left End Panel to a Right End Panel
[] Detach the Top Panel and Rear Cart Panel by removing the 4 Fiat Screws 1/4"x3/8" from each panel.
[] Detach the Front Cart Panel and Left Cart Panel by removing the 6 Fiat Screws 1/4"x3/8" from each panel.
[] With the assistance of another person, turn the steel frame around so the 2 support brackets face the grill island or
modulethatwilIsitadjacent to this Right End Panel. See Figure.
[] Turn the Front Cart Panel and Rear Cart Panels upside down and re-assemble them to the steel frame using the
previously removed screws.
[] Turn the Left Cart Panel upside down and re-assemble it to the steel frame using the previously removed screws.
[] Attach the Top Panel to the steel frame. Be sure the flat edge is on the left and the rounded corners of the Top Panel
are on the outside. Secure using the 4 previously removed Fiat Screws.
Left Cart
Panel
Top Cart Panel
Rear Cart
Panel
Decorative
Brackets
Upside '_
Down
Tum
Round
Upside
Down
Front Cart
Panel
Top Cart Panel
Decorative
Brackets
Rear Cart
Panel
When you have finished assembling this module
be sure that all screws are tightened for safe
operation of the unit.
Front
Panel
Left Cart
Panel

Remove the Support Bar
[] Remove all packing materials.
[] Remove the two 3/16"x3/8" Phillips Head Screws
and then remove the Support Bar.
Note: the Support Bar is used to reinforce the Cart
Frame Assembly during shipping and must be
removed to roll out the Serving Cart.
/
/
/
/
/Top Panel
To Level Serving Cart Module
[]
[]
Support Bar
Fig. 1
/
/i
\- ......./ Wrench
/
Level Adjuster
Level Adjusters are located on the underside of the Module as shown in Fig. 1.
Adjust the 4 preassembted Level Adjusters using the wrench provided.
- Turning adjusters clockwise raises the height.
- Turning adjusters counterclockwise lowers the height.
IMPORTANT: For illustration purpose the Module is shown
on a tilted angle. FOR YOUR SAFETY-DO NOT TILT your Module at any time.
/
Wrench
Qty. 1
Part # P05515017L
(The wrench is not provided, please find it from
16655900 grill pack)
DO NOT lift Module from the Top Panel when moving
or assembling the unit.
H nstall Cart Handle
[] Unscrew two Philip Head Screw 3/16"x 3/8" and Spring Washer 3/16" from Cart Handle.
[] Install the Cart Handle to Cart using Phillips Head Screw 3/16"x3/8" and Spring Washer 3/16".
1_ Install the Serving Cart
[] Push the Serving Cart into the Cart
Frame Assembly as shown.
Cart Frame Assembly
Serving Cart
When you have finished assembling this
module be sure that all screws are
tightened for safe operation of the unit.
8

To Level Refrigerator Module
[] Remove all packing materials.
[] Level Adjusters are located on the underside of the Module as shown.
[] Adjust the 4 preassembted Level Adjusters using the wrench provided.
- Turning adjusters clockwise raises the height.
- Turning adjusters counterclockwise lowers the height.
IMPORTANT: For illustration purpose the Module is shown
on a tilted angle. FOR YOUR SAFETY-DO NOT TILT your Module
at any time.
/
\\\\
Wrench
Qty. 1
Part # P05515017L
(The wrench is not provided, please
find it from 16655900 grill pack)
Top Panel
/
/
!
/,
/ /
//
//
//
/
//
//
!/
/
/
/
/
'\
Pull Refrigerator Cord out
[] Unscrew Trim Plate from the Rear Cart Panel, then
pull Refrigerator Cord out.
[] Reinstall Trim Plate to Rear Cart Panel.
[] Plug Refrigerator Cord into a properly grounded outlet.
/
/
Level Adjuster
Wrench
x\\\\
/-
/
/-
DO NOT lift Module from the Top Panel when moving
or assembling the unit.
When you have finished assembling this module
be sure that all screws are tightened for safe
operation of the unit.

Install FaucetAssembly(Thisassemblyprocessrequires2 people)
[] Remove all packing materials.
[] Open Cart Door as shown. (See Fig. 1).
[] Remove Faucet rubber washer and Bracket and insert the Faucet as shown.
From the underside of the Sink Frame, reattach the Faucet washer and Bracket, secure the Bracket.
(See Fig. 2).
[] Apply pipe tape (not provided) on the Faucet pipe inlet. Connect a 5/8" water supply hose, pipe or tube
(not provided) to the Faucet Pipe Inlet and then tighten as shown. (See Fig. 4)
CAUTION: Use a wrench to connect your water source. DO NOT over-tighten the connection or you
may damage the copper pipe.
[] Feed the loose end of the preassembted drain pipe through the Rear Cart Panel so the sink drains
outside the cabinet. (See Fig. 3)
[] Feed your 5/8" water supply hose, pipe or tube through the Rear Cart Panel and connect it to an appropriate
water source.
Fig. 1
Fig. 3
/
/
For illustration pur-
poses the left cart side
panel is not shown.
\
\
\
/ , Use Wrench to tighten
Outlets for Faucet '\
\ (not provided)
and Drain Pipe
Sink
Frame/
top /_,
i,, /
Bracket ',\ /
\\\\ !
\"... I _ Fig. 2
j
\
\
/
/
/
/
/
/
/
t _upply hose or tubes_
CAUTION: "-.... ..................... Fig. 4
Avoid breaking the copper
tube from the faucet.
Thee California Proposition 65 Warning
outdoor sink module is provided with a Faucet
Assembly. You can have the faucet plumbed directly
to your homes inside water supply line (supplies not
included) so your outdoor sink can be used for washing
food and dishes. However, if you elect to attach a
garden hose to your Faucet Assembly, be aware that
in some U.S. States water supplied through a garden
hose is regarded to be unfit for human consumption.
10

To Level Sink Module
[] Level Adjusters are located on the underside of the Module as shown.
[] Adjust the 4 preassembted Level Adjusters using the wrench provided.
- Turning adjusters clockwise raises the height.
- Turning adjusters counterclockwise lowers the height.
IMPORTANT: For illustration purpose the Module is shown
on a tilted angle. FOR YOUR SAFETY-DO NOT TILT your Module
at any time.
j ...... j-
Wrench
Qty.1
Part # P05515017L
(The wrench is not provided, please find
it from 16655900 grill pack)
_ Top Panel
',.. J
/
/ " ........... Wrench
Level Adjuster
DO NOT lift Module from the Top Panel when moving
or assembling the unit.
When you have finished assembling this module
be sure that all screws are tightened for safe
operation of the unit.
11

Thisappliancemustbegrounded.Intheeventof
an electricalshortcircuitgroundingreducesthe
riskof electricalshockby providingan escape
wirefor theelectricalcurrent.Thisapplianceis
equippedwithacordhavingagroundingwirewith
agroundingplug.Theplugmustbepluggedinto
anoutletthatisproperlyinstalledandgrounded.
Riskof childentrapment.Beforeyouthrowaway
yourold refrigeratoror freezer:
• Takeoff the doors.
• Leavetheshelvesinplacesothat
childrenmaynoteasilyclimbinside.
DON'T WAIT DO IT NOW!
An empty refrigerator is a very dangerous
attraction to children. Remove either the gasket,
latches, lids or doors from unused appliances,
or take some other action that guarantees it
rendered harmless.
Operation
[] Level the cabinet to avoid vibration.
[] To start the refrigerator, turn the control knob
to your desired cooling temperature. The re-
frigerator temperature will vary depending on
the quantity of the food stored and the fre-
quency with which the door is opened.
[] Turn the control to the " O " position to
temporarily discontinue the cooling cycle.
Note: Wait 3 to 5 minutes before restarting if
operation has been interrupted.
Improper use of the grounding plug can result
in a risk of electric shock. Consult a qualified
electrician or service person if the grounding
instructions are not completely understood, or if
the doubt exists as to whether the appliance is
properly grounded.
Use only extension cords approved for outdoor
use marked with W-A and rated for the power
of this appliance.
Do not splice the cord.
AC Power Rate: 115 VAC / 60 Hz, 90 Watts
Net Capacity: 70L
C_RCUIT DIAGRAM
THERMOSTAT
i .....; °-
L_ - OVER,_LLOAD
white COMPRE88OR
WARNING: If any of the original wire supplied with the appliance needs to be replaced, it must be replaced
with specified type as above or its equivalent.
12

Water supply and
Island Assembly.
drainage system for Faucet Operation
[] With the water and drain pipe fitted to a suitable outlet, be
sure the water and drain inlet/outlet connection fittings are
tightened securely.
[] Turn on the main water supply line.
[] Push the lever on the Faucet to the left to release
the water.
/
Outlets for Faucet
and Drain Pipe
For illustration purposes
the left cart side panel is
not shown.
Lever
/
Proper care and maintenance will keep your module in top oper-
ating condition and prolong its life. Follow these cleaning proce-
dures on a timely basis and your module will stay clean and
operate with minimum effort.
Cleaning Manufactured Stone Surfaces:
[] If needed, we suggest you wash the manufactured stone
surface using a mild soap and warm water solution only.
You can use a soft soapy cloth or sponge then rinse with
water. Never use abrasive cleaners, any cleaner contain-
ing bleach, scrubbers or stiff wire bushes on the stone
surface.These can cause discoloration and/or chipping
of the painted surface.
Cleaning Exterior Stainless Steel Surfaces:
[] Routine care and maintenance is required to preserve the
appearance and corrosion resistance ofstainless steel. The
fact is stainless steel can corrode, rust and discolor under
certain conditions. Rust is caused when regular steel par-
ticles in the atmosphere become attached to the stainless
steel surface. Steel particles can also become attached to
your module if you use steel wool or stiff wire brushes to
clean the module instead of non-abrasive cloth, sponge or
nylon cleaning tools. In coastal areas rust pits can develop
on stainless surfaces that cannot be fully removed. Bleach
and other
chlorine based solutions used for household and pool clean-
ing can also cause corrosion to stainless steel. Weather-
ing, extreme heat, smoke from cooking and machine oils
used in the manufacturing process of stainless steel can
cause stainless steel to turn tan in color.Although there are
many factors which can affect the surface appearance of
stainless steel, they do not affect the integrity of the steel or
the performance of the module.
[]
1.
To help maintain the finish of stainless steel follow these
cleaning procedures for the best results:
After every use, wipe stainless surfaces with a soft, soapy
cloth or sponge then rinse with water. Be sure to remove all
food particles, sauces or marinades from stainless steel
because these can be highly acidic and damaging to stain-
less surfaces.
2. Never use abrasive cleaners, scrubbers or stiff wire
brushes of any type on your module.
3. Use a heat resistant Stainless Steel Cleaner and rub or
wipe in the direction of the stainless steel grain or polish
lines NOT against the grain.
13

CleaningRefrigerator
To clean the inside, use a soft cloth and a solution of a
table spoon of baking soda to one quart of water, or a
mild soap suds solution, or some mild detergent. Wash drip
tray and glide out shelves in a mild detergent solution, then
dry and wipe with a soft cloth. Clean the outside with a
soft damp cloth and some mild detergent or appliance
cleaner.
Vacation Time
For short vacation periods, leave the control knobs at their
usual settings. During longer absences, (a)remove all foods,
(b) disconnect from electrical outlet, (c) clean the refrig-
erator thoroughly, (d) leave door open to avoid possible
formations of condensation, mold or odors.
Power Failure
Most power failures are corrected within an hour or two
and will not affect your refrigerator temperatures. However,
you should minimize the number of door openings while
the power is off. During power failure of longer duration,
take steps to protect your food by placing ice on top of
packages.
Correct Use
Some Important Rules for the Correct Use of the
Refrigerator
• Never place hot foods in the refrigerator.
• Beverages should be stored in sealed containers.
• Foods to be stored for a long time should be wrapped
in cellophane or polyethylene, or kept in glass containers.
Never place spoiled foods in the cabinet.
• Don't overload the cabinet.
• Don't open the door unless necessary.
If the refrigerator will be stored without use for long
periods it is suggested, after a careful cleaning, to leave
the door ajar to allow the air to circulate inside the cabinet
in order to avoid possible formations of condensation,
mold or odors.
If you have any problem with the refrigerator
please call the:
Information Center 1-888-317-7642
8am-8pm CST, Monday throuqh Friday
14

Congratulations on making a smart purchase. Your new Kenmore ®product is designed and manufactured for years of
dependable operation. But like all products, it may require repair from time to time. That's when having a Repair
Protection Agreement can save you money and aggravation.
Here's what the Repair Protection Agreement* includes:
[]
[]
[]
[]
[]
Expert service by our 10,000 professional repair specialists.
Unlimited service and no charge for parts and labor on all covered repairs.
Product replacement up to $1500 if your covered product can't be fixed.
Discount of 10% from regular price of service and related installed parts not covered by the agreement;
also, 10% off regular price of preventative maintenance check.
Fast help by phone - we call it Rapid Resolution - phone support from a Sears representative. Think of us
as a "talking Use and Care Guide."
Once you purchase the Repair Protection Agreement, a simple phone call is all that it takes for you to schedule service.
You can call anytime day or night, or schedule a service appointment online.
The Repair Protection Agreement is a risk-free purchase. If you cancel for any reason during the product warranty period,
we will provide a full refund. Or, a prorated refund anytime after the product warranty period expires. Purchase your
Repair Protection Agreement today!
Some limitations and exclusions apply. For prices and additional information in the U.S.A. call 1-800-827-6655.
* Coverage in Canada varies on some items. For full details call Sears Canada at 1-800-361-6665.
Sears Installation Service
For Sears professional installation of home appliances, garage door openers, water heaters, and other major home
items, in the U.S.A. or Canada call 1-800-4-MY-HOME ®.
15

Your Home
For expert troubleshooting and home solutions advice:
anage
www.managemyhome.com
For repair - in your home - of all major brand appliances,
lawn and garden equipment, or heating and cooling systems,
no matter who made it, no matter who sold it!
For the replacement parts, accessories and
owner's manuals that you need to do-it-yourself.
For Sears professional installation of home appliances
and items like garage door openers and water heaters.
1-800-4-MY-HOME ® (1-800-469-4663)
Call anytime, day or night (U.S.A. and Canada)
www.sears.com www.sears.ca
Our Home
For repair of carry-in items like vacuums, lawn equipment,
and electronics, call anytime for the location of your nearest
Sears Parts & Repair Service Center
1-800-488-1222 (U.S.A.)
www.sears.com
1-800-469-4663 (Canada)
www.sears.ca
To purchase a protection agreement on a product serviced by Sears:
1-800-827-6655 (U.S.A.) 1-800-361-6665 (Canada)
Para pedir servicio de reparaci6n
a domicilio, y para ordenar piezas:
1-888-SU-HOGAR ®
(1-888-784-6427)
Au Canada pour service en fran(_ais:
1-800-LE-FOYER M°
(1-800-533-6937)
www.sears.ca
® Registered Trademark / TMTrademark / SMService Mark of Sears Brands, LLC
® Marca Registrada / TM Marca de F&brica / SMMarca de Servicio de Sears Brands, LLC
MCMarque de commerce / MD Marque depos6e de Sears Brands, LLC @ Sears Brands, LLC
/