Greenheck 473325 RBD & RBDR Series Operating instructions
- Type
- Operating instructions

Receiving and Handling
Upon receiving dampers, check for both obvious
and hidden damage. If damage is found, record all
necessary information on the bill of lading and file
a claim with the final carrier. Check to be sure that
all parts of the shipment, including accessories, are
accounted for.
Dampers must be kept dry and clean. Indoor storage
and protection from dirt, dust and the weather is
highly recommended. Do not store at temperatures in
excess of 100°F (38°C).
Pre-Installation Guidelines
The basic intent of a proper installation is to secure the remote balancing damper in the opening in such a manner
as to prevent distortion and disruption of damper operation. The following items will aid in completing the damper
installation in a timely and effective manner.
1) Check the drawings for proper damper locations within the building. Visually inspect the damper for damage.
2) Lift or handle damper using sleeve or frame. Do not lift damper using blades or actuators.
3) Do not install screws in damper frame that will interfere with blade linkage or prevent damper blades from opening
and/or closing.
4) Damper must be installed into duct or opening square and free of twist or other misalignment. Out of square,
racked, twisted or misaligned installations can cause excessive leakage and/or torque requirements to exceed
damper/actuator design.
6) Damper and actuator must be kept clean and protected from dirt, dust and other foreign materials prior to and
after installation. Examples of such foreign materials include but are not limited to:
a) Mortar dust
b) Drywall dust
c) Firesafing materials
d) Wall texture
e) Paint overspray
7) Damper should be sufficiently covered as to prevent overspray if wall texturing or spray painting will be performed
within 5 feet of the damper. Excessive dirt or foreign material deposits on the damper can cause excessive
leakage and/or torque requirements to exceed damper/actuator design.
Electrical Guidelines
RBD & RBDR Series dampers are driven by a 9 volt
actuator. The 9 volt power is supplied from a Greenheck
“EZ Balance” hand held remote. The “EZ Balance”
remote is plugged into a wall or ceiling jack that is
wired to the damper actuator using wire and connector
assemblies.
After the damper and wiring is installed, operation of
the damper and wiring circuit must be visually verified
by connecting the “EZ Balance” remote to the wall jack
and power up the unit. Using the switch on the “EZ
Balance” remote, run the damper through a complete
cycle from full close to full open and reverse back to
closed position. Document that proper operation has
been verified.
®
RBD & RBDR Series 1
Document 473325
RBD and RBDR Series
Installation, Operation and Maintenance Manual
Please read and save these instructions for future reference. Read carefully before attempting to assemble, install,
operate or maintain the product described. Protect yourself and others by observing all safety information. Failure
to comply with these instructions will result in voiding of the product warranty and may result in personal injury
and/or property damage.

Installation Instructions
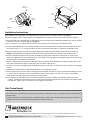
Round, RBDR series, dampers are supplied from the factory with the actuator installed, see Figure 1.
Square/rectangular, RBD series, dampers are supplied with an actuator kit that must be field installed as follows:
1) Install the RBD series damper into the ductwork with the lanced end of the blade positioned to the side of the duct
where the actuator is to be located (see Figure 2).
2) Drill a minimum 9⁄16 in. (14mm) diameter hole that lines up with the center pivot of the damper blade
3) Insert the pointed end of the pin through the hole and into the blade lances. Pound pin into the blade lances until
the end of hte pin is 1⁄2 in. (13mm) outside of the duct surface whilc the blade is centered in the damper frame.
4) With the blade closed, install the actuator by aligning the coupler over the end of the square pin (as shown in
Figure 2) and sliding the actuator assembly onto the pin until the bracket is in contact with the duct surface.
5) Check the blade clearance to be sure that the blade can move side to side in the frame and it is not pressed
against the opposite side of the damper frame. If the blade is pressed against the opposite side, the pin may need
to be pounded a little further into the blade.
6) Connect a Greenheck EZ Balance control device to the actuator. While holding the actuator assembly against the
duct, press and hold the “Close” button until the “full closed” light flashes.
7) Rotate the actuator assembly to hold the blade closed then secure the actuator to the duct using the two supplied
screws.
8) Recheck the blade clearance and damper operation by cycling the actuator.
9) All wire connections from the wall or ceiling jack to the damper actuator must be secured to the building structure
in such a way as to prevent strain on the wire connections (for example: use wire ties to secure a wire loop at
each connection and intermittently between the connections).
10) The actuator mounting bracket has a factory installed wire tie for the purpose of providing strain relief at the
actuator. Thread the wire through the wire tie, loop around and back through the wire tie before connecting to the
actuator box. Tighten the wire tie leaving a short loop at the actuator.
Duct
Damper
Damper
Blade
Blade
Lances
Wire
Wire
Tie
Figure 2
Damper
blade
Damper
frame/sleeve
Actuator
Figure 1
Standoff
bracket
Wire tie
Wire
Figure 1
473325 • RBD & RBDR Series, Rev. 9, September 2023 Copyright © 2023 Greenheck Fan Corporation2
As a result of our commitment to continuous improvement, Greenheck reserves the right to change specifications
without notice.
Product warranties can be found online at Greenheck.com, either on the specific product page or in the literature
section of the website at Greenheck.com/Resources/Library/Literature.
®
Phone: 715.359.6171 • Fax: 715.355.2399 • Parts: 800.355.5354 • E-mail: [email protected] • Website: www.greenheck.com
Our Commitment
-
 1
1
-
 2
2


Greenheck 473325 RBD & RBDR Series Operating instructions
- Type
- Operating instructions
Ask a question and I''ll find the answer in the document
Finding information in a document is now easier with AI
Related papers
-
Greenheck 473325 RBD & RBDR Series Operating instructions
-
-
-
-
-
-
-
-
-