Page is loading ...

240-3179-K
GUN FLUSH BOX ASSEMBLY
OPERATING INSTRUCTIONS
77-3100-R1 (9/2019) 1 / 12 www.carlisleft.com
EN
SERVICE MANUAL

LOCK OUT / TAG-OUT
Failure to de-energize, disconnect, lock out and tag-out all power
sources before performing equipment maintenance could cause
serious injury or death.
OPERATOR TRAINING
All personnel must be trained before operating finishing
equipment.
EQUIPMENT MISUSE HAZARD
Equipment misuse can cause the equipment to rupture,
malfunction, or start unexpectedly and result in serious injury.
PROJECTILE HAZARD
You may be injured by venting liquids or gases that are released
under pressure, or flying debris.
PINCH POINT HAZARD
Moving parts can crush and cut. Pinch points are basically any
areas where there are moving parts.
INSPECT THE EQUIPMENT DAILY
Inspect the equipment for worn or broken parts on a daily basis.
Do not operate the equipment if you are uncertain about its
condition.
Read the following warnings before using this equipment.
READ THE MANUAL
Before operating finishing equipment, read and understand all
safety, operation and maintenance information provided in the
operation manual.
WEAR SAFETY GLASSES
Failure to wear safety glasses with side shields could result in
serious eye injury or blindness.
NEVER MODIFY THE EQUIPMENT
Do not modify the equipment unless the manufacturer provides
written approval.
IT IS THE RESPONSIBILITY OF THE EMPLOYER TO PROVIDE THIS INFORMATION TO THE OPERATOR OF THE EQUIPMENT.
FOR FURTHER SAFETY INFORMATION REGARDING THIS EQUIPMENT, SEE THE GENERAL EQUIPMENT SAFETY BOOKLET (77-5300).
KNOW WHERE AND HOW TO SHUT OFF THE EQUIPMENT
IN CASE OF AN EMERGENCY
PRESSURE RELIEF PROCEDURE
Always follow the pressure relief procedure in the equipment
instruction manual.
NOISE HAZARD
You may be injured by loud noise. Hearing protection may be
required when using this equipment.
STATIC CHARGE
Fluid may develop a static charge that must be dissipated through
proper grounding of the equipment, objects to be sprayed and all
other electrically conductive objects in the dispensing area. Improper
grounding or sparks can cause a hazardous condition and result in
fire, explosion or electric shock and other serious injury.
WEAR RESPIRATOR
Toxic fumes can cause serious injury or death if inhaled.
Wear a respirator as recommended by the fluid and solvent
manufacturer’s Safety Data Sheet.
TOXIC FLUID & FUMES
Hazardous fluid or toxic fumes can cause serious injury or death if
splashed in the eyes or on the skin, inhaled, injected or
swallowed. LEARN and KNOW the specific hazards or the fluids
you are using.
KEEP EQUIPMENT GUARDS IN PLACE
Do not operate the equipment if the safety devices have been
removed.
!
WARNING
AUTOMATIC EQUIPMENT
Automatic equipment may start suddenly without warning.
FIRE AND EXPLOSION HAZARD
Improper equipment grounding, poor ventilation, open flame or
sparks can cause a hazardous condition and result in fire or
explosion and serious injury.
MEDICAL ALERT
Any injury caused by high pressure liquid can be serious. If you
are injured or even suspect an injury:
• Go to an emergency room immediately.
• Tell the doctor you suspect an injection injury.
• Show the doctor this medical information or the medical alert
card provided with your airless spray equipment.
• Tell the doctor what kind of fluid you were spraying or
dispensing.
GET IMMEDIATE MEDICAL ATTENTION
To prevent contact with the fluid, please note the following:
• Never point the gun/valve at anyone or any part of the body.
• Never put hand or fingers over the spray tip.
• Never attempt to stop or deflect fluid leaks with your hand,
body, glove or rag.
• Always have the tip guard on the spray gun before spraying.
• Always ensure that the gun trigger safety operates before
spraying.
In this part sheet, the words WARNING, CAUTION and NOTE are used to
emphasize important safety information as follows:
Hazards or unsafe practices which
could result in minor personal injury,
product or property damage.
!
CAUTION
Hazards or unsafe practices which
could result in severe personal
injury, death or substantial property
damage.
!
WARNING
Important installation, operation or
maintenance information.
NOTE
EN
77-3100-R1 (9/2019)2 / 12www.carlisleft.com

2/12 77-3100-R0.1
EN
EN
77-3100-R1 (9/2019) 3 / 12 www.carlisleft.com

4/12 77-3100-R0.1
EN
Gun Flush Box Assembly
Gun flush boxes are used to improve safety and minimize solvent usage and time when compared to
manual flushing of spray guns. Higher solvent and air pressures may be used, improving flushing
efficiency. A control device must be used to process the pneumatic signals generated by the unit.
Mount gun flush boxes to a sturdy metal
stand, wall, or support that is connected to
an earth ground. Conductive metal
flushing / solvent waste container should
be positioned directly below the flush box.
Mount box with 4 ea. 1/4” or 6mm
diameter screws using dimensions shown
at right. Remove the gun saddle from the
box to make mounting easier.
MOUNTING
Gun Box Mounting Hole Pattern
The gun flush box(es) must be enabled in the system software configuration, accessible only by
distributor. Contact distributor for installation and proper kit functionality.
CAUTION
WARNING
Gun flush box(es) will generate vapors and
mists of paint and solvent and therefore must
be mounted in a spray booth or other Class 1
Division 1 [Zone 1] Hazardous Area.
The gun flush box and conductive metal
waste container used for flushing must be
bonded to earth ground and continuity
checked with an ohmmeter .
Do NOT operate the gun flush box until
properly grounded. Use provided
grounding cable and verify continuity to
earth ground prior to use.
MOUNTING
Mount gun ush boxes to a sturdy metal stand,
wall, or support that is connected to an earth
ground. Conductive metal ushing / solvent waste
container should be positioned directly below the
ush box.
Mount box with 4 ea. 1/4” or 6mm diameter screws
using dimensions shown at right. Remove the gun
saddle from the box to make mounting easier.
GUN FLUSH BOX ASSEMBLY
Gun ush boxes are used to improve safety and minimize solvent usage and time when compared to manual
ushing of spray guns. Higher solvent and air pressures may be used, improving ushing efciency. A control
device must be used to process the pneumatic signals generated by the unit.
The gun flush box(es) must be enabled in the system software configuration, accessible only
by distributor. Contact distributor for installation and proper kit functionality.
!
CAUTION
Gun flush box(es) will generate vapors and
mists of paint and solvent and therefore
must be mounted in a spray booth or other
Class 1 Division 1 [Zone 1] Hazardous Area.
The gun flush box and conductive metal
waste container used for flushing must be
bonded to earth ground and continuity
checked with an ohmmeter.
Do NOT operate the gun flush box until
properly grounded. Use provided grounding
cable and verify continuity to earth ground
prior to use.
!
WARNING
GUN BOX MOUNTING HOLE PATTERN
EN
77-3100-R1 (9/2019)4 / 12www.carlisleft.com

GUN BOX PNEUMATIC CONNECTIONS
After mounting the box to the wall, use the pneumatic tubing to connect the ush box to the supply air
and controller. Use a length of tubing to provide supply air to the bulkhead ‘AIR’. Adapt to tubing size as
needed. Ensure all tubing is free from sharp bends and kinks. Keep tubing clear of sharp edges and hot
surfaces.
All pneumatic connections to the gun ush box are for 5/32” (4mm) OD tubing. See the details below for
hooking up tube connections.
AIR CONNECTION DESCRIPTIONS
AIR — Supply air needed to operate the Gun Box. 75-100 psi [5-7 bar] required.
GIB — Air signal sent to the controller (Gun In Box) when the spray gun is in the
Gun Box and the lid is closed.
ACO — Triggers the signal sent to the Air Cut Off (ACO) Valve. Enables and disables
the spray gun’s atomizing air depending on door open/closed conditions.
TRG — Air signal (input) used to trigger the spray gun in the closed box. Receives
signal from system controller.
IND – Pneumatic indicator shows when gun is triggered. This input is shared with
TRG via a tee. Only the TRG input must connect to the control.
PART NO. DESCRIPTION
240-3198-C Gun Holder — Binks 2100 Gun
240-3198-D Gun Holder — Binks Trophy Touch Up Gun
240-3198-G Gun Holder — DeVilbiss JGA / JGHV Gun
240-3198-H Gun Holder — Ransburg Vector Gun
240-3198-J Gun Holder — DeVilbiss GTi Pro Lite Gun (not available in NA)*
240-3198-K Gun Holder — DeVilbiss Advance HD Gun (not available NA)*
240-3198-L Gun Holder — Ransburg Ransex Electrostatic Gun
240-3198-M Gun Holder — Binks Trophy Gun
*These guns are not available in North America
GUN FLUSH BOX GUN SADDLES
A number of saddles are available to t Binks, DeVilbiss, and Ransburg spray guns. See the table below for
available gun holders and the corresponding part number. Contact your local Binks representative to order
these accessories.
Use the correct saddle for the spray gun installed on the GEMS system. Using an incorrect or
poorly fitting saddle may result in faulty flush box operation and / or paint and solvent blowing
back into the flush box during flushing.
!
CAUTION
77-3100-R0.1 5/12
EN
AIR — Supply air needed to operate the Gun Box. 75-100 psi [5-7 bar] required.
GIB— Air signal sent to the controller (Gun In Box) when the spray gun is in the
Gun Box and the lid is closed.
ACO — Triggers the signal sent to the Air Cut Off (ACO) Valve. Enables and
disables the spray gun’s atomizing air depending on door open/closed
conditions.
TRG—Air signal (input) used to trigger the spray gun in the closed box. Receives
signal from system controller.
IND– Pneumatic indicator shows when gun is triggered. This input is shared
with TRG via a tee. Only the TRG input must connect to the control.
Gun Box Pneumatic Connections
Air Connection Descriptions
After mounting the box to the wall, use the pneumatic tubing to connect the flush box to the supply air and
controller. Use a length of tubing to provide supply air to the bulkhead ‘AIR’. Adapt to tubing size as needed.
Ensure all tubing is free from sharp bends and kinks. Keep tubing clear of sharp edges and hot surfaces.
All pneumatic connections to the gun flush box are for 5/32” (4mm) OD tubing. See the details below for
hooking up tube connections.
Gun Flush Box Gun Saddles
Part Num- Description
240-3198-C Gun Holder—Binks 2100 Gun
240-3198-D Gun Holder— Binks Trophy Touch Up Gun
240-3198-G Gun Holder— DeVilbiss JGA / JGHV Gun
240-3198-H Gun Holder— Ransburg Vector Gun
240-3198-J Gun Holder— DeVilbiss GTi Pro Lite Gun (not available in NA)
240-3198-K Gun Holder — DeVilbiss Advance HD Gun (not available NA)
240-3198-L Gun Holder— Ransburg Ransflex Electrostatic Gun
240-3198-M Gun Holder— Binks Trophy Gun
A number of saddles are available to fit Binks, DeVilbiss, and Ransburg spray guns. See the table below for
available gun holders and the corresponding part number. Contact your local Binks representative to order
these accessories.
Use the correct saddle for the spray gun installed on the GEMS system. Using an
incorrect or poorly fitting saddle may result in faulty flush box operation and / or
paint and solvent blowing back into the flush box during flushing.
CAUTION
EN
77-3100-R1 (9/2019) 5 / 12 www.carlisleft.com

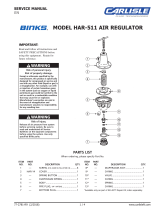
ADJUSTING THE GUN SADDLE
Gun flush box saddles are sold separately. Order the
appropriate saddle for the spray gun to be used on the
system from a Binks distributor. See chart on page 5 for
available saddles.
NOTE
The gun saddle is the plastic part inside the box used to cradle the spray
gun’s front end to ensure proper box operation. Install the gun saddle for
the specic model of spray gun to be used. Two 5/16”-18 screws will pass
through the box side wall and a plastic spacer then thread into the saddle.
The bottom of the gun saddle is threaded with a 2” NPT female thread for
connection to a 2” metal waste drain pipe with mating threads.
The gun saddle should
be adjusted for proper
gun position. Place the
gun in the saddle as
shown, and attempt to
shut the lid. If the lid
does not close all the
way, use the two screws
to adjust the height of
the gun holder so the
lid will shut properly.
Verify that the gun trigger actuator
pin will catch the “nger side” of
the spray gun trigger when the lid is
closed. If not, the holder may need
to be adjusted again.
Gun trigger actuator pin
ADJUSTMENT STEPS
1. To properly adjust the gun saddle in the gun
box you need the correct saddle for your gun.
2. Place the gun saddle into the gun box by
removing the 5/16-18 cap screws on the right
side of the gun box.
3. Screw in the new saddle for your gun, leaving
the bolts loose for adjustment.
4. Place gun in holder and bring the gun up to the
actuating pin so that the pin goes under the gun
trigger. Secure bolts on right side of gun box.
5. Position the adjustment for the gun handle so it
clears the gun controls on the back of the gun.
6. Close the gun box lid. If the lid triggers the
air output "Gun in Box" (GIB) signal, the box
is ready to use. If the lid does not trigger
the air output "Gun in Box" (GIB) signal,
continue with steps 7-10 below.
7. Adjust the actuation pin location, pull it up, and
secure its screws.
8. To access the screws for the actuator pin,
remove the four screws on the left side of the
gun box and remove the input-output part of
the box.
9. Loosen the two screws on the actuation
slide block and move upward or downward
depending on gun size and shape. Secure the
bolts.
10. Repeat steps (4 to 9) until the gun box GIB
output is working. You are now ready to use
the box.
Gun
saddle
Spacer
Screws
1-1/2"
Adjustment
Adjustment
locations
Adjustment
locations
Adjustment locations
1"
1/2"
Adjustment
3/16" saddle
movement when
gun is closed in box
Slight positioning
adjustments to the gun
handle seat may be
required for guns with
long butt-ends.
NOTE
EN
77-3100-R1 (9/2019)6 / 12www.carlisleft.com

GUN FLUSH BOX GUN OPERATION
With ush box mounted, pneumatic tubing connected, and saddle adjusted for proper operation:
Open valve or regulator to supply the ush box AIR inlet with 75-100 psi [5-7 bar] air.
Place the spray gun in the box and close the lid. If correctly installed, the atomizing air signal will be
triggered through the ACO hose, and the trigger actuating pin will extend to the front of the gun trigger.
With a TRG air signal, the gun will be automatically triggered to either load or ush, based on the supply
material sent through the paint hoses.
The gun flush box must be properly grounded to ensure safety.
Verify that the grounding cable is securely mounted to the box, and that the alligator clamp
has a clean and secure connection. An improperly grounded device risks static electricity
build-up, which could cause a safety hazard in the work space.
Verify continuity to ground of the gun flush box unit with a multi-meter.
!
CAUTION
Improper operation may occur if:
• The spray gun(s) are not in the gun box(es).
• The gun box lids are not fully closed.
NOTE
When paint is sufciently loaded, remove the TRG signal and the gun will no longer
Open the gun ush box and remove the spray gun. Close the ush box lid. Spray parts.
When spraying is complete, open the ush box lid and place the gun back into the box, then close the lid.
To ush, a controller must trigger the gun, and solvent should be sent through to the gun.
See service manual 77-3090 for details of gun flush box use with GEMS.
NOTE
EN
77-3100-R1 (9/2019) 7 / 12 www.carlisleft.com

TROUBLESHOOTING
Most problems associated with gun ush box operation may be easily checked:
• For ushes / color changes
• Is gun positioned properly in the box with the lid closed?
• Is air pressure to the box between 75-100 psi [5-7 bar]? Are there kinks in any of the air lines?
• Is the gun saddle height properly adjusted?
• Are the internal air switches functioning properly?
• For spraying
• Is the ush box lid closed?
• Is air pressure to the box between 75-100 psi [5-7 bar]? Are there kinks in any of the air lines?
• Are the air switches functioning properly?
Check these items in the order shown. Contact distributor if these checks do not resolve the issue.
PART NO. DESCRIPTION
LSME4000-00 GROUND WIRE KIT
77536-01 5/32” TUBING, BLACK
77536-02 5/32” TUBING, RED
77536-03 5/32” TUBING, GREEN
77536-04 5/32” TUBING, BLUE
77536-05 5/32” TUBING, NATURAL
77536-06 5/32” TUBING, SILVER
77536-07 5/32” TUBING, YELLOW
77536-08 5/32” TUBING, ORANGE
See page 4 INDIVIDUAL GUN HOLDERS
MISCELLANEOUS PARTS
EN
77-3100-R1 (9/2019)8 / 12www.carlisleft.com

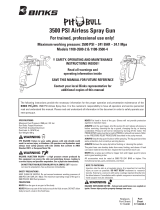
GUN FLUSH BOX COMPONENTS
240-3179-K
77-3100-R0.1 9/12
EN
Right Side View
Left Side View
Front View
Gun Flush Box Components
240-3179-K
EN
77-3100-R1 (9/2019) 9 / 12 www.carlisleft.com

NO. PART NO. DESCRIPTION QTY.
1 E22-1501 GUN BOX BODY 1
2 E22-1502 COVER 1
3 E22-1503 LID ASSEMBLY 1
4 E22-1504 GUN IN BOX BRACKET 1
5 E22-1505 TOGGLE PLATE 1
6 E22-1506 BLOCK 1
7 E22-1507 ARM 1
8 E22-1508 GUN SEAT 1
9 E22-1509 HINGE 1
10 E22-1510 PUSH CAP 1
11 E22-1511 TRIGGER CAP 1
12 E22-1512 HANDLE 1
13 E22-1513 HANDLE ADAPTER 1
14 240-3198 GUN SUPPORT/ HOLDER 1
15 E22-1515 SPRING SPACER 3
16 E22-1516 SUPPORT SPACER 1
17 E22-1517 TRIGGER CYLINDER 1
18 E22-1518 PUSH CYLINDER 1
19 E22-1519 AIR PILOTED SWITCH VALVE 1
20 E22-1520 AIR PILOT 1
21 E22-1521 5/32" TUBE Y ADAPTER 1
22 E22-1522 5/32" TUBE X 1/8" NPT TEE FITTING 1
23 E22-1523 5/32" TUBE X 1/8" NPT ELBOW 5
24 E22-1218 5/32" TUBE X #10-32 ELBOW 1
25 E22-1525 AIR SWITCH 2
26 E22-1526-K2 TORSION SPRING 1
27 E22-1527 COMPRESSION SPRING 1
28 E22-1528-K2 GROMMET 1
29 E22-1529 S.S. CHAIN LINK 4
30 E22-1530 S.S. CHAIN CONNECTOR 2
31 E22-1531-K2 SPRING PLUNGER 1
32 E22-1532-K2 1/4" X 1" S.S. DOWEL 1
33 E22-1533 PRESSURE INDICATOR 1
34 E22-1534 5/32" TUBE TEES 1
35 E22-1535 5/32" TUBE BULKHEAD 5
36 E22-1536 AIR CUT OFF VALVE 1
37 E22-1537 #4-40 X 3/4" SHCS SS 1
38 E22-1538 #8-32 X 5/8" SHCS SS 2
39 E22-1539 #8-32 X 1" SHCS SS 4
40 E22-1540 #8-32 NUT SS 4
41 E22-1552 #10-32 X 1/2" SHCS SS 4
42 E22-1542 5/16" LOCK WASHER SS 4
43 E22-1543 5/16" WASHER SS 4
44 E22-1544 5/16"-18 X 1/2" BHCS SS 2
45 E22-1545 5/16"-18 X 3/4" BHCS SS 2
46 E22-1546 5/16"-18 X 3" BHCS SS 2
47 E22-1547 3/8" LOCK WASHER SS 1
48 E22-1548 3/8" WASHER SS 2
49 E22-1549 3/8" LOCK NUT SS 1
50 E22-1550 3/8"-16 X 1/2" BHCS SS 2
51 E22-1551 5/8" X 1-1/2" X 1/16" WASHER SS 2
GUN BOX PARTS LIST
EN
77-3100-R1 (9/2019)10 / 12www.carlisleft.com

NOTES
EN
77-3100-R1 (9/2019) 11 / 12 www.carlisleft.com

EN
77-3100-R1 (9/2019)12 / 12www.carlisleft.com
WARRANTY POLICY
This product is covered by Carlisle Fluid Technologies’ materials and workmanship limited warranty.
The use of any parts or accessories, from a source other than Carlisle Fluid Technologies,
will void all warranties. Failure to reasonably follow any maintenance guidance provided
may invalidate any warranty.
For specic warranty information please contact Carlisle Fluid Technologies.
For technical assistance or to locate an authorized distributor,
contact one of our international sales and customer support locations.
Region Industrial/Automotive Automotive Renishing
Americas
Tel: 1-800-992-4657 Tel: 1-800-445-3988
Fax: 1-888-246-5732 Fax: 1-800-445-6643
Europe, Africa,
Middle East, India
Tel: +44 (0)1202 571 111
Fax: +44 (0)1202 573 488
China
Tel: +8621-3373 0108
Fax: +8621-3373 0308
Japan
Tel: +81 45 785 6421
Fax: +81 45 785 6517
Australia
Tel: +61 (0) 2 8525 7555
Fax: +61 (0) 2 8525 7575
Carlisle Fluid Technologies is a global leader in innovative nishing technologies.
Carlisle Fluid Technologies reserves the right to modify equipment specications without prior notice.
DeVilbiss
®
, Ransburg
®
, ms
®
, BGK
®
, and Binks
®
are registered trademarks of Carlisle Fluid Technologies, Inc.
©2019 Carlisle Fluid Technologies, Inc.
All rights reserved.
For the latest information about our products, visit www.carlisleft.com
/