
64
INSTALLATION
BEFORE INSTALLING THE REFRIGERATOR
PRECAUTIONS AND GENERAL
RECOMMENDATIONS
ELECTRICAL CONNECTION
LEVELLING YOUR REFRIGERATOR
6gb33059.fm Page 64 Monday, July 14, 2003 12:02 PM

65
BEFORE INSTALLING THE REFRIGERATOR
Foreword
Your new appliance is a FULL NO FROST model
exclusively for domestic use, i.e. both refrigerator
and freezer compartments are provided with an
automatic defrosting function.
This manual contains indications and warnings for
correct and safe installation of the appliance - read
it carefully before starting installation operations.
The model you have purchased may differ slightly
with respect to some descriptions in this manual,
since this manual covers several models.
Keep this manual for future consultation. If you sell
the appliance give it to the new buyer.
Declaration of conformity
This appliance is intended to come into contact
with foodstuffs and conforms to D.L. 108 of
25.01.1992 (European Directive 89/109/EEC).
Disposal of packaging materials
The packaging material for the protection and
transport of the appliance and single components is
entirely recyclable, and marked with the recycling
symbol .
Keep the packaging materials (plastic bags,
polystyrene parts, etc.) out of reach of children, as
they are potentially dangerous.
Disposal must be carried out in accordance with
local regulations for waste disposal.
PRECAUTIONS AND GENERAL
RECOMMENDATIONS
After unpacking the appliance, check for damage
and make sure that the doors shut properly. Any
damage must be reported to your dealer within
24 hours after delivery of the appliance.
Be careful not to damage the floors when you move
the appliance (e.g. parquet flooring). If, after
removing the doors, it is necessary to move the
appliance, make sure the internal components are
well secured and/or remove them in order to avoid
damage.
Because of the weight of the appliance, at least
2 persons are required to safely move/install it.
Installation of the appliance must be carried out by
a qualified technician.
Wait at least 1 hour before connecting the
appliance to the power supply in order to ensure
the refrigerant circuit is fully efficient.
Depending on the model purchased, the appliance
does not contain CFCs (if the refrigerant circuit
contains R134a) or HFCs (if the refrigerant circuit
contains R600a - Isobutane). Isobutane is a natural
gas with low environmental impact. Caution is
required, however, since isobutane is flammable.
Therefore, it is essential to ensure that refrigerant
pipelines are not damaged.
Data regarding refrigerant and insulating substances
is given on the rating plate.
Clean the inside of the appliance before introducing
food.
For correct and safe operation, install and connect
the appliance according to the instructions given in
this manual.
The appliance is set for optimum operation at
specific ambient temperature ranges, according to
the climatic class indicated on the data plate:
The appliance may not work properly if it is left for
a long period at a temperature above or below the
indicated range.
Temperature inside the compartments may be
influenced by various factors such as: position of the
appliance, ambient air temperature, frequency of
door opening.
Install the appliance in a dry and well-ventilated
place.
Avoid locations in direct sunlight or near a source of
heat (oven, heating, etc.). If this cannot be avoided,
install the appliance respecting the following
minimum distances:
Coal or paraffin stoves: 30 cm
Electric and/or gas stoves: 3 cm
Install and level the appliance on a floor strong
enough to take its weight and in an area suitable for
its size and use.
To allow product handling and sufficient air
circulation, leave at least 1 cm clearance at the
sides, above the appliance, and between the rear
panel and the wall.
Climatic class Amb. Temp.
(°C)
Amb. Temp.
(°F)
SN From 10 to 32 From 50 to 90
N From 16 to 32 From 61 to 90
ST From 18 to 38 From 64 to 100
T From 18 to 43 From 64 to 110
6gb33059.fm Page 65 Monday, July 14, 2003 12:02 PM

66
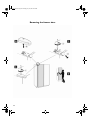
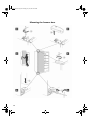
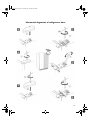
Removing the freezer door
6gb33059.fm Page 66 Monday, July 14, 2003 12:02 PM

67
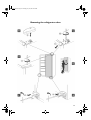
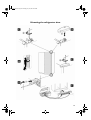
Removing the refrigerator door
6gb33059.fm Page 67 Monday, July 14, 2003 12:02 PM

68
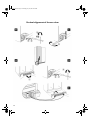
Mounting the freezer door
6gb33059.fm Page 68 Monday, July 14, 2003 12:02 PM

69
Mounting the refrigerator door
6gb33059.fm Page 69 Monday, July 14, 2003 12:02 PM

70
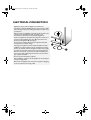
ELECTRICAL CONNECTION
Regulations require that the appliance is earthed. The
manufacturer declines all liability for injury to persons or animals
and for damage to property resulting from failure to observe the
prescriptions.
Make sure that the installation and the electrical connection are
carried out by a qualified technician according to the
manufacturers instructions and local safety regulations.
If your new appliance is provided with a plug with no earth wire,
connect the green/yellow earth wire (
A
) to the earth screw
located on the appliance (
B
) (see figure).
Ensure that the voltage indicated on the appliance data plate
corresponds to the mains voltage.
The plug of the appliance must be easily accessible even after
installation so that the appliance can be unplugged if necessary.
If this is not possible, connect the appliance to the mains supply
by means of a two-pole switch with minimum break distance
between contacts of 3 mm, fitted at an easily accessible point.
If the power supply cable plug and socket are not of the same
type, replace the socket.
Do not use extension leads or adapters.
After installation, make sure that the appliance is not standing on
the power supply cable.
Disconnect the appliance from the power supply by unplugging
it. Do not pull the power supply cable.
6gb33059.fm Page 70 Monday, July 14, 2003 12:02 PM

71
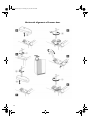
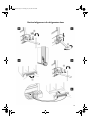
LEVELLING YOUR REFRIGERATOR
The refrigerator has two front and two rear wheels at the
base of the product on each side that can be adjusted.
If the appliance seems unsteady or you want the doors to
close easier, adjust the appliances tilt following the
instructions below.
1.
Check the installation location to be sure you have at least
1 cm clearance on all sides including the top.
2.
Connect the appliance to the mains power supply.
3.
Move the refrigerator into its final position.
4.
Open both doors and remove the plinth to locate the
levelling bolts at the left and right of the refrigerator base.
The top bolt (
1
) will adjust the rear wheel, and the bottom
bolt (
2
) will adjust the front wheel.
5.
Use the wrench provided to adjust the levelling bolts. Turn
the levelling bolt clockwise to raise the appliance, or anti-
clockwise to lower it.
It may take several turns of the levelling bolts to adjust the
tilt of the refrigerator.
Note
:
do not unscrew the levelling bolts too much when
lowering the appliance as they could fall out.
Aligning the doors
If, after switching on the appliance and adjusting the refrigerator
and freezer doors, the doors are misaligned, disconnect the
appliance from the power supply and adjust both doors as
indicated in the enclosed diagram.
6gb33059.fm Page 71 Monday, July 14, 2003 12:02 PM

72
Horizontal alignment of freezer door
6gb33059.fm Page 72 Monday, July 14, 2003 12:02 PM

73
Horizontal alignment of refrigerator door
6gb33059.fm Page 73 Monday, July 14, 2003 12:02 PM

74
Vertical alignment of freezer door
6gb33059.fm Page 74 Monday, July 14, 2003 12:02 PM

75
Vertical alignment of refrigerator door
6gb33059.fm Page 75 Monday, July 14, 2003 12:02 PM
-
 1
1
-
 2
2
-
 3
3
-
 4
4
-
 5
5
-
 6
6
-
 7
7
-
 8
8
-
 9
9
-
 10
10
-
 11
11
-
 12
12


Whirlpool S25C FWW2 X User guide
- Type
- User guide
- This manual is also suitable for
Ask a question and I''ll find the answer in the document
Finding information in a document is now easier with AI
Related papers
-
Whirlpool MSZ 801/HA Installation guide
-
Whirlpool AS2023GIMM User guide
-
Whirlpool WSC5553 A+N Owner's manual
-
Whirlpool KSN 570 A+ EW Installation guide
-
Whirlpool S25C FTT1X Installation guide
-
Whirlpool S25C RTT3 DF User guide
-
KitchenAid KRSC - 9020 I Installation guide
-
Whirlpool WSG5588 A+B Installation guide
-
Whirlpool MSZ 902 NDF(EX)/HA Installation guide
-
Whirlpool MSZ 802 DF (AUS) Installation guide