Aeg-Electrolux FM4803K-AN User manual

Category
Hobs
Type
User manual

Aeg-Electrolux FM4803K-AN is a state-of-the-art ceramic glass induction hob designed to make cooking easier, safer, and more enjoyable. Equipped with a range of advanced features, it offers precise heat control, energy efficiency, and various safety mechanisms to enhance your cooking experience.

Aeg-Electrolux FM4803K-AN is a state-of-the-art ceramic glass induction hob designed to make cooking easier, safer, and more enjoyable. Equipped with a range of advanced features, it offers precise heat control, energy efficiency, and various safety mechanisms to enhance your cooking experience.

FM 4803 K-AN
User manual Ceramic glass
induction hob
2
Dear Customer
Thank you for choosing one of our high-quality products.
With this appliance you will experience the perfect combination of functional
design and cutting edge technology.
Convince yourself that our appliances are engineered to deliver the best per-
formance and control - indeed we are setting the highest standards of excel-
lence.
In addition to this you find environmental and energy saving aspects as an inte-
gral part of our products.
To ensure optimal and regular performance of your appliance please read this
instruction manual carefully. It will enable you to navigate all processes perfect-
ly and most efficiently.
To refer to this manual any time you need to, we recommend you to keep it in a
safe place. And please pass it to any future owner of the appliance.
We wish you much joy with your new appliance.
Th
e
f
o
ll
ow
i
ng sym
b
o
l
s are use
d
i
n t
hi
s user
i
n
f
ormat
i
on:
1
Warning! This must be read! Important advice for the safety of persons and
information on avoiding damage to the appliance
3 General information and advice
2 Information on environmental protection
z Dangerous voltage
3Contents
Contents
Operating Instructions 4
Safety instructions 4
Description of the Appliance 6
Cooking surface layout 6
Control panel layout 6
Touch Control sensor fields 7
Displays 8
Residual heat indicator 8
Operating the appliance 9
Switching the appliance on and off 9
Selecting the heat setting 9
Switching the STOP+GO function on and off 9
Automatic warm up function and Power function 10
Using the automatic warm-up function 11
Switching the power function on and off 12
Using the child safety device 13
Using the timer 14
Automatic switch off 16
Tips on cooking and frying 17
Cookware for induction cooking zones 18
Tips on energy saving 19
Examples of cooking applications 20
Cleaning and care 21
What to do if … 22
Disposal 24
Installation Instructions 25
Safety instructions 25
Assembly 27
Installing more than one Frontline hob 31
Rating Plate 35
Guarantee/Customer Service 36
Service and Spare Parts 39
Operating Instructions4
Operating Instructions
1 Safety instructions
Please comply with these instructions. If you do not, any damage resulting is not
covered by the warranty.
Correct use
This appliance is not intended for use by children or other persons whose
physical, sensory or mental capabilities or lack of experience and knowledge
prevents them from using the appliance safely without supervision or instruc-
tion by a responsible person to ensure that they can use the appliance safely.
Do not leave the appliance unattended during operation.
This appliance should be used only for normal domestic cooking and frying of
food.
The appliance must not be used as a work surface or as a storage surface.
Additions or modifications to the appliance are not permitted.
Do not place or store flammable liquids, highly inflammable materials or fusi-
ble objects (e.g. plastic film, plastic, aluminium) on or near the appliance.
Child safety
Small children must be kept away from the appliance.
Only let bigger children work on the appliance under supervision.
To avoid small children and pets unintentionally switching the appliance on,
we recommend activation of the child safety device.
General safety
The appliance may only be installed and connected by trained, registered serv-
ice engineers, or competent persons.
Built-in appliances may only be used after they have been built in to suitable
built-in units and work surfaces that meet standards.
In the event of faults with the appliance or damage to the glass ceramic
(cracks, scratches or splits), the appliance must be switched off and discon-
nected from the electrical supply to prevent the possibility of an electric
shock.
Repairs to the appliance must only be carried out by trained registered service
engineers.
5Safety instructions
Safety during use
Overheated fats and oils can ignite very quickly. Warning! Fire hazard!
There is the risk of burns from the appliance if used carelessly.
Remove stickers and film from the glass ceramic.
Cables from electrical appliances must not touch the hot surface of the appli-
ance or hot cookware.
Switch the cooking zones off after each use.
Safety when cleaning
For cleaning, the appliance must be switched off and cooled down.
For safety reasons, the cleaning of the appliance with steam jet or high-pres-
sure cleaning equipment is not permitted.
How to avoid damage to the appliance
The ceramic glass can be damaged by objects falling onto it.
The edge of the ceramic glass can be damaged by being knocked by the cook-
ware.
Cookware made of cast iron, cast aluminium or with damaged bottoms can
scratch the ceramic glass if pushed across the surface.
Objects that melt and things that boil over can burn onto the ceramic glass
and should be removed straightaway.
To avoid damaging cookware and glass ceramics, do not allow saucepans or
frying pans to boil dry.
Do not use the cooking zones with empty cookware or without cookware.
Description of the Appliance6
Description of the Appliance
Cooking surface layout
Control panel layout
Induction cooking zone 1400 W
with power function 1800 W
Induction cooking zone 2300 W
with power function 3700 W
Frontline strip
Control panel
STOP+GO pilot light
Heat setting
indicator
Warm up pilot
light
Warm up pilot
light
Heat setting
indicator
STOP+GO
Heat setting
selection
Automatic warm up
function/
Power function
Automatic warm up
function/
Power function
Heat setting
selection
Timer indicator
Timer selection
On/Off pilot light
On/Off
Timer
7Description of the Appliance
Touch Control sensor fields
The appliance is operated using Touch Control sensor fields. Functions are con-
trolled by touching sensor fields and confirmed by displays and acoustic signals.
Touch the sensor fields from above, without covering other sensor fields.
Sensor field Function
On / Off Switches appliance on and off
Increase settings To increase heat settings
Reduce settings To reduce heat settings
Timer Timer selection
Increase settings To increase Timer time
Reduce settings To reduce Timer time
Stop+Go To switch the Keep Warm setting on/
off
Power Switching the power function on and
off
Description of the Appliance8
Displays
Residual heat indicator
1 Warning! Risk of burns from residual heat. After being switched off, the cook-
ing zones need some time to cool down. Look at the residual heat indicator .
3 Residual heat can be used for melting and keeping food warm.
The induction cooking zones create the heat required for cooking directly in
the base of the cookware. The glass ceramic is merely heated by the residual
heat of the cookware.
The cooling fan switches itself on and off depending upon the temperature of
the electronics.
Display Description
Cooking zone is switched off
Keep warm setting Keep warm setting/STOP+GO function
is set
- Heat settings Heat setting is set
- Heating setting plus
decimal point
Intermediate heat setting is set
Fault Malfunction has occurred
Residual heat Cooking zone is still hot
Child safety device Child safety device is engaged
Power Power function is switched on
Automatic switch off Switch off is active.
9Operating the appliance
Operating the appliance
3
Use the induction cooking zones with suitable cookware.
Switching the appliance on and off
3 After switching on, within approx. 10 seconds a heat setting or a function must
be set, otherwise the appliance automatically switches itself off.
Selecting the heat setting
Switching the STOP+GO function on and off
The STOP+GO function simultaneously switches all cooking zones that are
switched on to the keep warm setting and then back to the heat setting that
was previously set.
3 Timer functions are not stopped by .
3 locks the whole control panel except the sensor field .
Control panel Display Pilot light
Switch on Touch for 2 seconds / lights up
Switch off Touch for 1 second / none goes out
Control panel Indicator
To increase Touch to
To decrease Touch to
To switch off Touch and at the same time
Control panel Display
To switch on Touch
To switch off Touch heat setting that was previously
set (not automatic warm up func-
tion)
Operating the appliance10
Automatic warm up function and Power function
The sensor field controls the Power function and the Automatic warm up
function. Both functions make more power available to the cooking zone for a
short time.
Function Condition Result
Automatic warm up
function
A heat setting from to
is set
Appliance heats on
heat setting until
the requested heat
setting is reached
Power function Heat setting or is set Appliance heats for a
maximum of 10 min-
utes on heat setting .
11Operating the appliance
Using the automatic warm-up function
All cooking zones are equipped with an automatic warm-up function. The auto-
matic warm-up function sets the cooking zone to the highest setting for a cer-
tain period of time and then automatically switches back to the cooking setting
that was originally set.
3 If during the automatic warm up a higher heat setting is selected, e.g. from
to , the automatic warm up is adjusted.
The length of time that the automatic warm up function operates depends on
the heat setting selected.
Automatic warm-up
function
Sensor field Pilot light
To switch on Touch for 1 second at
heat setting to
is lit throughout the
automatic warm up
period
To switch off Touch for 1 second goes out
Heat
setting
Length of the
automatic warm up
[min:sec]
Intermediate
heat setting
Length of the
automatic warm up
[min:sec]
v 0:10
1 0:10
2 0:10 2. 1:20
3 3:10 3. 4:20
4 5:50 4. 8:10
5 10:10 5. 10:30
6 2:00 6. 2:00
7 2:30
8 2:50
9 ---
Operating the appliance12
Switching the power function on and off
The power function makes more power available to the induction cooking
zones, e.g. to bring a large quantity of water to the boil quickly.
The power function is activated for 10 minutes. After that the induction cooking
zone automatically switches back to heat setting 9.
3 If the power function has ended, the cooking zones automatically switch back to
the heat setting set previously.
Power Management
The cooking zones of the cooking surface have a maxi-
mum power available to them.
So that the Power function can always be carried out,
Power Management may reduce the power of the other
cooking zone.
Example: heat setting 9 is selected on a cooking zone.
The Power function is switched on for the other cooking
zone. The Power function is performed, but heat setting
9 on one cooking zone and Power function on the other
cooking zone exceeds the maximum output for both.
Therefore Power Management reduces the first cooking
zone that was switched on from 9 to 7, for example, and
the display for this cooking zone alternates between 9
and 7 and then remains on the current maximum of 7. (Whether the display al-
ternates between 9 and 7 or 9 and 6 or other values, depends on the appliance
type and the size of the cooking zone.)
Control panel Power indicator /
Display
To switch on Touch with heat setting
or
, lights up
To switch off Touch , goes out
Touch , goes out
13Operating the appliance
Using the child safety device
The child safety device prevents unintentional use of the appliance.
3 The child safety device can only be switched on and off, if the appliance is
switched on, but no cooking zone has a heat setting set.
Activating the child safety device
3 If you want to use a locked cooking zone (indicator ), an acoustic signal
sounds.
Overriding the child safety device
The child safety device can be released in this way for a single cooking session; it
remains activated afterwards.
3 After overriding the child safety device, a heat setting or a function must be set
within approx. 10 seconds, otherwise the appliance automatically switches itself
off.
Deactivating the child safety device
Step Control panel Indicator/Signal
1. Switch on the appliance
(Do not set a heat setting)
2. Touch
Appliance switches off. The child safety device is switched on.
Step control panel Indicator/Signal
1. Switch on the appliance
2. and touch any one of the
cooking zones
acoustic signal
Until the appliance is next switched off, it can be used as normal.
Step Control panel Indicator/Signal
1. Switch on the appliance
2. Touch 0 lights up
Appliance switches off. The child safety device is switched off.
Operating the appliance14
Using the timer
All cooking zones can use each use one of the two timer functions at the same
time.
3 If a heat setting is set on this cooking zone in addition to a countdown timer,
the cooking zone is switched off after the time set has elapsed.
Selecting the cooking zone
Setting the time
3 If other timer functions are set, after a few seconds the shortest remaining time
of all the timer functions is displayed and the corresponding pilot light flashes.
Function Pre-condition Outcome after time
has elapsed
Safety cut-out When a heat setting is set Acoustic signal
0 lights up
Cooking zone switches
off
Countdown timer When cooking zones are
not used
Acoustic signal
0 lights up
Step Control panel Display
1. Touch once Pilot light for the back
cooking zone flashes
2. Touch once Pilot light for the front
cooking zone flashes
Step Control panel Indicator
1. Select a cooking
zone
Pilot light for the selected cooking zone
flashes
2. Touch or 0 to 99 minutes
After a few seconds the pilot light flashes more slowly.
The time is set.
The time counts down.
15Operating the appliance
Switching off the Timer function
Changing the time
Displaying the time remaining for a cooking zone
Switching off the acoustic signal
Step Control panel Display
1. Select a cooking
zone
Pilot light of the selected cooking zone
flashes more quickly.
Remaining time is displayed
2. Touch for the cook-
ing zone selected
The remaining time counts down to 00.
Simultaneoulsy touch
and for the
cooking zone selected
00 is displayed.
The pilot light goes out.
The Timer function for the selected cooking zone is switched off.
Step Control panel Indicator
1. Selecting a cooking
zone
Pilot light of the selected cooking zone
flashes more quickly
Remaining time is displayed
2. Touch or 01 to 99 minutes
After a few seconds the pilot light flashes more slowly.
The time is set.
The time counts down.
Step Control panel field Display
1. Select cooking zone Pilot light of the cooking zone selected
flashes faster
The time remaining is displayed
After a few seconds the pilot light flashes more slowly.
Step Control panel field Acoustic signal
1. Touch Acoustic signal to acknowledge.
Acoustic signal stops.
Operating the appliance16
Automatic switch off
Cooking surface
If after switching on the cooking surface, a heat setting is not set for a cook-
ing zone within approx. 10 seconds, the cooking surface automatically switch-
es itself off.
If one or more sensor fields are covered for longer than approx. 10 seconds,
e.g. by a pan placed upon it, a signal sounds and the cooking surface switches
off automatically.
If all cooking zones are switched off, the cooking surface automatically
switches itself off after approx. 10 seconds.
Control panel
3 Moisture (e.g. a wet cloth) or liquid boiling over onto the control panel immedi-
ately switches all cooking zones off.
Induction cooking zones
In the case of overheating (e.g. when a saucepan boils dry) the cooking zone
automatically switches itself off. is displayed. Before being used again the
cooking zone must be set to
0 and allowed to cool.
If cookware that is not suitable is used, lights up in the display and after
2 minutes the display for the cooking zone switches itself off.
If one of the cooking zones is not switched off after a certain time, or if the
heat setting is not modified, the relevant cooking zone switches off automati-
cally. is displayed. Before being used again, the cooking zone must be set to
0.
Heat setting Switches off after
v, 1 - 2 6 hours
3 - 4 5 hours
5 4 hours
6 - 9 1.5 hours
17Tips on cooking and frying
Tips on cooking and frying
3
Information about acrylamides
According to the latest scientific research, intensive browning of food, especially
in products containing starch, may present a health risk due to acrylamide.
Therefore we recommend cooking at low temperatures and not browning foods
too much.
Tips on cooking and frying18
Cookware for induction cooking zones
Cookware material
3 Cookware for induction cooking zones is labelled as suitable by the manufactur-
er.
Suitability test
Cookware is suitable for induction cooking, if …
... a little water on an induction cooking zone set to heat setting 9 is heated
within a short time.
... a magnet sticks to the bottom of the cookware.
3 Certain cookware can make noises when being used on induction cooking zones.
These noises are not a fault in the appliance and do not affect operation in any
way.
Bottom of the cookware
The bottom of the cookware should be as thick and flat as possible.
Pan size
Induction cooking zones adapt automatically to the size of the bottom of the
cookware up to a certain limit. However the magnetic part of the bottom of the
cookware must have a minimum diameter depending upon the size of the cook-
ing zone.
3 The cookware must be placed centrally on the cooking zone.
Cookware material Suitable
Steel, enamelled steel yes
Cast iron yes
Stainless steel if appropriately labelled by the manufacturer
Aluminium, copper, brass ---
Glass, ceramic, porcelain ---
Diameter of cooking zone
[mm]
Minimum diameter of dish base
[mm]
210 180
145 120
19Tips on cooking and frying
Tips on energy saving
2 Place cookware on the cooking zone before it is switched on.
2 If possible, always place a lid on the cookware.
Tips on cooking and frying20
Examples of cooking applications
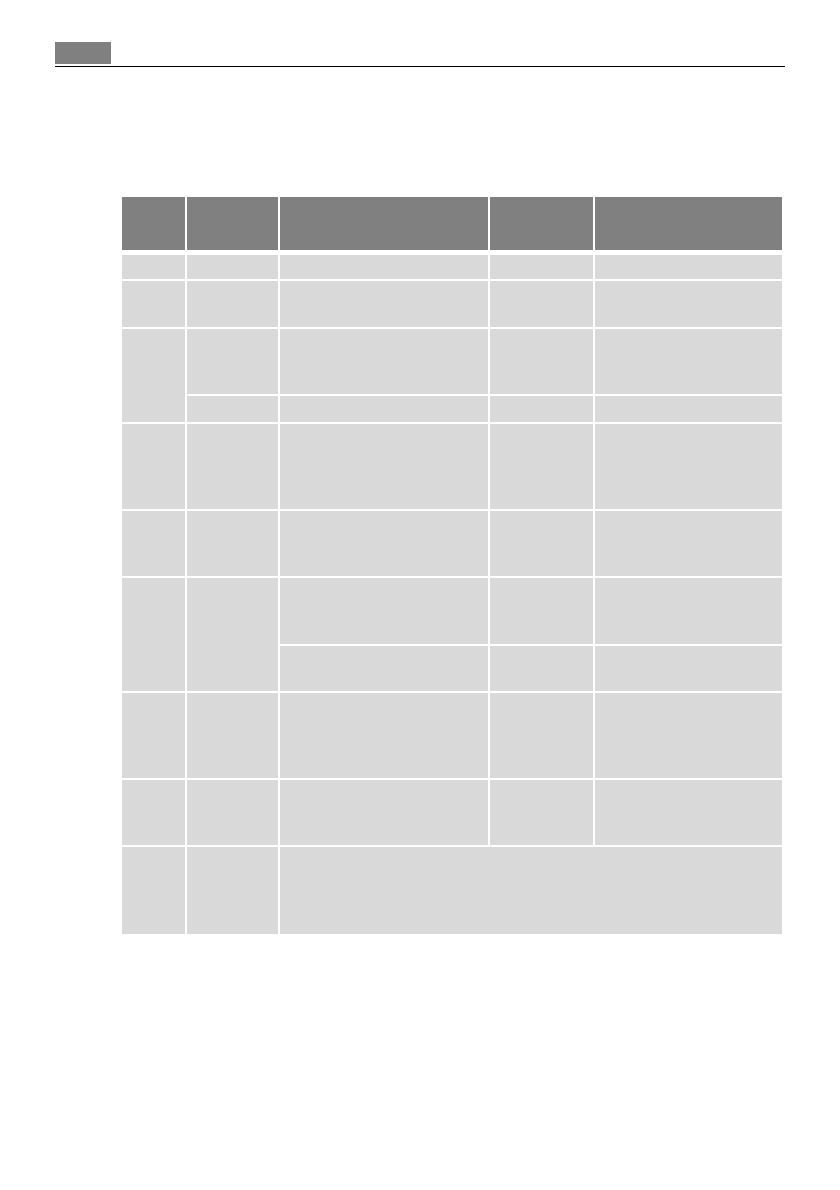
The information given in the following table is for guidance only.
The power function is suitable for heating large quantities of liquid.
Heat
setting
Cooking
process
suitable for Cook time Tips/Hints
0 Off position
1
Keeping
food warm
Keeping cooked foods warm as required Cover
1-2
Melting
Hollandaise sauce,
melting butter, chocolate,
gelatine
5-25 mins. Stir occasionally
Solidifying Fluffy omelettes, baked eggs 10-40 mins. Cook with lid on
2-3 Simmering
Simmering rice and milk-
based dishes
Heating up ready-cooked
meals
25-50 mins.
Add at least twice as
much liquid as rice, stir
milk dishes part way
through cooking
3-4
Steaming
Braising
Steaming vegetables, fish
Braising meat
20-45 mins.
With vegetables add only
a little liquid (a few table-
spoons)
4-5 Boiling
Steaming potatoes 20-60 mins.
Use only a little liquid, e.
g.: max.
¼ l water for
750 g of potatoes
Cooking larger quantities of
food, stews and soups
60-150 mins.
Up to 3 l liquid plus in-
gredients
6-7
Gentle
frying
Frying escalope, veal cordon
bleu, cutlets, rissoles, sausag-
es, liver, roux, eggs, pancakes,
doughnuts
as required
Turn halfway through
cooking
7-8
Heavy
frying
Hash browns, loin steaks,
steaks, Flädle (pancakes for
garnishing soup)
5-15 mins.
per pan
Turn halfway through
cooking
9
Boiling
Searing
Deep fry-
ing
Boiling large quantities of water, cooking pasta, searing meat (goulash,
pot roast), deep frying chips
  • Page 1 1
  • Page 2 2
  • Page 3 3
  • Page 4 4
  • Page 5 5
  • Page 6 6
  • Page 7 7
  • Page 8 8
  • Page 9 9
  • Page 10 10
  • Page 11 11
  • Page 12 12
  • Page 13 13
  • Page 14 14
  • Page 15 15
  • Page 16 16
  • Page 17 17
  • Page 18 18
  • Page 19 19
  • Page 20 20
  • Page 21 21
  • Page 22 22
  • Page 23 23
  • Page 24 24
  • Page 25 25
  • Page 26 26
  • Page 27 27
  • Page 28 28
  • Page 29 29
  • Page 30 30
  • Page 31 31
  • Page 32 32
  • Page 33 33
  • Page 34 34
  • Page 35 35
  • Page 36 36
  • Page 37 37
  • Page 38 38
  • Page 39 39
  • Page 40 40

Aeg-Electrolux FM4803K-AN User manual

Category
Hobs
Type
User manual

Aeg-Electrolux FM4803K-AN is a state-of-the-art ceramic glass induction hob designed to make cooking easier, safer, and more enjoyable. Equipped with a range of advanced features, it offers precise heat control, energy efficiency, and various safety mechanisms to enhance your cooking experience.

Ask a question and I''ll find the answer in the document

Finding information in a document is now easier with AI