Philips Switch 3121 235 20301 User manual
- Category
- AV receivers
- Type
- User manual
This manual is also suitable for

3121 235 20301
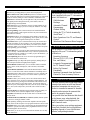
Read this manual first!
Congratulations on purchasing this Philips product.
We’ve included everything you need to get started.
If you have any problems, Philips Representatives can
help you get the most from your new product by explaining:
• Hookups,
• First Time Setup, and
• Feature Operation.
Do not attempt to return this product to the store.
For fast help, call us first!
1-800-531-0039
Thank you for making Philips a part of your home!

2
Once your PHILIPS purchase is registered, you’re eligible to receive all the privileges of owning a
PHILIPS product. So complete and return the Warranty Registration Card enclosed with your pur-
chase at once. And take advantage of these important benefits.
Return your Warranty Registration card today to ensure you
receive all the benefits you’re entitled to.
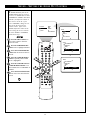
Congratulations
on your
purchase,
and welcome to the
“family!”
Dear PHILIPS product owner:
Thank you for your confidence in PHILIPS. You’ve selected one of the best-built, best-backed products
available today. And we’ll do everything in our power to keep you happy with your purchase for many
years to come.
As a member of the PHILIPS “family,” you’re entitled to protection by one of the most comprehensive
warranties and outstanding service networks in the industry.
What’s more, your purchase guarantees you’ll receive all the information and special offers for which
you qualify, plus easy access to accessories from our convenient home shopping network. And most
importantly you can count on our uncompromising commitment to your total satisfaction.
All of this is our way of saying welcome–and thanks for investing in a PHILIPS product.
Sincerely,
Philips Consumer Electronics Company
Know these
safety
symbols
t This “bolt of lightning” indicates uninsulated material within your unit may cause an electri-
cal shock. For the safety of everyone in your household, please do not remove product covering.
s The “exclamation point” calls attention to features for which you should read the enclosed
literature closely to prevent operating and maintenance problems.
WARNING: TO PREVENT FIRE OR SHOCK HAZARD, DO NOT EXPOSE THIS EQUIPMENT
TO RAIN OR MOISTURE.
CAUTION: To prevent electric shock, match wide blade of plug to wide slot, and fully insert.
ATTENTION: Pour éviter les chocs électriques, introduire la lame la plus large de la fiche dans la
borne correspondante de la prise et pousser jusqu’au fond.
CAUTION
RISK OF ELECTRIC SHOCK
DO NOT OPEN
CAUTION: TO REDUCE THE RISK OF ELECTRIC SHOCK, DO NOT
REMOVE COVER (OR BACK). NO USER-SERVICEABLE PARTS
INSIDE. REFER SERVICING TO QUALIFIED SERVICE PERSONNEL.
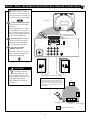
Warranty
Verification
Registering your product within
10 days confirms your right to
maximum protection under the
terms and conditions of your
PHILIPS warranty.
Owner
Confirmation
Your completed Warranty
Registration Card serves as
verification of ownership in the
event of product theft or loss.
Model
Registration
Returning your Warranty
Registration Card right away guar-
antees you’ll receive all the infor-
mation and special offers which
you qualify for as the owner of your
model.
P.S. Remember, to get the most from your PHILIPS product, you
must return your Warranty Registration Card within 10 days.
So please mail it to us right now!
R
E
G
I
S
T
R
A
T
I
O
N
N
E
E
D
E
D
W
I
T
H
I
N
1
0
D
A
Y
S
Hurry!
Visit our World Wide Web Site at http://www.philipsusa.com

3
IMPORTANT SAFETY INSTRUCTIONS
Read before operating equipment
1. Read these instructions.
2. Keep these instructions.
3. Heed all warnings.
4. Follow all instructions.
5. Do not use this apparatus near water.
6. Clean only with a dry cloth.
7. Do not block any of the ventilation openings. Install in
accordance with the manufacturers instructions.
8. Do not install near any heat sources such as radiators, heat
registers, stoves, or other apparatus (including amplifiers)
that produce heat.
9. Do not defeat the safety purpose of the polarized or ground-
ing-type plug. A polarized plug has two blades with one
wider than the other. A grounding type plug has two blades
and third grounding prong. The wide blade or third prong
are provided for your safety. When the provided plug does
not fit into your outlet, consult an electrician for replacement
of the obsolete outlet.
10. Protect the power cord from being walked on or pinched
particularly at plugs, convenience receptacles, and the point
where they exit from the apparatus.
11. Only use attachments/accessories specified by the manu-
facturer.
12. Use only with a cart, stand, tripod, bracket, or table
specified by the manufacturer, or sold with the app-
aratus. When a cart is used, use caution when
moving the cart/apparatus combination to avoid
injury from tip-over.
13. Unplug this apparatus during lightning storms or when
unused for long periods of time.
14. Refer all servicing to qualified service personnel. Servicing
is required when the apparatus has been damaged in any
way, such as power-supply cord or plug is damaged, liquid
has been spilled or objects have fallen into apparatus, the
apparatus has been exposed to rain or moisture, does not
operate normally, or has been dropped.
15. This product may contain lead and mercury. Disposal of
these materials may be regulated due to environmental con-
siderations. For disposal or recycling information, please
contact your local authorities or the Electronic Industries
Alliance: www.eiae.org
16. Damage Requiring Service - The appliance should be
serviced by qualified service personnel when:
A. The power supply cord or the plug has been damaged;
or
B. Objects have fallen, or liquid has been spilled into the
appliance; or
C. The appliance has been exposed to rain; or
D. The appliance does not appear to operate normally or
exhibits a marked change in performance; or
E. The appliance has been dropped, or the enclosure
damaged.
17. Tilt/Stability - All televisions must comply with recommend-
ed international global safety standards for tilt and stability
properties of its cabinet design.
• Do not compromise these design standards by applying
excessive pull force to the front, or top, of the cabinet which
could ultimately overturn the product.
• Also, do not endanger yourself, or children, by placing
electronic equipment/toys on the top of the cabinet. Such
items could unsuspectingly fall from the top of the set and
cause product damage and/or personal injury.
18. Wall or Ceiling Mounting - The appliance should be
mounted to a wall or ceiling only as recommended by the
manufacturer.
19. Power Lines - An outdoor antenna should be located away
from power lines.
20. Outdoor Antenna Grounding - If an outside antenna is
connected to the receiver, be sure the antenna system is
grounded so as to provide some protection against voltage
surges and built up static charges.
Section 810 of the National Electric Code, ANSI/NFPA No.
70-1984, provides information with respect to proper
grounding of the mats and supporting structure grounding of
the lead-in wire to an antenna discharge unit, size of
grounding connectors, location of antenna-discharge unit,
connection to grounding electrodes and requirements for
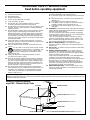
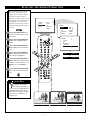
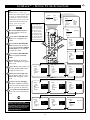
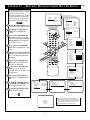
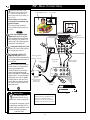
the grounding electrode. See Figure below.
21 Object and Liquid Entry - Care should be taken so that
objects do not fall and liquids are not spilled into the enclo-
sure through openings.
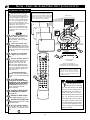
ANTENNA LEAD IN WIRE
ANTENNA DISCHARGE UNIT
(NEC SECTION 810-20)
GROUNDING CONDUCTORS (NEC SECTION 810-21)
GROUND CLAMPS
POWER SERVICE GROUNDING ELECTRODE SYSTEM (NEC ART 250, PART H)
GROUND CLAMP
ELECTRIC SERVICE EQUIPMENT
Example of Antenna Grounding
as per NEC - National Electric Code
Note to the CATV system installer: This reminder is provided to call the CATV system installer's attention to Article 820-40 of the NEC that provides
guidelines for proper grounding and, in particular, specifies that the cable ground shall be connected to the grounding system of the building, as close
to the point of cable entry as practical.

4
Introduction
✧Welcome/Registration of Your TV . . . . . . . . . . . . . . . . .2
✧Safety/Precautions . . . . . . . . . . . . . . . . . . . . . . . . . . . . .3
✧Table of Contents . . . . . . . . . . . . . . . . . . . . . . . . . . . . . .4
✧Features . . . . . . . . . . . . . . . . . . . . . . . . . . . . . . . . . . . . .5
ONSCREEN MENU
Picture
✧ Adjusting the Picture . . . . . . . . . . . . . . . . . . . . . .6
✧ Turning ON the Dynamic Noise Reduction
Control . . . . . . . . . . . . . . . . . . . . . . . . . . . . . . . . . . . . . .7
✧Turning ON the ImageMax™ Control . . . . . . . . . . . . . .7
Features
✧Using the Closed Captioning Control . . . . . . . . . . . . . . .8
✧Using the Format (screen) Control . . . . . . . . . . . . . . . . .9
✧Activating the Blue Mute Control . . . . . . . . . . . . . . . .10
✧Using the Sleep Timer Control . . . . . . . . . . . . . . . . . . .11
The Timer Feature
✧ The Timer – Setting the Clock . . . . . . . . . . . . . .12
✧ The Timer – Setting the Start Time . . . . . . . . . . . . . .13
✧The Timer – Setting the Stop Time . . . . . . . . . . . . . . .14
✧The Timer – Selecting the Channel . . . . . . . . . . . . . . .15
✧The Timer – Setting Activate to ON or OFF . . . . . . . .16
✧The Timer – Turning ON the Timer Display . . . . . . . .17
The AutoLockª Feature
✧ Understanding AutoLock™ . . . . . . . . . . . . . . . . . .18
✧AutoLock™ – Setting Up the Access Code . . . . . . . . .19
✧AutoLock™ – Blocking Channels . . . . . . . . . . . . . . . .20
✧AutoLock™ – Blocking by Movie Rating . . . . . . . . . .21
✧AutoLock™ – Blocking by TV Rating . . . . . . . . . . . .22
✧AutoLock™ – Turning Block ON or OFF . . . . . . . . . .23
✧AutoLock™ – Blocking Unrated
Broadcasts . . . . . . . . . . . . . . . . . . . . . . . . . . . . . . . . . .24
✧AutoLock™ – Blocking Broadcasts That
Have No Rating . . . . . . . . . . . . . . . . . . . . . . . . . . . . .25
✧AutoLock™ – Reviewing Your Settings . . . . . . . . . . .26
✧AutoLock™ – Viewing Blocked
Programming . . . . . . . . . . . . . . . . . . . . . . . . . . . . . . . .27
Sound
✧ Sound – Adjusting the Treble, Bass, and
and Balance . . . . . . . . . . . . . . . . . . . . . . . . . . . . . . . . .28
✧Sound – Setting the Volume . . . . . . . . . . . . . . . . . . . .29
✧Sound – Using the AVL (Audio Volume
Leveler) . . . . . . . . . . . . . . . . . . . . . . . . . . . . . . . . . . . .30
✧Sound – Using Incredible Surround . . . . . . . . . . . . . . .31
✧Sound – Setting the TV for Stereo and
SAP (Second Audio Program) . . . . . . . . . . . . . . . . . . .32
✧Sound – Setting the Audio Out Control . . . . . . . . . . . .33
✧Sound – Using the TV Speaker Control
and Audio Output Jacks . . . . . . . . . . . . . . . . . . . . . . . .34
✧Sound – Using the Surround Sound
External Speaker Connections . . . . . . . . . . . . . . . . . . .35
✧Sound – Using the Audio/Video
Input Jacks . . . . . . . . . . . . . . . . . . . . . . . . . . . . . . .36–38
TABLE OF CONTENTS
AutoChron, AutoLock, AutoPicture, AutoSound, M-Link, and
ImageMax are trademarks of Philips Consumer Electronics Company.
Copyright © 2001 Philips Consumer Electronics Company.
All rights reserved.
NOTE: This owner's manual is used with several dif-
ferent television models. Not all features (and draw-
ings) discussed in this manual will necessarily match
those found with your television system. This is normal
and does not require that you contact your dealer or
request service.
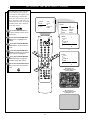
Remote Control Operation
✧ Remote Control – Using AutoPicture™ . . . . . . . .39
✧ Remote Control – Using AutoSound™ . . . . . . . .40
✧ Remote Control – Using Channel Surf . . . . . . . . . . . .41
The PIP (Picture-in-Picture) Feature
✧ PIP – Basic Connections . . . . . . . . . . . . . . . . . .42
✧PIP – Selecting the Signal Source . . . . . . . . . . . . . . . .43
✧PIP – Remote Control Buttons . . . . . . . . . . . . . . . . . . .44
✧PIP – Adjusting the Tint . . . . . . . . . . . . . . . . . . . . . . . .45
✧PIP – More Connections . . . . . . . . . . . . . . . . . . . .46–47
General Information
✧ Troubleshooting . . . . . . . . . . . . . . . . . . . . . . . .48
✧Glossary of Television Terms . . . . . . . . . . . . . . . . . . . .49
✧Index . . . . . . . . . . . . . . . . . . . . . . . . . . . . . . . . . . . . . .50
✧Factory Service Locations . . . . . . . . . . . . . . . . . . . . . .51
✧Limited Warranty . . . . . . . . . . . . . . . . . . . . . . . . . . . .52
12
1
2
3
4
5
6
7
8
9
10
11

5
Audio/Video Jack Panel allows direct connections with VCRs, DVDs, or
other devices, providing quality TV picture and sound playback.
Audio Volume Leveler (AVL) Control keeps the TV sound at an even
level. Peaks and valleys that occur during program changes or commercial
breaks are reduced, making for a more consistent, comfortable sound.
AutoChronª automatically sets the right time of day and maintains it
with digital precision through brownouts, power failures, and even
Daylight Savings Time adjustments.
AutoLockª allows you to block the viewing of certain channels or pro-
grams with certain ratings if you do not want your children to view inap-
propriate materials.
Auto Programming scans (when activated) for all available channels
from regular antenna or cable signals and stores only active broadcast sta-
tions in the TVÕs memory.
AutoPictureª allows you to change the picture settings (color, tint, con-
trast, etc.) for various types of programming, such as sports, movies, multi-
media (games), or weak signals with the push of one button.
AutoSoundª allows you to select from three factory-set controls and a
personal control that you set according to your own preferences through
the onscreen Sound menu. The three factory-set controls (Voice, Music,
and Theatre) enable you to tailor the TV sound so as to enhance the partic-
ular programming you are watching.
Channel Edit allows you to add or delete channels from the list stored in
the TVÕs memory. Channel Edit makes it easy to limit or expand the num-
ber of channels that are available to you when you press the Channel (+) or
(Ð) buttons on your remote control.
Closed Captioning allows the viewer to read TV program dialogue or
voice conversations as onscreen text.
ImageMaxª helps you sharpen the picture quality by making dark por-
tions of the picture darker and light portions brighter.
Infrared Remote Control works your TV and other remote-controlled
devices, such as VCRs, DVD players, cable converters, and satellite
receivers.
Infrared Remote (IR) Blaster works with the M-Link feature to enable
your TV to ÒlearnÓ the remote-control commands of new Philips devices
or multibrand devices that you have connected to your TV. After the com-
mands are learned, you can use your TV remote control to operate and
control all of the devices.
M-Linkª allows you to convert your TV into a home-cinema control
center composed of up to six devices (including an audio amplifier). You
activate the devices by pressing macro buttons and control the devices by
pressing ÒhotÓ buttons on your remote control. Choose from cable box,
digital set top box, DVD (digital video disc), laser disc (LD), satellite digi-
tal TV, VCD (video compact disc), and VCR (video cassette recorder)
devices.
Onscreen Menu shows helpful messages and instructions for setting TV
feature controls (can be viewed in English, French, or Spanish).
Sleep Timer automatically turns the TV OFF after a set amount of time
that you choose.
Standard Broadcast (VHF/UHF) or Cable TV (CATV) channel capabil-
ity allows for viewing by antenna or cable.
Stereo capability, including a built-in audio amplifier and twin-speaker
system, allows for the reception of TV programs broadcast in stereo sound.
Surf Button allows you to easily switch among only the channels that are
of interest to you (the ones that you have programmed into the TVÕs Surf
control through the onscreen menu).
Timer allows you to set your TV to turn itself ON and OFF once or daily
like an alarm clock.
Use the simple Quick Use and Installation
Guide (supplied with your TV information
packet) for details on:
• Cable/Antenna
Hookups
• Automatic Channel
Programming
• Channel Editing
• Setting the TV’s Clock Automatically
(AutoChron™)
• Basic Operation of the TV and Remote
Control
• Selection of the Onscreen Menu Language
QUICK USE AND INSTALLATION GUIDE
Q
UICK
U
SE AND
I
NSTALLATION
G
UIDE
TABLE OF CONTENTS
Getting Started
Warning/Precautions..................................1
Hooking Up Your TV.................................1
Basic TV and Remote Control Operation.................2
How to Use the “INSTALL”Controls ..................3-4
Using the Language Control......................................3
Setting the TV to Auto Program Channels................3
Setting the TV for a Cable or Antenna Signal...........3
Using the Channel Edit Control ................................4
Setting the Channel Name Control............................4
How to use the AutoChron control............................4
12
1
2
3
4
5
6
7
8
9
10
11
• For details on product registration,warranty,
and service refer to the other literature included
with your TV information packet.
Please retain all these materials and keep them
handy for future reference.
WARNING:TO PREVENT FIRE OR SHOCK
HAZARD DO NOT EXPOSE THIS UNIT TO RAIN
OR EXCESSIVE MOISTURE.
Color Television and Remote Control
NOTE:This Quick Use Guide may be used with
other models. Some of the features listed may or
may not apply to your TV.
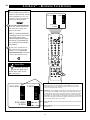
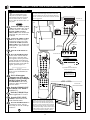
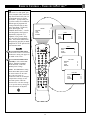
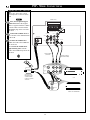
Y
our TV has two sepa-
rate ANT(enna)/Cable
inputs on the rear of the
set. These two signal inputs
offer convenient hook-up
options for both normal TV
program viewing and
Picture-In-Picture (PIP)
features.
The ANT(enna) A input is
intended for use and view-
ing on the TV’s main
screen. Your home’s prima-
ry Antenna, or Cable TV
signal, should be connect-
ed to this input for normal
TV setup, use and feature
operation.
ANTENNA OR
CABLE TV
ANT(ENNA) A & B INPUTS
Remember,
be sure to set the
TV for the type sig-
nal you've connect-
ed (see "TUNER"
section on page 3 of
this Guide.)
Your TV can set
itself to select only
the channel numbers
on your Cable sys-
tem (see “Auto
Program" page 3). If
you use a Cable
Converter box,set
the TV to the same
channel as the con-
verter's CH 3/4
switch (on the rear of
the converter.)
To order accessories
hth
l
itd
SMART
HELP
A typical ANT(enna)
A and PIP ANT B connection
(using a common signal source
and an optional Signal Splitter):
If your Antenna or Cable TV
signal has a round cable con-
nector (75 ohm) on the end,
then you're ready to connect it
to the 75ohm Signal Splitter.
If your antenna has flat twin-
lead wire (300 ohm), you first
need to attach the antenna wires
to the screws on a 300 to 75
ohm adapter before connecting
to the 75ohm Signal Splitter.
Connect your Antenna or
Cable TV signal to the single
75 ohm input plug on the two-
way Signal Splitter (optional).
Then connect two lengths of RF
Coaxial Cable to the two Output
plugs on the two-way Signal
Splitter (F-type connector on
both ends).
300 to 75ΩAdapter
Twin Lead
Wire
Back of TV
BEGIN
RoundCab
l
e
- Outdoor or Indoor Antenna -
receives normal broadcast channels
2-13 (VHF) and 14-69 (UHF).
OR
Connect the twin Output
plugs on the Signal Splitter to
the ANT A and PIP ANT B
inputs on the rear of the TV.
Push the round connector end of
the RF Coaxial Cable onto the
ANT(enna) plug and screw it
down tight (if using threaded
cables).
Combination VHF/UHF Antenna
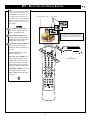
FEATURES
Your new television and its packing contain
materials that can be recycled and reused.
Specialized companies can recycle your
product to increase the amount of reusable
materials and minimize the amounts that
need to be properly disposed.
Your product also uses batteries that should
not be thrown away when depleted, but
should be handed in and disposed of as
small chemical waste.
When you replace your existing equipment,
please find out about the local regulations
regarding disposal of your old television,
batteries, and packing materials.
END-OF-LIFE DISPOSAL
Use the simple M-Link Instructions for Use
(supplied with your TV information packet)
for details on:
• Operating Accessory
Devices (VCR, DVD, Cable
Box, and Others)
• Automatic Programming Via
the TV Remote Control
• Setting Up Personal
Commands
• Inputting Commands from the Remote
Controls of Your Accessory Devices
M-LINK INSTRUCTIONS FOR USE
Instructions for use
3135 015 XXXXX

6
5
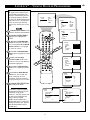
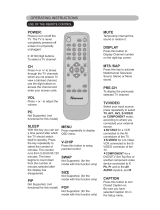
SLEEP
TV/VCR ON/OFF POSITION FREEZE
INCR. SURR. SURF
SOUND PICTURE
MENU
CH
MUTE
SWAP
SOURCE CC CLOCK
ITR/REC HOME HOME PERSONAL
VIDEO MOVIES
PROGRAM LIST
OPEN/CLOSE
POWER
A/CH
PIP
M-LINK
VOL
STATUS/EXIT
OK
SOURCE
3
PICTURE
SOUND
FEATURES
INSTALL
BRIGHTNESS
COLOR
PICTURE
SHARPNESS
TINT
BRIGHTNESS 30
COLOR
PICTURE
SHARPNESS
STORE
PICTURE
BRIGHTNESS
COLOR 30
PICTURE
SHARPNESS
STORE
PICTURE
BRIGHTNESS
COLOR
PICTURE 30
SHARPNESS
STORE
PICTURE
BRIGHTNESS
COLOR
PICTURE
SHARPNESS 30
TINT
PICTURE
BRIGHTNESS
COLOR
PICTURE
SHARPNESS
TINT 0
PICTURE
COLOR
PICTURE
SHARPNESS
TINT
COLOR TEMP NORMAL
PICTURE
COLOR TEMP COOL
COLOR TEMP WARM
OR
OR
2
1
4
6
5
3
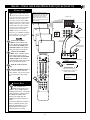
T
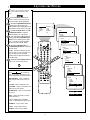
o adjust your TV picture controls,
select a channel and follow these
steps.
Press the MENU button on the
remote control to show the onscreen
menu. PICTURE will be highlighted.
Press the CURSOR RIGHT button
and the menu will shift to the left.
BRIGHTNESS will be highlighted and an
adjustment bar will be shown to the right.
Use the CURSOR LEFT or CUR-
SOR RIGHT button to adjust the
BRIGHTNESS level of the picture.
After adjusting the BRIGHTNESS
control, press the CURSOR DOWN
button to select another picture adjust-
ment: COLOR, PICTURE, SHARP-
NESS, TINT, OR COLOR TEMP.
Press the CURSOR LEFT or
CURSOR RIGHT button to adjust the
selected control.
NOTE: The menu will show only five
items at a time, so you will need to con-
tinue scrolling with the CURSOR
DOWN button to adjust the TINT and
COLOR TEMP.
Press the STATUS/EXIT button to
remove the menu from the screen.
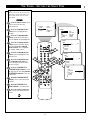
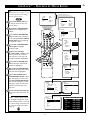
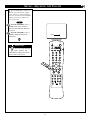
ADJUSTING THE PICTURE
Remember, when the bar scale is cen-
tered , the control set-
tings are at normal, mid-range levels.
Picture adjustments are described here.
BRIGHTNESS Ð adds or subtracts
light from the darkest part of the pic-
ture.
COLOR Ð adds or eliminates color.
PICTURE Ð improves the detail of the
lightest parts of the picture.
SHARPNESS Ð improves the detail in
the picture.
TINT Ð adjusts the picture to obtain
natural skin tones.
COLOR TEMP offers NORMAL,
COOL, or WARM picture preferences.
NORMAL Ð keeps whites, white.
COOL Ð makes whites, bluish.
WARM Ð makes whites, reddish.

7
SLEEP
TV/VCR ON/OFF POSITION FREEZE
INCR. SURR. SURF
SOUND PICTURE
MENU
CH
MUTE
SWAP
SOURCE CC CLOCK
ITR/REC HOME HOME PERSONAL
VIDEO MOVIES
PROGRAM LIST
OPEN/CLOSE
POWER
A/CH
PIP
M-LINK
VOL
STATUS/EXIT
OK
SOURCE
4
PICTURE
SOUND
FEATURES
INSTALL
BRIGHTNESS
COLOR
PICTURE
SHARPNESS
TINT
BRIGHTNESS 30
COLOR
PICTURE
SHARPNESS
TINT
PICTURE
2
1
3
5
PICTURE
PICTURE
SHARPNESS
TINT
COLOR TEMP
DNR
ON
OR
DNR OFF
4
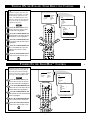
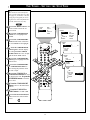
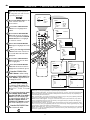
D
ue to many reasons, such as poor
cable reception, the picture can
sometimes appear slightly ÒspeckledÓ
(an indication of signal noise in the
picture). The DNR (Dynamic Noise
Reduction) control can help eliminate
this type of interference and improve
the quality of the picture.
Press the MENU button on the
remote to show the onscreen menu.
PICTURE will be highlighted.
Press the CURSOR RIGHT but-
ton and the menu will shift to the left.
BRIGHTNESS will be highlighted.
Press the CURSOR DOWN but-
ton repeatedly until the DNR control
is highlighted.
Press the CURSOR RIGHT but-
ton to switch DNR ON or press the
CURSOR LEFT button to switch
DNR OFF.
Press the STATUS/EXIT button
to remove the menu from the screen.
TURNING ON THE DYNAMIC NOISE REDUCTION CONTROL
SLEEP
TV/VCR ON/OFF POSITION FREEZE
INCR. SURR. SURF
SOUND PICTURE
MENU
CH
MUTE
SWAP
SOURCE CC CLOCK
ITR/REC HOME HOME PERSONAL
POWER
A/CH
PIP
M-LINK
VOL
STATUS/EXIT
SOURCE
4
PICTURE
SOUND
FEATURES
INSTALL
BRIGHTNESS
COLOR
PICTURE
SHARPNESS
TINT
BRIGHTNESS 30
COLOR
PICTURE
SHARPNESS
TINT
PICTURE
PICTURE
SHARPNESS
TINT
COLOR TEMP
DNR
IMAGEMAX ON
ON
OR
IMAGEMAX OFF
2
1
3
5
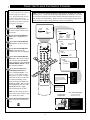
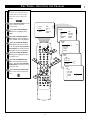
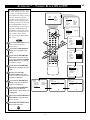
I
mageMaxª helps you sharpen the
picture quality by making dark por-
tions of the picture darker and light
portions of the picture brighter. Follow
these steps to turn ImageMaxª ON.
Press the MENU button on the
remote control to show the onscreen
menu. PICTURE will be highlighted.
Press the CURSOR RIGHT but-
ton and the menu will shift to the left.
BRIGHTNESS will be highlighted.
Press the CURSOR DOWN but-
ton repeatedly until the IMAGEMAX
control is highlighted.
Press the CURSOR RIGHT but-
ton to switch between ON and OFF.
Press the STATUS/EXIT button
to remove the menu from the screen.
TURNING ON THE IMAGEMAX™ CONTROL

8
SLEEP
TV/VCR ON/OFF POSITION FREEZE
INCR. SURR. SURF
SOUND PICTURE
MENU
CH
MUTE
SWAP
SOURCE CC CLOCK
ITR/REC HOME HOME PERSONAL
VIDEO MOVIES
PROGRAM LIST
OPEN/CLOSE
POWER
A/CH
PIP
M-LINK
VOL
STATUS/EXIT
OK
SOURCE
PICTURE
SOUND
FEATURES
INSTALL
TIMER
AutoLock
PIP
CLOSED CAP
FORMAT
1
2
4
5
3
6
7
FEATURES
TIMER
AutoLock
PIP
CLOSED CAP
FORMAT
TIME
START TIME
STOP TIME
CHANNEL
ACTIVATE
FEATURES
TIMER
AutoLock
PIP
CLOSED CAP
FORMAT
CLOSED CAP
CAPTION MODE
CC DISPLAY
FEATURES
CAPTION MPDE
CC DISPLAY
CC1
CC2
CC3
CLOSED CAP
CAPTION MODE
CC DISPLAY
FEATURES
CC1
CC2
CC3
CC1
CC2
CC3
CC4
CC MUTE
TXT1
TXT2
TXT3
TXT4
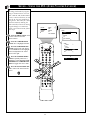
6
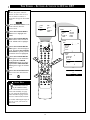
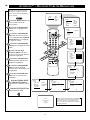
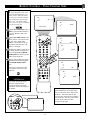
C
losed Captioning (CC) allows
you to read the voice content of
television programs on the TV
screen. Designed to help the hear-
ing impaired, this feature uses
onscreen Òtext boxesÓ to show dia-
logue and conversations while the
TV program is in progress.
Press the MENU button on
the remote control to show the on-
screen menu.
Press the CURSOR DOWN
button twice to highlight FEA-
TURES.
Press the CURSOR RIGHT
button and the menu will shift to
the left.
Press the CURSOR DOWN
button repeatedly until the
CLOSED CAP control is highlight-
ed.
Press the CURSOR RIGHT
button again. The menu will shift
to the left and CAPTION MODE
will be highlighted. Then press the
CURSOR RIGHT button to high-
light CAPTION MODEs.
Press the CURSOR UP or
CURSOR DOWN button to
select a CAPTION MODE: CC1,
CC2, CC3, CC4, CMUTE, TXT1,
TXT2, TXT3, or TXT4. CC DIS-
PLAY turns text OFF or ON if the
TV station broadcasting on the
channel is making CLOSED CAP-
TIONING available. With CC DIS-
PLAY highlighted, press the CUR-
SOR RIGHT button to toggle
Closed Captioning ON or OFF.
NOTE: You also can press the CC
button on the remote control to turn
the CC TEXT ON or OFF.
Press the STATUS/EXIT but-
ton to remove the menu from the
screen.
USING THE CLOSED CAPTIONING CONTROL
JOHN: Why did they move the
meeting up to this week?
MARSHA: I don't know, but they
are pushing to close the deal.
CLOSE CAPTION PROGRAMS ON WXYZ
ALL ITEMS ARE EASTERN STANDARD TIME (EST)
CHECK LOCAL LISTINGS
FOR TIMES IN YOUR AREA
6:00 TOP OF THE MORNING
12:00 NOONDAY NEWS
6:00 WORLD NEWS FOR TODAY
10:00 THE BEST LITTLE CALL-IN SHOW EVER
9:00 PLAYHOUSE MOVIE OF THE WEEK
1:30 AS YOUR LIFE TURNS MY WORLD AROUND
NOTE: Not all TV programs and product commercials are broadcast with Closed
Captioning (CC). Nor are all Closed Captioning MODEs (CAPTION 1Ð4 or TEXT
1Ð4) necessarily being used by broadcast stations during the transmission of a pro-
gram offering Closed Captioning. Refer to your areaÕs TV program listings for the
stations and times of shows being broadcast with Closed Captioning.
CAPTION Mode
Example Display
TEXT Mode Example Display -
The TV screen will be
blocked from viewing.
NOTE: The CC MUTE
option can be used to set the
TV to turn the CLOSED
CAPTIONING mode ON
whenever the MUTE button
is pressed.
You can press the CC
button on the remote
control to turn the CC
text ON or OFF.

9
SLEEP
TV/VCR ON/OFF POSITION FREEZE
INCR. SURR. SURF
SOUND PICTURE
MENU
CH
MUTE
SWAP
SOURCE CC CLOCK
ITR/REC HOME HOME PERSONAL
VIDEO MOVIES
PROGRAM LIST
OPEN/CLOSE
POWER
A/CH
PIP
M-LINK
VOL
STATUS/EXIT
OK
SOURCE
6
1
2
4
5
3
PICTURE
SOUND
FEATURES
INSTALL
TIMER
AutoLock
PIP
CLOSED CAP
FORMAT
FORMAT 4:3
FORMAT EXPAND 4:3
FORMAT COMPRESS 16:9
FEATURES
TIMER
AutoLock
PIP
CLOSED CAP
FORMAT
TIME
START TIME
STOP TIME
CHANNEL
ACTIVATE
FEATURES
AutoLock
PIP
CLOSED CAP
BLUE MUTE
FORMAT 4:3
FORMAT EXPAND 4:3
OR
FORMAT COMPRESS 16:9
OR
Y
ou can change the screen for-
mat size to match the type of
program youÕre watching. Select
the normal 4:3 aspect ratio or
expand the 4:3 aspect ratio to com-
pletely fill the screen. There also is
a compressed 16:9 aspect ratio,
which allows movies to be viewed
in their full width (known as letter-
box style).
Press the MENU button on
the remote control to show the on-
screen menu.
Press the CURSOR DOWN
button twice to highlight FEA-
TURES.
Press the CURSOR RIGHT
button and the menu will shift to
the left.
Press the CURSOR DOWN
button repeatedly until the FOR-
MAT control is highlighted.
Press the CURSOR RIGHT
button repeatedly to toggle among
the three screen format sizes Ð 4:3,
EXPAND 4:3, or COMPRESS
16:9.
Press the STATUS/EXIT but-
ton to remove the menu from the
screen.
SELECTING THE SCREEN FORMAT SIZE
SMART HELP
Without the onscreen
menu display showing, you
also can press the CURSOR UP or
CURSOR DOWN button on the
remote control to toggle among the
screen sizes 4:3, Expand 4:3, or
Compress 16:9.

10
SLEEP
TV/VCR ON/OFF POSITION FREEZE
INCR. SURR. SURF
SOUND PICTURE
MENU
CH
MUTE
SWAP
SOURCE CC CLOCK
ITR/REC HOME HOME PERSONAL
VIDEO MOVIES
PROGRAM LIST
OPEN/CLOSE
POWER
A/CH
PIP
M-LINK
VOL
STATUS/EXIT
OK
SOURCE
6
PICTURE
SOUND
FEATURES
INSTALL
TIMER
AutoLock
PIP
CLOSED CAP
FORMAT
FEATURES
TIMER
AutoLock
PIP
CLOSED CAP
FORMAT
TIME
START TIME
STOP TIME
CHANNEL
ACTIVATE
FEATURES
AutoLock
PIP
CLOSED CAP
FORMAT
BLUE MUTE OFF
FEATURES
AutoLock
PIP
CLOSED CAP
FORMAT
BLUE MUTE ON
OR
1
2
4
5
3
T
he Blue Mute feature will elimi-
nate annoying snow from the
screen when no video signal is pres-
ent by displaying a pleasant blue
screen. This occurs in cases such as
when a VCR tape is removed or an
antenna signal is broken. To turn the
Blue Mute feature ON or OFF, fol-
low the steps below.
Press the MENU button on
the remote control to show the on-
screen menu.
Press the CURSOR DOWN
button twice to highlight FEA-
TURES.
Press the CURSOR RIGHT
button and the menu will shift to
the left.
Press the CURSOR DOWN
button repeatedly until the BLUE
MUTE control is highlighted.
Press the CURSOR RIGHT
button repeatedly to toggle the
Blue Mute option ON or OFF.
Press the STATUS/EXIT but-
ton to remove the menu from the
screen.
ACTIVATING THE BLUE MUTE CONTROL
BLUE MUTE OFF
-with no video signal; screen
is snowing looking.
BLUE MUTE ON
-with no video signal; screen is
a pleasant blue color.

11
SLEEP
TV/VCR ON/OFF POSITION FREEZE
INCR. SURR. SURF
SOUND PICTURE
MENU
CH
MUTE
SWAP
SOURCE CC CLOCK
ITR/REC HOME HOME PERSONAL
VIDEO MOVIES
PROGRAM LIST
OPEN/CLOSE
POWER
A/CH
PIP
M-LINK
VOL
STATUS/EXIT
OK
SOURCE
2
SLEEP OFF
1
15 MIN
30 MIN
45 MIN
60 MIN
90 MIN
120 MIN
180 MIN
240 MIN
50 SEC
GOOD BYE
H
ave you ever fallen asleep in
front of the TV, only to have it
wake you up at two in the morning
with a test pattern sound screeching
in your ears? Well, your TV can
enable you to avoid that discomfort
by automatically turning itself off.
With the Sleep Timer feature, you
can set a timer to automatically
switch the TV OFF after a period
of time you choose (15-minute
increments up to 60 minutes, then
30-minute increments up to 90 min-
utes, then 60-minute increments up
to 240 minutes).
Press the SLEEP button on
the remote control. The SLEEP
timer onscreen display will appear
in the upper part of the screen.
Within five seconds, press the
SLEEP button repeatedly to pick
the amount of time (15-minute
increments up to 60 minutes, then
30-minute increments up to 90 min-
utes, then 60-minute increments up
to 240 minutes) before the TV will
turn itself off.
An onscreen countdown will appear
during the last minute before the
TV shuts itself off.
USING THE SLEEP TIMER
During the last minute of a
SLEEP timer setting, an onscreen
countdown will be displayed.
During the last 10 seconds of a
SLEEP timer setting, an onscreen
display will read GOOD BYE.
SMART HELP
To see how many min-
utes remain before the TV
shuts itself off, press the STA-
TUS/EXIT button.

12
SLEEP
TV/VCR ON/OFF POSITION FREEZE
INCR. SURR. SURF
SOUND PICTURE
MENU
CH
MUTE
SWAP
SOURCE CC CLOCK
ITR/REC HOME HOME PERSONAL
VIDEO MOVIES
PROGRAM LIST
OPEN/CLOSE
POWER
A/CH
PIP
M-LINK
VOL
STATUS/EXIT
OK
SOURCE
5
4
PICTURE
SOUND
FEATURES
INSTALL
TIMER
AutoLock
PIP
CLOSED CAP
FORMAT
3
1
2
10
FEATURES
7
TIMER
AutoLock
PIP
CLOSED CAP
FORMAT
TIME
START TIME
STOP TIME
CHANNEL
ACTIVATE
FEATURES
TIMER
TIME _ _:_ _ AM
START TIME
STOP TIME
CHANNEL
ACTIVATE
TIMER
TIME 10:30 AM
START TIME
STOP TIME
CHANNEL
ACTIVATE
TIMER
FEATURES
FEATURES
6
7
8
6
9
7
9
THE TIMER – SETTING THE CLOCK
TIME _ _:_ _ AM
START TIME
STOP TIME
CHANNEL
ACTIVATE
TIMER
FEATURES
CH
MUTE
SOURCE CC CLOCK
ITR/REC HOME HOME PERSONAL
VIDEO MOVIES
PROGRAM LIST
OPEN/CLOSE
STATUS/EXIT
OK
11
Y
our television comes with an on-
screen clock. During normal oper-
ation, the clock appears on the screen
when the STATUS/EXIT button is
pressed or if the TIMER DISPLAY
control is turned ON.
Press the MENU button on the
remote control to show the onscreen
menu.
Press the CURSOR DOWN but-
ton twice to highlight FEATURES.
Press the CURSOR RIGHT but-
ton and the menu will shift to the left.
TIMER will be highlighted.
With TIMER selected, press the
CURSOR RIGHT button again to
shift the display left and highlight the
TIME control.
Press the CURSOR RIGHT but-
ton again to highlight the time indica-
tor area.
Press the CURSOR LEFT or
CURSOR RIGHT button to select
the position or digit you wish to enter.
Press the CURSOR UP or CUR-
SOR DOWN button to select the
digits for the time. Or press the
NUMBERED buttons to enter the
correct time.
Press the CURSOR RIGHT but-
ton to move to the AM or PM posi-
tion.
Press the CURSOR UP or
DOWN button to set AM or PM.
Press the STATUS/EXIT button
to remove the menu from the screen.
SMART HELP
Remember, be sure to press
0 first and then the hour num-
ber for single-digit entries.
The Clock also can be set automati-
cally using the AutoChron
TM
feature
found on page 4 of the Quick Use
and Installation Guide that came
with your television.
The TVÕs clock settings may be lost
when the TV is unplugged (or when
AC power to the set is interrupted).
NOTE: The TIME (Clock) fea-
ture can be accessed directly by
pressing the CLOCK button on the
remote control, and then by simply
following steps 5 through 10 to
complete the task.
11
10

13
SLEEP
TV/VCR ON/OFF POSITION FREEZE
INCR. SURR. SURF
SOUND PICTURE
MENU
CH
MUTE
SWAP
SOURCE CC CLOCK
ITR/REC HOME HOME PERSONAL
VIDEO MOVIES
PROGRAM LIST
OPEN/CLOSE
POWER
A/CH
PIP
M-LINK
VOL
STATUS/EXIT
OK
SOURCE
5
4
PICTURE
SOUND
FEATURES
INSTALL
TIMER
AutoLock
PIP
CLOSED CAP
FORMAT
3
1
2
10
7
4
FEATURES
TIMER
AutoLock
PIP
CLOSED CAP
FORMAT
TIME
START TIME
STOP TIME
CHANNEL
ACTIVATE
TIMER
FEATURES
TIMER
FEATURES
TIME
START TIME _ _:_ _ AM
STOP TIME
CHANNEL
ACTIVATE
TIME _ _:_ _ AM
START TIME
STOP TIME
CHANNEL
ACTIVATE
TIMER
FEATURES
TIME
START TIME 10:30 AM
STOP TIME
CHANNEL
ACTIVATE
7
6
9
7
9
8
6
THE TIMER – SETTING THE START TIME
J
ust as you would an alarm clock,
you can set the TV to turn itself
ON once or at the same time every
day. Follow these steps to set the
Start Time.
Press the MENU button on the
remote control to show the
onscreen menu.
Press the CURSOR DOWN
button twice to highlight FEA-
TURES.
Press the CURSOR RIGHT
button and the menu will shift to
the left. TIMER will be highlighted.
Press the CURSOR RIGHT
button again to shift the display
left. Then press the CURSOR
DOWN button once to highlight
the START TIME control.
Press the CURSOR RIGHT
button again to highlight the time
indicator area.
Press the CURSOR RIGHT
or CURSOR LEFT button to
move among the positions where
the time is input.
Press the CURSOR UP or
CURSOR DOWN button to select
the digits for the time. Or press the
NUMBERED buttons to enter the
correct time.
Press the CURSOR RIGHT
button to move to the AM or PM
position.
Press the CURSOR UP or
DOWN button to set AM or PM.
Press the STATUS/EXIT but-
ton to remove the menu from the
screen.
10

14
SLEEP
TV/VCR ON/OFF POSITION FREEZE
INCR. SURR. SURF
SOUND PICTURE
MENU
CH
MUTE
SWAP
SOURCE CC CLOCK
ITR/REC HOME HOME PERSONAL
VIDEO MOVIES
PROGRAM LIST
OPEN/CLOSE
POWER
A/CH
PIP
M-LINK
VOL
STATUS/EXIT
OK
SOURCE
5
4
PICTURE
SOUND
FEATURES
INSTALL
TIMER
AutoLock
PIP
CLOSED CAP
FORMAT
3
1
2
10
7
4
FEATURES
TIMER
AutoLock
PIP
CLOSED CAP
FORMAT
TIME
START TIME
STOP TIME
CHANNEL
ACTIVATE
TIMER
FEATURES
TIMER
FEATURES
TIME
START TIME
STOP TIME _ _:_ _ AM
CHANNEL
ACTIVATE
TIME _ _:_ _ AM
START TIME
STOP TIME
CHANNEL
ACTIVATE
TIMER
FEATURES
TIME
START TIME
STOP TIME 10:30 AM
CHANNEL
ACTIVATE
6
7
8
6
9
7
9
THE TIMER – SETTING THE STOP TIME
U
se the START TIME control to
set the TV to turn itself ON
once or at the same time every day
(see page 13 for details). The fol-
lowing steps will guide you in set-
ting the TV to turn itself OFF once
or at the same time every day.
Press the MENU button on the
remote control to show the on-
screen menu.
Press the CURSOR DOWN
button twice to highlight FEA-
TURES.
Press the CURSOR RIGHT
button and the menu will shift to
the left. TIMER will be highlight-
ed.
Press the CURSOR RIGHT
button again to shift the display
left. Then press the CURSOR
DOWN button once twice to high-
light the STOP TIME control.
Press the CURSOR RIGHT
button again to highlight the time
indicator area.
Press the CURSOR RIGHT
or CURSOR LEFT button to
move among the positions where
the time is input.
Press the CURSOR UP or
CURSOR DOWN button to select
the digits for the time. Or press the
NUMBERED buttons to enter the
correct time.
Press the CURSOR RIGHT
button to move to the AM or PM
position.
Press the CURSOR UP or
DOWN button to set AM or PM.
Press the STATUS/EXIT but-
ton to remove the menu from the
screen.
10

15
6
SLEEP
TV/VCR ON/OFF POSITION FREEZE
INCR. SURR. SURF
SOUND PICTURE
MENU
CH
MUTE
SWAP
SOURCE CC CLOCK
ITR/REC HOME HOME PERSONAL
VIDEO MOVIES
PROGRAM LIST
OPEN/CLOSE
POWER
A/CH
PIP
M-LINK
VOL
STATUS/EXIT
OK
SOURCE
5
4
PICTURE
SOUND
FEATURES
INSTALL
TIMER
AutoLock
PIP
CLOSED CAP
FORMAT
3
1
2
7
6
4
FEATURES
TIMER
AutoLock
PIP
CLOSED CAP
FORMAT
TIME
START TIME
STOP TIME
CHANNEL
ACTIVATE
TIMER
FEATURES
TIMER
FEATURES
TIME
START TIME
STOP TIME
CHANNEL 12
ACTIVATE
TIME _ _:_ _ AM
START TIME
STOP TIME
CHANNEL
ACTIVATE
TIMER
FEATURES
TIME
START TIME 10:30 AM
STOP TIME
CHANNEL 12
ACTIVATE
Y
ou can select a specific channel
that the television will tune to
when the timer turns the set ON.
Follow these steps to select the
channel.
Press the MENU button on the
remote control to show the
onscreen menu.
Press the CURSOR DOWN
button twice to highlight FEA-
TURES.
Press the CURSOR RIGHT
button and the menu will shift to
the left. TIMER will be highlighted.
Press the CURSOR RIGHT
button again to shift the menu to
the left. Then press the CURSOR
DOWN button repeatedly until the
CHANNEL control is highlighted.
Press the CURSOR RIGHT
button again to highlight the chan-
nel indicator area.
Press the NUMBERED but-
tons to enter the desired start-up
channel. Or, press the CURSOR
RIGHT button to enter the start-up
channel you want.
Press the STATUS/EXIT but-
ton to remove the menu from the
screen.
THE TIMER – SELECTING THE CHANNEL

16
SLEEP
TV/VCR ON/OFF POSITION FREEZE
INCR. SURR. SURF
SOUND PICTURE
MENU
CH
MUTE
SWAP
SOURCE CC CLOCK
ITR/REC HOME HOME PERSONAL
VIDEO MOVIES
PROGRAM LIST
OPEN/CLOSE
POWER
A/CH
PIP
M-LINK
VOL
STATUS/EXIT
OK
SOURCE
5
4
PICTURE
SOUND
FEATURES
INSTALL
TIMER
AutoLock
PIP
CLOSED CAP
FORMAT
3
1
2
6
4
FEATURES
TIMER
AutoLock
PIP
CLOSED CAP
FORMAT
TIME
START TIME
STOP TIME
CHANNEL
ACTIVATE
TIMER
FEATURES
TIME _ _:_ _ AM
START TIME
STOP TIME
CHANNEL
ACTIVATE
TIMER
FEATURES
START TIME
STOP TIME
CHANNEL
ACTIVATE OFF
DISPLAY
ACTIVATE ONCE
OR
ACTIVATE DAILY
OR
A
fter you have set the Time, Start
Time, Stop Time, and Start
Channel, the timer must be set to
come on ONCE or DAILY, or
turned OFF through the ACTIVATE
control.
Press the MENU button on the
remote control to show the
onscreen menu.
Press the CURSOR DOWN
button twice to highlight FEA-
TURES.
Press the CURSOR RIGHT
button and the menu will shift to
the left. TIMER will be highlight-
ed.
Press the CURSOR RIGHT
button again to shift the display to
the left. Then press the CURSOR
DOWN button repeatedly until the
ACTIVATE control is highlighted.
Press the CURSOR RIGHT
button again to set ACTIVATE to
ONCE; press the CURSOR
RIGHT button again for DAILY;
and press the CURSOR RIGHT
button again to toggle ACTIVATE
to OFF.
Press the STATUS/EXIT but-
ton to remove the menu from the
screen.
THE TIMER – SETTING ACTIVATE TO ON OR OFF
SMART HELP
Remember, before set-
ting the TIMER controls,
the TVÕs clock must be set to the
correct time manually (see page
12) or by using the AutoChronª
feature described on page 4 of the
Quick Use and Installation Guide.
Try it! After following the steps on
pages 12Ð17, use your TV as an
alarm clock.

17
SLEEP
TV/VCR ON/OFF POSITION FREEZE
INCR. SURR. SURF
SOUND PICTURE
MENU
CH
MUTE
SWAP
SOURCE CC CLOCK
ITR/REC HOME HOME PERSONAL
VIDEO MOVIES
PROGRAM LIST
OPEN/CLOSE
POWER
A/CH
PIP
M-LINK
VOL
STATUS/EXIT
OK
SOURCE
5
4
PICTURE
SOUND
FEATURES
INSTALL
TIMER
AutoLock
PIP
CLOSED CAP
FORMAT
3
1
2
6
4
FEATURES
TIMER
AutoLock
PIP
CLOSED CAP
FORMAT
TIME
START TIME
STOP TIME
CHANNEL
ACTIVATE
TIMER
FEATURES
TIME _ _:_ _ AM
START TIME
STOP TIME
CHANNEL
ACTIVATE
TIMER
FEATURES
START TIME
STOP TIME
CHANNEL
ACTIVATE
DISPLAY ON
DISPLAY OFF
OR
5
A
fter the TVÕs clock has been set,
you can use your TV as a clock.
The TIMER DISPLAY control
allows you to permanently display
the time in the upper right corner
of the screen.
Press the MENU button on
the remote to show the onscreen
menu.
Press the CURSOR DOWN
button twice to highlight FEA-
TURES.
Press the CURSOR RIGHT
button and the menu will shift to
the left. TIMER will be highlighted.
Press the CURSOR RIGHT
button again to shift the menu left.
Then press the CURSOR DOWN
button repeatedly until the DIS-
PLAY control is highlighted.
Press the CURSOR RIGHT
or CURSOR LEFT button to turn
the TIMER DISPLAY ON or OFF.
Press the STATUS/EXIT but-
ton to remove the menu from the
screen.
THE TIMER – TURNING ON THE TIMER DISPLAY
SMART HELP
Remember, be sure you
have set the TVÕs clock with
the correct current time. (Refer to
page 12 to set the clock manually
or page 4 of the Quick Use and
Installation Guide to set the clock
automatically using the
AutoChronª feature.)

18
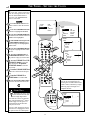
UNDERSTANDING AUTOLOCK™
MOVIE RATING
AutoLock
ON
G
PG
PG-13
R
NC-17
T
he AutoLock™ feature receives
and processes data sent by
broadcasters or other program
providers that contain program con-
tent advisories. When programmed
by the viewer, a TV with AutoLock™
can respond to the content advisories
and block program content that may
be found objectionable (such as
offensive language, violence, sexual
situations, etc.). This is a great fea-
ture to censor the type of program-
ming children may watch.
In the AutoLock™ section, you’ll
learn how to block channels and pro-
gramming that is not rated, is unrat-
ed, or has no rating. You will also
find out how to turn these blocking
features ON or OFF. Following are
brief explanations of some terms and
ratings related to the AutoLock™
feature.
AutoLock™ offers various
Blocking Options from which to
choose:
BLOCKING: The BLOCKING con-
trol is what can be thought of as the
Òmaster switchÓ for AutoLockª.
This control affects the settings you
have chosen for blocking programs
according to movie ratings or TV
ratings, or for blocking programs
that have no rating or are unrated.
When the BLOCKING control is
OFF, the blocking or censoring of
programs is disabled. When the
BLOCKING control is ON, blocking
will occur according to the settings
you have chosen.
BLOCK UNRATED: ALL unrated
programs will be blocked if this fea-
ture is set to ON.
UNRATED programming is encoded
with information from the MPAA
(Motion Picture Association of
America) or TV broadcasters, but it
does not have a specific rating. In
other words, the MPAA or the TV
broadcasters have chosen not to
assign a rating to the programming.
NO RATING: ALL programming
with no content advisory data can be
blocked if NO RATING is set to
ON.
Programming that has No Rating is
not encoded with any rating infor-
mation from the MPAA or the
Parental Guidelines. Any program-
ming could fall into this category.
You also can block individual
channels or block programming
based on ratings of the MPAA and
TV broadcasters. (See a description
of the ratings on this page.)
G: General Audience - All ages admitted.
Most parents would find this program-
ming suitable for all ages. This type of
programming contains little or no vio-
lence, no strong language, and little or no
sexual dialogue or sexual situations.
PG: Parental Guidance Suggested -
This
programming contains material that parents
may find unsuitable for younger children. It
may contain one or more of the following:
Moderate violence, some sexual situations,
infrequent coarse language, or some sugges-
tive dialogue.
PG-13: Parents Strongly Cautioned - This
programming contains material that parents
may find unsuitable for children under the
age of 13. It contains one or more of the
following: violence, sexual situations,
coarse language, or suggestive dialogue.
R: Restricted -This programming is specifi-
cally designed for adults. Anyone under the
age of 17 should view this programming
only with an accompanying parent or adult
guardian. It contains one or more of the fol-
lowing: intense violence; intense sexual sit-
uations; strong, coarse language; or intense-
ly suggestive dialogue.
NC-17: No one under the age of 17 will be
admitted. - This type of programming
should be viewed by adults only. It contains
graphic violence; explicit sex; or crude,
indecent language.
X: Adults Only - This type of programming
contains one or more of the following: very
graphic violence, very graphic and explicit
or indecent sexual acts, very coarse and
intensely suggestive language.
MOVIE RATINGS
(M
OTION
P
ICTURE
A
SSOCIATION OF
A
MERICA
)
TV-Y: (All children -- This program
is designed to be appropriate for all
children.) Designed for a very young
audience, including children ages 2-6. This
type of programming is not expected to
frighten younger children.
TV-Y7: (Directed to Older
Children -- This program is designed
for children ages 7 and above.) It
may be more appropriate for children who
have acquired the development skills needed
to distinguish between make-believe and
reality. This programming may include mild
fantasy and comic violence (FV).
TV-G: (General Audience -- Most
parents would find this program suit-
able for all ages.) This type of pro-
gramming contains little or no violence, no
strong language, and little or no sexual dia-
logue or sexual situations.
TV-PG: (Parental Guidance
Suggested -- This program contains
material that parents may find unsuit-
able for younger children.) This type of pro-
gramming contains one or more of the fol-
lowing: Moderate violence (V), some sexual
situations (S), infrequent coarse language
(L), or some suggestive dialogue (D).
TV-14: (Parents Strongly
Cautioned -- This program contains
some material that many parents
would find unsuitable for children under 14
years of age.) This type of programming
contains one or more of the following:
intense violence (V); intense sexual situa-
tions (S); strong, coarse language (L); or
intensely suggestive dialogue (D).
TV-MA: (Mature Audience Only --
This program is specifically designed
to be viewed by adults and therefore
may be unsuitable for children under 17.)
This type of programming contains one or
more of the following: graphic violence (V);
explicit sexual situations (S); or crude, inde-
cent language (L).
TV PARENTAL GUIDELINES
(TV BROADCASTERS)
TV
G
TV
PG
TV
Y
TV
Y7
TV
14
TV
MA
TV RATING
AutoLock
ON
TV-Y
TV-Y7
TV-G
TV-PG
TV-14

19
SLEEP
TV/VCR ON/OFF POSITION FREEZE
INCR. SURR. SURF
SOUND PICTURE
MENU
CH
MUTE
SWAP
SOURCE CC CLOCK
ITR/REC HOME HOME PERSONAL
VIDEO MOVIES
PROGRAM LIST
OPEN/CLOSE
POWER
A/CH
PIP
M-LINK
VOL
STATUS/EXIT
OK
SOURCE
4
PICTURE
SOUND
FEATURES
INSTALL
TIMER
AutoLock
PIP
CLOSED CAP
FORMAT
OPEN/CLOSE
TUNER A/B
3
1
2
9
TIMER
AutoLock
PIP
CLOSED CAP
FORMAT
FEATURES
TIMER
AutoLock
PIP
CLOSED CAP
FORMAT
FEATURES
TIME
START TIME
STOP TIME
CHANNEL
ACTIVATE
ACCESS CODE
- - - -
TIMER
AutoLock
PIP
CLOSED CAP
FORMAT
FEATURES
ACCESS CODE
- - - -
TIMER
AutoLock
PIP
CLOSED CAP
FORMAT
FEATURES
ACCESS CODE
X X X X
TIMER
AutoLock
PIP
CLOSED CAP
FORMAT
FEATURES
ACCESS CODE
X X X X
INCORRECT
TIMER
AutoLock
PIP
CLOSED CAP
FORMAT
FEATURES
ACCESS CODE
- - - -
TIMER
AutoLock
PIP
CLOSED CAP
FORMAT
FEATURES
ACCESS CODE
X X X X
TIMER
AutoLock
PIP
CLOSED CAP
FORMAT
FEATURES
ENTER
NEW CODE
- - - -
TIMER
AutoLock
PIP
CLOSED CAP
FORMAT
FEATURES
ENTER
NEW CODE
X X X X
TIMER
AutoLock
PIP
CLOSED CAP
FORMAT
FEATURES
CONFIRM
CODE
- - - -
TIMER
AutoLock
PIP
CLOSED CAP
FORMAT
FEATURES
CONFIRM
CODE
X X X X
TIMER
AutoLock
PIP
CLOSED CAP
FORMAT
FEATURES
CONFIRM
CODE
X X X X
CORRECT
TIMER
AutoLock
PIP
CLOSED CAP
FORMAT
FEATURES
ACCESS CODE
- - - -
3
8
7
5
6
AUTOLOCK™ – SETTING UP THE ACCESS CODE
NOTE TO PARENTS:
It isnÕt possible for
your child to unblock a
channel without know-
ing your access code or
changing it to a new
one. If your code has
been changed without
your knowledge, then
you will become aware
that blocked channels
may have been viewed.
A
utoLock
TM
allows parents to
block out or ÒcensorÓ any
channels they think children should
not watch. A channel blocked by
the AutoLock
TM
control cannot be
viewed until a correct access code
is used to unlock the channel for
viewing. First, letÕs set your
AutoLock access code.
Press the MENU button on
the remote control to show the
onscreen menu.
Press the CURSOR DOWN
button twice to highlight FEA-
TURES.
Press the CURSOR RIGHT
button and the menu will shift to
the left. Then press the CURSOR
DOWN button once to highlight
the AutoLock control.
Press the CURSOR RIGHT
button to highlight ACCESS
CODE.
Press 0,7,1,1 on the remote
control. INCORRECT will appear
on the screen.
Press 0,7,1,1 on the remote con-
trol again. ENTER NEW CODE
will appear on the screen.
Enter a new four-digit code
using the number buttons. CON-
FIRM CODE will appear on the
screen.
Enter your new four-digit
code again. CORRECT will flash
on the screen briefly and the high-
light bar goes back to AutoLock.
Press the STATUS/EXIT but-
ton to remove the menu from the
screen.
Remember that 0711 is the default
AutoLock
TM
code. If your access code has
been changed by someone other than you
(a child, for example) or you have forgot-
ten the code, you can always get in by
inputting the default code.

20
SLEEP
TV/VCR ON/OFF POSITION FREEZE
INCR. SURR. SURF
SOUND PICTURE
MENU
CH
MUTE
SWAP
SOURCE CC CLOCK
ITR/REC HOME HOME PERSONAL
VIDEO MOVIES
PROGRAM LIST
OPEN/CLOSE
POWER
A/CH
PIP
M-LINK
VOL
STATUS/EXIT
OK
SOURCE
4
PICTURE
SOUND
FEATURES
INSTALL
TIMER
AutoLock
PIP
CLOSED CAP
FORMAT
3
1
2
9
TIMER
AutoLock
PIP
CLOSED CAP
FORMAT
FEATURES
TIMER
AutoLock
PIP
CLOSED CAP
FORMAT
FEATURES
TIME
START TIME
STOP TIME
CHANNEL
ACTIVATE
ACCESS CODE
- - - -
TIMER
AutoLock
PIP
CLOSED CAP
FORMAT
FEATURES
ACCESS CODE
- - - -
TIMER
AutoLock
PIP
CLOSED CAP
FORMAT
FEATURES
ACCESS CODE
X X X X
3
8
5
6
AutoLock
FEATURES
BLOCK CHANNEL
SETUP CODE
CLEAR ALL
MOVIE RATING
TV RATING
AV2
AV3
ALL
1
2
AutoLock
FEATURES
BLOCK CHANNEL
SETUP CODE
CLEAR ALL
MOVIE RATING
TV RATING
12
13
14
15
16
AutoLock
FEATURES
BLOCK CHANNEL
SETUP CODE
CLEAR ALL
MOVIE RATING
TV RATING
12
13
14
15
16
7
7
AutoLock
AV2
AV3
ALL
1
2
FEATURES
BLOCK CHANNEL
SETUP CODE
CLEAR ALL
MOVIE RATING
TV RATING
AutoLock
FEATURES
BLOCK CHANNEL
SETUP CODE
CLEAR ALL
MOVIE RATING
TV RATING
AV2
AV3
ALL
1
2
Channel 12
Blocked by AutoLock
TV rating TV-PG
Access Code
- - - -
AUTOLOCK™ – BLOCKING CHANNELS
NOTE: You also can block out the use of the A/V external inputs on the rear of the TV. This stops the viewing of VCR, DVD, and other sources that can be
shown through the A/V input jacks. Select AV1, AV2, or AV3 and then select BLOCK.
A
fter your personal access code
has been set (see the previous
page), you are ready to select the
channels or inputs you want to
block out or censor.
Press the MENU button on
the remote control to show the
onscreen menu.
Press the CURSOR DOWN
button twice to highlight FEA-
TURES.
Press the CURSOR RIGHT
button and the menu will shift to
the left. Then press the CURSOR
DOWN button once to highlight
the AutoLockª control.
Press the CURSOR RIGHT
button again to highlight ACCESS
CODE.
Enter your four-digit
ACCESS CODE. CORRECT will
flash very briefly and the menu will
move to the left with BLOCK
CHANNEL highlighted.
Press the CURSOR RIGHT
button to highlight the TVÕs avail-
able channels.
Press the CURSOR UP or
CURSOR DOWN button to high-
light the channel you want to block.
Press the CURSOR RIGHT
button to block the channel. A
padlock image appears to the right
of the channel number.
Repeat steps 7 and 8 for any chan-
nels you want to block from view-
ing.
Press the STATUS/EXIT but-
ton to remove the menu from the
screen.
NOTE: Blocked
channels will be
skipped when you
press the Channel
+/Ð buttons. To
view a blocked
channel, refer to
page 28 for details.
If a channel is blocked by the
BLOCK CHANNEL option, the
TV will display the screen shown
to the right. To watch the channel,
enter your access code or change
the BLOCK CHANNEL option
back to off.
Page is loading ...
Page is loading ...
Page is loading ...
Page is loading ...
Page is loading ...
Page is loading ...
Page is loading ...
Page is loading ...
Page is loading ...
Page is loading ...
Page is loading ...
Page is loading ...
Page is loading ...
Page is loading ...
Page is loading ...
Page is loading ...
Page is loading ...
Page is loading ...
Page is loading ...
Page is loading ...
Page is loading ...
Page is loading ...
Page is loading ...
Page is loading ...
Page is loading ...
Page is loading ...
Page is loading ...
Page is loading ...
Page is loading ...
Page is loading ...
Page is loading ...
Page is loading ...
-
 1
1
-
 2
2
-
 3
3
-
 4
4
-
 5
5
-
 6
6
-
 7
7
-
 8
8
-
 9
9
-
 10
10
-
 11
11
-
 12
12
-
 13
13
-
 14
14
-
 15
15
-
 16
16
-
 17
17
-
 18
18
-
 19
19
-
 20
20
-
 21
21
-
 22
22
-
 23
23
-
 24
24
-
 25
25
-
 26
26
-
 27
27
-
 28
28
-
 29
29
-
 30
30
-
 31
31
-
 32
32
-
 33
33
-
 34
34
-
 35
35
-
 36
36
-
 37
37
-
 38
38
-
 39
39
-
 40
40
-
 41
41
-
 42
42
-
 43
43
-
 44
44
-
 45
45
-
 46
46
-
 47
47
-
 48
48
-
 49
49
-
 50
50
-
 51
51
-
 52
52


Philips Switch 3121 235 20301 User manual
- Category
- AV receivers
- Type
- User manual
- This manual is also suitable for
Ask a question and I''ll find the answer in the document
Finding information in a document is now easier with AI
Related papers
-
Philips 32PT81S1 User manual
-
-
-
-
-
-
-
Philips 26PF5320/78 User manual
-
-
Other documents
-
 Norcent LT-2021 Operating instructions
-
Magnavox 20MT4405 User manual
-
Haier HTF27R11 - 09-01 User manual
-
-
-
-
-
-
-
