HP Scitex FB500 Industrial Printer User guide
- Category
- Large format printers
- Type
- User guide
This manual is also suitable for

HP Scitex FB500 Printer
HP Scitex FB700 Printer
Rigid Media Guide

HP Scitex FB500/FB700 Rigid Media Guide November 2010 Page 2
© 2010 Hewlett-Packard Development
Company, L.P.
The information contained herein is subject
to change without notice. The only
warranties for HP products and services are
set forth in the express warranty statements
accompanying such products and services.
Nothing herein should be construed as
constituting an additional warranty. HP shall
not be liable for technical or editorial errors
or omissions contained herein.
Brand names contained herein are trademarks
of their respective companies.
TN2794 Revision A – November 4, 2010

HP Scitex FB500/FB700 Rigid Media Guide November 2010 Page 3
Table of Contents
Table of Contents ................................................................................................................................................. 3
Introduction........................................................................................................................................................... 4
Print Mode Considerations ................................................................................................................................... 4
Media Wizard Settings ......................................................................................................................................... 5
Non-white media .................................................................................................................................................. 5
Media Measurement Options ............................................................................................................................... 6
Edge-to-Edge Printing .......................................................................................................................................... 6
Overprinting .................................................................................................................................................... 7
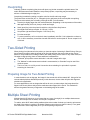
Two-Sided Printing ............................................................................................................................................... 7
Preparing Image for Two-Sided Printing......................................................................................................... 7
Multiple Sheet Printing ......................................................................................................................................... 7
Rigid Media Guidelines ........................................................................................................................................ 8
Rigid Media Properties ......................................................................................................................................... 9
Static Electricity .................................................................................................................................................... 9
Reflective Media................................................................................................................................................. 10
Rigid Media Details ............................................................................................................................................ 11
Acrylic Sheet ................................................................................................................................................. 11
Aluminum Composite.................................................................................................................................... 12
Compressed Cardboard / Cardstock ............................................................................................................ 13
Corrugated Cardboard .................................................................................................................................. 14
Corrugated Plastic ........................................................................................................................................ 15
Foam Board .................................................................................................................................................. 16
Foam PVC .................................................................................................................................................... 17
Glass............................................................................................................................................................. 18
Plywood ........................................................................................................................................................ 19
Polycarbonate Sheet..................................................................................................................................... 20
Polystyrene Sheet......................................................................................................................................... 21
Polystyrene Foam Board .............................................................................................................................. 22
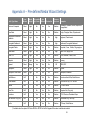
Appendix A – Pre-defined Media Wizard Settings ............................................................................................. 23
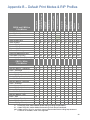
Appendix B – Default Print Modes & RIP Profiles .............................................................................................. 24

HP Scitex FB500/FB700 Rigid Media Guide November 2010 Page 4
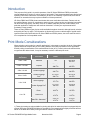
Introduction
This purpose of this guide is to provide operators of the HP Scitex FB500 and FB700 printers with
recommendations for printing on various types of rigid media. These recommendations provide the best
operating instructions under most circumstances, yet due to the variability of print media, there will be
situations or scenarios that may require modification of these procedures.
HP Scitex FB500 and FB700 printers work better with some media than with others. Factors such as
the media’s flatness, texture or smoothness, reaction to heat, surface tension and chemical composition
can affect the image quality, the ability of the ink to adhere adequately and the overall usability for a
particular application. Always test new media to determine if it meets your requirements before
purchasing a large quantity.
There are many different types of print media available throughout the world, although brands, selection
and quality will vary by region. The information in this document covers a broad range of typical media
types that have been tested with the HP Scitex FB500 and FB700 printers, but at the same time this is
not a complete list of all compatible media.
Print Mode Considerations
When selecting a print mode for a specific application it is important to consider; the level of throughput
(speed) desired to complete the job, the viewing distance and quality expectation for the application,
and the printing characteristics of the media selected for the job. If a certain print mode selected does
not generate the desired result, it may be necessary to select a different print mode.
Viewing dista
nce /
Application
Print mode FB500 FB700
> 30m / 100ft Billboard n/a
80.0 m
2
/h
861 ft
2
/h
5-30m / 16-100ft Express
37.0 m
2
/h
398 ft
2
/h
42.2 m
2
/h
455 ft
2
/h
3-5m / 10-16ft Outdoor Signage
29.6 m
2
/h
319 ft
2
/h
34.0 m
2
/h
366 ft
2
/h
2-3m / 6-10ft
Outdoor Signage
Plus
1
21.3 m
2
/h
229 ft
2
/h
24.3 m
2
/h
261 ft
2
/h
1-2m / 3-6ft
Indoor Signage
1
16.4 m
2
/h
177 ft
2
/h
18.8 m
2
/h
202 ft
2
/h
Indoor Signage Plus
1
11.1 m
2
/h
120 ft
2
/h
12.8 m
2
/h
138 ft
2
/h
<1m / 3ft
Photo
1
8.6 m
2
/h
93 ft
2
/h
9.9 m
2
/h
107 ft
2
/h
Photo Plus
4.4 m
2
/h
47 ft
2
/h
5.0 m
2
/h
54 ft
2
/h
Max DPI - Saturated
1
4.4 m
2
/h
47 ft
2
/h
5.0 m
2
/h
54 ft
2
/h
1) These print modes are also available for printing with white ink when the printer is equipped with the
optional HP Scitex FB500/FB700 White Ink Upgrade Kit. Print speeds will be slightly less than half that
shown in the table above when printing a white ink overflood or underflood.

HP Scitex FB500/FB700 Rigid Media Guide November 2010 Page 5
Billboard print mode (FB700 only) – For the sake of this guide, the primary purpose of Billboard print
mode is for creating drafts or proof prints. In certain instances it may be used to produce sellable output
as long as the buyer and seller understand that the viewable distance for output generated in Billboard
Print Mode is greater than 100 feet (30 m). Billboard Print Mode does not utilize the printer’s jet
mapping feature, therefore, any missing or misfiring jets reported or detected using the manual or
automatic calibrations will not be substituted with known working jets.
Print resolution – The print modes, Billboard, Express, Outdoor Signage and Outdoor Signage Plus,
are printed at a resolution of 600x300-dpi. A tradeoff of printing at this resolution is a slightly reduced
color gamut when compared with 600x600-dpi print modes. Indoor Signage, Indoor Signage Plus,
Photo and Photo Plus print modes use a resolution of 600x600-dpi. The Max DPI print mode prints at
1200x600-dpi.
Gloss / Matte adjustment – The printer is able to adjust how the ink cures to cause it to have a slightly
glossy or matte appearance. For matte, both the leading and trailing UV lamps are open during travel of
the printhead carriage assembly in either direction. The trailing lamp will begin to cure the ink droplets
immediately after being jetted onto the media. For a glossier appearance, the trailing lamp is shuttered
during travel in either direction, thereby allowing the ink droplets to spread out slightly before the leading
lamp on the following pass begins the curing process.
By default, the print modes; Billboard, Express, Outdoor Signage, Outdoor Signage Plus and Indoor
Signage use the matte setting (trailing lamp unshuttered), and the print modes; Indoor Signage Plus,
Photo, Photo Plus and Max DPI use the gloss setting (trailing lamp shuttered). Two exceptions to this
are when the printer is configured to use Foamed PVC media or when printing with white ink. In either
of these cases, all print modes use the matte setting. See Appendix B for more detail.
It is possible to control the trailing lamp outside the default modes mentioned above by creating a
custom media type in Media Wizard. Note, however, due to the increased curing energy needed, it is
recommended to never shutter the trailing lamp when printing with white ink.
Due to the variation in dot gain from matte to gloss, it may be beneficial to use a matching color profile
on the RIP. Onyx software provides an extensive set of gloss and matte profiles. For other RIP
software, it may be desirable to create a custom profile.
Media Wizard Settings
HP Scitex FB500 and FB700 printers have a pre-defined set of common media types stored in the
Media Wizard along with the printing parameters tested and determined to be work best in most
applications. A list of the pre-defined media and their parameters can be found in Appendix A of this
document.
While the printing parameters for these pre-defined media types cannot be changed, it is possible to
create a copy, rename it and change the parameters using the printer’s Media Wizard. Refer to the HP
Scitex FB500/FB700 User Guide for details.
When creating a new media type, choose a media type that best matches the characteristics and
change the desired printing parameters. Also, to eliminate Media Mismatch errors, consider creating a
copy of the media profile in the RIP and renaming it to match the name of the new custom media type.
Non-white media
The printer uses a camera on the printhead carriage assembly to detect the placement and size of the
media. This camera works best on white or near-white media that provides a strong contrast between it
and the transport belt. When using clear or colored media, select or create a media type from the Media
Wizard that has the attribute, Detectable by Printer, set to off. When loading the media, it will be
necessary to enter the location of the left (user side) and right (service side) edges of the media
according to the Media Measurement Option selection.

HP Scitex FB500/FB700 Rigid Media Guide November 2010 Page 6
Media Measurement Options
The printer has a camera onboard the carriage that can automatically measure the media. You can
choose various levels of precision for finding right, left and leading edges of the media. This option is
set on the printer’s control panel under “Printing -> Options -> Measure Media”.
First, the printer prompts you to select a measurement frequency (trade-off between precision and
speed):
Measure only on first load — measure only once, after you configure the media; best for fast
throughput when precise image placement is not required or when using the media alignment pins
Measure on all loads — best for precise image placement, such as for N-UP and edge-to-edge
printing
Don’t measure media — best for fast throughput when precise image placement is not required
and there are very wide margins around the image
After you select one of these options, the printer prompts you to select a measurement type:
Maximal — measures the width of the media in 5 places, and finds the right and left front edges to
estimate skew and detect non-square sheets. This adds a few additional seconds to the media
load process but facilitates the most accurate media placement.
Standard — measures the width of the media once, and finds the right and left front edges to
estimate skew. This is the default setting and is recommended for most applications.
One Edge — measures the user- and service-end edges on the first sheet, user-end edge only on
subsequent sheets, and the front right edge (no skew detection). For single-sheet jobs only, not
available for multi-sheet N-UP. Works best on jobs with wider margins.
Minimal — measures the width of the media once, and finds the front right edge only. This method
is fastest but does not provide any feedback regarding possible media skew.
Choose Minimal for fastest throughput, Maximal for greatest precision and skew detection when printing
edge-to-edge.
When configuring a media that is transparent, reflective or colored, use the appropriate media type with
“Detectable by Printer” set to “No”. This bypasses the automatic media detection and measurement and
the printer will prompt you to enter to coordinates of the right and left edges of the media.
Edge-to-Edge Printing
Edge-to-Edge printing is automatically enabled when the left, right top and bottom margins are set to
zero and a job is sent to print that is the same width and height as the media loaded.
The procedures for loading media for Edge-to-Edge printing are the same for any other media, but the
additional considerations should be made:
“Centered” print position should be used. The Print Position is set on the printer’s control panel
under “Printing -> Options -> Print Position and Eject Settings”.
The “Maximal” media measurement method is recommended, or “Standard” may be used if the
media is square.
With the Standard or Maximal media measurement method, the printer will detect if the media is loaded
askew and give the option to reload or use as is.

HP Scitex FB500/FB700 Rigid Media Guide November 2010 Page 7
Overprinting
Ordinarily (without overprinting) the printer will reject any job that exceeds the printable area of the
media. Because some media sheets are not precisely square, overprinting may be necessary to
achieve a full-bleed edge-to-edge print.
Overprinting is enabled by setting a negative value for the left and/or top margin.
The printer does not alter the job; i.e., enlarge the job or add extra pixels to accomplish overprinting.
The job must be resized prior to sending it through the RIP. For best results:
Size the job slightly larger than the media dimensions. Depending on the squareness of the media,
add approximately 0.25 inch (6 mm) to width and length.
Send (spool) the job to the printer’s hard drive using the Save Only feature.
Set negative left and top margins: -0.125 inch (-3 mm).
Set positive right and bottom margins: 0.125 inch (3 mm).
Print the stored job.
To prevent a build-up of ink on the belt, clean immediately with IPA. If ink is allowed to continue to
cure, it will be necessary to soak the area with IPA before it can be wiped off. Do not scrape ink off
of the belt.
Two-Sided Printing
When printing from jobs stored in the printer you have the option of selecting 2-Sided Printing, Doing so,
the printer will prompt to select the stored job for first side and then the second side as they can be
different. The procedures for loading media for two-sided printing are the same for any other media, but
like edge-to-edge printing, there are these additional considerations:
“Centered” print position centers both side 1 and side 2 images left to right.
The “Maximal” media measurement method is recommended, or “Standard” may be used if the
media is square.
The ink on side 1 is not fully cured. Use caution when reloading it to print side 2 to prevent
scratching ink from side 1.
Preparing Image for Two-Sided Printing
In most situations, such as signage, the image for the second side will be rotated 180°. Using all of the
recommended practices described previously in this document, the two sides will print with alignment
suitable to the application.
For some applications, such as images that will be die-cut to a custom shape, the image should be
flipped in the X-axis (side to side) and the media sheet also flipped in the X-axis. This method will
achieve the greatest accuracy of alignment on the leading edge of the media.
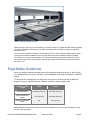
Multiple Sheet Printing
Multiple-sheet N-UP allows you to print more than one copy of a single job on multiple sheets across
the belt, and multiple rows of sheets, until the job is completed.
To enable, select N-UP when loading media and have the number of sheets you intend to print across
the width of the printer in position to be loaded. Sheets must not be more than 3 inches (7.6 cm) apart
from each other. Use the alignment pins if you will be printing multiple rows.

HP Scitex FB500/FB700 Rigid Media Guide November 2010 Page 8
Figure 1: Multiple Sheet Printing
When selecting a job to print, set the quantity to a number equal to or greater than the number of sheets
you loaded. The printer will prompt you to load more sheets until the number of copies you specified
has been printed.
You can print any number of copies in a multi-sheet N-UP job, even if the total number does not divide
evenly into the number of sheets per row. Only the last row may have a different number of sheets.
For example: in a twenty-sheet job where you fit three sheets across, the printer will print six rows of
three sheets, plus one row of two sheets. Load the last row with the sheets from the user end toward
the service end.
Rigid Media Guidelines
Never use sheets of media that exceeds the maximum published weight specification of 150 lb (68 kg).
For materials between 50-150 lbs. (22-68 kg), choose Heavy when selecting media weight in the Media
Wizard.
To reduce the risk of damage due to a head strike, do not print on media longer than the tables are
designed to support. Optional Extension Tables are available to support longer media.
Maximum media
length
FB500 FB700
Standard tables 48 inches (122 cm) 48 inches (122 cm)
Optional extension
tables
120” (305 cm) 80 inches (203 cm)
Two sets of extension
tables
n/a 120” (305 cm)
Media tables should be leveled such that the tops of the table rollers are level and coplanar to the flat
surface of the media belt.

HP Scitex FB500/FB700 Rigid Media Guide November 2010 Page 9
Ensure that the tables are latched securely to the printer to establish a proper grounding path for any
residual static build up on the media.
Print speed may need to be adjusted when using certain materials that deform when subjected to
sustained heat (e.g. polystyrene-face foam board). In these cases it may require some combination of a
higher vacuum setting, faster print mode, higher than standard head height and the addition of a printing
delay (Printer/Options/Print Delay) to achieve the best results.
Rigid Media Properties
Store media flat, in a clean environment with the same or similar temperature and humidity as the
printer.
For best results, individual sheets of media should be flat. Curves in either axis of the media (left to
right, or front to back) can lead to head strikes of the carriage on the media. Accuracy of dot
placement or overall feed accuracy can also be affected by non-flat media.
For best results, media should have parallel opposite edges with 90° corners. Media that is not
square with itself will require extra attention when loading.
Both sides of the material should be clean and dry.
Some substrates may have a surface coating. Certain coatings may cause ink to pool and cure
unevenly, yielding poor image quality. Be sure to test coated materials for compatibility before
purchasing significant quantities.
Use caution to avoid substrates with bent or damaged edges on the material, especially metal
composite and corrugated materials. In addition to the risk of damage due to a head strike, they
may create drag or vacuum loss that results in media feed errors or skew.
Warped or bowed media that the vacuum belt system is unable to hold flat against the belt will
require the media hold down rollers to be employed in conjunction with Warped Media Mode.
Although this reduces the effective print area of the sheet of media, it reduces the risk of damage
due to a head strike
Static Electricity
Static electricity is often a problem when working with synthetic materials. These materials are often
nonconductive, so static charges cannot dissipate on their own. Besides minor personal discomfort from
static shocks, static attracts foreign particles to the media surface that prevent ink from adhering to the
media surface. Static can also attract ink droplets to areas of the media surface that were supposed to
remain unprinted. Low humidity levels in the printer and media storage environment can exacerbate the
issue.
A number of active and passive methods can be employed to minimize static:
Maintain a relative humidity level of 40-60% in both the printer and media storage areas.
Clean the static elimination ionizer bar every 3 months according to the instructions in the
HP Scitex FB500/FB700 User Guide.
Drape a conductive material such as copper tinsel over the media stacks and attach it to a
grounding point. This will help discharge the static from each sheet as it is removed from the stack.
Wipe down the media surface prior to printing with isopropyl alcohol (IPA) that has a concentration
of 90% or greater. This will remove any foreign particles that were attracted to the media by static.
For extreme static problems, careful use of an antistatic spray may be warranted. Some examples
are K2r Static Stopper and Alberto-Culver Static Guard. Lightly spray on, but do not allow it to pool
on the media. Note that the ink-adhesion properties of some media may be negatively affected by
the spray, so use the minimum amount necessary to achieve results. Adhesion decreases
approximately 10% and typically occurs on media that already has poor adhesion properties
without the spray.

10
Reflective Media
When printing on reflective media, such as polished metal or mirror, additional preparation and
maintenance procedures are necessary to minimize UV light being reflected back to the printhead
nozzles where it could cure ink, plugging the nozzles.
Set the Auto Purge & Wipe Interval to Between Each Job. (Ink -> Maintenance -> Auto Purge &
Wipe Interval)
On flat, well behaved materials such as glass mirror, lower the printhead height to its minimum
0.065 inch (1.6 mm) value. (Printing -> Options -> Head Height off Media) Remember to change
this back to the nominal value of 0.085 inch (2.2 mm) when done printing on reflective media.
Mask off any areas of the media surface that will not be imaged.
Perform a manual cleaning of the printhead orifice plates at the end of each day that reflective
materials are being printed.

11
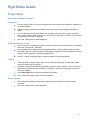
Rigid Media Details
Acrylic Sheet
Brand name example: Plexiglas
®
Preparation
Peel the protective film off one side, leaving the other side protected until finishing or installation of
the finished graphic.
Wipe the printing surface with an anti-static tack cloth to remove static charge and any dust or
debris.
If an anti-static tack cloth is not available, 90% or higher IPA on a lint-free cloth can be used to
remove dust or debris. Allow the sheet to sit out on the input table about 5 minutes to allow the IPA
to evaporate and the static to dissipate.
Use clean, cotton gloves to avoid fingerprints.
Recommended print modes
Photo or Photo Plus for applications where it will be viewed from the printed surface. For increased
saturation, use Max DPI – Saturated.
Indoor Signage Plus or higher quality for applications where it will be viewed through the media
and either a white ink overflood is used or white backer is applied over the printed surface. Flip the
image in the RIP software for view-through applications.
Max DPI – Backlit, using either Spot or Overflood modes, for backlit applications.
Printing
These materials are heavy in larger sizes. Do not exceed 150 lb (68 kg). Use the Heavy media
setting for sheets over 50 lb (22 kg).
Depending on end-use application, ink adhesion may be an issue. In addition, white ink overflood
applications may develop small localized loss of adhesion. Use of an acrylic primer can improve
overall ink adhesion.
Select Clear Sheet when configuring and loading this media.
Use a Clear Sheet media profile from the RIP software.
Output handling
Use caution when loading or lifting sheets off the table as the media and ink can be easily
scratched.
Use clean, cotton gloves to avoid fingerprints.

12
Aluminum Composite
Brand name examples: Alumacore
™
, Alumalite
®
, Dibond
®
, Graphic-AL
™
, Omega-Bond
™
Preparation
Peel the protective film off one side, leaving the other side protected until finishing or installation of
the finished graphic.
Wipe the printing surface with an anti-static tack cloth to remove static charge and any dust or
debris.
If an anti-static tack cloth is not available, 90% or higher IPA on a lint-free cloth can be used to
remove dust or debris. Allow the sheet to sit out on the input table about 5 minutes to allow the IPA
to evaporate and the static to dissipate.
Ensure the media is flat and there are no damaged corners, edges or ends.
Recommended print modes
Indoor Signage Plus, Photo or Photo Plus print modes. For increased saturation, use Max DPI –
Saturated.
Printing
Select Aluminum Composite when configuring and loading this media.
Media placement detection is disabled when using this media type. When loading the media, it is
necessary to enter the location of the left (user side) and right (service side) edges of the media
according to the Media Measurement Option selection.
If the edges are bent, they should be flattened before imaging. A head height higher than the
standard 0.085 inches (2.2 mm) may be necessary to avoid damaged or bowed edges that will
interfere with the path of the carriage.
Use an Aluminum Composite media profile from the RIP software.
For increased saturation on non-white or brushed aluminum surfaces, use the RIP software’s
Saturated Rendering Intent option or select a Max DPI print mode.
Output handling
Use caution when loading or lifting sheets off the table as the media and ink can be easily
scratched.
Known incompatibility
Avoid using aluminum composite materials, such as Alucobond
®
, that have a polyvinylidene
fluoride (PVDF) surface coating. PVDF coated materials have reduced ink adhesion and may not
work for some applications.
.

13
Compressed Cardboard / Cardstock
Also known as: cover stock, paperboard, pasteboard, tag board
Preparation
Store media flat, in a clean environment with the same or similar temperature and humidity as the
printer. Changes in temperature or humidity will cause the material to warp.
Some coated sheets may interact with the ink yielding poor image quality. Test coated materials
for compatibility before purchasing significant quantities.
Clean with a lint-free cloth to remove any dust and debris.
Use gloves when handling the media to avoid transferring fingerprints and oils to the print surface.
The material can bend and crease easily. Watch for edges that may strike the carriage.
Recommended print modes
Depending on application, ink coverage and image content, all print modes may print acceptably.
Printing
Select Card Stock when configuring and loading this media.
Some colored media may not be able to be detected by the onboard camera. If so, created a copy
of the Card Stock media using the Media Wizard and change the Detectable by Printer option to
No.
Use the lowest possible UV lamp power setting to cure the ink.
Use a Card Stock media profile from the RIP software.
Some materials are more porous and absorb the ink giving a washed out appearance. Use the RIP
software’s Saturated Rendering Intent option to increase saturation.
Output handling
Use gloves to avoid transferring fingerprints and oils to the print surface.
Use caution when lifting it off the table to avoid creases.

14
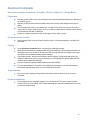
Corrugated Cardboard
Also known as: corrugated fiberboard, box board
Preparation
Store media flat, in a clean environment with the same or similar temperature and humidity as the
printer. Changes in temperature or humidity will cause the material to warp.
Clean with a lint-free cloth to remove any dust and debris.
The material can bend and crease easily. Watch for edges that may strike the carriage.
Recommended print modes
Depending on application, ink coverage and image content, all print modes may print acceptably.
Faster print modes are less susceptible to bowing of the media due to heat.
Printing
Select Corrugated Cardboard when configuring and loading this media.
Some colored media may not be able to be detected by the onboard camera. If so, create a copy
of the Card Stock media using the Media Wizard and change the Detectable by Printer option to
No.
Use the Warped Media option when loading non-flat media. Using this option reduces the available
print area.
Use the lowest possible UV lamp power setting to cure the ink.
Use a Corrugated Cardboard media profile from the RIP software.
Some materials are more porous and absorb the ink giving a washed out appearance. Use the RIP
software’s Saturated Rendering Intent option to increase saturation.
Output handling
Use caution when lifting it off the table to avoid creases.

15
Corrugated Plastic
Also known as: corrugated or fluted polypropylene
Brand name examples: Corflute
®
, Coroplast
®
, Correx
®
Preparation
The quality of corrugated polypropylene can vary greatly. A corona treatment is generally applied
when manufactured to increase the surface tension for better ink adhesion. This corona treatment
will diminish over time. Material that has be shipped long distances or stored for an extended
period of time will have more problems with ink adhesion.
This material tends to hold static charge - avoid sliding the media from the stack or carrying across
carpeted surfaces.
Review and follow the steps in the Static Electricity chapter of this guide.
Ensure that media tables are attached and secured to the printer to provide a grounding path for
static loaded material.
Media is often supplied un-square, so trimming it to square may be necessary for some
applications, such as edge to edge printing. Make sure all edges are cut clean and are free of
burrs and/or excess material.
Wipe the printing surface with an anti-static tack cloth to remove static charge and any dust or
debris.
If an anti-static tack cloth is not available, 90% or higher IPA on a lint-free cloth can be used to
remove dust or debris. Allow the sheet to sit out on the input table about 5 minutes to allow the IPA
to evaporate and the static to dissipate.
Recommended print modes
Depending on application, ink coverage and image content, all print modes may print acceptably.
Faster print speeds can be obtained without noticeable banding by feeding the media with the
flutes in parallel with the printhead carriage motion.
Printing
Select Corrugated Plastic when configuring and loading this media.
Non-white media may not be able to be detected by the onboard camera. If so, create a copy of
the Corrugated Plastic media using the Media Wizard and change the Detectable by Printer option
to No.
Use the lowest possible UV lamp power setting to cure the ink.
Media is heat-sensitive. It may require a higher vacuum setting, faster print modes, higher than
standard head height, and printing delays in some combination to achieve best output.
Use a Corrugated Plastic media profile from the RIP software.
Output handling
Ink adhesion improves over 24 hours. Sometimes it is beneficial to wait 24 hours before cutting
full-bleed prints.

16
Foam Board
Brand names examples: Fome-Cor
®
, Kapa
®
, MightyCore
®
Preparation
Store media flat, in a clean environment with the same or similar temperature and humidity as the
printer. Changes in temperature or humidity will cause the material to warp.
Clean with a lint-free cloth to remove any dust and debris.
The material is susceptible to dents and damages easily. Watch for corners and edges that may
strike the carriage.
Recommended print modes
Depending on application, ink coverage and image content, all print modes may print acceptably.
Printing
Select Foam Board when configuring and loading this media.
Non-white media may not be able to be detected by the onboard camera. If so, create a copy of
the Foam Board media using the Media Wizard and change the Detectable by Printer option to No.
Use the lowest possible UV lamp power setting to cure the ink.
Media is heat-sensitive. It may require a higher vacuum setting, faster print modes, higher than
standard head height, and printing delays in some combination to achieve best output.
Use a Foam Board media profile from the RIP software.
Output handling
You can usually recover from heat warp by laying this media flat and allowing it to cool.
Always use a very sharp blade when trimming.
Substrate is susceptible to dents and it damages more easily than most media types.
Known incompatibility
Kapa
®
Color is a series of foam boards with a colored plastic-coated cellucarton covering layer that
is known to interact with the ink and have poor image quality.

17
Foam PVC
Also known as: closed-cell PVC foamboard
Brand names examples: Celtec
®
, Forex
®
, Komatex
®
, Sintra
®
Preparation
If the media has a protective film attached, peel the protective film off of one side, leaving the other
side protected until finishing or installation of the finished graphic.
If one side is smoother than the other, print on the rougher side for best adhesion.
Wipe the printing surface with an anti-static tack cloth to remove static charge and any dust or
debris.
If an anti-static tack cloth is not available, 90% or higher IPA on a lint-free cloth can be used to
remove dust or debris. Allow the sheet to sit out on the input table about 5 minutes to allow the IPA
to evaporate and the static to dissipate.
Recommended print modes
Depending on application, ink coverage and image content, all print modes may print acceptably.
Printing
Select Foam PVC when configuring and loading this media.
Use a Foam PVC media profile from the RIP software.
Output handling
No special handling required.
If ink adhesion is inadequate, print in a higher quality mode and/or wait 24 hours before finishing.
Always use a sharp blade when cutting.

18
Glass
Considerations
The smooth, non-porous surface of glass does not provide a good interface for ink to adhere
making it susceptible to scratches and scraping. Special precautions are necessary in the handling
and display of the printed piece to protect it from abrasion.
Adhesion can be improved with the use of a pre-treatment or primer, such as HP PT40 Specialty
Glass Scitex Primer – part number CD571A.
Preparation
Use a lint-free cloth with a glass cleaner to remove dust or debris. Do not use a detergent.
Use clean, cotton gloves to avoid fingerprints.
If a pre-treatment primer is used, apply it according to the instructions and allow it to dry before
printing.
Recommended print modes
Photo or Photo Plus modes for applications where it will be viewed from the printed surface. Use
Max DPI – Saturated if higher ink density is needed.
Indoor Signage Plus or higher quality for applications where it will be viewed through the glass and
either a white ink overflood is used or white backer is applied over the printed surface. Flip the
image in the RIP software prior to printing for view-through applications.
Max DPI – Backlit, using either Spot or Overflood modes, for backlit applications.
Printing
Select Clear Sheet when configuring and loading this media.
Media placement detection is disabled when using this media type. When loading the media, it is
necessary to enter the location of the left (user side) and right (service side) edges of the media
according to the Media Measurement Option selection.
Use a Clear Sheet media profile from the RIP software.
For applications that require fine detail, use the Fine Text option (available in firmware version 2.01
and later) and/or lower the printhead height from its nominal 0.085 inch (2.2 mm) setting.
Output handling
Use clean, cotton gloves to avoid fingerprints.
Take care when loading or lifting sheets off the table as media and ink can be easily scratched.
Depending on the end use application, a post treatment may be necessary to minimize risk of
surface damage.

19
Plywood
Examples: Raw, primed or painted plywood, MDO, MDF
Preparation
Store media flat, in a clean environment with the same or similar temperature and humidity as the
printer. Changes in temperature or humidity will cause the material to warp.
Media is often supplied un-square, so trimming it to square may be necessary for some
applications, such as edge to edge printing. Make sure all edges are cut clean and are free of
burrs and/or excess material.
Use compressed air to blow dust and debris from printing surface.
Recommended print modes
Depending on application, ink coverage, image content and wood surface, all print modes may
print acceptably.
Printing
Select Plywood when configuring and loading this media.
Some surfaces are more porous and absorb the ink giving a washed out appearance. Use the RIP
software’s Saturated Rendering Intent option to increase saturation.
Non-white media may not be able to be detected by the onboard camera. If so, create a copy of
the Plywood media using the Media Wizard and change the Detectable by Printer option to No.
Due to the strength and shape memory of wood products the printer may not be able to feed some
warped sheets.
A head height higher than the nominal 0.085 inch (2.2 mm) setting may be necessary to avoid
carriage scraping on non-flat materials.
Use a Plywood media profile from the RIP software.
Output handling
These materials are heavy in larger sizes. Do not exceed 150 lb (68 kg).

20
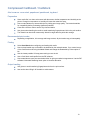
Polycarbonate Sheet
Brand names examples: Lexan
®
, Makrolon
®
, Tuffak
®
)
Considerations
In general, ink adhesion is better on polycarbonate then on acrylic or glass.
However, the smooth, non-porous surface does make it susceptible to scratches and scraping.
Special precautions are necessary in the handling and display the printed piece to protect it from
abrasion.
Adhesion can be improved with the use of a pre-treatment or primer, such as HP PT70 Specialty
Polycarbonate Scitex Primer – part number CD574A.
Preparation
Peel the protective film off one side, leaving the other side protected until finishing or installation of
the finished graphic.
This material tends to hold static charge. Review and follow the steps in the Static Electricity
chapter of this guide.
Ensure that media tables are attached and secured to the printer to provide a grounding path for
static loaded material.
Wipe the printing surface with an anti-static tack cloth to remove static charge and any dust or
debris.
If an anti-static tack cloth is not available, 90% or higher IPA on a lint-free cloth can be used to
remove dust or debris. Allow the sheet to sit out on the input table about 5 minutes to allow the IPA
to evaporate and the static to dissipate.
Depending on end-use application, ink adhesion may be an issue. Use of a polycarbonate primer
can improve ink adhesion.
Recommended print modes
Photo or Photo Plus modes for applications where it will be viewed from the printed surface. Use
Max DPI – Saturated if higher ink density is needed.
Indoor Signage Plus or higher quality for applications where it will be viewed through the glass and
either a white ink overflood is used or white backer is applied over the printed surface. Flip the
image in the RIP software prior to printing for view-through applications.
Max DPI – Backlit, using either Spot or Overflood modes, for backlit applications.
Printing
Select Clear Sheet when configuring and loading this media.
Media placement detection is disabled when using this media type. When loading the media, it is
necessary to enter the location of the left (user side) and right (service side) edges of the media
according to the Media Measurement Option selection.
Use a Clear Sheet media profile from the RIP software.
For applications that require fine detail, use the Fine Text option (available in firmware version 2.01
and later) and/or lower the printhead height from its nominal 0.085 inch (2.2 mm) setting.
Output handling
Use clean, cotton gloves to avoid fingerprints.
Take care when loading or lifting sheets off the table as media and ink can be easily scratched.
Depending on the end use application, a post treatment may be necessary to minimize risk of
surface damage.
Page is loading ...
Page is loading ...
Page is loading ...
Page is loading ...
-
 1
1
-
 2
2
-
 3
3
-
 4
4
-
 5
5
-
 6
6
-
 7
7
-
 8
8
-
 9
9
-
 10
10
-
 11
11
-
 12
12
-
 13
13
-
 14
14
-
 15
15
-
 16
16
-
 17
17
-
 18
18
-
 19
19
-
 20
20
-
 21
21
-
 22
22
-
 23
23
-
 24
24


HP Scitex FB500 Industrial Printer User guide
- Category
- Large format printers
- Type
- User guide
- This manual is also suitable for
Ask a question and I''ll find the answer in the document
Finding information in a document is now easier with AI
Related papers
-
HP Scitex FB750 Printer User guide
-
-
-
-
-
-
-
-
-
Other documents
-
Optoma DE-3100EGS Datasheet
-
Ritter 553.051 Datasheet
-
3M 411DC-SF Specification
-
 APPLYLABWORK S100 Operating instructions
-
EFI 6717432021 Datasheet
-
-
-
MIMAKI UJF-7151 plus User guide
-
-
MIMAKI UJF-3042MkII User guide
