DeLorme Earthmate PN-40 User manual

Category
Navigators
Type
User manual
Earthmate
®
PN-40
DE LORME
User Manual
Updated for 2.5 Firmware Release
GPS for Serious Outdoor Adventures
Earthmate
®
PN-40 Accessories
We offer a variety of products designed to carry, securely mount, and power your Earthmate
PN-40. You can also inexpensively subscribe for a year’s worth of supplemental data downloads,
including color aerial imagery, USGS 7.5-min. topographic quads, and NOAA nautical charts.
Also Available from DeLorme
DeLorme is a leading provider of mapping software for both consumer and professional markets.
Our Street Atlas USA
®
software titles deliver intelligent mapping, routing, and GPS navigation
solutions for laptop PCs and PDAs. XMap
®
is a three-tiered GIS software suite that integrates
advanced geospatial data management into DeLorme's core GPS mapping framework.
We also publish the Atlas & Gazetteer
series of topographic map books for individual states.
Table of Contents
Getting Started .......................................................................................................................................................................2
Basic Functions ....................................................................................................................................................................10
The Satellites Page............................................................................................................................................................... 12
The Map Page ......................................................................................................................................................................16
The Compass Page ..............................................................................................................................................................31
The Trip Info Page ................................................................................................................................................................34
The Find Page ......................................................................................................................................................................37
The Waypoints Page ............................................................................................................................................................45
The Geocaches Page ...........................................................................................................................................................50
The Routes Page ..................................................................................................................................................................56
The Tracks Page ...................................................................................................................................................................62
The Sun/Moon Page ............................................................................................................................................................66
The Tide Page ......................................................................................................................................................................68
The Hunt/Fish Page .............................................................................................................................................................69
The Device Setup Page ........................................................................................................................................................70
Appendix A: Page Function Table ........................................................................................................................................77
Appendix B: Specications ..................................................................................................................................................82
Appendix C: Waypoint/Geocache Symbols .........................................................................................................................87
Glossary ...............................................................................................................................................................................91
Index .....................................................................................................................................................................................94
2
Getting Started
Thank you for purchasing the DeLorme Earthmate PN-40. This versatile and compact GPS receiver
lets you create tracks of your travels, create routes so you never get lost, nd points of interest, go
geocaching, and more!
This manual provides instructions for using the Earthmate PN-40. Most of the chapters are based
on pages, which are the main pages on the Earthmate PN-40. Each chapter describes the features
of that particular page and the menu options that are available from that page. In addition, this
manual discusses basic functions (such as map panning, battery information, map data information,
and more), as well as frequently asked questions, warranty information, and so on.
Installing the Batteries
The Earthmate PN-40 is a battery-powered device. It can be powered by one rechargeable Lithium-
ion (Li-ion) battery or two AA batteries (NiMH, alkaline, or lithium).
To install the batteries, unscrew the D-rings on the back of the Earthmate PN-40 until you can
remove the battery cover. Then, insert the batteries according to the polarity symbols found inside
the battery compartment. Position the battery cover on the Earthmate PN-40 and screw the
D-rings into the Earthmate PN-40.
Because the Earthmate PN-40 has a real-time clock that requires power even when the device is
powered off, your batteries are constantly in use. If you use your Earthmate PN-40 sporadically (for
example, more than a month between uses), remove the batteries for long-term storage and then
reinsert them when you want to use the device.
Turning On the Earthmate PN-40
The Power button is located at the bottom right corner of the button area. To turn on the Earthmate
PN-40, press and hold the Power button until you see the Welcome screen. When you rst turn
on the Earthmate PN-40, it opens in Demo Mode. Follow the instructions on the screen to view
demo slides. To prevent Demo Mode from showing when you start the device, press ENTER
to clear the Show at Startup check box. You can restore Demo Mode with the MENU>Device
Setup>System>GPS Settings.
The rst page that appears after you exit Demo Mode is the Satellites Page. Your GPS status
displays in the top left corner of the Satellites Page. Press the PAGE button to display the Map Page
Note: If the Earthmate PN-40
is connected to your computer,
the rst page you see is
the Connect to Computer
page. For more information,
see Connecting to Your
Computer on page 6.
Tips:
•Settingthecorrectbattery
typeoptimizesthebatterys
performance. For more
informationonselectingbat-
tery type, see To Modify the
System Settings on page 70.
•IftheEarthmatePN-40does
not turn on, ensure that
thebatteriesareproperly
inserted into the device and
that they are mostly or fully
charged.
3
on the screen. The map centers on your current location when the device gets a 2-D or 3-D x.
The default view when a GPS x cannot be obtained is your last GPS position.
If it takes a long time for the device to obtain a 2-D or 3-D x, verify it has a clear view of the sky.
Be sure that trees, buildings, and other obstacles are not blocking the Earthmate PN-40. If the
device still cannot obtain a 2-D or 3-D x, press the QUIT button to return to the Satellites Page,
press the MENU button, highlight the Set Current Location option, and then press ENTER. The
Map Page automatically displays. Pan the map to your current location and press ENTER.
To turn off the Earthmate PN-40, press the Power button and then press the ENTER button to
conrm you want to turn off the Earthmate PN-40.
Using the Buttons on the Earthmate PN-40
The buttons on the Earthmate PN-40 give you access to all of the functions on the device.
In/Out
Use the IN and OUT button to zoom the map in or out or scroll through a list.
• PresstheIN(left)sideofthebuttononcetozoomthemapinonelevelandshowmoredetail.
• PressandholdtheINsideofthebuttontozoomthemapintoitsmaximumlevel.
• PresstheOUT(right)sideofthebuttononcetozoomthemapoutonelevelandshowless
detail.
• PressandholdtheOUTsideofthebuttontozoomthemapouttoitsmaximumlevel.
• PressINorOUTtoscrollbackwardorforwardthroughalist.
Page
Use the PAGE button to scroll through the enabled pages on the Earthmate PN-40. The default
sequence is:
• Satellites
• Map
• Compass
• TripInfo
• RouteDirections(availablewhennavigating)
For an overview of what you can view and do on each page and each page’s menu functions, see
Appendix A on page 77.
Tip: Use the Device
Setup>PageOrdersettingsto
add, remove, or reorder the
pages that display when you
pressthePAGEbutton.For
more information, see the To
Modify the Page Order Set-
tings section on page 75.
Getting Started
4
Menu
The MENU button gives you access to many functions. Some menus are divided into top and
bottom sections that are separated by a line. The items in the top section are specic to the active
page. The items in the bottom section are standard menu options that are available from any page.
Find
The Find button is labeled with a magnifying glass. Use it to search for a point of interest, waypoint,
geocache, address, coordinate, and more. You can search for a location based on its name or its
proximity to the current map center.
Mark Waypoint
The Mark button is labeled with a push pin. Use it to mark a waypoint at your current GPS location
or, when panning, at the cursor location. Once you mark a location, you can edit the waypoint
name, coordinates, and elevation; provide comments about the waypoint; view the waypoint on the
map; navigate to the waypoint; average the waypoint for greater accuracy; save the waypoint; or
delete the waypoint.
Arrow Keypad
Use the arrow keypad to:
• Movethemapcursorleft,right,up,ordown.
• Panthemapbymovingthecursortotheedgeofthemap.
• Highlightoptionsinmenusorlists.Pressdowntomovetothenextentry,pressupfromthe
rst entry to go to the last entry, or down from the last entry to go to the rst entry. Press and
hold to quickly scroll through a menu or list.
• Highlightcharactersonthekeyboardscreen.
• Highlightelds.
• Pressanyarrowoncetoturnonthebacklight.
Enter
Use the ENTER button to:
• Selectamenuentryoron-screenbutton/eld.
• Getinformationaboutapointonthemap.PresstheENTERbuttonatanytimewhenviewing
Note: To ensure your
waypoint displays on the
Waypoints Page, make sure
youselectawaypointsymbol.
Ifyouuseageocachesymbol,
thewaypointwillbesavedin
the Geocaches Page. For a list
ofsymbols,seeAppendix C
on page 87.
5
the Map Page to see detailed information, if available.
Quit
The function of the QUIT button varies depending on the current status of the Earthmate PN-40.
You can use the QUIT button to cancel actions (for example, panning), for keyboard entry, to delete
individual points when measuring distance, and so on. If you are performing steps in a procedure,
pressing the QUIT button moves you backward through the page sequence.
Power
Use the Power button to turn the Earthmate PN-40 on and off, to change the backlight settings, or
to reset it:
• ToturntheEarthmatePN-40on,pressandholdthePower button until the Welcome screen
displays.
• ToturntheEarthmatePN-40off,pressthePower button. When you see the “Press ENTER to
power down.” message, press the ENTER button to conrm that you want to turn off the
Earthmate PN-40. If you do not want to turn the Earthmate PN-40 off, wait ve seconds or
press the QUIT button.
• Tochangethebacklightintensitypercentage,pressandholdthePower button for
approximately two seconds until you see the backlight indicator. Press the arrow keypad to the
left to move the slider and decrease the backlight intensity. Press the arrow keypad to the right
to move the slider and increase the backlight intensity. Each level of intensity represents a 10%
interval (100% is the maximum backlight intensity, 10% is the minimum backlight intensity).
• ToturnthebacklightoffwhenthebacklighttimerissettoAlwaysOn,pressandholdthe
Power button for three seconds until the backlight shuts off.
Note: The backlight turns on any time you press a button unless you turned it off using the
Device Setup menu. For more information, see the ToModifytheDisplaySettings section on
page 71.
• WhenyouchargetheEarthmatePN-40,thebacklightintensitysettingissettoadefault
charging intensity.
• ToresettheEarthmatePN-40whenitison,pressandholdthePower button for seven
seconds.
Getting Started
Tip: Decreasethebacklight
timertohelpconservebattery
life.
Press ENTER to conrm that
you want to turn the device off
6
Transferring Map Data to the Earthmate PN-40
Your Earthmate PN-40 comes equipped with a base map showing overview-level world coverage,
as well as U.S. interstates and routes, state routes, and major roads. While this provides a great
view of a large area, chances are that you will want a detailed view of a smaller area for hiking,
geocaching, and other activities. You can transfer more detailed maps to the Earthmate PN-40
using:
• PN-40 Detailed Map DVDsIncluded with your Earthmate PN-40 are three DVDs of detailed
pre-cut Topo USA
®
data of the entire U.S. Install the maps you need on your SD/SDHC card to
easily and quickly get them on your device. When you use the pre-cut maps, you do not have
to include the topographic data from your mapping software when you create a map package —
which means smaller le size and faster transfer to the Earthmate PN-40.
• Compatible DeLorme Mapping SoftwareInstructions for sending maps to your Earthmate
PN-40 vary by application. For more information, see the mapping application’s Help for
instructions on sending maps to your Earthmate PN-40.
You can also use the NetLink tab in your DeLorme mapping software or the DeLorme Earthmate
Online Map Center (http://data.delorme.com) to download many types of data, such as satellite
imagery, aerial imagery, USGS Topo Quad maps, NOAA nautical charts, and more. With an annual
Map Library subscription, you can download unlimited data. See www.delorme.com for details.
Connecting to Your Computer
When you connect your Earthmate PN-40 to your computer, the Connect to Computer page
displays. This allows you to select the correct option for transferring information between your
mapping application and your device. If you do not want to see this page when you connect your
Earthmate PN-40 to your computer, you can hide it using the Device Setup>Connect to Computer
menu. For more information, see ToModifytheComputerConnectionSettings on page 71.
To Connect to Your Computer
To connect your Earthmate PN-40 to your computer, attach the USB cable to the device and then
plug it into the computer.
Data Exchange
Use this option for GPS use and to transfer waypoints, tracks, and routes to or from the device. This
is the default transfer method. You can transfer map packages, but transfer will be slower than the
Note: Large maps may take
longer to transfer to the device.
Note: To activate your Earth-
mate PN-40 for exchanging
maps and data with your De-
Lorme desktop software,
connect the device to your
computer and select the Data
Exchange option. Then, in
your mapping software, click
the Exchangebuttononthe
toolbar.Thisenablesthefull
capabilitiesthatareavailable
for exchanging maps and data.
7
map transfer method. Highlight Data Exchange and press ENTER.
Map Transfer
Use this option to quickly transfer map packages. Highlight Map Transfer and press ENTER. On
the Choose Transfer Method page, highlight one of the following options and press ENTER:
• Transfer to SD Card-Use this option to transfer map packages to an SD card in the device.
Map packages are transferred to the “maps” folder on the SD card. You can also use this
method to transfer a map from the Earthmate PN-40 to your DeLorme mapping software. You
cannot use this method to transfer waypoints, tracks, and routes.
• Transfer to Internal-Select this option to transfer map packages to the device’s internal
memory. The device is used as a USB hard drive. You cannot use this method to transfer
waypoints, tracks, or routes.
Once you select an option, the Transfer Maps page displays. Use your mapping software to transfer
your maps, and then press ENTER on the device to return to Data Exchange mode.
Firmware Transfer
Transfer rmware updates to an SD card in your Earthmate PN-40 to update your device. Updates
are available through the NetLink tab and the Technical Support section of the DeLorme website.
Follow the rmware update installation instructions and download the update to your computer.
Connect your device to your computer, and, on the device, select the Data Exchange option. Then,
press MENU, go to Device Setup>Connect to Computer>USB Settings, select the Firmware
Transfer option, and follow the update instructions.
About GPS
What is GPS?
The Global Positioning System (GPS) applies modern technology to the ancient art of navigation.
The U.S. Department of Defense has developed and launched a series of positioning satellites in an
orbiting “constellation.” These satellites are used as reference points in much the same way stars
have been used in conventional navigation.
Using these satellites, a GPS receiver can determine your position anywhere on the globe. GPS
provides accurate information about coordinate position, elevation, speed, and direction of travel.
Many people have discovered the benets of GPS for recording tracks and much more.
Getting Started
Note: Mac and Linux users
should always select Map
TransferSDCardorMap
Transfer Internal.
Connect to Computer page
8
How Does GPS Work?
The GPS constellation consists of at least 24 satellites, each carrying several atomic clocks to
ensure the most accurate time possible. The satellites broadcast low-power radio waves containing
the satellite’s identity code and the exact time (to the nanosecond) that the message was sent.
When a GPS receiver picks up a satellite signal, it identies the satellite and compares the signal
time with its own clock. The time difference represents the time it has taken for that radio wave
to travel from the satellite to the receiver. Since radio waves travel at the speed of light, the time
difference can be used to calculate the distance from the satellite to the GPS receiver.
The satellite’s identity code provides the location of the satellite, and the distance to the receiver
creates a sphere of possible locations for the GPS receiver. Without more information, the receiver
knows only that it is located somewhere on that sphere.
Two additional satellites are necessary to narrow down the receiver’s position. Each of these
satellites sends a similar radio message containing time and identity information. The GPS receiver
checks the orbital location of each satellite and uses the elapsed time to create two additional
spheres of possible locations. These three spheres intersect at two points; however, one of these
points is eliminated because it is far away from the Earth’s surface. Therefore, the second point
is assumed to be correct. The data from these three satellites provides the receiver with a two-
dimensional location.
Data acquired from a fourth satellite pinpoints the receiver’s exact location. This additional
positioning information allows the GPS receiver to calculate its elevation, which is particularly
important for GPS users in mountainous locations.
GPS Position Accuracy
Any buildings, natural structures, or heavy foliage that obstruct the GPS antenna’s view of the sky
prevent satellite signals from reaching the receiver and decrease the accuracy of your position.
Frequently Asked Questions
Can I install non-DeLorme maps on the Earthmate PN-40?
DeLorme’s professional GIS software, XMap
®
, allows you to register non-DeLorme maps and
transfer them to the Earthmate PN-40.
Note: Placing the Earthmate
PN-40inajacketorbackpack
pocketshouldnotaffectGPS
position accuracy.
9
How can I improve the life of my batteries?
When the backlight is on, it consumes a large part of the battery. Changing the backlight timer to
turn off after 15 seconds will greatly improve the life of your batteries. For information on changing
the backlight timer, see To Modify the Backlight Timer on page 69.
Other ways to increase the life of the batteries include:
• SettingtheGPSSettingstoPowerSavingmode
• DisablingGPSwhileindoors
• Usingbatterieswithhighermilliampratings(suchasDuracellUltras,EnergizerE2s,etc.)
Why does it take so long to nd satellites?
Acquiring satellite data takes longer if the batteries are low or if the Earthmate PN-40 does not
have a clear view of the sky. Be sure that trees, buildings, and other obstacles are not blocking the
Earthmate PN-40 when you begin tracking.
Other factors, such as if you haven’t used the device for a long time or if you’ve moved the device a
great distance from its last location, can affect the amount of time it takes to nd satellites.
How do I reset the Earthmate PN-40 when it will not turn off?
To reset the Earthmate PN-40, hold the Power button for seven seconds. If that does not work,
remove and replace the batteries to reset the Earthmate PN-40.
Why won’t my Lithium-ion battery hold a charge?
The Li-ion battery is designed to last for 300-500 charges, depending on environmental conditions.
Where can I nd more information about using my Earthmate PN-40?
You can nd more information about using the Earthmate PN-40 on our website:
• DeLorme Forumhttp://forum.delorme.com/
• Bloghttp://blog.delorme.com/
• Scenarios and Tutorialshttp://www.delorme.com/support. Type “pn” in the Search by
Keyword box.
• Send to GPS Plugin for Geocachinghttp://www.delorme.com/geocaching/plugin/
Getting Started
Note: The charging circuit
in the Earthmate PN-40
was designed for optimum
operation with the RCR-V3
Li-Ionbatterysoldthrough
DeLorme.OtherRCR-V3Li-Ion
batteriesmayworkandcharge
inthedevice,butDeLorme
can make no guarantees of
compatibleoperation.
10
Basic Functions
Panning the Map
There are two ways to pan the map:
• Manuallypanthemapbyplacingthecursoralongthemapedgeandholdingthearrowkeypad
in the direction that you want to view the map. Press QUIT to center the map on your current
location.
• AutomaticallypanthemapwhenGPStracking/navigating.Themapautomaticallypansinthe
direction of travel when the GPS cursor travels outside of the map area.
Getting Information About a Map Object
There are two ways to get information about a map object.
• Pressthearrowkeypadtopositionyourcursoroverthemapobjectsyouwanttolearnmore
about. The status bar at the bottom of the Map Page provides name information for the object.
Press ENTER to display the Info Page.
• PressENTERatanytimetogetinformationaboutobjectsthatareatyourcurrentGPSlocation.
Note: If multiple objects are found at the cursor location, the Multiple Objects screen displays a
list of the available objects at that location; objects you have created appear at the top of the
list. Use the arrow keypad to select an object and then press ENTER to view the Info Page for
that object. To save a map object as a waypoint, select it, highlight it, and press Mark.
Navigating vs. Tracking
What is the difference between navigating and tracking with the Earthmate PN-40?
• Youarenavigating with the Earthmate PN-40 when you use it to follow a route.
• Youaretracking with the Earthmate PN-40 when the GPS is on, but you are not following a
route.
Using the Keyboard
The keyboard is accessible when you need to enter text, such as when editing a waypoint label.
Once the keyboard appears, use the arrow keypad to highlight the letter (AZ), number (09),
symbol (+, -, /, &), or punctuation (period, comma, apostrophe, exclamation point) you want to use.
In addition, the following special functions are provided:
Note: Manually panning the
map changes the focus of the
mapfromyourGPSlocationto
the manually panned location.
Note:Onceyouhavemarkeda
mapobjectasawaypoint,you
can edit the waypoint details
(byhighlightingthewaypoint
information, pressing ENTER
and then modifying the infor-
mation),viewitbyhighlighting
View and pressing ENTER, or
createaroutebyhighlighting
Route and pressing ENTER.
Move your cursor to the edge
of the screen to pan the map in
that direction
11
Moves the cursor one space to the left without deleting characters.
Moves the cursor one space to the right without deleting characters.
Changes the letters from lowercase to uppercase letters (the active case is shown in the
keyboard). This function toggles to all caps mode by pressing ENTER twice.
Moves the cursor one space to the left, deleting the character that was there.
Clears the content of the text eld being edited.
Accepts the changes made to the text eld and closes the keyboard.
Moves the cursor one space to the right, leaving a blank space.
Moves the cursor to the next line. This option can be used to type more than one line in a
comment eld.
Charging the Earthmate PN-40
If you are using a DeLorme-supplied RCR-V3 Li-Ion battery, you can charge the Earthmate PN-40
battery by connecting the USB end of the cable to your computer and the other end of the cable to
the Earthmate PN-40. To charge the device with the USB cable, the device must be powered on
while connected. You cannot use the Earthmate PN-40 to charge rechargeable AA batteries.
Storing Data on the Earthmate PN-40
The Earthmate PN-40 stores waypoints, geocaches, tracks, routes, and the base map data in
its internal memory. You can save maps that are transferred to the Earthmate PN-40 in internal
memory or on a removable memory (SD/SDHC) card located under the battery compartment. Use
multiple cards to create a map library of the areas you travel to.
Basic Functions
Tips:
•PressOUTtoquicklyhigh-
lighttheOKbutton.
•PressINtodeleteone
character at a time.
•PressQUITtocancelyour
keyboardentries.
•Forexistingtext,enteralet-
ter to replace the highlighted
content. To keep the existing
textbutmovethecursor
tothebeginning/endofthe
text, select the option
to move the cursor to the
beginningortomovethe
cursor to the end of the text.
Keyboardscreen
12
The Satellites Page
Viewing the Satellites Page
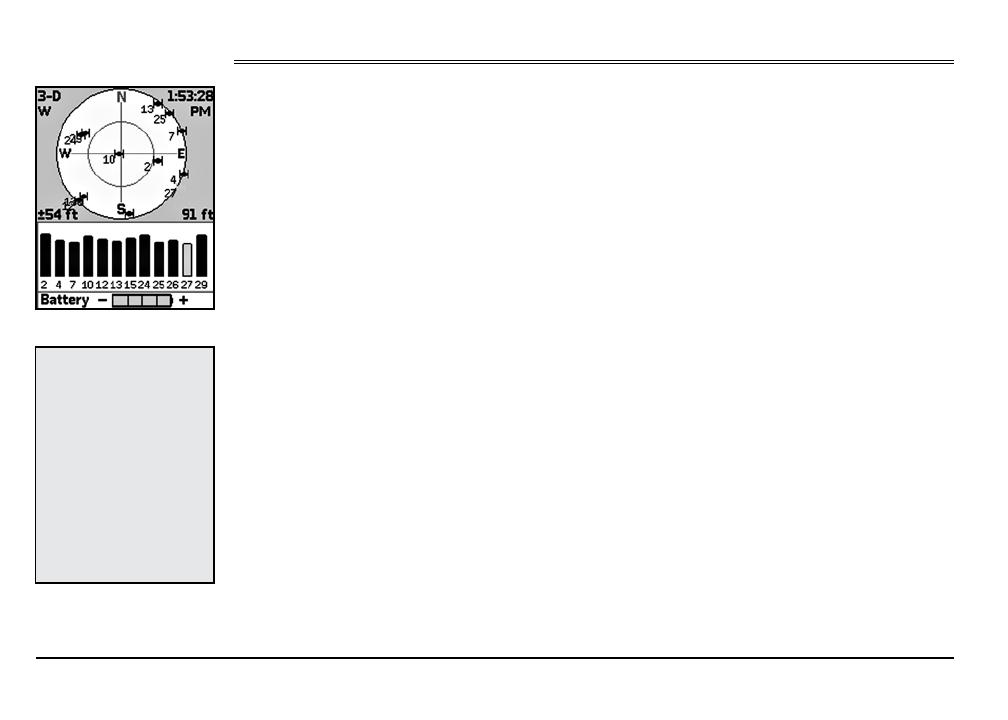
Once you turn on the Earthmate PN-40, the Satellites Page appears. The Satellites Page informs
you of your current GPS status, the number of satellites the Earthmate PN-40 is acquiring data
from, the signal strength, the GPS accuracy (available only when a 2-D or 3-D x is obtained), the
time, and the elevation.
Note: If the device is connected to your computer, the rst page you will see is the Connect to
Computer page. For more information, see Connecting to Your Computer on page 6.
Satellite Constellation and Signal Graph
Both the satellite constellation and the satellite signal graph display visible satellites and their
identifying numbers, which are assigned by the Department of Defense.
In the satellite constellation, satellite-shaped icons display each satellite’s position in the sky relative
to the device’s current position. North, South, East, and West are shown on the graph.
In the satellite signal graph, each satellite is represented as a bar that is sized according to signal
strength. Longer bars have greater strength and shorter bars have less strength.
The icons in the satellite constellation and the lines in the signal graph are color coded based on the
quality of the data they are transmitting:
• RedIndicates your GPS receiver is tracking the satellite, but it is not using it to navigate.
• GreenIndicates your GPS receiver is tracking the satellite, ephemeris data is available, and
the satellite is being used for navigation.
• YellowIndicates your GPS receiver is tracking the satellite, predicted ephemeris data is
available, and the satellite is being used for navigation.
• BlueIndicates your receiver is tracking the satellite, ephemeris data is available, the satellite
is being used for navigation, and the satellite has WAAS corrections available.
GPS and WAAS Status
GPS status displays in the top left corner of the page and displays the following, depending on your
satellite acquisition status:
• GPS Off—The GPS is disabled.
SatellitesPage
Tip: If it is taking a long time
forthedevicetoobtaina2-D
or 3-D x, verify it has a clear
view of the sky. Be sure that
trees,buildings,andother
obstaclesarenotblocking
the Earthmate PN-40. If the
devicestillcannotobtaina
2-D/3-Dx,pressPAGEuntil
theSatellitesPagedisplays,
press MENU, highlight the Set
Current Location option, and
then press ENTER. The Map
Page displays automatically.
Pan the map to your current
location and press ENTER.
13
• No Fix—The GPS cannot nd sufcient satellite data to determine your current GPS position.
• 2-D—The GPS connection is successful, but the connection quality is not quite as sufcient as
a 3-D x. This usually indicates insufcient data for an accurate location because only three
satellites are being used or signals from the satellites are poor. Move your receiver to another
location until you get better reception.
• 3-D—The GPS receiver is receiving sufcient satellite data to determine your location.
If a W shows below 2-D or 3-D, the Earthmate PN-40 has obtained a WAAS connection. WAAS
provides up to ve times greater position accuracy than a regular 2-D or 3-D connection. WAAS is
available only in North America.
Time
The time displays in the top right corner of the page. You can change the time format, time zone,
and enable or disable Daylight Saving Time using the Time menu option in the Device Setup page.
Elevation
The elevation based on the current altimeter reading displays in the bottom right corner of the page.
For information about calibrating the altimeter, see ToCalibratetheAltimeter on page 14.
When the Auto Calibrate Altimeter option is enabled, you may see the word Calibrating” in the bottom
right corner of the screen and a red exclamation point in the Elevation: Altimeter info eld as the
altimeter adjusts. For more information, see ToModifytheCompassandAltimeterSettings on page 72.
GPS Accuracy
The GPS accuracy displays in the bottom left corner of the screen in feet or meters, depending on
the measurement preferences you assigned in the Device Setup Page (see To Modify the Units
Settingson page 74 for more information). GPS accuracy is represented on the map by a circle with
a radius equal to the GPS accuracy, allowing you to see a representation of your accuracy in relation
to your map scale.
Battery Indicator
The battery indicator is a graphic representation of the current available battery power:
• Four green barsIndicates a full charge.
• Three green barsOne quarter of the battery power has been used.
• Two yellow barsOne half of the battery power has been used.
The Satellites Page
Batteryindicatorlabelchanges
to “external” when charging
Note: Toensurethebattery
indicator provides accurate
information, make sure you
havethecorrectbattery
type selected on the Device
Setup>Systempage.
See To Modify the System
Settings on page 70 for more
information.
14
• One red bar—Three quarters of the battery power has been used. Once the battery has
reached 5% of its total battery power, a low battery warning displays.
While the Li-Ion battery is charging, the battery indicator graphic is animated and the word
“Battery” is replaced with “Charging.” Once the battery is fully charged, the battery indicator
graphic displays four static green bars and the word “Charging” is replaced with “External” until the
charging cable is removed.
Calibrating Sensors
Changes in weather patterns and geographic locations can cause errors in sensor readings.
Calibrating the sensors ensures that they record and display accurate data in the track le. The
Calibrate menu option is available from the the Satellite Page, the Compass Page and the Device
Setup>Compass & Altimeter menu option. You can also use the Compass & Altimeter menu on the
Device Setup Page to disable the electronic compass and the barometric altimeter, as well as the
auto calibrate altimeter feature. For more information, see To Modify the Compass and Altimeter
Settingson page 72.
To Calibrate the Altimeter
There are three options for manually calibrating the altimeter. Units are based on your device
settings. By default, the device is set to auto calibrate the altimeter using GPS elevation; however,
manual calibration using the known elevation or barometric pressure provides greater accuracy.
If the device is automatically calibrating, “Calibrating” appears in the bottom right corner of the
Satellites Page and a red exclamation point displays in the Elevation: Altimeter info eld.
1. From the Satellite Page or the Compass Page press MENU.
OR
From the Device Setup Page, use the arrow keypad to highlight Compass & Altimeter and
press ENTER.
2. Use the arrow keypad to highlight Calibrate and press ENTER.
3. Highlight Calibrate Altimeter and press ENTER.
4. Highlight a calibration method and press ENTER:
• Known Elevation—The elevation at your location. Units are based on your device settings.
With the elevation eld highlighted, press ENTER. Use the arrow keypad to highlight the part
Notes:
•Youcandisablethe
GPSusingtheDevice
Setup>Systemmenuoption.
SelectDisable GPS from
the GPS Settings drop-
down list.
•WhenGPShasbeen
disabled,youcanenableit
bypressingMENUandthen
selecting Enable GPS.
•GPSistemporarilydisabled
when in simulate mode (dur-
ingtrackplayback,navigation
simulation, and so on).
•IftheEarthmatePN-40is
unabletoacquireaxafter
approximately ten minutes,
youwillbepromptedto
disabletheGPSorcontinue
searching for satellites.
15
of the eld you want to change. Press the arrow keypad up or down to change it. When
nished entering the elevation, press ENTER, highlight Calibrate, and then press ENTER.
• Known Pressure—The barometric pressure (adjusted for sea level) for your location.
With the pressure eld highlighted, press ENTER. Use the arrow keypad to highlight the part
of the eld you want to change. Press the arrow keypad up or down to change it. When
nished entering the pressure, press ENTER, highlight Calibrate, and then press ENTER.
• GPS Elevation—The GPS elevation displays. Press ENTER.
5. When you see the message that your device is calibrated, press ENTER.
Note: If you use the Known Elevation or Known Pressure method to calibrate the altimeter, and
the Enable Barometric Altimeter check box is selected in MENU>Device Setup>Compass &
Altimeter, a message asks you if you want to disable it. Highlight Yes to disable or No to leave it
enabled, and then press ENTER.
To Calibrate the Compass
There are three steps for calibrating the electronic compass. If compass accuracy is poor, “Poor
Accuracy” appears in the bottom right corner of the Compass Page and a red exclamation point
displays in the Heading info eld.
1. From the Satellite Page or the Compass Page press MENU.
2. Use the arrow keypad to highlight Calibrate and press ENTER.
3. Highlight Calibrate Compass and press ENTER.
4. Follow the on-screen steps to calibrate the compass.
To Disable GPS
There are many features on the Earthmate PN-40 that do not require a GPS x. You can turn off the
GPS connection using the Disable GPS option in the Satellites menu.
1. From the Satellites Page, press MENU.
2. Use the arrow keypad to highlight Disable GPS and press ENTER.
GPS OFF displays in the top left corner of the screen and all satellites are removed from the
constellation display.
The Satellites Page
Note: When the electronic
compassisenabled,the
Earthmate PN-40 uses it when
you are stationary or almost
motionless. It provides the
greatest accuracy when you
are not moving. When your
speed is 0.5 mph or higher, the
compassreadingisbasedon
theGPSlocation.
Note:
•Calibratetheelectronic
compass the rst time you
use the Earthmate PN-40.
•Makesureyouareoutside
and away from magnetic
elds, such as vehicles
and power lines, when you
calibratethecompass.
•Calibratewhenyouchange
thetypeofbatteryyouare
using—batterieshave
uniquemagneticeldsthat
affect the accuracy of the
electronic compass.
16
The Map Page
Viewing the Map Page
If a 2-D or 3-D x is obtained, the Map Page displays the map data that is available for your current
GPS location. If a GPS x cannot be obtained, the location of your last GPS x displays on the map.
The color of the GPS arrow depends on your GPS signal.
• AashingredarrowindicatesthattheEarthmatePN-40cannotobtainaGPSsignal.
• AbluearrowindicatesthatthedeviceisinTrackPlaybackmodeorSimulateNavigationmode.
• Ayellowarrowindicatesa2-Dx.
• Agreenarrowindicatesa3-Dx.
Below the map are information elds. The information displayed in these elds varies based on the
selections you choose (for more information, see To Change the Information Fields on page 18).
The scale is located above the information elds. A north arrow is also available in the top right
corner of the screen; this is available only when Heading Up is selected as the map orientation (or
Course Up is selected when navigating).
To View Map Data
The Earthmate PN-40 comes standard with a base map showing high-level world coverage, as well
as more detailed U.S. coverage. You cannot remove the base map from memory.
Several data types are compatible with the Earthmate PN-40:
• High-resolutionCities
• ColorAerialImagery(ColorDOQQ)
• AerialImagery(DOQQ)
• USGSQuads(3DTQ)
• NOAANauticalCharts
• SatelliteImagery(SAT10)
• DeLormeTopographicData
The list above shows the default layering of the data types from top to bottom. To change the data
layering, see To Layer Your Data on page 24.
Tip: You can hide the
information elds to make
the map area larger (for more
information, see To Hide the
Information Fields on page
26)orchangethenumberof
information elds that display
(for more information, see To
Arrange the Information
Fieldsonpage26).
Map Page
17
To View Comment Details
When navigating, the View Comment Details option displays the comment for the waypoint or
geocache to which you are navigating.
Note: If you view the comment details for another waypoint or geocache while navigating, View
Comment Details displays the most recent comment details viewed.
1. From the Map Page, press MENU.
2. Use the arrow keypad to highlight View Comment Details and press ENTER.
To Change Route Options
When navigating, use Route Options to stop navigating, get back on track, or switch the route type.
For more information about route options, see ToEdittheRouteSettings on page 60.
1. From the Map Page, press MENU.
2. Use the arrow keypad to highlight Route Options and press ENTER.
3. Highlight Stop Navigating, Back on Track, or Switch to Direct Route/Switch to Road
Route and press ENTER.
To Show/Hide the Information Fields
You can hide the information elds to enlarge the map area.
1. From the Map Page, press MENU.
2. Use the arrow keypad to highlight Info Fields and press ENTER.
3. Highlight Hide Info Fields and press ENTER. The information elds are hidden.
Note: If Show Info Fields displays, the information elds are hidden. Press ENTER to display
the information elds.
To Arrange the Information Fields
You can change the information elds to display as one wide eld, one wide eld and two narrow
elds, four narrow elds, two wide elds, or two narrow elds.
1. From the Map Page, press MENU.
2. Use the arrow keypad to highlight Info Fields and press ENTER.
3. Highlight Arrange Info Fields and press ENTER.
The Map Page
Arrange Info Fields menu option
18
Note: If Show Info Fields displays, the information elds are hidden. Press ENTER to display
the information elds and then repeat steps 1 and 2.
4. Use the arrow keypad to select the information eld style you want to view and press ENTER.
To Change the Information Fields
You can customize the information elds to display the information that is most important to you.
You may want to change the information that displays based on the type of activity you are doing.
Note: The information elds change when navigating.
1. From the Map Page, press MENU.
2. Use the arrow keypad to highlight Info Fields and press ENTER.
3. Highlight Change Info Fields and press ENTER.
Note: If Show Info Fields displays, the information elds are hidden. Press ENTER to display
the information elds and then repeat steps 1 and 2.
4. Highlight the information eld you want to change and press ENTER. The available information
eld options display.
5. Use the arrow keypad to select the information eld and press ENTER.
6. Press QUIT to exit Change Info mode.
The available information elds include:
Information Field Option Description
Back on Course The direction of travel needed to return to the route while
continuing in the direction of the destination. Expressed in
degrees.
Battery Life The percentage of battery power that remains for the
Earthmate GPS PN-40.
Bearing The direction of travel from the current location to the dest-
ination (nish or next stop). Expressed in degrees. Displays a
green arrow pointing in the direction of the next waypoint or
route point. The arrow is grayed out when no movement is
reported by the device. It is green when the device is moving.
Change Info Fields menu option
Notes:
•Theinformationeldsyou
selectmaybeabbreviated
on the screen. For example,
Velocity Made Good displays
as VMG.
•Wheninformationisnot
available(forexample,the
Distance to Finish informa-
tion eld is only pertinent
when navigating), dashes
(--)displayintheapplicable
eld.
  • Page 1 1
  • Page 2 2
  • Page 3 3
  • Page 4 4
  • Page 5 5
  • Page 6 6
  • Page 7 7
  • Page 8 8
  • Page 9 9
  • Page 10 10
  • Page 11 11
  • Page 12 12
  • Page 13 13
  • Page 14 14
  • Page 15 15
  • Page 16 16
  • Page 17 17
  • Page 18 18
  • Page 19 19
  • Page 20 20
  • Page 21 21
  • Page 22 22
  • Page 23 23
  • Page 24 24
  • Page 25 25
  • Page 26 26
  • Page 27 27
  • Page 28 28
  • Page 29 29
  • Page 30 30
  • Page 31 31
  • Page 32 32
  • Page 33 33
  • Page 34 34
  • Page 35 35
  • Page 36 36
  • Page 37 37
  • Page 38 38
  • Page 39 39
  • Page 40 40
  • Page 41 41
  • Page 42 42
  • Page 43 43
  • Page 44 44
  • Page 45 45
  • Page 46 46
  • Page 47 47
  • Page 48 48
  • Page 49 49
  • Page 50 50
  • Page 51 51
  • Page 52 52
  • Page 53 53
  • Page 54 54
  • Page 55 55
  • Page 56 56
  • Page 57 57
  • Page 58 58
  • Page 59 59
  • Page 60 60
  • Page 61 61
  • Page 62 62
  • Page 63 63
  • Page 64 64
  • Page 65 65
  • Page 66 66
  • Page 67 67
  • Page 68 68
  • Page 69 69
  • Page 70 70
  • Page 71 71
  • Page 72 72
  • Page 73 73
  • Page 74 74
  • Page 75 75
  • Page 76 76
  • Page 77 77
  • Page 78 78
  • Page 79 79
  • Page 80 80
  • Page 81 81
  • Page 82 82
  • Page 83 83
  • Page 84 84
  • Page 85 85
  • Page 86 86
  • Page 87 87
  • Page 88 88
  • Page 89 89
  • Page 90 90
  • Page 91 91
  • Page 92 92
  • Page 93 93
  • Page 94 94
  • Page 95 95
  • Page 96 96
  • Page 97 97
  • Page 98 98
  • Page 99 99
  • Page 100 100
  • Page 101 101
  • Page 102 102

DeLorme Earthmate PN-40 User manual

Category
Navigators
Type
User manual

Ask a question and I''ll find the answer in the document

Finding information in a document is now easier with AI