National Geographic 9130700 Owner's manual
- Type
- Owner's manual

Art.No.: 91-30700
Bedienungsanleitung
Operating instructions
Mode d’emploi
Istruzioni di montaggio
Instrucciones de uso
ES
DE
EN
FR
IT
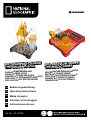
DIE GALVANISCHE ZELLE
THE GALVANIC CELL
FLÜSSIGKEITSBETRIEBENE-UHR
LIQUID-POWERED CLOCK
MONTRE ACTIONNÉE PAR FLUIDE
OROLOGIO AD AZIONAMENTO IDRAULICO
RELOJ ACCIONADO POR UN LÍQUIDO
DIE MAGISCHE LAMPE
THE MAGIC LAMP
ELEKTRONISCHER GERÄUSCHSENSOR
ELECTRONIC SOUND SENSOR
DÉTECTEUR ÉLECTRONIQUE DE BRUIT
SENSORE ELETTRONICO SONORO
SENSOR ACÚSTICO ELECTRÓNICO

2
DE
Inhaltsverzeichnis
Allgemeine Warnhinweise ................................................... 4-7
Flüssigkeitsbetriebene-Uhr
Lieferumfang/Teileübersicht ................................................ 25
Flüssigkeitsbetriebene Uhr zusammenbauen
...................... 29-42
Batteriebetriebene Uhr zusammenbauen ...........................42-51
Elektronischer Geräuschsensor
Lieferumfang/Teileübersicht ................................................ 52
Elektronischen Geräuschsensor zusammenbauen
.............. 54-63
Was geschieht bei diesem Experiment? ................................. 64
Hinweise zur Reinigung ....................................................... 68
Entsorgung ....................................................................... 70
EG-Konformitätserklärung ................................................... 74
EN
Table of contents
General warnings .............................................................8-11
Liquid-powered Clock
Scope of delivery/Parts overview ......................................... 25
Assembling the liquid-powered clock ................................ 29-42
Assembling the battery-powered clock ..............................42-51
Electronic Sound Sensor
Scope of delivery/Parts overview ......................................... 53
Assembling the electronic sound sensor ........................... 54-63
What happens in this experiment?......................................... 64
Tips on cleaning ................................................................ 68
Disposal ........................................................................... 70
EC Declaration of Conformity ............................................... 74
FR
Table des matières
Consignes générales de sécurité ......................................12-15
Montre actionnée par fluide
Volume de livraison/Aperçu des pièces ................................. 26
Assemblage de la montre actionnée par fluide ................... 29-42
Assemblage de la montre actionnée par pile ......................42-51
Page is loading ...
Page is loading ...
Page is loading ...
Page is loading ...
Page is loading ...

8
EN
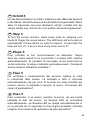
General Warnings
0-3
Not suitable for children under 3 years!
Do not use in the presence of small children or animals. Store out of
the reach of small children and animals.
CAUTION!
This product includes chemicals and/or materials that are classified
as safety hazards. Prevent the contact of chemicals with any body
parts - especially mouth and eyes. Wear suitable safety glasses
during the whole use.
RISK OF CHOKING!
Children should only use the device under adult supervision. Keep
packaging material, like plastic bags and rubber bands, out of the
reach of children, as these materials pose a choking hazard.
Contains functional sharp edges and points! Small parts –
CHOKING HAZARD!
RISK of BODILY INJURY!
Do not drink the chemicals. Wash hands thoroughly with running
water after using the chemicals. In the event that the chemicals
come into contact with your eyes or mouth, rinse thoroughly with
water. If you are in pain after exposure, contact a doctor immediately
and take the substances with which you came into contact with.

9
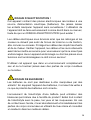
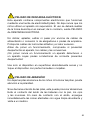
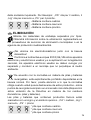
RISK of ELECTRIC SHOCK!
This device contains electronic components that operate via a
power source (batteries). Children should only use the device under
adult supervision. Only use the device as described in the manual;
otherwise, you run the risk of an electric shock.
Never bend, pinch or pull the power and connecting cables,
extensions and adapters. Protect the cables from sharp edges and
heat. Before operating, check the device, cables and connections
for damage. Never use a damaged unit or a unit with damaged
power cables.
Only use the device in complete dry environment and do not touch
it with wet or moist parts of your body.
RISK OF CHEMICAL BURN!
Keep batteries out of the reach of children! Make sure you insert the
batteries correctly.
Leaking battery acid can lead to chemical burns. Avoid contact of
battery acid with skin, eyes and mucous membranes. In the event of
contact, rinse the affected region immediately with a plenty of water
and seek medical attention.
RISK of FIRE/EXPLOSION!
Do not expose the device to high temperatures. Use only the
recommended batteries. Do not short-circuit the device or batteries,
or throw them into a fire. Excessive heat or improper handling could
trigger a short-circuit, a fire or an explosion.

10
Protect the device from severe shocks!
Never recharge normal, non-rechargeable batteries. This could
lead to explosion during the charging process.
NOTE!
Use only the recommended batteries. Always replace weak or empty
batteries with a new, complete set of batteries at full capacity. Do not
use batteries from different brands or with different capacities. Remove
the batteries from the unit if it has not been used for a long time.
Never use rechargeable batteries.
The clock cannot be operated simultaneously with batteries and an
electrolyte solution. This could lead to irreparable damage to the
device; the manufacturer is not liable for this damage!
The manufacturer is not liable for damage related to improperly
installed batteries!
The workplace for the experiment must be clean and free of
disturbing elements and located out of the reach of food containers.
It must also be well lit and ventilated and located near a water
source. The use of a solid table with a heat-resistant surface is
recommended.

11
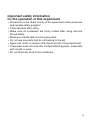
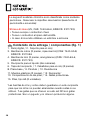
Important safety information
for the operation of this experiment
• All persons in the direct vicinity of the experiment setup must use
appropriate safety goggles
2
.
• Clean all parts after using.
• Make sure all containers are firmly closed after using and are
stored safely.
• Wash your hands after touching any parts.
• Do not use any parts that do not belong to the set.
• Never eat, drink or smoke in the direct vicinity of the experiment.
• Chemicals must not come into contact with body parts - especially
with mouth or eyes.
• Do not store any food in the containers.
Page is loading ...
Page is loading ...
Page is loading ...
Page is loading ...
Page is loading ...
Page is loading ...
Page is loading ...
Page is loading ...
Page is loading ...
Page is loading ...
Page is loading ...

23
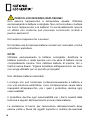
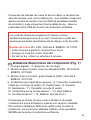
Advertencias importantes para realizar
el experimento
• Todas las personas que participen activamente en la construcción
de este experimento deberán llevar gafas protectoras
2
.
• Limpie todos los componentes tras su uso.
• Asegúrese de que todos los recipientes están bien cerrados y
guárdelos adecuadamente tras realizar el experimento.
• Lávese las manos detenidamente después de tocar algún
componente.
• No use ninguna otra pieza que no forme parte de este set.
• Nunca coma, beba o fume al lado del experimento.
• Los agentes químicos no deben tocar ninguna parte del cuerpo
-en especial ni los ojos ni la boca-.
• No guarde comida en los recipientes.

24
Ob
Oc
Od
Oe
OF
OG
OH
OI
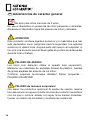
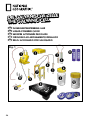
Fig. 1
Oe
Od
OJ
O1)
O1!
O1@
O1#
O1$
O1%
DIE GALVANISCHE ZELLE
THE GALVANIC CELL
DE
FLÜSSIGKEITSBETRIEBENE-UHR
EN
LIQUID-POWERED CLOCK
FR
MONTRE ACTIONNÉE PAR FLUIDE
IT
OROLOGIO AD AZIONAMENTO IDRAULICO
ES
RELOJ ACCIONADO POR UN LÍQUIDO

25
DE
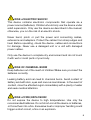
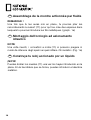
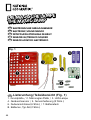
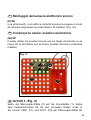
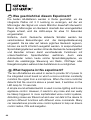
Lieferumfang/Teileübersicht (Fig. 1)
1. Digitaluhr / 2. Halterung für die Uhr / 3. Kupferstreifen (2 Stck.,
rötlich-braun) (CAS: 7440-50-8, EINECS: 2311596)
4. Zinkstreifen (2 Stck, bläulich-grau) (CAS: 7440-66-6, EINECS:
2311753) / 5. Flüssigkeitsbehälter (zwei Kammern)
6. Behälterabdeckung / 7. Ständer für die Uhr (2 Stck.)
8. Grundplatte / 9. Pendel / 10. Widerstand
11. Federanschlüsse (3 Stck.) / 12. Aufbewahrungsbehälter
1
13. Batteriefach / 14. Arbeitsbrille
2
/ 15. Batterien, Typ AA (2 Stck.)
1
Kupfer- und Zinkstreifen in diesem kindersicheren Behälter aufbe-
wahren, wenn sie nicht benutzt werden.
2
Die im Lieferumfang ent-
haltene Brille ist NICHT als Schutzbrille geeignet, sondern lediglich
als Spielzeug OHNE ausreichende Schutzfunktion verwendbar.
Die folgenden Chemikalien werden als Gefahrenstoffe
eingestuft. Bitte beachten Sie dazu die folgenden Anmerkungen
(Risiko- und Sicherheitshinweise):
Zinkstreifen (Zn, CAS: 7440-66-6, EINECS: 2311753):
• Behälter stets fest verschlossen halten
• Behälter vor Feuchtigkeit schützen
• Bei Feuer Schaumlöscher einsetzen
EN
Scope of delivery/Parts overview (Fig. 1)
1. Digital clock / 2. Stand for the clock / 3. Copper strip (2 pcs.,
reddish-brown) (CAS: 7440-50-8, EINECS: 2311596)
4. Zinc strip (2 pcs, bluish-grey) (CAS: 7440-66-6, EINECS:
2311753)
5. Container for liquid (two compartments) / 6. Container cover
7. Footholders for the clock (2 pcs.) / 8. Base plate / 9. Pendulum

26
10. Resistor / 11. Spring connectors (3 pcs.)
12. Storage containers
1
/ 13. Battery compartement
14. Safety goggles
2
/ 15. Batteries, type AA (2 pcs.)
1
Store the copper and zinc strips in these childproof containers
when they are not in use.
2
The goggles delivered with this set must
NOT be used as safety goggles but only as a toy WITHOUT any
protective function.
The following chemicals are classified as a safety hazard. Please
read the following information (risk and safety advices):
zinc stripes (Zn, CAS: 7440-66-6, EINECS: 2311753):
• Always keep the container closed firmly
• Protect the container from moisture
• Use foam extinguisher in case of fire.
FR
Volume de livraison/Aperçu des pièces (graph. 1)
1. Montre numérique / 2. Socle de la montre
3. Bandes de cuivre (2 pièces, brun-rouge) (CAS : 7440-50-8,
EINECS : 2311596)
4. Bandes de zinc (2 pièces, gris-bleu) (CAS : 7440-66-6,
EINECS : 2311753)
5. Conteneur de liquide (deux compartiments)
6. Couvercle du récipient / 7. Supports pour la montre (2 pièces)
8. Plaque de montage / 9. Pendule / 10. Résistance
11. Raccordements à ressort (3 pièces)
12. Récipient de stockage
1
/ 13. Compartiment à piles
14. Lunettes de travail
2
/ 15. Piles, type AA (2 pièces)
Page is loading ...
Page is loading ...

29
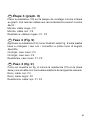
Los siguientes agentes químicos fueron clasificados como
materiales peligrosos. Le rogamos que tenga en cuenta las
siguientes advertencias (advertencias de seguridad y riesgos):
Barritas de zinc (Zn, CAS: 7440-66-6, EINECS: 2311753):
• Conserve el recipiente bien cerrado
• Proteja el recipiente de la humedad
• En caso de incendio, use el extintor
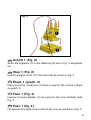
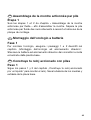
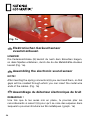
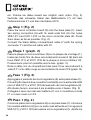
Fig. 1a
DE
Flüssigkeitsbetriebene Uhr zusammenbauen
HINWEIS!
Die Federanschlüsse (11) kannst du nach dem Einsetzen biegen,
so dass Spalten entstehen, durch die du die Metalldrähte stecken
kannst (Fig. 1a).
EN
Assembling the liquid-powered clock
NOTE!
After inserting the spring connectors (11) you can bend them, so
that gaps will be created through which you can insert the metal
wire ends of the cables. (Fig. 1a)
Page is loading ...

31
Ob
Oc
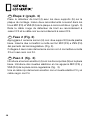
Fig. 2
DE
Schritt 1 (Fig. 2)
Setze die Digitaluhr (1) in die Halterung (2) wie in Fig. 2 dargestellt
ein.
EN
Step 1 (Fig. 2)
Insert the digital clock (1) in the stand (2) as shown in Fig. 2.
FR
Étape 1 (graph. 2)
Place la montre numérique (1) dans le support (2) comme indiqué
au graph. 2.
IT
Fase 1 (Fig. 2)
Inserire l‘orologio digitale (1) nel supporto (2) come illustrato nella
Fig. 2.
ES
Paso 1 (fig. 2)
Introduce el reloj digital (1) en el soporte (2) como se muestra en la fig. 2.

32
Oj
Oh
Fig. 3
Oi
DE
Schritt 2 (Fig. 3)
Bringe das Pendel (9) wie in Fig. 3 gezeigt unter der Halterung für
die Uhr an und setze beidseitig in die Ständer für die Uhr (7) ein.
Setze anschließend alles in die Grundplatte (8) ein.
EN
Step 2 (Fig. 3)
Attach the Pendulum (9) to the bottom of the stand as shown in Fig.
3 and then place it with both sides on the footholders for the clock
(7). After that place everything on the base plate (8).
FR
Étape 2 (graph. 3)
Place le pendule (9) sous le socle de la montre comme indiqué au
graph. 3 et place le socle des deux côtés sur les supports de la
montre (7). Insère ensuite le tout dans la plaque de montage (8).
Page is loading ...

34
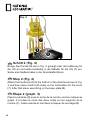
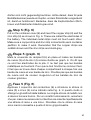
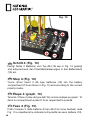
EN
Step 3 (Fig. 4)
Place two spring connectors (11) onto the base plate (8). Insert
them with their small ends first as deep as possible into the holes
F1 to F2 on the base plate. Connect the red clock cable with the
spring connector F1 and the black cable with F2 (Fig. 4).
FR
Étape 3 (graph. 4)
Insère deux raccordements à ressort (11) dans la plaque de
montage (8). Pour cela, introduis le plus loin possible le bout fin des
ressorts dans les trous F1 et F2 sur la plaque de montage. Relie le
câble rouge de la montre au raccordement à ressort F1 et le câble
noir au raccordement à ressort F2 (graph. 4).
IT
Fase 3 (Fig. 4)
Inserire due connettori a molla (11) nella piastra base (8). A tale
scopo inserire le molle rispettivamente con l‘estremità sottile il più in
fondo possibile nei fori F1 e F2 della piastra base.Collegare il cavo
rosso dell‘orologio con il connettore a molla F1 e il cavo nero con
F2 (Fig. 4).
ES
Paso 3 (fig. 4)
Coloca dos muelles elásticos (11) en la placa base (8). Introduce
cada muelle por su parte más estrecha en los agujeros F1 y F2
de la placa base. Une el cable rojo del reloj con el muelle elástico
situado en F1 y el cable negro con el muelle situado en F2 (fig. 4).

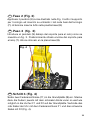
35
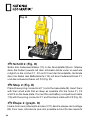
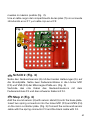
Fig. 5
OF
DE
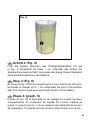
Schritt 4 (Fig. 5)
Fülle die beiden Kammern des Flüssigkeitsbehälters (5) wie
in Fig. 5 dargestellt bis etwa 1 cm unterhalb des Endes der
Kammertrennwand mit Saft, Limonade oder Essig. Diese Flüssigkeit
dient als Elektrolytlösung der Batterie.
EN
Step 4 (Fig. 5)
As shown in Fig. 5 fill both compartments of the container (5) with juice,
lemonade or vinegar up to 1 cm underneath the end of the partition
wall. This liquid is used as an electrolyte solution of the battery.
FR
Étape 4 (graph. 5)
Prends du jus, de la limonade ou du vinaigre et remplis les deux
compartiments du conteneur de liquide (5) comme indiqué au
graph. 5 jusqu’à environ 1 cm au-dessous de l’extrémité de la paroi
de séparation. Ce liquide sert de solution d’électrolyte pour la pile.
Page is loading ...

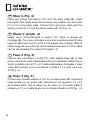
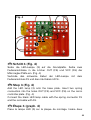
37
dürfen sich nicht gegenseitig berühren. Achte darauf, dass für jede
Behälterkammer jeweils ein Kupfer- und ein Zinkstreifen eingesteckt
ist, damit es funktioniert. Bedenke, dass die Kupferstreifen rötlich-
braun und Zinkstreifen bläulich-grau sind.
EN
Step 5 (Fig. 6)
Put on the container cover (6) and insert the copper strip (3) and the
zinc strip (4) as shown in Fig. 6. These are called the electrodes of
the battery. The individual metal strips must not touch each other.
Make sure a copper strip and zinc strip is inserted to each container
partition to make it work. Remember that the copper strips are
reddish-brown and the zinc strips are bluish-grey.
FR
Étape 5 (graph. 6)
Mets le couvercle du récipient (6) en place et insère les bandes
de cuivre (3) et de zinc (4) comme illustré au graph. 6. On dit que
ce sont les électrodes de la pile. Il ne faut pas que les bandes
métalliques se touchent. Pour que le tout fonctionne comme il faut,
il faut que se trouve dans chaque compartiment à chaque fois une
bande de cuivre et une bande de zinc. N’oublie pas que les bandes
de cuivre sont de couleur rouge-brun et les bandes de zinc de
couleur gris-bleu.
IT
Fase 5 (Fig. 6)
Applicare il coperchio del contenitore (6) e introdurre le strisce di
rame (3) e zinco (4) come indicato nella Fig. 6. In questo modo si
ottengono gli elettrodi della batteria. Le singole strisce di metallo non
si devono toccare tra loro. Per un corretto funzionamento, accertarsi
che per ciascuna camera del contenitore sia inserita rispettivamente
una striscia di rame e una zinco. Ricordare che le strisce di rame
sono marroni-rossastre e quelle di zinco grigio-bluastre.
Page is loading ...

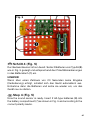
39
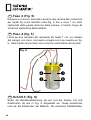
EN
Step 6 (Fig. 7)
Connect the red cable with a copper strip and the spring connector
F1. Connect the black cable with the zinc strip in the opposite
container partition and with F2 (Fig. 7). Now connect the other zinc
strip and copper strip together. You‘re done! The digital clock is now
powered up.
FR
Étape 6 (graph. 7)
Relie le câble rouge à une bande de cuivre et au raccordement
à ressort F1. Relie le câble noir à la bande de zinc de l’autre
compartiment et au raccordement à ressort F2 (voir graph. 7).
Relie maintenant directement ensemble les deux autres bandes de
zinc et de cuivre. Terminé ! La montre numérique est maintenant
alimentée en courant.
IT
Fase 6 (Fig. 7)
Collegare il cavo rosso con una striscia di rame e il connettore a
molla F1. Collegare il cavo nero con la striscia di zinco nell‘altra
camera e con F2 (vedi Fig. 7). Ora collegare ancora le altre strisce
di zinco e rame direttamente tra loro. Finito! A questo punto la
corrente è alimentata all‘orologio digitale.
ES
Paso 6 (fig. 7)
Une el cable rojo con una de las barritas de cobre y el muelle
elástico de F1. Une el cable negro con la barrita de zinc de la otra
cámara y con F2 (fig. 7). Ahora une las otras dos barritas de zinc y
cobre. Tu reloj digital se abastece con energía.

40
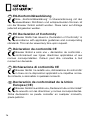
DE
Was geschieht bei diesem Experiment?
Die Digitaluhr benötigt Elektrizität, um zu arbeiten. Elektrizität wird
produziert durch den Fluss mikroskopisch kleiner Partikel, die
man Elektronen nennt. Die Batterie, die du gerade gebaut hast,
sorgt dafür, dass diese Elektronen fließen können. Das ist also
elektrischer Strom. Was passiert genau? Es findet eine chemische
Reaktion an den Zink- und Kupferstreifen statt. In Verbindung mit
der sauren Lösung findet dann ein Elektronenfluss statt, wenn sie
mit einem Kabel verbunden sind. Wie jede normale Batterie hat
auch diese eine begrenzte Lebenszeit. An der Kupferelektrode
wird Wasserstoff produziert während an der Zink-Elektrode Oxid-
Ablagerungen entstehen, die als Barriere zwischen dem Metall
und der Elektrolytlösung fungieren. Um deine Batterie wieder zu
verwenden, reinige die Metallstreifen mit Sandpapier und fülle die
Behälterkammern erneut mit frischer Flüssigkeit.
EN
What happens in this experiment?
The digital clock needs electricity to work. Electricity is produced
through the flow of tiny particles which are called electrons. The
battery that you have already built ensures for a constant flow of
the elctrons. This is electrical current. What happens in detail? A
chemical reaction takes place on the zinc and copper strips. In
combination with the acid solution a flow of the electrons proceeds
as long as they are connected with the cable. As every normal
battery does, this one has a limited lifetime. Hydrogen is produced at
the copper electrode and zinc electrode oxide deposits are formed
which function as a barrier between the metal and the electrolyte
solution. To reuse the battery just clean the metal strips with sand
paper and fill the container partitions with new fresh liquid.
Page is loading ...

42
ES
¿ Qué ocurre exactamente durante este
experimento?
El reloj digital necesita electricidad para funcionar. La electricidad
se produce mediante el flujo de diminutas partículas microscópicas
que se llaman electrones. La batería que acabas de construir sirve
para que los electrones puedan fluir. Es decir, corriente eléctrica.
Y, ¿qué pasa exactamente? Se forma una reacción química en las
barritas de cobre y zinc. Gracias la solución ácida se produce una
corriente de electrones si éstos están conectados con un cable.
Como cualquier pila o batería, la vida útil de este experimento
es limitada. En los electrones de cobre se produce hidrógeno,
mientras que en las barritas de zinc se genera óxido que funciona
como barrera entre el metal y la solución electrolítica. Para usar de
nuevo la batería, limpia las barritas de metal con papel de lija y llena
las cámaras del recipiente con nuevo líquido.
DE
Batteriebetriebene Uhr zusammenbauen
Schritt 1
Führe die Schritte 1. und 2. aus dem Kapitel „Flüssigkeitsbetriebene
Uhr zusammenbauen“ aus, um die Uhr zusammenzubauen. Trenne
die flüssigkeitsbetriebene Batterie von den Federanschlüssen und
entferne Sie von der Grundplatte.
EN
Assembling the battery-powered clock
Step 1
Repeat steps 1 and 2 of chapter „Assembling the liquid-powered
clock“ to assemble the clock. Disconnect the liquid-powered clock
from the spring connectors and remove it from the base plate.
Page is loading ...

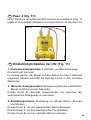
44
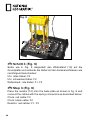
Fig. 8
F1☛
F2☛
F3☛
O1#
OI
DE
Schritt 2 (Fig. 8)
Setze drei Federanschlüsse (11) in die Grundplatte (8) ein. Stecke
dazu die Federn jeweils mit dem schmalen Ende voran so weit wie
möglich in die Löcher F1, F2 und F3 auf der Grundplatte. Verbinde
das rote Kabel des Batteriefachs (13) mit dem Federanschluss F1
und das schwarze Kabel mit F2 (Fig. 8).
EN
Step 2 (Fig. 8)
Place three spring connectors (11) onto the base plate (8). Insert them
with their small ends first as deep as possible into the holes F1, F2
and F3 on the base plate. Connect the red battery compartment cable
(13) with the spring connector F1 and the black cable with F2 (Fig. 8).
FR
Étape 2 (graph. 8)
Insère trois raccordements à ressort (11) dans la plaque de montage
(8). Pour cela, introduis le plus loin possible le bout fin des ressorts
Page is loading ...
Page is loading ...
Page is loading ...
Page is loading ...
Page is loading ...
Page is loading ...
Page is loading ...
Page is loading ...
Page is loading ...
Page is loading ...
Page is loading ...
Page is loading ...
Page is loading ...
Page is loading ...
Page is loading ...
Page is loading ...
Page is loading ...
Page is loading ...
Page is loading ...
Page is loading ...
Page is loading ...
Page is loading ...
Page is loading ...
Page is loading ...
Page is loading ...
Page is loading ...
Page is loading ...
Page is loading ...
Page is loading ...
Page is loading ...
Page is loading ...
Page is loading ...
-
 1
1
-
 2
2
-
 3
3
-
 4
4
-
 5
5
-
 6
6
-
 7
7
-
 8
8
-
 9
9
-
 10
10
-
 11
11
-
 12
12
-
 13
13
-
 14
14
-
 15
15
-
 16
16
-
 17
17
-
 18
18
-
 19
19
-
 20
20
-
 21
21
-
 22
22
-
 23
23
-
 24
24
-
 25
25
-
 26
26
-
 27
27
-
 28
28
-
 29
29
-
 30
30
-
 31
31
-
 32
32
-
 33
33
-
 34
34
-
 35
35
-
 36
36
-
 37
37
-
 38
38
-
 39
39
-
 40
40
-
 41
41
-
 42
42
-
 43
43
-
 44
44
-
 45
45
-
 46
46
-
 47
47
-
 48
48
-
 49
49
-
 50
50
-
 51
51
-
 52
52
-
 53
53
-
 54
54
-
 55
55
-
 56
56
-
 57
57
-
 58
58
-
 59
59
-
 60
60
-
 61
61
-
 62
62
-
 63
63
-
 64
64
-
 65
65
-
 66
66
-
 67
67
-
 68
68
-
 69
69
-
 70
70
-
 71
71
-
 72
72
-
 73
73
-
 74
74
-
 75
75
-
 76
76


National Geographic 9130700 Owner's manual
- Type
- Owner's manual
Ask a question and I''ll find the answer in the document
Finding information in a document is now easier with AI
in other languages
Related papers
-
National Geographic Science Kit: The Reflex Barrier & The hot Wire Owner's manual
-
-
-
-
-
-
-
-
-
Other documents
-
Bresser Liquid-powered Clock Owner's manual
-
Bresser Junior 9660100 Owner's manual
-
Skandika Kiruna Jord Operating instructions
-
-
Bresser BR-PH50 Light Cube + Light 50x40x39cm Owner's manual
-
-
-
-
-