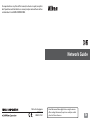
En
Network Guide
• Read this manual thoroughly before using the camera.
• After reading this manual, keep it in a readily accessible
place for future reference.
No reproduction in any form of this manual, in whole or in part (except for
brief quotation in critical articles or reviews), may be made without written
authorization from NIKON CORPORATION.
Printed in Singapore
SB5L01(11)
6MB29811-01

ii
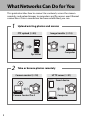
What Networks Can Do for You
This guide describes how to connect to a network, access the camera
remotely, and upload images to computers and ftp servers over Ethernet
connections. Once a connection has been established, you can:
1
Upload existing photos and movies
2
Take or browse photos remotely
FTP upload (045) Image transfer (014)
ftp server
Computer
Camera control (018) HTTP server (021)
Camera Control Pro 2
Smart device
Computer

iii
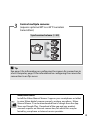
3
Control multiple cameras
(requires optional WT-6 or WT-5 wireless
transmitters)
A Tip
See page 5 for information on configuring the camera for connection to
a host computer, page 39 for information on configuring the camera for
connection to an ftp server.
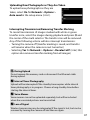
Nikon Manual Viewer 2
Install the Nikon Manual Viewer 2 app on your smartphone or tablet
to view Nikon digital camera manuals, anytime, anywhere.
Nikon
Manual Viewer 2 can be downloaded free of charge from the App
Store and Google Play.
Download of the app and any product
manuals requires an Internet connection, for which fees may be
levied by your phone or Internet service provider.
Synchronized release (049)

iv
Trademark Information
IOS is a trademark or registered trademark of Cisco Systems, Inc., in the
United States and/or other countries and is used under license. Windows
is either a registered trademark or a trademark of Microsoft Corporation in
the United States and/or other countries. Mac, OS X, iPhone, and iPad are
registered trademarks of Apple Inc. in the United States and/or other
countries. XQD is a trademark of Sony Corporation. CompactFlash is a
trademark of SanDisk Corporation. All other trade names mentioned in
this guide or the other documentation provided with your Nikon product
are trademarks or registered trademarks of their respective holders.
Memory Cards
This camera is available in XQD- and CompactFlash-compatible models.
The instructions in this guide assume an XQD memory card is used, but
the operations for both models are identical.
Apple Public Source License
This product includes Apple mDNS source code that is subject to the
terms of the Apple Public Source License located at URL
http://developer.apple.com/opensource/.
This file contains Original Code and/or Modifications of Original Code as
defined in and that are subject to the Apple Public Source License Version
2.0 (the ‘License’). You may not use this file except in compliance with the
License. Please obtain a copy of the License at
http://www.opensource.apple.com/license/apsl/ and read it before
using this file.
The Original Code and all software distributed under the License are
distributed on an ‘AS IS’ basis, WITHOUT WARRANTY OF ANY KIND, EITHER
EXPRESS OR IMPLIED, AND APPLE HEREBY DISCLAIMS ALL SUCH
WARRANTIES, INCLUDING WITHOUT LIMITATION, ANY WARRANTIES OF
MERCHANTABILITY, FITNESS FOR A PARTICULAR PURPOSE, QUIET
ENJOYMENT OR NON-INFRINGEMENT. Please see the License for the
specific language governing rights and limitations under the License.

v
Notices
• No part of this guide may be reproduced, transmitted, transcribed,
stored in a retrieval system, or translated into any language in any form,
by any means, without Nikon’s prior written permission.
• Nikon reserves the right to change the appearance and specifications of
the hardware and software described in this guide at any time and
without prior notice.
• Nikon will not be held liable for any damages resulting from the use of
this product.
• While every effort has been made to ensure that the information in this
guide is accurate and complete, we would appreciate it were you to
bring any errors or omissions to the attention of the Nikon
representative in your area (address provided separately).
Notice Concerning Prohibition of Copying or Reproduction
Note that simply being in possession of material that has been digitally
copied or reproduced by means of a scanner, digital camera, or other
device may be punishable by law.
• Items prohibited by law from being copied or reproduced
Do not copy or reproduce paper money, coins, securities, government
bonds, or local government bonds, even if such copies or reproductions
are stamped “Sample.”
The copying or reproduction of paper money, coins, or securities which
are circulated in a foreign country is prohibited.
Unless the prior permission of the government has been obtained, the
copying or reproduction of unused postage stamps or post cards issued
by the government is prohibited.
The copying or reproduction of stamps issued by the government and
of certified documents stipulated by law is prohibited.

vi
• Cautions on certain copies and reproductions
The government has issued cautions on copies or reproductions of
securities issued by private companies (shares, bills, checks, gift
certificates, etc.), commuter passes, or coupon tickets, except when a
minimum of necessary copies are to be provided for business use by a
company. Also, do not copy or reproduce passports issued by the
government, licenses issued by public agencies and private groups, ID
cards, and tickets, such as passes and meal coupons.
• Comply with copyright notices
Under copyright law, photographs or recordings of copyrighted works
made with the camera can not be used without the permission of the
copyright holder. Exceptions apply to personal use, but note that even
personal use may be restricted in the case of photographs or recordings
of exhibits or live performances.
Background Knowledge
This guide assumes basic knowledge of ftp servers, local area networks
(LANs), and wireless networks. For more information on installing,
configuring, and using the devices in a network, contact the manufacturer
or network administrator. Information on configuring computers for
connection to wireless networks may be found in the on-line help for the
Wireless Transmitter Utility.
Life-Long Learning
As part of Nikon’s “Life-Long Learning” commitment to ongoing product
support and education, continually-updated information is available on-
line at the following sites:
• For users in the U.S.A.: http://www.nikonusa.com/
• For users in Europe and Africa: http://www.europe-nikon.com/support/
• For users in Asia, Oceania, and the Middle East: http://www.nikon-asia.com/
Visit these sites to keep up-to-date with the latest product information,
tips, answers to frequently-asked questions (FAQs), and general advice on
digital imaging and photography. Additional information may be
available from the Nikon representative in your area. See the following
URL for contact information: http://imaging.nikon.com/

vii
Illustrations
The appearance and content of the software and operating system
dialogs, messages, and displays shown in this guide may vary with the
operating system used. For information on basic computer operations,
see the documentation provided with the computer or operating system.

viii
What Networks Can Do for You.........................................................ii
Notices........................................................................................................v
Introduction 1
Network Options.....................................................................................2
The Wireless Transmitter Utility ........................................................4
Transfer, Control, and HTTP 5
Ethernet Connections ...........................................................................5
Step 1: Connecting an Ethernet Cable....................................... 6
Step 2: Enabling the Ethernet ....................................................... 8
Step 3: The Connection Wizard .................................................... 8
Step 4: Pairing...................................................................................12
Image Transfer...................................................................................... 14
Camera Control .................................................................................... 18
HTTP Server............................................................................................ 21
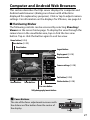
Computer and Android Web Browsers....................................27
iPhone Web Browsers ....................................................................34
Table of Contents
For information on connecting to a wireless LAN using an
optional WT-6 or WT-5 wireless transmitter, see the manual
provided with the device.

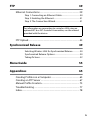
ix
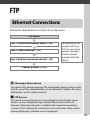
FTP 39
Ethernet Connections........................................................................ 39
Step 1: Connecting an Ethernet Cable .................................... 40
Step 2: Enabling the Ethernet..................................................... 41
Step 3: The Connection Wizard.................................................. 41
FTP Upload............................................................................................. 45
Synchronized Release 49
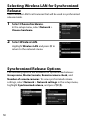
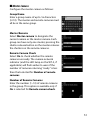
Selecting Wireless LAN for Synchronized Release.............. 50
Synchronized Release Options .................................................. 50
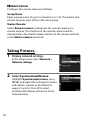
Taking Pictures................................................................................. 52
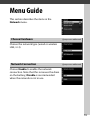
Menu Guide 55
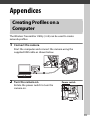
Appendices 65
Creating Profiles on a Computer ................................................... 65
Creating an FTP Server ...................................................................... 67
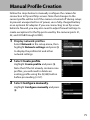
Manual Profile Creation..................................................................... 75
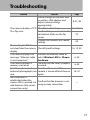
Troubleshooting .................................................................................. 77
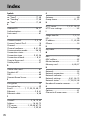
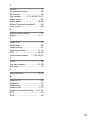
Index......................................................................................................... 78
For information on connecting to a wireless LAN using an
optional WT-6 or WT-5 wireless transmitter, see the manual
provided with the device.

x

1
Introduction
This guide describes how to use the camera in (chiefly Ethernet)
network environments, including connecting to and operating the
camera in a network. Be sure to read this guide and the camera
manual thoroughly and to keep them where they will be read by
all those who use the product. Information on using optional WT-6
and WT-5 wireless transmitters can be found in the manuals for the
devices in question.
Symbols and Conventions
The following symbols and conventions are used throughout this guide:
Save where otherwise noted, it is assumed that default camera settings
are used.
D
This icon marks cautions, information that should be read before
use to prevent damage to the product.
A
This icon marks notes, information that should be read before
using the device.
0
This icon marks references to other pages in this guide.

2
Network Options
The camera can be connected to Ethernet or wireless networks
using the built-in Ethernet port or an optional WT-6 or WT-5
wireless transmitter (note that an Ethernet cable — available
separately from commercial sources — is required for an Ethernet
connection). Choose from the following connection modes:
FTP upload
(045)
Upload existing photos and movies to a computer
or ftp server, or upload new photos as they are
taken.
Image transfer
(014)
Camera control
(018)
Control the camera using optional
Camera Control Pro 2 software and save new
photos and movies directly to the computer.
HTTP server
(021)
View and take pictures remotely using a browser-
equipped computer or smart device.
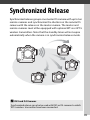
Synchronized release
(wireless only; 049)
Synchronize the shutter releases for multiple
remote cameras with a master camera.
A Ethernet Connection
Ethernet connections require no adjustments to wireless LAN settings.
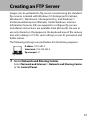
A FTP Servers
Servers can be configured using standard ftp services available with
supported operating systems, such as IIS (Internet Information
Services). Internet ftp connections and connection to ftp servers
running third-party software are not supported.
A HTTP Sever Mode
Internet connections are not supported in http server mode.

3
A Routers
Connection to computers on other networks via a router is not
supported.
A Firewall Settings
TCP ports 21 and 32768 through 61000 are used for ftp, TCP ports 22
and 32768 through 61000 for sftp, and TCP port 15740 and UDP port
5353 for connections to computers. File transfer may be blocked if the
server firewall is not configured to allow access to these ports.

4
The Wireless Transmitter Utility
The Wireless Transmitter Utility is used for pairing in image transfer
and camera control modes (013) and can also help create
network profiles. You can install the utility after downloading it
from the following website:
http://downloadcenter.nikonimglib.com/
Be sure to use the latest versions of the Wireless Transmitter Utility
and the camera firmware.

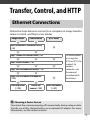
5
Transfer, Control, and HTTP
Follow the steps below to connect to a computer in image transfer,
camera control, and http server modes.
Ethernet Connections
Image transfer Camera control HTTP server
Install the Wireless Transmitter Utility
(04)
Step 1: Connect an Ethernet cable (06)
For information
on using the
WT-6 or WT-5 to
connect to
wireless
networks, see
the manual
provided with
the device.
Step 2: Select Ethernet (08)
Step 3: Run the connection wizard (08)
Step 4: Pair the camera and computer
(012)
Transfer pictures
(014)
Control the
camera (018)
Access the camera
(021)
D Choosing a Power Source
To prevent the camera powering off unexpectedly during setup or data
transfer, use a fully-charged battery or an optional AC adapter. For more
information, see the camera manual.

6
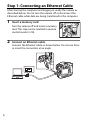
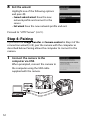
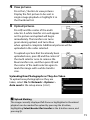
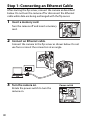
Step 1: Connecting an Ethernet Cable
After starting the computer and logging in, ready the camera as
described below. Do not turn the camera off or disconnect the
Ethernet cable while data are being transferred to the computer.
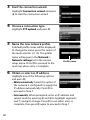
1 Insert a memory card.
Turn the camera off and insert a memory
card. This step can be omitted in camera
control mode (018).
2 Connect an Ethernet cable.
Connect the Ethernet cable as shown below. Do not use force
or insert the connectors at an angle.

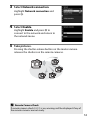
7
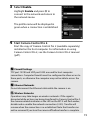
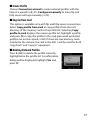
3 Turn the camera on.
Rotate the power switch to turn the
camera on.
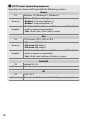
A Connection Status
Connection status is shown by the network
indicator.
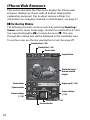
A The Viewfinder Display
Connection status is also shown in the
camera viewfinder. T is displayed when the
camera is connected via Ethernet, U when it
is connected to a wireless network, and a
flashing when an error has occurred.
Power switch
Network
indicator
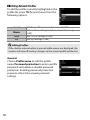
Network indicator Status
●
(off)
Network functions disabled (055) or Ethernet
cable not connected.
K
(green)
Waiting to connect.
H
(flashes green)
Connected.
H
(flashes amber)
Error.

8
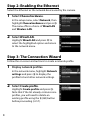
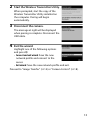
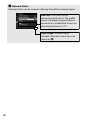
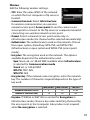
Step 2: Enabling the Ethernet
Select the Ethernet as the network device used by the camera.
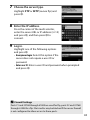
1 Select Choose hardware.
In the setup menu, select Network, then
highlight Choose hardware and press 2.
The menu offers a choice of Wired LAN
and Wireless LAN.
2 Select Wired LAN.
Highlight Wired LAN and press J to
select the highlighted option and return
to the network menu.
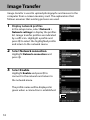
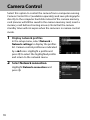
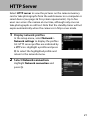
Step 3: The Connection Wizard
Follow the on-screen instructions to create a network profile.
1 Display network profiles.
In the network menu, highlight Network
settings and press 2 to display the
profiles list and other network settings.
2 Select Create profile.
Highlight Create profile and press 2.
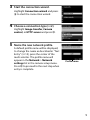
Note that if the list already contains nine
profiles, you will need to delete an
existing profile using the O (Q) button
before proceeding (057).

9
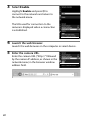
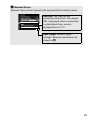
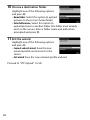
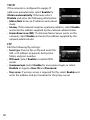
3 Start the connection wizard.
Highlight Connection wizard and press
2 to start the connection wizard.
4 Choose a connection type (02).
Highlight Image transfer, Camera
control, or HTTP server and press J.
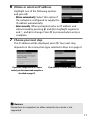
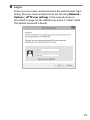
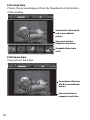
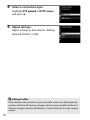
5 Name the new network profile.
A default profile name will be displayed;
to change the name as described in “Text
Entry” (0 10), press the center of the
multi selector. The profile name will
appear in the Network > Network
settings list in the camera setup menu.
Press J to proceed to the next step when
entry is complete.
Profile name

10
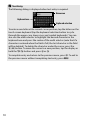
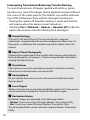
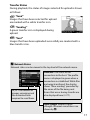
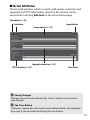
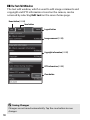
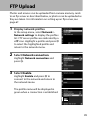
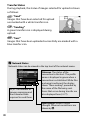
A Tex t Entry
The following dialog is displayed when text entry is required.
To enter a new letter at the current cursor position, tap the letters on the
touch-screen keyboard (tap the keyboard selection button to cycle
through the upper-case, lower-case, and symbol keyboards). You can
also use the multi selector to highlight the desired character in the
keyboard area and press the center of the multi selector (note that if a
character is entered when the field is full, the last character in the field
will be deleted). To delete the character under the cursor, press the
O (Q) button. To move the cursor to a new position, tap the display or
hold the W (M) button and press 4 or 2.
To complete entry and return to the previous menu, press J. To exit to
the previous menu without completing text entry, press G.
Name area
Keyboard area
Keyboard selection
Page is loading ...
Page is loading ...
Page is loading ...
Page is loading ...
Page is loading ...
Page is loading ...
Page is loading ...
Page is loading ...
Page is loading ...
Page is loading ...
Page is loading ...
Page is loading ...
Page is loading ...
Page is loading ...
Page is loading ...
Page is loading ...
Page is loading ...
Page is loading ...
Page is loading ...
Page is loading ...
Page is loading ...
Page is loading ...
Page is loading ...
Page is loading ...
Page is loading ...
Page is loading ...
Page is loading ...
Page is loading ...
Page is loading ...
Page is loading ...
Page is loading ...
Page is loading ...
Page is loading ...
Page is loading ...
Page is loading ...
Page is loading ...
Page is loading ...
Page is loading ...
Page is loading ...
Page is loading ...
Page is loading ...
Page is loading ...
Page is loading ...
Page is loading ...
Page is loading ...
Page is loading ...
Page is loading ...
Page is loading ...
Page is loading ...
Page is loading ...
Page is loading ...
Page is loading ...
Page is loading ...
Page is loading ...
Page is loading ...
Page is loading ...
Page is loading ...
Page is loading ...
Page is loading ...
Page is loading ...
Page is loading ...
Page is loading ...
Page is loading ...
Page is loading ...
Page is loading ...
Page is loading ...
Page is loading ...
Page is loading ...
Page is loading ...
Page is loading ...
Page is loading ...
Page is loading ...
-
 1
1
-
 2
2
-
 3
3
-
 4
4
-
 5
5
-
 6
6
-
 7
7
-
 8
8
-
 9
9
-
 10
10
-
 11
11
-
 12
12
-
 13
13
-
 14
14
-
 15
15
-
 16
16
-
 17
17
-
 18
18
-
 19
19
-
 20
20
-
 21
21
-
 22
22
-
 23
23
-
 24
24
-
 25
25
-
 26
26
-
 27
27
-
 28
28
-
 29
29
-
 30
30
-
 31
31
-
 32
32
-
 33
33
-
 34
34
-
 35
35
-
 36
36
-
 37
37
-
 38
38
-
 39
39
-
 40
40
-
 41
41
-
 42
42
-
 43
43
-
 44
44
-
 45
45
-
 46
46
-
 47
47
-
 48
48
-
 49
49
-
 50
50
-
 51
51
-
 52
52
-
 53
53
-
 54
54
-
 55
55
-
 56
56
-
 57
57
-
 58
58
-
 59
59
-
 60
60
-
 61
61
-
 62
62
-
 63
63
-
 64
64
-
 65
65
-
 66
66
-
 67
67
-
 68
68
-
 69
69
-
 70
70
-
 71
71
-
 72
72
-
 73
73
-
 74
74
-
 75
75
-
 76
76
-
 77
77
-
 78
78
-
 79
79
-
 80
80
-
 81
81
-
 82
82
-
 83
83
-
 84
84
-
 85
85
-
 86
86
-
 87
87
-
 88
88
-
 89
89
-
 90
90
-
 91
91
-
 92
92