Page is loading ...

Firmware-Upgradeable
User-definable Hotkey-preceding
Sequence
Addlogix
PowerReach Elite HD
KVM-801PREU-OSD / KVM-1601PREU-OSD
8/16-port Cascadable Rackmount
USB PS/2 KVM Switch w/ OSD
Quick Installation Guide
Thank you for purchasing the Addlogix KVM-801PREU-OSD /
KVM-1601PREU-OSD Cascadable Rackmount USB PS/2 KVM
Switch. With our high quality product, users can enjoy countless
benefits from using it.
Out-of-the-box Installation
Take the KVM Switch out of the box and begin
installation...
If you are using any PS/2 computer: Please make sure
all of your PS/2 computers are powered off before connecting to
the KVM Switch. Otherwise, the KVM Switch system might not be
properly set up. However, USB computers do not have this
limitation.
Step 1. Make sure (at least the PS/2) computers that are to be
connected to the KVM switch are powered off. If not,
power them off before you proceed with the following
steps.
Step 2. Connect the shared keyboard, mouse and monitor to the
console connectors on the rear of your (master) KVM
switch. Power on the KVM Switch by attaching the
power adapter cord.
Although the power is constantly fed through the USB or PS/2
interface from the connected computer, it is still necessary to use
the external power adapter for more stable OSD operation and the
cascaded application. Without external power source, the stability
of the KVM system might be compromised.
If you use only a single KVM switch in non-cascaded
application, you should ignore step 3, 4 and 5 and jump directly to
step 5.
If you want to daisy-chain multiple KVM Switches, go to
step 3. You can daisy-chain up to 16 levels of KVM Switches with a
maximum of 256 computers connected.
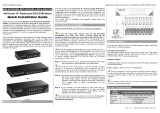
Step 3. Use the daisy-chain cable (M-HDB15-HDB15-F) to
connect the DaisyChain OUT Port (HDB 15 female) of
the master KVM Switch to the DaisyChain IN Port (HDB
15 male) of the second KVM switch. Connect the power
adapter cord to the second switch to power it on.
Step 4. If you have yet another switch to be daisy-chained, just
repeat Step 3 to connect them. You can daisy-chain up
to 16 units of KVM switches. Plug a terminator onto
the Daisy-chain Out Port of the last KVM switch unit.
No Terminator required if only using a single unit.
Step 5. (Now your KVM switch or daisy-chained KVM Switches
should have been powered-up and initialized). Connect
each of your computers to a computer port on the rear of
the switch(es). You should use the special USB PS/2
KVM cable (with the USB-to-PS/2 adapter) for
connection to a USB computer (PS/2 computer).
The special KVM cable provides a PS/2 keyboard connector, a
USB connector and a HDB video connector for the computer
connection. When connecting with a USB computer, just plug the
USB connector to it and leave the PS/2 connector free. When
connecting with a PS/2 computer, just add one USB-to-PS/2
adapter to the USB connector and you’ll have a PS/2 connector for
mouse. Do not connect USB connector and PS/2 keyboard
connector to a computer at the same time.
Step 6. Power up the connected computers. After your computer is
powered up the keyboard and mouse will be recognized
and now you can begin operating the switch.
Easy Operation
There are three ways to select a specific computer (on a specific
switch, if you have multiple daisy-chained KVM switches), using
front-panel push button, hotkey sequence or OSD Menu.
Front-panel push buttons
The front-panel buttons let you have direct control over KVM
switch operation and channel switching. Simply press a button to
switch to its corresponding channel.
See Quick Reference Sheet
Keyboard hotkeys
A keyboard hotkey sequence consists of at least three specific
keystrokes:
See Quick Reference Sheet
Hotkey sequence = ScrLk + ScrLk + Command key(s)
The two consecutive ScrLk keystrokes should be pressed
within 2 seconds and the following command key(s) should also be
pressed within 2 seconds in likewise manner. Otherwise, the
hotkey sequence will not be validated.
For detailed Hotkey sequences and their corresponding
functional commands.
See Quick Reference Sheet
OSD Menu
To activate the OSD (On Screen Display) Menu, use the hotkey
sequence:
Activate OSD = ScrLk + ScrLk + Space Bar
Deactivate OSD = ESC (Escape key)
Main OSD Menu Setup Menu
Main menu
Select computer: use Up/Down Arrow key to navigate,
PgUp/PgDn to scroll page. Hit Enter to select.
Edit computer name: just hit Insert to edit and Enter to confirm.
F1 : Next Page - rotate through Main Page / Setup page / Status
page
F10: Logout - lock your keyboard and mouse for security.
Password will be needed to log in.
Setup Menu
Autologout: specify time for auto logout (00~99 min)
OSD timeout: specify duration for OSD menu to stay on screen
Autoscan period: specify time for autoscan period
Title bar: enalble/disable the title bar, and also specify its position
Hotkey: specify the hotkey preceding sequence (SCROLL LOCK,
CAPS, ESC, F12 or NUM LOCK)
Setup Password: specify the password for access
Load Default: load default settings
Load Default All: load default settings to all daisy-chained units
Upgrade Firmware: upgrade the firmware of the KVM switch
Firmware Upgrade
This KVM Switch allows its user to upgrade firmware contents
whenever is needed to enhance the compatibility to other devices
or its functions and performance. Use the firmware upgrade cable
for connection to a host PC via the “Daisy-chain IN” port (see
previous configuration diagram). For firmware upgrade procedure,
please refer to Firmware Upgrade Operation Guide.

Notes:
1. OSD Menu control is only available when the OSD menu is activated on the screen. To activate the OSD menu, use the hotkey sequence ScrLk + ScrLk + (Space Bar). For detailed OSD operation reference,
please refer to the User Guide. When OSD Menu is active, the mouse will be locked until the OSD Menu is off.
2. Note that a, b, y and z each denotes a number key. (ab) = 01 ~ 16 ; (yz) = 01 ~ 08. For example, ScrLk + ScrLk + 03 + 06 is for bank 3 port 6. When using a single KVM Switch configuration, the default bank no.
is 01, therefore hit ScrLk + ScrLk + 01 + 12 for port 12 for a single KVM Switch configuration.
3. The password is up to 8-character length. You should remember the password since it is required for access to your KVM switch once you enable the password protection for your KVM switch. However, if you
forget the password and thus are blocked from KVM access, you should contact your local dealer for tech support.
Quick Reference Sheet
QUICK REFERNCE SHEET for Addlogix KVM Switch -- Operation Commands Hotkeys/ OSD Menu / Front-Panel Buttons
Hotkey sequence = [ScrLk]
*
+ [ScrLk]
*
+ Command key(s) * User-definable Preceding sequence = SCROLL LOCK, CAPS, ESC, F12 or NUM LOCK
Command Hotkeys OSD control
1
Front-panel Description
Select Computer
ScrLk + ScrLk + (a) + (b) + (y) + (z)
(ab = bank no. ; xy = channel no.)
2
Cursor keys to navigate
Enter to select
Press corresponding button yz on Switch
ab for channel yz on bank ab.
Select the active bank (switch) and channel
Next lower channel ScrLk + ScrLk + ↑ (arrow up)
Cursor keys to navigate
Enter to select
Press corresponding button
Select the next lower connected channel within
the current active bank
Next higher channel ScrLk + ScrLk + ↓ (arrow down)
Cursor keys to navigate
Enter to select
Press corresponding button Select the next higher connected channel
Next lower bank
ScrLk + ScrLk + PgUp PgUp (w/ OSD Menu)
Press corresponding button on that
switch
Select the next lower bank (switch) when with
multiple daisy-chained units
Next higher bank
ScrLk + ScrLk + PgDn PgDn (w/ OSD Menu)
Press corresponding button on that
switch
Select the next higher bank (switch ) when
with multiple daisy-chained units
Autoscan Beep Sound
On/Off
ScrLk + ScrLk + B -- --
Toggle on/off the beep sound for switching
confirmation while autoscanning
Define Hotkey Preceding
Sequence
--
Main Menu/Setup/Hotkey
[ SCROLL LOCK, CAPS, ESC,
F12 or NUM LOCK]
--
Select the hotkey preceding sequence among 5
alternative keys
Load Factory Default [All]
--
Main Menu / Setup / Load
Default [Load Default All]
--
Restore the EEPROM [all] settings to the
factory default
Change Computer Name
--
Cursor keys to navigate
Enter (Ins) to select/edit
--
Change the computer name
[max. length = 8 alphanumeric characters]
Reset / Initialize KVM
(whole daisy-chain)
ScrLk + ScrLk + End
-- --
Reset the KVM Switch / initialize the daisy-
chain setup
Show OSD Menu ScrLk + ScrLk + (Space Bar) -- -- Activate the OSD Menu on the console screen
Autoscan
ScrLk + ScrLk + S -- --
Autoscan through every connected channel for
quick screen browsing of each channel.
Stop Autoscan
Any key -- Press any push button Terminate Autoscan activity
Autoscan Period
[5 ~ 10 ~ 95 seconds]
--
Main Menu / Setup /
Autoscan period
--
Specify delay time within a range of 5 ~ 99
seconds [default = 10 sec ]
Auto Logout Timeout
Enable/Disable
[0 ~ 99 min ]
--
Main Menu / Setup / Auto
Logout
--
Specify the time out for auto logout -- screen
/keyboard/mouse locked after timeout period
for security. (default = 0 = disable)
OSD Menu Timeout
[0 ~ 60 ~ 95 seconds]
--
Main Menu / Setup / OSD
Timeout
--
Specify the timeout for OSD menu
[default = 60 seconds; 0 = disable]
OSD Title Bar On/Off
[ON/OFF]
ScrLk + ScrLk + T -- --
Enable/disable the OSD Title Bar
[default = ON]
OSD Title Bar Position
[Left/Right]
--
Main Menu / Setup / Title
Bar
Select the OSD title bar position on your screen
Setup Password
3
[Disable/Enable]
--
Main Menu / Setup / Setup
Password
--
Enable/disable password protection
[default == disable; password length <= 8
characters]
/