Page is loading ...

1
KOR Modular
and Spanner Table
Assembly Instructions
Congratulations on the purchase of your Tropitone® KOR Modular
Components. Read through all steps before fastening components
together.
CAUTION: Do not try to lift or flip furniture components
with only one person. Components may be heavy and
awkward to handle, and may result in injury to persons or
damage to property if not lifted properly.
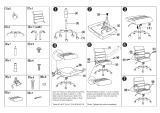
Tools Required
7/16” Combination Wrench Safety Glasses
Parts List per Sectional Unit
(1) Modular Component
(MC, ML, MR, or CC)
(2) Connecting Brackets
(MC, ML, MR, or CC)
(4) ¼ x 7/8” Hex Head Bolts
(MC, ML, MR or CC)
(4) ¼” Lock Washers
(MC, ML, MR, & CC)
(1) Seat Cushion
(1) Back Cushion
Parts List per Spanner Table
(1) Spanner Table
(8) ¼ x 3/4” Hex Head Bolts
(8) ¼” Lock Washers
Check that all items listed in the Parts List are in your carton.
Assembled furniture
is heavy. Assemble
at place of use.
2
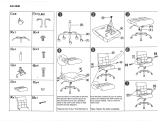
Modular Component Assembly
Step 1
Modular Components can be assembled in upright position. By
reaching under furniture with cushions removed, the attachment
locations may be accessed.
Step 2
Align Modular Components to be ready for assembly.
At the front and rear of the Modular Components that are being
joined together, attach a connecting Bracket to join the items
using (1) ¼-20 x 7/8” Hex Head Bolts fitted with (1) ¼” Lock
Washer through the holes in the brackets into the threaded holes
at the front and back of the components. Threaded holes are
located below the cushion under sling near the front of the
furniture components. Tighten bolts hand tight in both locations.
Fully Tighten bolts in both locations using a 7/16” combination
wrench.
Step 3
Repeat Step 2 for each additional Modular Component until all
items are fastened together into the desired configuration.

3
Step 4
Place the seat cushions onto each Modular Component with
Velcro attachment straps facing down and to the rear. Wrap
attachment straps around cross member bracing on furniture
component seat and engage Velcro 1 place on MC, ML, and MR,
and 3 places on CC.
Place the seat backs onto each Modular Component with Velcro
attachment straps facing rear. Wrap attachment straps around
cross member bracing on furniture component back and engage
Velcro 2 places on MC, ML, and MR, and 3 places on CC.
Spanner Table Assembly
Step 1
Modular Components can be assembled in upright position. By
reaching under furniture with cushions removed, the attachment
locations may be accessed.
Step 2
Align Modular Components to be ready for assembly.
At the front and rear of the Modular Components that the Spanner
Table is being joined to, attach a connecting Bracket to join the
items using (1) ¼-20 x ¾” Hex Head Bolts fitted with (1) ¼” Lock
Washer through the holes in the brackets into the threaded holes
at the front and back of the Components. Tighten bolts hand tight
in both locations. Repeat for second side of the Spanner Table.
Fully tighten all bolts.
4
MORE INFORMATION
For care and cleaning instructions, refer to the Tropitone® Care,
Maintenance, Safety & Warranty Information guide included with
your furniture and available at www.tropitone.com/warranty.
Additional care information, “How To” videos and assembly
instructions for Tropitone Outdoor Furniture and Basta Sole shade
products are also available at our website.
If you have difficulty understanding any of the instructions and
need assistance while assembling your KOR Components, please
call Tropitone’s Customer Service Center at 949-951-2010.
Tropitone Furniture Co., Inc.
5 Marconi, Irvine, CA 92618
949 951 2010 phone
www.tropitone.com
Part # R9T00027
Revised: 05.25.2017
©2017 Tropitone Furniture Co., Inc.
/