
Copyright © 2022 Pahlén AB, Box 728, SE-194 27 Upplands Väsby, Sweden
Tel. +46 8 594 110 50, Fax +46 8 590 868 80, e-mail: [email protected], www.pahlen.com
User manual
Jet Swim Motion
MA30-09 rev.3
2022

SVENSKA 3
ENGLISH 11
DEUTSCH 19
РУССКИЙ 27
FRANÇAIS 35
ESPAÑOL 43
ITALIANO 51

3
Jet Swim Motion
MA30-09 SV Instruktionens originalspråk
SVENSKA
Det är viktigt att läsa igenom denna manual noggrant för att trygga poolutrustningens funktion och livslängd.
Denna manual nns även att hämta från www.pahlen.se
Pahlén AB ansvarar ej för produktgaranti eller skador som sker till följd av felaktig installation, handhavandefel eller felaktigt
underhåll.
VARNING
• Denna apparat får inte användas i aggressivt vatten, saltvatten eller pooler/badtunnor med
klormaskin/saltklorinator, se rekommenderade värden beträande vattenkvalitet.
• Apparaten skall installeras i enlighet med gällande nationella lagar och förordningar och
den elektriska installationen får endast utföras av behörig elinstallatör.
• Påbörja inte installation av apparaten innan ni läst och förstått installationsanvisningar och
varningar i denna manual. Om ni har några frågor om installationsanvisningar eller
varningar, kontakta er lokala återförsäljare.
• Denna apparat får under inga omständigheter startas utan att den är helt fyllld med vatten.
• Denna apparat får inte övertäckas, inte placeras i närheten av brännbart material eller i
direkt solsken.
• Denna apparat får inte användas av mycket små barn (0–3 år).
• Denna apparat får inte användas av små barn (3–8 år) och personer med mycket om-
fattande och komplexa funktionshinder om de inte ständigt övervakas av en person som
är ansvarig för deras säkerhet.
• Denna apparat får användas av barn äldre än 8 år och personer med nedsatt fysisk,
sensorisk eller mental förmåga eller med brist på erfarenhet eller kunskap, såvida de har
fått handledning eller information om hur man använder apparaten på ett säkert sätt och
förstår risker som kan förekomma av en person som är ansvarig för deras säkerhet.
• Barn får inte leka med apparaten.
• Denna apparat skall inte rengöras eller underhållas av barn utan övervakning.
• Koppla alltid bort apparaten från elnätet före montering, demontering eller rengöring.
• Pumpar utan indikation på att de är skyddade mot inverkan av frysning får inte lämnas
utomhus under frostiga väderförhållanden.
• Om installationsanvisningen inte följs gäller inte produktgarantin.

4
Jet Swim Motion
MA30-09 SV Instruktionens originalspråk
SVENSKA
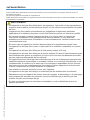
This document and its contents are the exclusive
property of Pahléns and may not be copied,
reproduced, transmitted or communicated to a third
party, or used for any purpose without written permission.
This document and its contents are the exclusive
property of Pahléns and may not be copied,
reproduced, transmitted or communicated to a third
party, or used for any purpose without written permission.
Art.no.
Rev.no.
Scale
Designed by: Approved by:
Revised by: Date
Drawn by: Date
Drawing number
Assembly drawing no.
Surface treatment
part of ISO 2768
The tolerance class in accordance with this
E
Box 728, SE-194 27 Upplands Väsby, Sweden
Phone +46 8 59411050, Fax +46 8 59086880
CR
1301280
2012-03-23
TK 2017-07-06
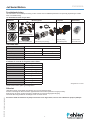
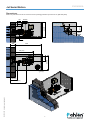
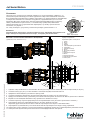
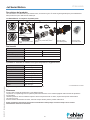
Pumpsats (IE3)
Jet Swim 1200 - 2,2kW M10192 5
1152X1
M12843122469PVCDistans munstycke18
M12737122464EPDM Sh70Packning till munstycke17
Slangklammer127431Slangklämma16
Slang för luft-1 i ngj122409Generic
Slang armerad PVC Ø8x12mm L= 0,8m
15
Slang för start-1 ingj
122404
GenericSlang Ø2x4mm L=1,5m
14
M127891224103Skyddsrör Jet Swim Motion23
R10543121952Ingjut ningsrör L=250mm 2"utv22
Skjutventil dela d903040Skjutventil R2" mässing, delad21
Drawing.no:Art_nrMaterialTitle/ NameQty.Item.
Art.no.
Rev.no.
Scale
Designed by: Approved by:
Revised by: Date
Drawn by: Date
Drawing number
Assembly drawing no.
Surface treatment
part of ISO 2768-1
The tolerance class in accordance with this
E
Box 728, SE-194 27 Uppl ands Väsby, Sweden
Phone +46 8 59411050, Fax +46 8 59086880
1301320
RJ 2017-10-12
Jet Swim Motion
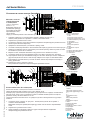
Monteringssats tjockväggig pool
M12815 0
This document and its contents are the exclusive
property of Pahléns and may not be copied,
reproduced, transmitted or communicated to a third
party, or used for any purpose without written permission.
5
4
1
10
14
15
16
22
23
12
13
6
5
4
32
7
9
21
11
M10191-2
130528 OA
Jet Swim 1200
24
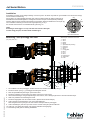
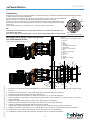
M6M M5 A419930020Rostfritt A4Mutter M6M M569
RBS M5199 40022Rostfritt A4Bricka 5,3x15x1,268
Torx A4 FM5x25199 20235Steel, MildSkruv MFT A4 M5x2 567
Slangklammer127431Slangklämma16
Slang för luft-1 i ngj122409Generic
Slang armerad PVC Ø8x12mm L= 0,8m
15
Slang för start -1
122404
GenericSlang Ø2x4mm L=1,5m
14
HM2020122414Mässing CW614NSlangnippel R1/ 2 x 5/16"13
Skjutventil dela d903040Skjutventil R2" mässing, delad22
Nippel 2 tum90307GenericNippel mässing R2"21
Drawing.no:Art_nrMaterialTitle/ NameQty.Item.
Art.no.
Rev.no.
Scale
Designed by: Approved by:
Revised by: Date
Drawn by: Date
Drawing number
Assembly drawing no.
Surface treatment
part of ISO 2768-1
The tolerance class in accordance with this
E
Box 728, SE-194 27 Uppl ands Väsby, Sweden
Phone +46 8 59411050, Fax +46 8 59086880
1:3
1301310
RJ 2018-01-15
Jet Swim Motion
Monteringssats tunnväggig pool
M12816 0
This document and its contents are the exclusive
property of Pahléns and may not be copied,
reproduced, transmitted or communicated to a third
party, or used for any purpose without written permission.
1
10
14
15
16
22
23
12
13
6
5
4
32
7
9
21
11
M10191-2
130528 OA
Jet Swim 1200
24
This document and its contents are the exclusive
property of Pahléns and may not be copied,
reproduced, transmitted or communicated to a third
party, or used for any purpose without written permission.
This document and its contents are the exclusive
property of Pahléns and may not be copied,
reproduced, transmitted or communicated to a third
party, or used for any purpose without written permission.
Art.no.
Rev.no.
Scale
Designed by: Approved by:
Revised by: Date
Drawn by: Date
Drawing number
Assembly drawing no.
Surface treatment
part of ISO 2768-1
The tolerance class in accordance with this
E
Box 728, SE-194 27 Upplands Väsby, Sweden
Phone +46 8 59411050, Fax +46 8 59086880
ASA 2019-07-26
Motion Glasfibersats
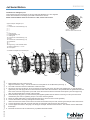
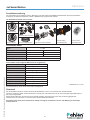
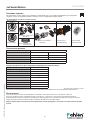
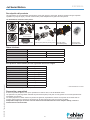
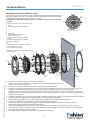
Produktbeskrivning
Jet Swim Motion är ett redskap för träning, motion och lek. Den har ställbara jetströmmar för personlig anpassning av vatten-
öde och luftinblandning.
Jet Swim Motion består av fyra delar:
Grundsats Monteringssats Pumpsats Kontrollbox
1301300 Classic
1301310 för tunn poolvägg
1301320 för tjock poolvägg
1301285 (50Hz),
1301285HZ (60Hz)
1301390 400V
130139NO 230V
1301305 Marine 1301315 för glasberpool
Tekniska data
Motor 2.2 kW
Spänning 230/400V 50Hz 3N~ 265/460V 60Hz 3N~
Strömstyrka 8.0 / 4.6 A 6.8 / 3.9 A
Pumpens kapacitet 46 m3/h 43 m3/h
IP-klass IP55
Omgivningstemperatur max +45°C
Produkten är avsedd för följande vattenvärden:
Totalt klor: max 3.5 mg/liter*
Klorid(salt)halt: max 250 mg/liter
pH-värde: 7.2–7.6
Alkalinitet: 60–120 mg/liter (ppm)
Kalciumhårdhet: 100–300 mg/liter (ppm)
Järn: max 0.1 mg/liter*
Koppar: max 0.2 mg/liter*
Mangan: max 0.05 mg/liter*
Fosfor: max 0.01 mg/liter*
Nitrat: max 50 mg/liter*
* Enligt EN16713-3 2016
Utanför dessa värden gäller ej produktgarantin.
Säkerhet
Jetstrålen är stark, vistas därför inte närmare än 0.5 m från strålens utlopp.
Personer med långt hår skall vara extra uppmärksamma så att håret ej fastnar i insuget (i fronten).
Små barn bör ej vistas i poolen utan tillsyn, särskilt inte när Jet Swim-aggregatet är igång.
Informera alltid övriga badande i bassängen innan Jet Swim startas.
Kontrollera alltid att strömmen till pumpen är bruten innan något arbete, service eller underhåll av pumpen påbörjas.

5
Jet Swim Motion
MA30-09 SV Instruktionens originalspråk
SVENSKA
This document and its contents are the exclusive
property of Pahléns and may not be copied,
reproduced, transmitted or communicated to a third
party, or used for any purpose without written permission.
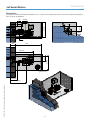
230 15
292
610min
100
282 (80)
611 (410)
1000200
250min
600min
Avlopp
198
150-200
912 (714)
Avlopp
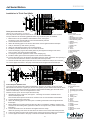
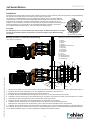
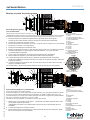
Dimensioner
Mått inom parantes avser art.nr 1301310 för tunn poolvägg med liner (stomme av trä, plåt eller plast).

6
Jet Swim Motion
MA30-09 SV Instruktionens originalspråk
SVENSKA
Art.no.
Rev.no.
Scale
Designed by: Approved by:
Revised by: Date
Drawn by: Date
Drawing number
Assembly drawing no.
Surface treatment
part of ISO 2768-1
The tolerance class in accordance with this
E
Box 728, SE-194 27 Upplands Väsby, Sweden
Phone +46 8 59411050, Fax +46 8 59086880
RJ 2018-01-19
Jet swim motion tunnväggig sprängskiss
This document and its contents are the exclusive
property of Pahléns and may not be copied,
reproduced, transmitted or communicated to a third
party, or used for any purpose without written permission.
3
4
1
2
5
6
7
9
11
14
13 15
10
8
12
This document and its contents are the exclusive
property of Pahléns and may not be copied,
reproduced, transmitted or communicated to a third
party, or used for any purpose without written permission.
Art.no.
Rev.no.
Scale
Designed by: Approved by:
Revised by: Date
Drawn by: Date
Drawing number
Assembly drawing no.
Surface treatment
part of ISO 2768-1
The tolerance class in accordance with this
E
Box 728, SE-194 27 Upplands Väsby, Sweden
Phone +46 8 59411050, Fax +46 8 59086880
1:2
122460
RJ 2017-05-03
mK
Nisch Svetsad
M12748 1
A A
B
(6x)
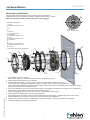
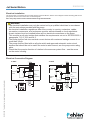
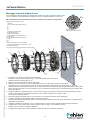
Installation
Pumpdelen monteras på ett stadigt underlag i ett torrt utrymme. Se till att utrymmet har god ventilation och förses med avlopp
för att undvika översvämning.
All montering av rostfria detaljer skall ske med verktyg avsedda enbart för detta material för att
bibehålla korrosionsbeständigheten. Samtliga skruvar bör smörjas med Molykote® (medföljer).
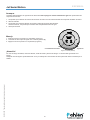
Nischen skall monteras vågrätt med knapparna på nersidan. Nischens änskant har små jack (A)
som underlättar markering och kontroll av vågrät placering, se g 1.
Se avsnittet “Dimensioner” för installationsmått, placering, etc.
OBS!
Startslangen skall läggas i en loop 150–200 mm ovanför vattenytan.
Torrkör aldrig pumpen, då detta skadar axeltätningen.
1. Gör ett Ø258 mm hål i poolväggen. Använd nischen som mall för sex Ø5 hål (se B g 1).
2. Montera nischen (se g. 1) i poolväggen med bifogade skruvar.
3. Fäst den självhäftande packningen på nischens äns.
4. Montera poolduken och fyll poolen med vatten upp till 5 cm under huset.
5. Skruva fast klämringen och gummipackningen mot nischen, 5Nm i åtdragningsmoment. Skruvarna skall smörjas.
6. Skär bort poolduken mot klämringens insida.
7. Montera insugsgallret och den rostfria fronten. (Dessa skruvar skall smörjas.)
8. Anslut slangen för luftinblandning och drag åt slangklämman.
Fäst slangens andra mynningen 100 mm ovanför vattenytan bakom poolväggen.
9. Anslut startslangen (med en loop minst 150 mm ovanför vattenytan) till kontrollboxen.
10. Anslut rör och ventiler till pumpen. Alla gängor skall tätas med gängtejp.
11. Elanslutning skall göras av behörig elinstallatör.
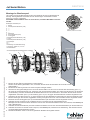
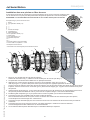
Montering i tunn poolvägg med liner
(trä, plåt, plast, etc.)
Figur. 1
Nisch sedd framifrån.
UPP
Bildexempel: trästomme med liner
1. Nisch
2. Skruv
3. Mutter
4. Bricka
5. Självhäftande packning
6. Packning
7. Klämring
8. Skruv
9. Insugsgaller
10. Skruv
11. Front
12. Skruv
13. Poolstomme
14. Väggmatta
15. Liner

7
Jet Swim Motion
MA30-09 SV Instruktionens originalspråk
SVENSKA
11
12
10 98
72
116*
17*
18* 13
This document and its contents are the exclusive
property of Pahléns and may not be copied,
reproduced, transmitted or communicated to a third
party, or used for any purpose without written permission.
Art.no.
Rev.no.
Scale
Designed by: Approved by:
Revised by: Date
Drawn by: Date
Drawing number
Assembly drawing no.
Surface treatment
part of ISO 2768-1
The tolerance class in accordance with this
E
Box 728, SE-194 27 Upplands Väsby, Sweden
Phone +46 8 59411050, Fax +46 8 59086880
1:2
122460
RJ 2017-05-03
mK
Nisch Svetsad
M12748 1
A A
B
(6x)
Montering i tunn poolvägg med liner
(trä, plåt, plast, etc.)
Bildexempel: trästomme med liner
1. Nisch
2. Skruv
3. Mutter
4. Bricka
5. Självhäftande packning
6. Packning
7. Klämring
8. Skruv
9. Insugsgaller
10. Skruv
11. Front
12. Skruv
13. Poolstomme
14. Väggmatta
15. Liner
1. Gör ett Ø258 mm hål i poolväggen.
Rikta nischen enligt g 1, använd nischen som mall för sex Ø5 hål (se B g 1).
2. Hålens väggar skall förseglas med en härdplast.
3. Stryk ett jämnt lager silikon, ca 2 mm tjockt runt hålet och på den sidan av packningen (pos 17)
som ska ligga mot pool väggen. Applicera även silikon i borrhålen. Placera nischen i poolväggen med
packningen mellan nischänsens baksida och poolväggen. Skruva fast nischen med bifogade skruvar (pos 2) i stödringen
(pos 16) som placeras mot poolväggens utsida.
4. Skruva fast klämringen (pos 7) mot nischen (packningarna som medföljer grundsatsen för montage i tunnn poolvägg kan
utelämnas här), 5Nm i åtdrag ningsmoment. Skruvarna skall smörjas.
5. Montera insugsgallret (pos 9) och den rostfria fronten. (Dessa skruvar skall smörjas.)
6. Anslut slangen för luftinblandning och drag åt slangklämman.
Fäst slangens andra mynningen 100 mm ovanför vattenytan bakom poolväggen, se bildexempel under “Dimensioner”.
7. Anslut startslangen (med en loop minst 150 mm ovanför vattenytan) till kontrollboxen.
8. Anslut rör och ventiler till pumpen, se bildexempel “Trästomme med liner”. Gängorna skall tätas med gängtejp.
9. Elanslutning skall göras av behörig elinstallatör.
Montering i glasberpool
Här krävs både monteringssatsen för tunn poolvägg och för glasberpool.
Medföljande skruvar är avsedda för montage i poolväggar med tjocklek 6 –20 mm.
OBS! Jet Swim Motion skall monteras på en plan, vertikal väggyta.
Bildexempel: glasberpool
1. Nisch
2. Försänkt skruv M5x25 (6 st)
3. —
4. —
5. —
6. —
7. Klämring
8. Skruv M5x20 (8 st)
9. Insugsgaller
10. Försänkt skruv M5x35 (4 st)
11. Front
12. Försänkt skruv M5x35 (2 st)
13. Poolstomme
14. —
15. —
16. Stödring* med gängade hål
17. Packning* Ø284 mm, t=3 mm
18. Täckplåt*
* Ingår i Monteringssats för glasberpool.
Figur. 1
Nisch sedd framifrån.
UPP

8
Jet Swim Motion
MA30-09 SV Instruktionens originalspråk
SVENSKA
Art.no.
Rev.no.
Scale
Designed by: Approved by:
Revised by: Date
Drawn by: Date
Drawing number
Assembly drawing no.
Surface treatment
part of ISO 2768-1
The tolerance class in accordance with this
E
Box 728, SE-194 27 Upplands Väsby, Sweden
Phone +46 8 59411050, Fax +46 8 59086880
RJ 2018-01-19
Jet swim motion mursten sprängskiss
This document and its contents are the exclusive
property of Pahléns and may not be copied,
reproduced, transmitted or communicated to a third
party, or used for any purpose without written permission.
2
3
12
6
7
8
10
13
14
1
4
5
9
11
B ( 1 : 8 )
Art.no.
Rev.no.
Scale
Designed by: Approved by:
Revised by: Date
Drawn by: Date
Drawing number
Assembly drawing no.
Surface treatment
part of ISO 2768-1
The tolerance class in accordance with this
E
Box 728, SE-194 27 Upplands Väsby, Sweden
Phone +46 8 59411050, Fax +46 8 59086880
RJ 2018-01-19
Jet swim motion betong sprängskiss
This document and its contents are the exclusive
property of Pahléns and may not be copied,
reproduced, transmitted or communicated to a third
party, or used for any purpose without written permission.
B
23
1
12
11
10
9
8
6
7
18
15
16
15
13
14
17
This document and its contents are the exclusive
property of Pahléns and may not be copied,
reproduced, transmitted or communicated to a third
party, or used for any purpose without written permission.
Art.no.
Rev.no.
Scale
Designed by: Approved by:
Revised by: Date
Drawn by: Date
Drawing number
Assembly drawing no.
Surface treatment
part of ISO 2768-1
The tolerance class in accordance with this
E
Box 728, SE-194 27 Upplands Väsby, Sweden
Phone +46 8 59411050, Fax +46 8 59086880
1:2
122460
RJ 2017-05-03
mK
Nisch Svetsad
M12748 1
A A
Betongpool utan liner
Betongpool med kakel/mosaik:
Innan montering i formen skall munstycket (18) och bakomvarande detaljer demonteras.
En distans (16) och en extra packning (15) läggs till i den ordning som visas i ovanstående bild
när munstycket monteras tillbaka EFTER gjutning (pinnskruvarna i nischen smörjs). Muttrarna
dras med 1,5 Nm.
Målade betongpooler: behöver ej ovanstående moment.
1. Montera nischen i formen, se g 1. Flänsen på nischen skall ligga i liv med färdig poolvägg.
OBS! Armeringen får aldrig ligga närmare rostfritt material än minst 50 mm.
2. Anslut startslangen till nischen.
3. Montera samtliga ingjutningsrör i nischen före gjutning. Alla gängor tätas med gängtejp.
4. Gjut. När betongen brunnit (och eventuell kakelsättning är utförd) monteras spännring och
front med insugsgaller, åtdragningsmoment för skruvar 5Nm. (dessa skruvar skall smörjas).
5. Anslut slangen för luftinblandning och drag åt slangklämman.
Fäst slangens mynningen 100 mm ovanför vattenytan, bakom poolväggen.
6. Anslut startslangen (med en loop minst 150 mm ovanför vattenytan) till kontrollboxen.
7. Anslut rör och ventiler till pumpen. Gängor tätas med gängtejp.
Tjock poolvägg med liner
(Mursten, thermoblock, betong, etc.)
OBS! Ev. armering får aldrig ligga närmare
rostfritt material än minst 50 mm.
Poolväggen ska vara färdigputsad innan montering av ingående detaljer.
1. Gör hål i poolväggen/formen och xera nischen, se g 1.
Flänsen på nischen skall ligga i liv med färdig poolvägg.
2. Anslut startslangen till nischen.
3. Montera samtliga ingjutningsrör i nischen. Alla gängor tätas med gängtejp.
4. Gjut (alt. mura murstenen).
5. Fäst den självhäftande packningen på nischens äns.
6. Montera poolduken och fyll poolen med vatten upp till 5 cm under huset.
7. Skruva fast klämringen och gummipackningen mot nischens äns, 5Nm i åtdragnings-
moment, skruvarna skall smörjas.
8. Skär bort poolduken mot klämringens insida.
9. Montera insugsgallret och fronten (dessa skruvar skall smörjas).
10. Anslut slangen för luftinblandning och drag åt slangklämman.
Fäst slangens andra mynningen 100 mm ovanför vattenytan, bakom poolväggen.
11. Anslut startslangen (med en loop minst 150 mm ovanför vattenytan) till kontrollboxen.
12. Anslut rör och ventiler till pumpen. Alla gängor tätas med gängtejp.
Bildexempel: mursten med liner
1. Nisch
2. Ingjutningsrör vatten
3. Ingjutningsrör luft/start
4. Självhäftande packning
5. Packning
6. Klämring
7. Skruv
8. Insugsgaller
9. Skruv
10. Front
11. Skruv
12. Poolstomme (mursten)
13. Väggmatta
14. Liner
Montering i tjocka poolväggar
Bildexempel: betong utan liner
1. Nisch
2. Ingjutningsrör vatten
3. Ingjutningsrör luft/start
4. -
5. -
6. Klämring
7. Skruv
8. Insugsgaller
9. Skruv
10. Front
11. Skruv
12. Poolstomme
13. Puts
14. Kakel/kakelx
15. Packning
16. Distans
17. Delar till munstycket
18. Munstycke
Figur. 1
Nisch sedd framifrån.
UPP

9
Jet Swim Motion
MA30-09 SV Instruktionens originalspråk
SVENSKA
U1
V1
W1
2
4
6
2
4
6
14 13
1
3
5
1
K1
2,5~D
B1
M1
P
NO COM
F1
3
5
1
3
5
A1
A1A29695
L1
L2
L3
N
M
W2 U2 V2
U1 V1 W1
U1
V1
W1
2
4
6
2
4
6
14 13
1
3
5
1
K1
1,5~D
2,5~D
B1
F2
M1
P
NO COM
F1
3
5
1
3
5
A1A2
2
4
1
3
9695
L1
L2
L3
M
W2 U2 V2
U1 V1 W1
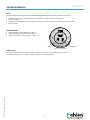
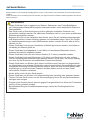
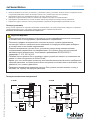
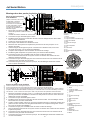
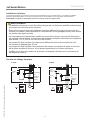
Tryck-
brytare Kontaktor
Motor-
skyddsrelä
PE
Krets.
brytare
Kontaktor
Motor-
skyddsrelä
PE
Tryck-
brytare
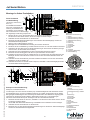
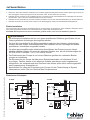
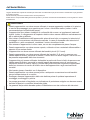
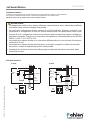
Elinstallation
Pumpmotorn kopplas in via automatikskåp för Jet Swim Motion, se kopplingsschema.
Kontrollera pumpmotorns märkskylt för korrekt inkoppling på kopplingsbleck.
OBS! Pumpen får aldrig startas utan att vara vattenfylld.
3~400V 3~230V
Kopplingsschema el
VARNING
• Den elektriska installationen får endast utföras av behörig elinstallatör enligt instruktioner
som medföljer pumpen.
• Elinstallationsregler skiljer sig åt mellan olika länder, därför behöver kontaktorer, kablar,
anslutningskomponenter och kapslingar väljas utifrån lokala regler.
• En huvudströmbrytare skall installeras före pumpens samtliga spänningsförande
elanslutningar. Det skall vara en allpolig brytare som uppfyller kraven i IEC/EN 60335-1
stycke 7.12.2, 22.2 och 24.3.
• Pumpen skall förses med en jordfelsbrytare som har en från koppling av drift med högst
30mA.
• Pumpen skall förses med ett godkänt motorskydd som skall ställas in enligt motorns
strömvärde, se pumpmontorns märkskylt.
• Kontrollera att pumpens rotationsriktning stämmer överens med pilen på motorns
äktkåpa.

10
Jet Swim Motion
MA30-09 SV Instruktionens originalspråk
SVENSKA
This document and its contents are the exclusive
property of Pahléns and may not be copied,
reproduced, transmitted or communicated to a third
party, or used for any purpose without written permission.
Art.no.
Rev.no.
Scale
Designed by: Approved by:
Revised by: Date
Drawn by: Date
Drawing number
Assembly drawing no.
Surface treatment
part of ISO 2768-1
The tolerance class in accordance with this
E
Box 728, SE-194 27 Upplands Väsby, Sweden
Phone +46 8 59411050, Fax +46 8 59086880
RJ 2017-06-07
Classic
Grundsats Jet Swim Motion
M12782 0
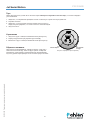
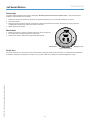
A
Av/På
B
Luftjustering
Figur 2. Front (Classic)
A
På/Av
B
Luftjustering
Start
Pumpen måste vara vattenfylld före start. Torrkör aldrig pumpen, detta kan skada ingående komponenter.
1. Kontrollera att pumpens rotationsriktning överensstämmer med pilen på motorns äktkåpa.
2. Öppna ventilerna.
3. Kontrollera att alla ventiler till och från pumpen är öppna. Se till att pumpen är helt vattenfylld innan den startas.
4. Starta pumpen.
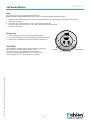
Observera
Vid frysrisk: stäng ventilerna, lossa och dränera pumpen på allt vatten. Pumpen bör förvaras inomhus.
Sänk vattennivån till ca 10 cm under Jet Swim-huset för att undvika frysskador.
Handhavande
1. Starta Jetstrålen med tryckknappen (A gur 2).
2. Luftinblandningen kan justeras med vred (B).
3. Stäng av Jetstrålen med tryckknappen (A gur 2).

11
Jet Swim Motion
MA30-09 GB Translated from the original language of the instruktions (Swedish)
ENGLISH
t is important to read through this manual carefully in order to ensure the function and useful length of the pool equipment.
Pahlén AB is not responsible for product warranties or damages that occur as a result of faulty installation, improper use or poor
maintenance.
WARNING
• This appliance must not be used in aggressive water, salt water or pools/hot tubs with
a chlorine machine/salt chlorinator, see the recommended water quality values.
• The appliance must be installed in accordance with applicable national laws and provisions
and the electrical installation must only be carried out by a qualied electrician.
• Do not start installing the appliance until you have read and understood the installation
instructions and warnings in this manual. If you have any questions about the installation
instructions or warnings, please contact your local dealer.
• Under no circumstances may this appliance be started without being completely lled
with water.
• This appliance must not be covered, placed near combustible material or in direct sunlight.
• This appliance must not be used by very young children (0-3 years).
• This appliance must not be used by young children (3-8 years) and people with signicant
and complex disabilities unless they are under constant supervision by a person who is
responsible for their safety.
• This appliance may be used by children over 8 years of age and persons with reduced
physical, sensory or mental capabilities or lack of experience or knowledge, provided that
they’re under supervision or have received information on how to use the appliance safely
and understand risks that may occur by a person who is responsible for their safety.
• Children are not allowed to play with the appliance.
• This appliance should not be cleaned or maintained by children without supervision.
• Always disconnect the appliance from the supply before assembling, disassembling or
cleaning.
• Pumps without indication that they are protected against the eects of freezing shall not be
left outside during freezing weather conditions.
• Failure to follow the installation instructions invalidates the product warranty.warranty.

12
Jet Swim Motion
MA30-09 GB Translated from the original language of the instruktions (Swedish)
ENGLISH
This document and its contents are the exclusive
property of Pahléns and may not be copied,
reproduced, transmitted or communicated to a third
party, or used for any purpose without written permission.
This document and its contents are the exclusive
property of Pahléns and may not be copied,
reproduced, transmitted or communicated to a third
party, or used for any purpose without written permission.
Art.no.
Rev.no.
Scale
Designed by: Approved by:
Revised by: Date
Drawn by: Date
Drawing number
Assembly drawing no.
Surface treatment
part of ISO 2768
The tolerance class in accordance with this
E
Box 728, SE-194 27 Upplands Väsby, Sweden
Phone +46 8 59411050, Fax +46 8 59086880
CR
1301280
2012-03-23
TK 2017-07-06
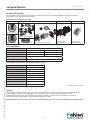
Pumpsats (IE3)
Jet Swim 1200 - 2,2kW M10192 5
1152X1
M12843122469PVCDistans munstycke18
M12737122464EPDM Sh70Packning till munstycke17
Slangklammer127431Slangklämma16
Slang för luft-1 i ngj122409Generic
Slang armerad PVC Ø8x12mm L= 0,8m
15
Slang för start-1 ingj
122404
GenericSlang Ø2x4mm L=1,5m
14
M127891224103Skyddsrör Jet Swim Motion23
R10543121952Ingjut ningsrör L=250mm 2"utv22
Skjutventil dela d903040Skjutventil R2" mässing, delad21
Drawing.no:Art_nrMaterialTitle/ NameQty.Item.
Art.no.
Rev.no.
Scale
Designed by: Approved by:
Revised by: Date
Drawn by: Date
Drawing number
Assembly drawing no.
Surface treatment
part of ISO 2768-1
The tolerance class in accordance with this
E
Box 728, SE-194 27 Uppl ands Väsby, Sweden
Phone +46 8 59411050, Fax +46 8 59086880
1301320
RJ 2017-10-12
Jet Swim Motion
Monteringssats tjockväggig pool
M12815 0
This document and its contents are the exclusive
property of Pahléns and may not be copied,
reproduced, transmitted or communicated to a third
party, or used for any purpose without written permission.
5
4
1
10
14
15
16
22
23
12
13
6
5
4
32
7
9
21
11
M10191-2
130528 OA
Jet Swim 1200
24
M6M M5 A419930020Rostfritt A4Mutter M6M M569
RBS M5199 40022Rostfritt A4Bricka 5,3x15x1,268
Torx A4 FM5x25199 20235Steel, MildSkruv MFT A4 M5x2 567
Slangklammer127431Slangklämma16
Slang för luft-1 i ngj122409Generic
Slang armerad PVC Ø8x12mm L= 0,8m
15
Slang för start -1
122404
GenericSlang Ø2x4mm L=1,5m
14
HM2020122414Mässing CW614NSlangnippel R1/2 x 5/16"13
Skjutventil dela d903040Skjutventil R2" mässing, delad22
Nippel 2 tum90307GenericNippel mässing R2"21
Drawing.no:Art_nrMaterialTitle/ NameQty.Item.
Art.no.
Rev.no.
Scale
Designed by: Approved by:
Revised by: Date
Drawn by: Date
Drawing number
Assembly drawing no.
Surface treatment
part of ISO 2768-1
The tolerance class in accordance with this
E
Box 728, SE-194 27 Uppl ands Väsby, Sweden
Phone +46 8 59411050, Fax +46 8 59086880
1:3
1301310
RJ 2018-01-15
Jet Swim Motion
Monteringssats tunnväggig pool
M12816 0
This document and its contents are the exclusive
property of Pahléns and may not be copied,
reproduced, transmitted or communicated to a third
party, or used for any purpose without written permission.
1
10
14
15
16
22
23
12
13
6
5
4
32
7
9
21
11
M10191-2
130528 OA
Jet Swim 1200
24
This document and its contents are the exclusive
property of Pahléns and may not be copied,
reproduced, transmitted or communicated to a third
party, or used for any purpose without written permission.
This document and its contents are the exclusive
property of Pahléns and may not be copied,
reproduced, transmitted or communicated to a third
party, or used for any purpose without written permission.
Art.no.
Rev.no.
Scale
Designed by: Approved by:
Revised by: Date
Drawn by: Date
Drawing number
Assembly drawing no.
Surface treatment
part of ISO 2768-1
The tolerance class in accordance with this
E
Box 728, SE-194 27 Upplands Väsby, Sweden
Phone +46 8 59411050, Fax +46 8 59086880
ASA 2019-07-26
Motion Glasfibersats
Product Description
Jet Swim Motion is an apparatus use for training, exercise and recreation. It features adjustable jet stream for personal
customisation of the water ow and air mixture.
Jet Swim Motion consists of four parts:
Base kit Installation kit Pump kit Control box
1301300 Classic
1301310 for thin pool walls
1301320 for thick pool walls
1301285 (50Hz),
1301285HZ (60Hz)
1301390 400V
130139NO 230V
1301305 Marine 1301315 for berglass pool
Technical Data
Motor 2.2 kW
Volage 230/400V 50Hz 3N~ 265/460V 60Hz 3N~
Current 8.0 / 4.6 A 6.8 / 3.9 A
Pump capacity 46 m3/h 43 m3/h
Enclosed protection class IP55
Ambient temperature max +45°C
The product is intended for the following water values:
Total chlorine content: max 3.5 mg/liter*
Chloride (salt) content: max 250 mg/liter
pH-value: 7.2 –7.6
Alkalinity 60 –120 mg/liter (ppm)
Calcium hardness: 100 – 300 mg/liter (ppm)
Iron: max 0.1 mg/liter*
Copper: max 0.2 mg/liter*
Manganese: max 0.05 mg/liter*
Phosphorus: max 0.01 mg/liter*
Nitrate: max 50 mg/liter*
*According to EN16713-3 2016
The product warranty does not apply outside of these values.
Safety
The jet stream is powerful, which is why one should not be closer than 0.5 m from the stream outlet for a protracted period.
People with long hair should pay careful attention so that their hair does not get stuck in the inlets (in the front).
Small children should not be in the pool without supervision, especially not when the Jet Swim device is in operation.
Always inform all the other bathers in the pool before starting the Jet Swim.
Always make sure that the power to the pump is turned o prior to any work, service or maintenance of the pump begins.

13
Jet Swim Motion
MA30-09 GB Translated from the original language of the instruktions (Swedish)
ENGLISH
This document and its contents are the exclusive
property of Pahléns and may not be copied,
reproduced, transmitted or communicated to a third
party, or used for any purpose without written permission.
230 15
292
610min
100
282 (80)
611 (410)
1000200
250min
600min
Avlopp
198
150-200
912 (714)
Drain
Dimensions
Measurements within parentheses pertain to item no. 1301310 for thin pool walls with liner (
framework of wood, metal or plastic
).

14
Jet Swim Motion
MA30-09 GB Translated from the original language of the instruktions (Swedish)
ENGLISH
Art.no.
Rev.no.
Scale
Designed by: Approved by:
Revised by: Date
Drawn by: Date
Drawing number
Assembly drawing no.
Surface treatment
part of ISO 2768-1
The tolerance class in accordance with this
E
Box 728, SE-194 27 Upplands Väsby, Sweden
Phone +46 8 59411050, Fax +46 8 59086880
RJ 2018-01-19
Jet swim motion tunnväggig sprängskiss
This document and its contents are the exclusive
property of Pahléns and may not be copied,
reproduced, transmitted or communicated to a third
party, or used for any purpose without written permission.
3
4
1
2
5
6
7
9
11
14
13 15
10
8
12
This document and its contents are the exclusive
property of Pahléns and may not be copied,
reproduced, transmitted or communicated to a third
party, or used for any purpose without written permission.
Art.no.
Rev.no.
Scale
Designed by: Approved by:
Revised by: Date
Drawn by: Date
Drawing number
Assembly drawing no.
Surface treatment
part of ISO 2768-1
The tolerance class in accordance with this
E
Box 728, SE-194 27 Upplands Väsby, Sweden
Phone +46 8 59411050, Fax +46 8 59086880
1:2
122460
RJ 2017-05-03
mK
Nisch Svetsad
M12748 1
A A
B
(6x)
Installation
The pump section is installed on a stable surface in a dry area. Make sure that the area is well venti-
lated and is equipped with a drain in order to prevent ooding.
All installation of stainless steel parts shall be done using tools solely intended for such material
in order to maintain its corrosion-resistance. All screws should be lubricated with Molykote®
(included). The recess must be installed horizontally with the buttons on the lower side. The edge
of the ange on the recess has a small jacks (A) that aid in marking and checking the horizontal
placement, see Fig 1.
See the Section entitled “Dimensions” for installation measures, placements etc.
N.B.!
The starting hose must be set in a loop 150-200 mm above the surface of the water.
Never run the pump dry. This will damage the axle seal.
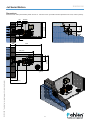
Installation in thin pool wall with liner
(wood, sheet metal, plastic, etc.)
1. Make an Ø258 mm hole in the pool wall. Use the niche as the template for six Ø5 mm holes (see B g 1).
2. Attach the niche (see Fig 1) in the pool wall with the included screws.
3. Attach the self-adhesive gasket onto the niches ange.
4. Install the pool liner with water up to 5 cm under the house.
5. Screw the clamping ring and the rubber gasket in place against the niche, 5 Nm in torque. The screws must be lubricated.
6. Cut away the pool liner against the inside of the clamping ring.
7. Install the intake grate and the stainless-steel front. (These screws must be lubricated.)
8. Connect the hose for the air admixture and tighten the hose clamp.
Attach the other opening of the hose 100 mm above the surface of the water behind the pool wall.
9. Connect the start hose (with a look at least 150mm over the surface of the water) to the control box.
10. Connect pipes and valves to the pump. All threads must be tightened with thread tape.
11. Electrical connection shall be made by an authorised electrician.
Sample image: wooden frame with liner
1. Niche
2. Screw
3. Nut
4. Washer
5. Self-adhesive gasket
6. Gasket
7. Clamping ring
8. Screw
9. Inlet grate
10. Screw
11. Front
12. Screw
13. Pool framework
14. Wall covering
15. Liner
Figure 1.
Recess seen from the front.
UP

15
Jet Swim Motion
MA30-09 GB Translated from the original language of the instruktions (Swedish)
ENGLISH
This document and its contents are the exclusive
property of Pahléns and may not be copied,
reproduced, transmitted or communicated to a third
party, or used for any purpose without written permission.
Art.no.
Rev.no.
Scale
Designed by: Approved by:
Revised by: Date
Drawn by: Date
Drawing number
Assembly drawing no.
Surface treatment
part of ISO 2768-1
The tolerance class in accordance with this
E
Box 728, SE-194 27 Upplands Väsby, Sweden
Phone +46 8 59411050, Fax +46 8 59086880
1:2
122460
RJ 2017-05-03
mK
Nisch Svetsad
M12748 1
A A
B
(6x)
11
12
10 98
72
116*
17*
18* 13
1. Make a Ø258 mm hole in the pool wall.
Align the enclosure of Fig. 1, use the enclosure as a template for the six Ø5 holes (see B Fig. 1).
2. The walls of the holes must be sealed with a thermoset resin.
3. Smooth an even layer of silicone, about 2 mm thick around the hole and on the side of the gasket (item 17) that should lie
against the pool wall. Apply silicone in the boreholes as well. Place the enclosure in the pool wall with the gasket between the
back of the enclosure ange and the pool wall. Screw the enclosure with the enclosed screws (item 2) into the support ring
(item 16) placed against the outside of the pool wall.
4. Screw the clamp ring (item 7) to the enclosure (the supplied gaskets with the base for mounting in a thin pool wall can be
omitted here) with 5 Nm in tightening torque. The screws must be greased.
5. Mount the intake grille (item 9) and the stainless-steel front. (These screws must be greased.)
6. Connect the hose for air mixing and tighten the hose clamp.
Attach the other hose orice 100 mm above the water surface behind the pool wall, see the gure example under “Dimensions”.
7. Connect the starter hose (with a loop at least 150 mm above the water surface) to the control box.
8. Connect pipes and valves to the pump, see the gure example “Wooden frame with liner”. The threads must be sealed with
thread tape.
9. Electrical connection must be carried out by a qualied electrical installer.
Installation for berglass pool
This requires both the mounting kit for thin pool wall and berglass pool. The supplied
screws are intended for mounting in pool walls of thickness 6 – 20 mm.
NOTE! Jet Swim Motion must be mounted on a at, vertical wall surface.
Figure example: berglass pool
1. Niche
2. Countersunk screw M5x25 (6 pcs)
3. —
4. —
5. —
6. —
7. Clamping ring
8. Screw M5x20 (8 pcs)
9. Intake grate
10. Countersunk screw M5x35 (4 pcs)
11. Front
12. Countersunk screw M5x35 (2 pcs)
13. Poolstomme
14. —
15. —
16. Support ring * with threaded holes
17. Gasket * Ø284 mm, t = 3 mm
18. Cover plate *
* Included in berglass pool assembly kit.
Figure. 1
Niche as seen from the front.
UP

16
Jet Swim Motion
MA30-09 GB Translated from the original language of the instruktions (Swedish)
ENGLISH
Art.no.
Rev.no.
Scale
Designed by: Approved by:
Revised by: Date
Drawn by: Date
Drawing number
Assembly drawing no.
Surface treatment
part of ISO 2768-1
The tolerance class in accordance with this
E
Box 728, SE-194 27 Upplands Väsby, Sweden
Phone +46 8 59411050, Fax +46 8 59086880
RJ 2018-01-19
Jet swim motion mursten sprängskiss
This document and its contents are the exclusive
property of Pahléns and may not be copied,
reproduced, transmitted or communicated to a third
party, or used for any purpose without written permission.
2
3
12
6
7
8
10
13
14
1
4
5
9
11
B ( 1 : 8 )
Art.no.
Rev.no.
Scale
Designed by: Approved by:
Revised by: Date
Drawn by: Date
Drawing number
Assembly drawing no.
Surface treatment
part of ISO 2768-1
The tolerance class in accordance with this
E
Box 728, SE-194 27 Upplands Väsby, Sweden
Phone +46 8 59411050, Fax +46 8 59086880
RJ 2018-01-19
Jet swim motion betong sprängskiss
This document and its contents are the exclusive
property of Pahléns and may not be copied,
reproduced, transmitted or communicated to a third
party, or used for any purpose without written permission.
B
23
1
12
11
10
9
8
6
7
18
15
16
15
13
14
17
This document and its contents are the exclusive
property of Pahléns and may not be copied,
reproduced, transmitted or communicated to a third
party, or used for any purpose without written permission.
Art.no.
Rev.no.
Scale
Designed by: Approved by:
Revised by: Date
Drawn by: Date
Drawing number
Assembly drawing no.
Surface treatment
part of ISO 2768-1
The tolerance class in accordance with this
E
Box 728, SE-194 27 Upplands Väsby, Sweden
Phone +46 8 59411050, Fax +46 8 59086880
1:2
122460
RJ 2017-05-03
mK
Nisch Svetsad
M12748 1
A A
Concrete pool without liner
Concrete pool with tiles/mosaic: Before assembling in the form, the nozzle (18) and the parts
behind them are removed. A spacer (16) and an extra gasket (15) are added in the order as shown
in the image above when the nozzle is put back in place AFTER moulding (the stud bolts in the
nische are lubricated). The nuts are tightened to 1.5 Nm.
Painted concrete pools: Do not require the above step.
1. Assembly the niche in the form, see Figure 1. The ange on the niche should be in line
with the nished pool wall.
N.B.! Reinforcement present must not be closer than 50 mm from stainless steel material.
2. Connect the start hose to the niche.
3. Attach all socketing pipes in the niche prior to moulding. All threads must be tightened with
thread tape.
4. Mould. When the concrete has burned (and any tiling is completed), install the clamping ring
and the front with intake grates, tighten the screws to a torque of 5 Nm. (these screws must be
lubricated.)
5. Connect the hose for the air admixture and tighten the hose clamp.
Attach the opening of the hose 100 mm above the surface of the water, behind the pool wall.
6. Connect the start hose
(with a look at least 150mm over the surface of the water)
to the control box.
7. Connect pipes and valves to the pump. Threads are sealed with thread seal tape.
Thick pool wall with liner
(Masonry block, thermoblock, concrete etc.)
N.B.! Any reinforcement present must not be closer than 50 mm from stainless steel material.
The pool wall must be done being polished before any constituent parts are installed.
1. Make a hole in the pool wall/form and attach the niche, see Figure 1.
The ange on the niche should be in line with the nished pool wall.
2. Connect the start hose to the niche.
3. Attach all socketing pipes in the recess. All threads must be tightened with thread tape.
4. Cast (or else brick up with masonry stones).
5. Attach the self-adhesive gasket onto the niches ange.
6. Install the pool liner with water up to 5 cm under the house.
7. Screw the clamping ring and the rubber gasket in place against the ange of the niche,
5 Nm in torque, the screws must be lubricated.
8. Cut away the pool liner against the inside of the clamping ring.
9. Install the intake grate and the front (these screws must be lubricated).
10. Connect the hose for the air admixture and tighten the hose clamp. Attach the other opening of
the hose 100 mm above the surface of the water, behind the pool wall.
11. Connect the start hose
(with a loop at least 150 mm over the surface of the water)
to the control box.
12. Connect pipes and valves to the pump. All threads must be tightened with thread tape.
Installation in Thick Pool Walls
Sample image:
concrete without liner
1. Niche
2. Socketing pipes, water
3. Socketing pipes, air/start
4. —
5. —
6. Clamping ring
7. Screw
8. Intake grate
9. Screw
10. Front
11. Screw
12. Pool framework
13. Polish
14. Tile/tile cement
15. Gasket
16. Spacer
17. Parts of the nozzle
18. Nozzle
Figure 1.2
Niche seen from the front.
UP
Sample image:
masonry block with liner
1. Niche
2. Socketing pipes, water
3. Socketing pipes, air/start
4. Self-adhesive gasket
5. Gasket
6. Clamping ring
7. Screw
8. Intake grate
9. Screw
10. Front
11. Screw
12. Pool frame (brick)
13. Wall covering
14. Liner

17
Jet Swim Motion
MA30-09 GB Translated from the original language of the instruktions (Swedish)
ENGLISH
U1
V1
W1
2
4
6
2
4
6
14 13
1
3
5
1
K1
2,5~D
B1
M1
P
NO COM
F1
3
5
1
3
5
A1
A1A29695
L1
L2
L3
N
M
W2 U2 V2
U1 V1 W1
U1
V1
W1
2
4
6
2
4
6
14 13
1
3
5
1
K1
1,5~D
2,5~D
B1
F2
M1
P
NO COM
F1
3
5
1
3
5
A1A2
2
4
1
3
9695
L1
L2
L3
M
W2 U2 V2
U1 V1 W1
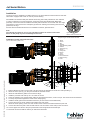
Electrical Installation
The pump motor is connected via the control panel for Jet Swim Motion, see the circuit diagram. Check the rating plate on the
pump motor for the correct connection on the closing link.
N.B.! The pump must never be started without being lled with water.
3~400V 3~230V
Pressure
switch
Connector
Engine
circuit relay
PE
Circuit
breaker
Connector
Engine
circuit relay
PE
Pressure
switch
Electrical Connection Diagram
WARNING
• The electrical installation may only be carried out by a qualied electrician in accordance
with the instructions provided with the pump.
• As electrical installation regulations dier from country to country, contactors, cables,
connection components, and enclosures must be selected based on local regulations.
• A main isolator must be installed before all live electrical connections on the pump.
This must be an all-pole isolator that satises the requirements set out in IEC/EN 60335-1
paragraphs 7.12.2, 22.2 and 24.3.
• The pump shall be fed via a residual current device with maximum leakage current of no
more than 30mA.
• The pump shall be tted with an all-pole switch and approved automatic motor circuit
breaker that should be set to match the motor’s rated current, see the pump motor rating
plate.
• Check that the pump’s direction of rotation is the same as system ow – see the arrow
on the motor housing.

18
Jet Swim Motion
MA30-09 GB Translated from the original language of the instruktions (Swedish)
ENGLISH
This document and its contents are the exclusive
property of Pahléns and may not be copied,
reproduced, transmitted or communicated to a third
party, or used for any purpose without written permission.
Art.no.
Rev.no.
Scale
Designed by: Approved by:
Revised by: Date
Drawn by: Date
Drawing number
Assembly drawing no.
Surface treatment
part of ISO 2768-1
The tolerance class in accordance with this
E
Box 728, SE-194 27 Upplands Väsby, Sweden
Phone +46 8 59411050, Fax +46 8 59086880
RJ 2017-06-07
Classic
Grundsats Jet Swim Motion
M12782 0
A
Av/På
B
Luftjustering
Figure 1. Front (Classic)
A
On/O
B
Air adjustment
Operation
1. Start the jet streams with the push button (A gure 2).
2. The air mixture can be adjusted with the dial (B)
3. Turn o the jet streams with the push button (A gure 2).
N.B!
When there is a risk of freezing, close the valves, remove and drain the
pump of all water. The pump should be stored indoors. Lower the water
level to approximately 10 cm under the Jet Swim housing in order to
avoid freezing damage.
Start
The pump must be lled with water prior to starting. Never run the pump dry, as that can damage the parts inside.
1. Make sure that the pump’s direction of rotations is consistent with the arrow on the motor’s fan cover.
2. Open the valves.
3. Make sure that all the valves to and from the pump are open.
Make sure that the pump is completely lled with water before it is started.
4. Start the pump.

19
Jet Swim Motion
MA30-09 DE Übersetzt aus der Originalsprache der Bedienungsanleitung (Schwedisch)
DEUTSCH
Dieses Handbuch muss unbedingt sorgfältig gelesen werden, um die Funktion und Lebensdauer der Poolausrüstung sicher-
zustellen.
Pahlén AB haftet nicht für Produktgarantie oder Schäden, die aufgrund falscher Installation, Bedienungsfehlern oder falscher
Wartung auftreten.
WARNHINWEIS
• Dieses Gerät darf nicht in aggressivem Wasser, Salzwasser oder Pools/Badefässern
mit Chlorgenerator/Salzelektrolysegerät verwendet werden, siehe empfohlene Werte zur
Wasserqualität.
• Das Gerät muss in Übereinstimmung mit den geltenden nationalen Gesetzen und
Vorschriften installiert werden. Die elektrische Installation darf nur von einem qualizierten
Elektriker durchgeführt werden.
• Beginnen Sie erst mit der Installation des Geräts, wenn Sie die Installationsanweisungen
und Warnhinweise in dieser Anleitung gelesen und verstanden haben. Wenn Sie Fragen
zu Installationsanweisungen oder Warnhinweisen haben, wenden Sie sich bitte an Ihren
Händler vor Ort.
• Dieses Gerät darf unter keinen Umständen in Betrieb genommen werden, ohne dass es
vollständig mit Wasser gefüllt ist.
• Dieses Gerät darf nicht abgedeckt, in der Nähe von brennbaren Materialien oder in
direktem Sonnenlicht aufgestellt werden.
• Dieses Gerät darf nicht von sehr kleinen Kindern (0–3 Jahre) verwendet werden.
• Dieses Gerät darf nicht von Kleinkindern (3-8 Jahre) und Menschen mit sehr umfang-
reichen und komplexen Behinderungen benutzt werden, es sei denn, sie werden ständig
von einer für ihre Sicherheit verantwortlichen Person beaufsichtigt.
• Dieses Gerät kann von Kindern ab 8 Jahren und älter sowie Personen mit eingeschränk-
ten körperlichen oder geistigen Fähigkeiten oder eingeschränkten Sinnesfähigkeiten oder
mangelnder Erfahrung und Wissen benutzt werden, wenn sie unter Aufsicht stehen oder
Anweisungen zu einem sicheren Gebrauch erhalten haben und die mit dem Gerät
verbundenen Gefahren verstehen.
• Kinder dürfen nicht mit dem Gerät spielen.
• Dieses Gerät darf von Kindern, die unbeaufsichtigt sind, gereinigt oder gewartet werden.
• Trennen Sie das Gerät immer von der Stromversorgung, bevor Sie es zusammenbauen,
zerlegen oder reinigen.
• Pumpen ohne Hinweis darauf, dass sie gegen Frost geschützt sind, dürfen bei Frostwetter
nicht im Freien gelassen werden.
• Bei Nichtbeachtung der Installationsanweisungen verliert die Produktgarantie ihre
Gültigkeit.

20
Jet Swim Motion
MA30-09 DE Übersetzt aus der Originalsprache der Bedienungsanleitung (Schwedisch)
DEUTSCH
This document and its contents are the exclusive
property of Pahléns and may not be copied,
reproduced, transmitted or communicated to a third
party, or used for any purpose without written permission.
This document and its contents are the exclusive
property of Pahléns and may not be copied,
reproduced, transmitted or communicated to a third
party, or used for any purpose without written permission.
Art.no.
Rev.no.
Scale
Designed by: Approved by:
Revised by: Date
Drawn by: Date
Drawing number
Assembly drawing no.
Surface treatment
part of ISO 2768
The tolerance class in accordance with this
E
Box 728, SE-194 27 Upplands Väsby, Sweden
Phone +46 8 59411050, Fax +46 8 59086880
CR
1301280
2012-03-23
TK 2017-07-06
Pumpsats (IE3)
Jet Swim 1200 - 2,2kW M10192 5
1152X1
M12843122469PVCDistans munstycke18
M12737122464EPDM Sh70Packning till munstycke17
Slangklammer127431Slangklämma16
Slang för luft-1 i ngj122409Generic
Slang armerad PVC Ø8x12mm L= 0,8m
15
Slang för start-1 ingj
122404
GenericSlang Ø2x4mm L=1,5m
14
M127891224103Skyddsrör Jet Swim Motion23
R10543121952Ingjut ningsrör L=250mm 2"utv22
Skjutventil dela d903040Skjutventil R2" mässing, delad21
Drawing.no:Art_nrMaterialTitle/ NameQty.Item.
Art.no.
Rev.no.
Scale
Designed by: Approved by:
Revised by: Date
Drawn by: Date
Drawing number
Assembly drawing no.
Surface treatment
part of ISO 2768-1
The tolerance class in accordance with this
E
Box 728, SE-194 27 Uppl ands Väsby, Sweden
Phone +46 8 59411050, Fax +46 8 59086880
1301320
RJ 2017-10-12
Jet Swim Motion
Monteringssats tjockväggig pool
M12815 0
This document and its contents are the exclusive
property of Pahléns and may not be copied,
reproduced, transmitted or communicated to a third
party, or used for any purpose without written permission.
5
4
1
10
14
15
16
22
23
12
13
6
5
4
32
7
9
21
11
M10191-2
130528 OA
Jet Swim 1200
24
M6M M5 A419930020Rostfritt A4Mutter M6M M569
RBS M5199 40022Rostfritt A4Bricka 5,3x15x1,268
Torx A4 FM5x25199 20235Steel, MildSkruv MFT A4 M5x2 567
Slangklammer127431Slangklämma16
Slang för luft-1 i ngj122409Generic
Slang armerad PVC Ø8x12mm L= 0,8m
15
Slang för start -1
122404
GenericSlang Ø2x4mm L=1,5m
14
HM2020122414Mässing CW614NSlangnippel R1/2 x 5/16"13
Skjutventil dela d903040Skjutventil R2" mässing, delad22
Nippel 2 tum90307GenericNippel mässing R2"21
Drawing.no:Art_nrMaterialTitle/ NameQty.Item.
Art.no.
Rev.no.
Scale
Designed by: Approved by:
Revised by: Date
Drawn by: Date
Drawing number
Assembly drawing no.
Surface treatment
part of ISO 2768-1
The tolerance class in accordance with this
E
Box 728, SE-194 27 Uppl ands Väsby, Sweden
Phone +46 8 59411050, Fax +46 8 59086880
1:3
1301310
RJ 2018-01-15
Jet Swim Motion
Monteringssats tunnväggig pool
M12816 0
This document and its contents are the exclusive
property of Pahléns and may not be copied,
reproduced, transmitted or communicated to a third
party, or used for any purpose without written permission.
1
10
14
15
16
22
23
12
13
6
5
4
32
7
9
21
11
M10191-2
130528 OA
Jet Swim 1200
24
This document and its contents are the exclusive
property of Pahléns and may not be copied,
reproduced, transmitted or communicated to a third
party, or used for any purpose without written permission.
This document and its contents are the exclusive
property of Pahléns and may not be copied,
reproduced, transmitted or communicated to a third
party, or used for any purpose without written permission.
Art.no.
Rev.no.
Scale
Designed by: Approved by:
Revised by: Date
Drawn by: Date
Drawing number
Assembly drawing no.
Surface treatment
part of ISO 2768-1
The tolerance class in accordance with this
E
Box 728, SE-194 27 Upplands Väsby, Sweden
Phone +46 8 59411050, Fax +46 8 59086880
ASA 2019-07-26
Motion Glasfibersats
Produktbeschreibung
Jet Swim Motion ist ein Gerät für Training, Bewegung und Spiel. Mit den einstellbaren Strahlströmen kann eine persönliche
Anpassung des Wasserdurchusses und der Luftbeimischung vorgenommen werden.
Jet Swim Motion besteht aus vier Teilen:
Basissatz Montagesatz Pumpensatz Kontrollbox
1301300 Classic
1301310
für dünne Poolwände
1301320 für dicke Poolwände
1301285 (50Hz),
1301285HZ (60Hz)
1301390 400V
130139NO 230V
1301305 Marine 1301315 im Glasfaserpool
Technische Daten
Motor 2.2 kW
Spannung 230/400V 50Hz 3N~ 265/460V 60Hz 3N~
Stromstärke 8.0 / 4.6 A 6.8 / 3.9 A
Pumpenkapazität 46 m3/h 43 m3/h
Schutzart IP55
Umgebungstemperatur Max. +45°C
Das Produkt ist für folgende Wasserwerte vorgesehen:
Gesamter Chlorgehalt: max 3.5 mg/liter*
Chlorid(Salz)Gehalt: max 250 mg/liter
pH-Wert: 7.2–7.6
Alkalinität: 60–120 mg/liter (ppm)
Kalziumhärte: 100–300 mg/liter (ppm)
Eisen: max 0.1 mg/liter*
Kupfer: max 0.2 mg/liter*
Mangan: max 0.05 mg/liter*
Phosphor: max 0.01 mg/liter*
Nitrat: max 50 mg/liter*
* Gemäß EN16713-3 2016
Bei Nichteinhaltung dieser Werte erlischt die Produktgarantie.
Sicherheit
Da der Strahlstrom stark ist, müssen Sie einen Mindestabstand von 0,5 m vom Auslass des Strahls einhalten.
Personen mit langen Haaren müssen besonders vorsichtig sein, damit das Haar nicht an den Ansaugönungen (Önungen in
der Front) hängen bleibt.
Kleine Kinder sollten sich im Pool nicht ohne Aufsicht aufhalten, besonders nicht, wenn das Jet Swim-Aggregat läuft.
Informieren Sie vor dem Start von Jet Swim immer andere Badende im Becken.
Kontrollieren Sie immer, dass der Strom zur Pumpe vor Beginn von Arbeiten, Service oder Wartung an der Pumpe
unterbrochen ist.
Page is loading ...
Page is loading ...
Page is loading ...
Page is loading ...
Page is loading ...
Page is loading ...
Page is loading ...
Page is loading ...
Page is loading ...
Page is loading ...
Page is loading ...
Page is loading ...
Page is loading ...
Page is loading ...
Page is loading ...
Page is loading ...
Page is loading ...
Page is loading ...
Page is loading ...
Page is loading ...
Page is loading ...
Page is loading ...
Page is loading ...
Page is loading ...
Page is loading ...
Page is loading ...
Page is loading ...
Page is loading ...
Page is loading ...
Page is loading ...
Page is loading ...
Page is loading ...
Page is loading ...
Page is loading ...
Page is loading ...
Page is loading ...
Page is loading ...
Page is loading ...
-
 1
1
-
 2
2
-
 3
3
-
 4
4
-
 5
5
-
 6
6
-
 7
7
-
 8
8
-
 9
9
-
 10
10
-
 11
11
-
 12
12
-
 13
13
-
 14
14
-
 15
15
-
 16
16
-
 17
17
-
 18
18
-
 19
19
-
 20
20
-
 21
21
-
 22
22
-
 23
23
-
 24
24
-
 25
25
-
 26
26
-
 27
27
-
 28
28
-
 29
29
-
 30
30
-
 31
31
-
 32
32
-
 33
33
-
 34
34
-
 35
35
-
 36
36
-
 37
37
-
 38
38
-
 39
39
-
 40
40
-
 41
41
-
 42
42
-
 43
43
-
 44
44
-
 45
45
-
 46
46
-
 47
47
-
 48
48
-
 49
49
-
 50
50
-
 51
51
-
 52
52
-
 53
53
-
 54
54
-
 55
55
-
 56
56
-
 57
57
-
 58
58


Pahlen Jet Swim Motion Owner's manual
- Type
- Owner's manual
- This manual is also suitable for
Ask a question and I''ll find the answer in the document
Finding information in a document is now easier with AI
in other languages
Related papers
-
Pahlen Jet Swim 2000 Owner's manual
-
-
-
-
-
-
-
-
-
Other documents
-
agape AVAS1092E Assembly Instructions
-
Blue Wave 64920 User manual
-
-
WaterWay POWER Stream Swim Jet Operating instructions
-
-
Josef Kihlberg JKPC782 User manual
-
-
Electrolux ERN34800 User manual
-
Wacker Neuson HP252 User manual
-
Electrolux EUX2245AOX User manual