Page is loading ...

BEFORE YOU BEGIN...
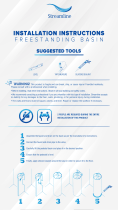
READ INSTRUCTIONS FIRST
TOOLS AND MATERIALS
hacksaw
adjustable
wrench (10")
tube cutter
basin wrench
level
REMOVING YOUR OLD
LAVATORY
INSTALLING YOUR NEW
LAVATORY
pipe wrench (12")
Installation Instructions
Cornice
Pedestal
Lavatory
If you are installing your lavatory in a new or
remodeled bathroom, you should make sure that
you are in compliance with all local plumbing codes.
The rough-in information, available on page 2 of
these instructions or at www.americanstandard.com,
will be helpful in placing the lavatory, water supply
piping, shut-off valves and drain in their proper
positions.
1. Turn off the water supply. This is done by closing
the two shut-off valves located under the lavatory.
If there are no shut-off valves leading to the lavatory,
you must turn off the water at the main valve. This is
usually located in the basement, garage or near the
foundation on the outside of the house. It may also be
near the water meter.
Check to be sure the water is off by turning on the
faucet where you are working until the water stops
flowing.
If you have shut off the main valve in a two-story
house or greater, you should open the kitchen faucet
and another faucet on the same level. Water will then
drain from the entire line. This will help avoid spills.
Be sure to close the faucets before you turn on the
main valve again.
2. Disconnect the drain pipes. Take off as many
sections as possible between the lavatory and the
wall or floor to facilitate removal.
Place a basin under the work area to catch any water
that may still be in the drain.
3. Before removing anything else, check to see if the
pipes in the wall are providing support for the lavatory.
If this is the case, use care in removing the faucet
connections. The lavatory may fall once the faucet is
disconnected, so have a helper hold it up while you
work.
Detach the faucet from the shut-off valves by
unscrewing the compression nut at the joints between
the valves and the water supply tubes.
If the connection is corroded you may need to cut off
the nut with a hacksaw. If there is no nut or shut-off
valve, use a tube cutter or hacksaw to separate the
faucet from the water supply tubes.
Keep the basin and sponge handy for water that
remains in the pipe and faucet.
4. Determine how the lavatory is mounted. Especially
notice if there is a good structural support for wall
mounting. See step 5 for bracing instructions, if
required.
If there is a wall bracket at the back, you might be
able to lift the lavatory off. It may be heavy, so have a
helper lend a hand. A floor mounted lavatory can be
removed by lifting it off of the pedestal or legs after
first detaching any wall-mount fittings.
5. If you are installing the lavatory in a new or
substantially remodeled bathroom, refer to the
rough-in drawings for locations of shut-off valves and
drain. The inlets of the shut-off valves should match
the size of the piping in the house and the outlets
should match the water supply tubes you will run to
the faucet. The latter are usually 1/2" I.P.S. tubing.
You should also install shut-off valves if there were
none in the existing bathroom or if the old ones are
unserviceable or unsightly.
A cross brace is required to provide a solid mounting
support for the new lavatory. Check to be sure there
is one in the existing bathroom. If not, use a saw and
chisel to mortise a 2" x 4" board across at least two of
the vertical 2" x 4" wall studs on each wall of the
corner as shown in FIGURE 1. Nail both boards
securely into place.
The centerline of the cross braces should be
29-3/4"up from the floor on both walls.
6. Hangers provided with the lavatory should be
mounted 11" from the corner and 29-3/4" up from
the floor on each wall (see FIGURE 2). Tighten the
hangers, center slot only, until they will support the
lavatory, leaving "play" for final adjustment later.
Make sure hanger is in highest position when
snugging hanger. Set the lavatory in place.
7. Position the pedestal leg by using the recess
indentation on the underside of the lavatory as a
guide. The back side of the leg should be vertical
and away from the wall surface. See FIGURE 3.
Mark the location of the hole(s) in the bottom of the
leg. Remove the leg, then drill the starter hole(s)
as marked. These hole(s) should be 1-1/2" deep.
Insert a plastic expansion shield into each hole(s)
if required.
You can determine which tools and materials are
necessary by reading the complete installation
instructions and examining the job you have to do.
These are normally needed:
sponge
basin or pail
tape measure
flat blade screwdriver
emery cloth
hammer and nails
saber saw or keyhole saw
drill
chisel
cardboard, newspapers or a dropcloth
2" x 4" x 48" lumber
screws
3/4" washers
expansion or anchor plugs
bathroom caulking
These are optional, in case existing
materials are unusable:
two shut-off valves with 1/2" I.P.S. outlet,
optional (check house piping to determine
valve inlet dimenstion.)
1/2" I.P.S. hot and cold water supply tubes
with compression nut and ferrule
drain tail pipe, trap and additional drain pipe
as required
29-3/4"
(756mm)
FLOOR
FIGURE 1
29-3/4"
(756mm)
FC-071-1102
29-3/4"
(756mm)
29-3/4"
(756mm)
11"
(279mm)
11"
(279mm)
WALL
WALL
FLOOR
FIGURE 2
FIGURE 3
FLOOR
WALL WALL
ANCHOR
SCREWS
(2)-PEDESTAL BASE
(1)-LAVA BACK

8. Set the pedestal back in place. Put a 3/4" washer
on each of the screw(s), then screw the screw(s) for
the pedestal loosely to the floor.
9. Examine the alignment of the pedestal lavatory
to the wall to be sure it is centered where you want
it. Also check the level and adjust as needed.
Tighten the screw(s) at the base of the pedestal leg.
CAUTION: Do not over-tighten, as this may crack
the vitreous china.
10. Remove the lavatory and slide the hangers
upward to their highest positions. Reset the lavatory
to position the hangers in their final position.
Remove the lavatory once more and tighten the
hangers firmly into place, using additional screws.
11. Place the new lavatory on a thick layer of
newspapers, dropcloth, or the box in which it
was packed to protect it from scratches.
Attach the pop-up drain and the faucet to the
lavatory according to the faucet manafacturer's
instructions. You may also attach the hot and cold
water supply tubes to the faucet at this time.
Sealant may be required around the faucet and
pop-up where they meet the china. Check the
faucet manufacturer's recommendations. These
steps are easier to do before you mount the
lavatory in its place.
Reset the lavatory and anchor to the wall using the
bolt provided with the lavatory. Hole for anchoring
is located on the bottom of the lavatory near the
back corner as shown in FIGURE 3.
12. Connect the drain trap to the pop-up drain tail
piece, then join the trap to the drain pipe in the
wall. You may use metal or plastic drain pipe
and trap following the directions provided by
the manufacturer.
13. Use a tube cutter to trim the free ends of the hot
and cold supply tubes to at least 1/4" longer than
necessary to reach into the inlets of the shut-off
valves. It is better to cut the tubes longer than
needed, then trim them again. Remove any burrs or
sharp edges with an emory cloth.
Join the hot and cold water supplies to the shut-off
valves as instructed by the manufacturer.
14. Turn the main water supply on, then open the
shut-off valves. Check all connections for leaks. A
slight tightening of about 1/4 turn will normally stop
any leaks.
15. Many people prefer a bead of caulking applied
at joint between lavatory and wall. Apply caulking
now, following caulking manufacturer's instructions.
15. Everyday cleaning of American Standard
china products maybe accomplished by using an
antibacterial liquid dishwashing soap and water.
For stubborn stains, use AJAX
®
or Comet
®
sparingly. Read and follow all label directions. In
all cases, rinse thoroughly with plenty of water
and dry the fixture.
In areas with hard water, a buildup of mineral
deposits or lime may make the finish of the
product appear dull. To remove lime buildup on
vitreous china products, KRC-7
®
liquid cleaner
may be used. Read and follow all label directions.
In all cases, rinse thoroughly with plenty of water
and dry the fixture.
Parts Policy...In order to avoid unnecessary delay or
uncertainty in the satisfaction of warranty claims,
buyers are advised to return alleged defective parts
to the place of purchase. Sellers are authorized to
address and resolve all warranty claims on fixtures
directly with buyers.
Your limited warranty is packed in with your lavatory.
FC-071-1102
CARE AND CLEANING
PARTS
INSTALLING YOUR NEW
LAVATORY (continued)
Fixture dimensions are nominal and conform to tolerances established by
ANSI standards A112.19.2M
7"
(178mm)
15-1/2"
(394mm)
11"
(279mm)
HANGER
ATTACH
HANGERS
FINISHED WALL
CENTER OF SLOT
ON HANGER
FINISHED WALL
FINISHED FLOOR
OUTLET
7-1/2"
(191mm)
18-1/2"
(470mm)
22"
(559mm)
4"
(102mm)
2-1/4"
(57mm)
13-1/4"
(337mm)
29-3/4"
(756mm)
3-1/2"
(89mm)
12-3/4"
(324mm)
3-1/2"
(89mm)
10"
(254mm)
7-1/4"
(184mm)
9-1/4"
(235mm)
3/8" HOT
WATER
(10mm)
3/8" COLD
WATER
(10mm)
31"
RIM HEIGHT
(787mm)
C
L
C
L
FOR MORE INFORMATION
CUSTOMER SERVICE: 1-800-442-1902
www.americanstandard-us.com
www.craneplumbing.com
www.eljer.com
/