
X12
User Manual

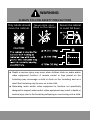
WARNING
ALWAYS FOLLOW SAFETY PRECAUTIONS
Only Adults should
move the cabinet.
Never climb, sit or
stand on the cabinet.
Push
Secure the cabinet
to avoid fall down.
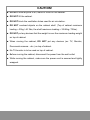
CAUTION
Death or serious injury may occur when children climb on audio and/or
video equipment furniture. A remote control or toys placed on the
furnishing may encourage a child to climb on the furnishing and as a
result the furnishing may tip over on to the child.
Relocating audio and/or video equipment to furniture not specifically
designed to support audio and/or video equipment may result in death or
serious injury due to the furnishing collapsing or over turning onto a child.

CAUTION!
DO NOT allow anyone to sit, stand or climb on the cabinet.
DO NOT lift the cabinet.
DO NOT block the ventilation holes used for air circulation.
DO NOT overload objects on the cabinet shelf. (Top of cabinet maximum
loading = 20kg / 44.1lbs; the shelf maximum loading = 32.66kg / 72lbs).
DO NOT put any devices that the weight is over the maximum loading weight
on top of cabinet.
When moving the cabinet, DO NOT put any devices (ex: TV, Monitor,
Documents camera…etc.) on top of cabinet.
No TV/monitor is to be used on top of cabinet.
Before moving the cabinet, disconnect the power from the wall outlet.
While moving the cabinet, make sure the power cord is secured and tightly
wrapped.

FCC NOTICE (Class A)
This device complies with Part 15 of the FCC Rules. Operation is
subject to the following two conditions: (1) this device may not cause
harmful interference, and (2) this device must accept any interference
received, including interference that may cause undesired operation.
Federal Communications Commission Statement
NOTE: This equipment has been tested and found to comply with the limits for a
Class A digital device, pursuant to part 15 of the FCC Rules. These limits are
designed to pro-vide reasonable protection against harmful interference when the
equipment is operate din a commercial environment. This equipment generates,
uses, and can radiate radiofrequency energy and, if not installed and used in
accordance with the instruction manual, may cause harmful interference to radio
communications. Operation of this equipment in a residential area is likely to
cause harmful interference in which case the user will be required to correct the
interference at his own expense.
FCC Caution: Any changes or modifications not expressly approved by the party
responsible for compliance could void the user's authority to operate this
equipment.
This device complies with part 15 of the FCC Rules.
Operation is subject to the following two conditions:
(1) This device may not cause harmful interference, and this device must accept
any interference received, including interference that may cause undesired
operation.
European Community Compliance Statement (Class A)
This product is herewith confirmed to comply with the requirements set
out in the Council Directives on the Approximation of the laws of the
Member States relating to Electromagnetic Compatibility Directive
2014/30/EU.
Warning: This is a class A product. In a domestic environment this product may
cause radio interference in which case the user may be required to take adequate
measures.
DISCLAIMER
No warranty or representation, either expressed or implied, is made with respect to
the contents of this documentation, its quality, performance, merchantability, or
fitness for a particular purpose. Information presented in this documentation has
been carefully checked for reliability; however, no responsibility is assumed for
inaccuracies. The information contained in this documentation is subject to change
without notice.
In no event will AVer Information Inc. be liable for direct, indirect, special, incidental,
or consequential damages arising out of the use or inability to use this product or

documentation, even if advised of the possibility of such damages.
TRADEMARKS
“AVer” is a trademark owned by AVer Information Inc. Other trademarks used
herein for description purpose only belong to each of their companies.
COPYRIGHT
©2018 AVer Information Inc. All rights reserved.
All rights of this object belong to AVer Information Inc. Reproduced or transmitted
in any form or by any means without the prior written permission of AVer
Information Inc. is prohibited. All information or specifications are subject to
change without prior notice.
The mark of Crossed-out wheeled bin indicates that this product must
not be disposed of with your other household waste. Instead, you need
to dispose of the waste equipment by handing it over to a designated
collection point for the recycling of waste electrical and electronic
equipment. For more information about where to drop off your waste
equipment for recycling, please contact your household waste disposal
service or the shop where you purchased the product.
Contact Information
Global
AVer Information Inc.
www.aver.com
8F, No.157, Da-An Rd., Tucheng
Dist.,
New Taipei City
Taiwan
Tel: +886-2-2269-8535
Fax: +886-2-2269-8537
USA
AVer Information Inc.
668 Mission Ct
Fremont, CA 94539
www.averusa.com
Toll-free: 1(877)528-7824
Local: 1(408)263-3828
Fax: 1(408)263-8132
Fax(RMA): 1(408)263-3822
Support.usa@aver.com

CONTENTS
Package Contents ................................................................................................... 1
Tools Required ........................................................................................................ 1
Dimensions .............................................................................................................. 2
Diagram .................................................................................................................... 2
Front and Back ..................................................................................................... 2
Sides ..................................................................................................................... 3
Top and Bottom ..................................................................................................... 3
Installation ............................................................................................................... 4
Door/Top Cover Lock ............................................................................................ 4
Charging the Cabinet ............................................................................................ 5
Adapter Configuration ........................................................................................... 6
Cable Management .............................................................................................. 7
Wall Mount ............................................................................................................... 8
Stacking Installation ............................................................................................... 9
Troubleshooting .................................................................................................... 10
Specifications .........................................................................................................11
Service and Warranty ........................................................................................... 12

1
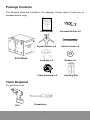
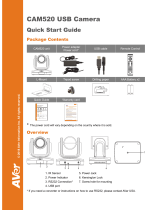
Package Contents
The following items are included in the package. Please check if each item is
available before using.
X12Cabinet
User Manual
Concrete Anchor x 6
Drywall Anchor x 6 Anchor Screw x 6
Lock key x 4 Washer x 6
Cable Grommet x 2 Stacking Kits
Tools Required
For wall mount use.
Drill
Screwdriver

2
Dimensions
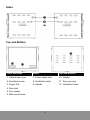
Diagram
Front and Back

3
Sides
Top and Bottom
Front and Back Sides Top and Bottom
1. Cabinet top cover
7. Power cable hole 10. Handle
2. Ventilation holes
8. Ventilation holes 11. Top cover lock
3. Finger Pull
9. Handle 12. Ventilation holes
4. Door lock
5. Foot rubber
6. Wall mount holes

4
Installation
[Note]
1. It is recommended to use cable ties or zip-tie (optional) to secure and manage
cables.
2. It is recommended to allocate 2 persons for efficient device cabling.
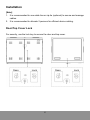
Door/Top Cover Lock
For security, use the lock key to secure the door and top cover.

5
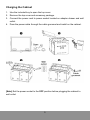
Charging the Cabinet
1. Use the included key to open the top cover.
2. Remove the top cover and accessory package.
3. Connect the power cord to power socket located on adapter drawer and wall
outlet.
4. Pass the power cable through the cable grommet and install on the cabinet.
[Note] Set the power socket to the OFF position before plugging the cabinet to
wall outlet.

6
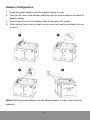
Adapter Configuration
1. Place the power adapter onto the adapter drawer in order.
2. Pass the DC-end of the adapter cable through the hole located on the back of
adapter drawer.
3. Plug-in the AC-end of the adapter cable to the power AC socket.
4. Align the top cover hole to install the top cover and use the included lock key
to lock it.
[Note] Place the power adapter onto the adapter drawer in order, don’t stack the
adapters.

7
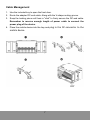
Cable Management
1. Use the included key to open the front door.
2. Route the adapter DC-end cable. Along with the V-shape routing groove.
3. Snap the locking piece until hear a "click" to firmly secure the DC-end cable.
Remember to reserve enough length of power cable to connect the
power plug of the device.
4. Place the mobile device into the bay and plug in the DC‐connector to the
mobiledevice.

8
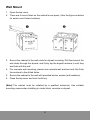
Wall Mount
1. Open the top cover.
2. There are 6 mount holes on the cabinet’s rear panel. (See the figure as below
for exact mount holes locations).
3. Secure the cabinet to the wall studs for drywall mounting. Drill the holes at the
wall studs through the drywall, and firmly tap the drywall anchors in until they
are flush with the wall.
4. For concrete wall mounting, please use concrete wall anchors and fully flush
the anchors to the drilled holes.
5. Secure the cabinet to the wall with provided anchor screws (with washers).
6. Close the top cover and lock it with key.
[Note] The cabinet must be installed by a qualified technician. Use suitable
mounting means when installing to cinder block, concrete or drywall.

9
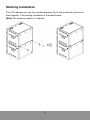
Stacking Installation
The X12 cabinets can use the included stacking kits to stack cabinets and secure
them together. The stacking installation is illustrated below:
[Note] The maximum stack is 2 cabinets.

10
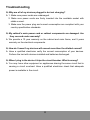
Troubleshooting
Q: Why are all of my devices plugged in but not charging?
A: 1. Make sure power cords are undamaged.
2. Make sure power cords are firmly inserted into the available socket with
stable current.
3. Make sure the power plug and current consumption are compliant with your
country specification standards.
Q: My cabinet's main power cord or cabinet components are damaged. Are
they covered under warranty?
A: We provide a 10 year warranty on the cabinet and main frame, and 5 years
warranty on the electrical components.
Q: How do I know if my devices will exceed more than the allotted current?
A: Have a qualified electrician verify the current consumption of your devices.
Perform the test with devices installed and batteries discharged.
Q: When I plug in the device it trips the circuit breaker. What is wrong?
A: You may have other equipment or appliances sharing the same circuit that is
causing a circuit overload. Have a qualified electrician check that adequate
power is available in the circuit.

11
Specifications
Model
X12
Capacity
12
Supported Devices
Mobile devices up to 15"
Charging Type
Fully Charging
Power Specification
Power Strip: 100-120V ~ 50/60Hz, 12A
Security
Front door: 2 points mechanism with key lock
function. Padlock hole is combine with handle
Top cover: 1 point key lock function.
The key of front door and top cover use the same
key.
[Note] Padlock is not included in the package
Fixed Shelf
Yes
Top Surface(work
platform)
20kg (44.1lbs)
Shelf Support
Weight(ea.)
32.66kg (72lbs)
Adapter Shelves(ea.)
6kg(13.2lbs)
Working Temperature
0
°~30°C
Working RH%
10%~90%
Storage Temperature -40°C~60°C
Storage RH%
5%~95%
Warranty
10 years cabinet and tray
5 years electrical components
Cabinet Dimensions
(W x D x H)
614.1(W)×483.4(D)×447.8(H) mm
24.18"(W)×19.03"(D)×17.63"(H)
Slot Dimensions
(W x D x H)
34(W)×419.1(D)×304.8(H) mm
1.34"(W)×16.5"(D)×12"(H)
Weight without Devices
22.5 Kg (49.6 lbs) ± 3 Kg(6.61 lbs)

12
Service and Warranty
All of our products come with a quality and safety assurance.
For customers located in North America, please visit the AVer USA support site for
comprehensive RMA, Warranty, and Service information:
http://averusa.com/classroom-technology/support/
For customers located outside North America, please visit AVer Global support site:
http://www.aver.com/
-
 1
1
-
 2
2
-
 3
3
-
 4
4
-
 5
5
-
 6
6
-
 7
7
-
 8
8
-
 9
9
-
 10
10
-
 11
11
-
 12
12
-
 13
13
-
 14
14
-
 15
15
-
 16
16
-
 17
17
-
 18
18


Ask a question and I''ll find the answer in the document
Finding information in a document is now easier with AI
Related papers
Other documents
-
Multibrackets 7350105213120 M Motorized Public Floorstand Dual Pillar Installation guide
-
Hewlett Packard Enterprise IAP-92 User manual
-
Aruba Networks IAP-92 Installation guide
-
Hewlett Packard Enterprise Q9DAP105 User manual
-
Aruba AP100 Series Installation guide
-
Glacier Bay SP5685 Installation guide
-
 AVer Information Inc. CAM520 Quick start guide
-
Martin Audio Blackline X115 User Guides
-
Black Box UD10KP, UD20KP, UD30KP, UD10KP-C, UD10KP-CD, UD20KP-C, UD30KP-LD, UD10KP-LD, UD20KP-LD, UD40KP User manual
-
NewAge Products 59550 Installation guide
