
STIHL AR 2000 L, 3000 L
Instruction Manual
Manual de instrucciones
WARNING
Read Instruction Manual thoroughly before use and
follow all safety precautions – improper use can cause
serious or fatal injury.
ADVERTENCIA
Antes de usar la máquina lea y siga todas las precauciones
de seguridad dadas en el manual de instrucciones – el uso
incorrecto puede causar lesiones graves o mortales.


Original Instruction ManualPrinted on chlorine-free paper
Printing inks contain vegetable oils, paper can be recycled.
© ANDREAS STIHL AG & Co. KG 2020
0458-820-8621-A. VA3.G20.
0000008789_005_GB
0458-820-8621-A
English
1
This instruction manual is protected by copyright. All rights reserved, especially the rights to reproduce, translate and process
with electronic systems.
Contents
1 Introduction
. . . . . . . . . . . . . . . . . . . . . . . . . . . . . . . . . . . . . . . . .
2
2 Guide to Using this Manual
. . . . . . . . . . . . . . . . . . . . . . . . . .
2
2.1 Signal Words
. . . . . . . . . . . . . . . . . . . . . . . . . . . . . . . . . . . . . . . .
2
2.2 Symbols in Text
. . . . . . . . . . . . . . . . . . . . . . . . . . . . . . . . . . . . .
3
3 Main Parts
. . . . . . . . . . . . . . . . . . . . . . . . . . . . . . . . . . . . . . . . . .
3
3.1 Battery
. . . . . . . . . . . . . . . . . . . . . . . . . . . . . . . . . . . . . . . . . . . . . .
3
3.2 Battery Harness
. . . . . . . . . . . . . . . . . . . . . . . . . . . . . . . . . . . . .
3
3.3 Connecting Cord and AP Adapter
. . . . . . . . . . . . . . . . . . .
4
4 Safety Symbols on the Product
. . . . . . . . . . . . . . . . . . . . . .
4
4.1 Backpack Battery
. . . . . . . . . . . . . . . . . . . . . . . . . . . . . . . . . . .
4
5 IMPORTANT SAFETY INSTRUCTIONS
. . . . . . . . . . . . .
5
5.1 Intended Use
. . . . . . . . . . . . . . . . . . . . . . . . . . . . . . . . . . . . . . . .
5
5.2 Battery Warnings and Instructions
. . . . . . . . . . . . . . . . . . .
5
5.3 Operator
. . . . . . . . . . . . . . . . . . . . . . . . . . . . . . . . . . . . . . . . . . . .
7
5.4 Connecting Cord
. . . . . . . . . . . . . . . . . . . . . . . . . . . . . . . . . . . .
7
5.5 Using the Backpack Battery
. . . . . . . . . . . . . . . . . . . . . . . . .
8
6 Maintenance, Repair and Storage
. . . . . . . . . . . . . . . . . . .
9
6.1 Warnings and Instructions
. . . . . . . . . . . . . . . . . . . . . . . . . . .
9
7 Before Starting Work
. . . . . . . . . . . . . . . . . . . . . . . . . . . . . . .
10
7.1 Preparing the Backpack Battery for Operation
. . . . . .
10
7.2 Connecting to the STIHL connected App
. . . . . . . . . . .
10
8 Charging the Backpack Battery
. . . . . . . . . . . . . . . . . . . . .
10
8.1 Setting up the Charger
. . . . . . . . . . . . . . . . . . . . . . . . . . . . .
10
8.2 Charging
. . . . . . . . . . . . . . . . . . . . . . . . . . . . . . . . . . . . . . . . . . .
11
9 LED Diagnostics and Acoustic Signals
. . . . . . . . . . . . .
12
9.1 Battery Status
. . . . . . . . . . . . . . . . . . . . . . . . . . . . . . . . . . . . . .
12
9.2 Power Tool Status
. . . . . . . . . . . . . . . . . . . . . . . . . . . . . . . . . .
12
9.3 Charge Status
. . . . . . . . . . . . . . . . . . . . . . . . . . . . . . . . . . . . . .
13
10 Turning the Bluetooth® Interface On and Off
. . . . . . .
13
10.1 Turning the Bluetooth
®
Interface On
. . . . . . . . . . . . . . . .
13
10.2 Turning the Bluetooth
®
Interface Off
. . . . . . . . . . . . . . .
13
11 Assembling the Backpack Battery
. . . . . . . . . . . . . . . . . .
13
11.1 Attaching the Connecting Cord to the Battery
. . . . . .
13
11.2 Attaching and Removing the Battery and
Connecting Cord to the Battery Harness
. . . . . . . . . . . .
14
12 Adjusting the Backpack Battery
. . . . . . . . . . . . . . . . . . . .
15
12.1 Adjusting the Battery Harness to Suit the
Operator’s Height
. . . . . . . . . . . . . . . . . . . . . . . . . . . . . . . . . .
15
12.2 Positioning the Connecting Cord
. . . . . . . . . . . . . . . . . . .
15
12.3 Putting on the Harness
. . . . . . . . . . . . . . . . . . . . . . . . . . . . .
16
13 Connecting the Backpack Battery to the Power
Tool
. . . . . . . . . . . . . . . . . . . . . . . . . . . . . . . . . . . . . . . . . . . . . . . .
17
13.1 Connecting to a Power Tool with an Integrated
Socket
. . . . . . . . . . . . . . . . . . . . . . . . . . . . . . . . . . . . . . . . . . . . .
17
13.2 Connecting to a Power Tool with a Battery
Compartment
. . . . . . . . . . . . . . . . . . . . . . . . . . . . . . . . . . . . . .
17
13.3 Connecting to a STIHL Battery-Powered Product
Designed for Use with STIHL AR L Batteries
. . . . . . .
17
13.4 Disconnecting the Battery
. . . . . . . . . . . . . . . . . . . . . . . . . .
18
14 During Operation
. . . . . . . . . . . . . . . . . . . . . . . . . . . . . . . . . . .
19
14.1 Using the Battery, Battery Harness, Connecting
Cord and AP Adapter
. . . . . . . . . . . . . . . . . . . . . . . . . . . . . .
19
15 After Finishing Work
. . . . . . . . . . . . . . . . . . . . . . . . . . . . . . .
20
15.1 Preparing for Transportation or Storage
. . . . . . . . . . . .
20
16 USB Port
. . . . . . . . . . . . . . . . . . . . . . . . . . . . . . . . . . . . . . . . . . .
20
16.1 Charging a USB Device
. . . . . . . . . . . . . . . . . . . . . . . . . . . .
20
17 Transporting
. . . . . . . . . . . . . . . . . . . . . . . . . . . . . . . . . . . . . . .
20
17.1 Backpack Battery
. . . . . . . . . . . . . . . . . . . . . . . . . . . . . . . . . .
20
18 Storing
. . . . . . . . . . . . . . . . . . . . . . . . . . . . . . . . . . . . . . . . . . . . .
21
18.1 Backpack Battery
. . . . . . . . . . . . . . . . . . . . . . . . . . . . . . . . . .
21
18.2 Battery Harness, Connecting Cord and
AP Adapter
. . . . . . . . . . . . . . . . . . . . . . . . . . . . . . . . . . . . . . . .
21
19 Cleaning
. . . . . . . . . . . . . . . . . . . . . . . . . . . . . . . . . . . . . . . . . . .
22
19.1 Battery, Battery Harness, Connecting Cord and
AP Adapter
. . . . . . . . . . . . . . . . . . . . . . . . . . . . . . . . . . . . . . . .
22
19.2 Contact Surfaces of the Connecting Cord
. . . . . . . . . .
22

0458-820-8621-A
2
English
1 Introduction
Thank you for your purchase. The information contained in
this manual will help you receive maximum performance and
satisfaction from your STIHL backpack battery and, if
followed, reduce the risk of injury from its use.
SAVE THIS MANUAL!
Do not lend or rent your backpack battery without this
instruction manual. Allow only persons who fully understand
the information in this manual to use the backpack battery.
For further information, or if you do not understand any of
the instructions in this manual, please go to
www.stihlusa.com or contact your authorized STIHL
servicing dealer.
2.1 Signal Words
This manual contains safety information that requires your
special attention. Such information is introduced with the
following symbols and signal words:
DANGER
Indicates a hazardous situation that, if not avoided, will
result in death or serious injury.
20 Inspection and Maintenance
. . . . . . . . . . . . . . . . . . . . . . . .
22
20.1 Inspecting and Maintaining the Battery, Battery
Harness, Connecting Cord and AP Adapter
. . . . . . . . .
22
21 Troubleshooting Guide
. . . . . . . . . . . . . . . . . . . . . . . . . . . . .
23
21.1 Backpack Battery
. . . . . . . . . . . . . . . . . . . . . . . . . . . . . . . . . .
23
22 Specifications
. . . . . . . . . . . . . . . . . . . . . . . . . . . . . . . . . . . . . .
25
22.1 STIHL AR Series Battery
. . . . . . . . . . . . . . . . . . . . . . . . . . .
25
22.2 STIHL AL 300
. . . . . . . . . . . . . . . . . . . . . . . . . . . . . . . . . . . . . .
25
22.3 STIHL AL 500
. . . . . . . . . . . . . . . . . . . . . . . . . . . . . . . . . . . . . .
26
22.4 Symbols on the Backpack Battery
. . . . . . . . . . . . . . . . . .
26
22.5 Engineering Improvements
. . . . . . . . . . . . . . . . . . . . . . . . .
26
22.6 FCC 15 Compliance Statement
. . . . . . . . . . . . . . . . . . . .
26
23 Replacement Parts and Equipment
. . . . . . . . . . . . . . . . .
28
23.1 Genuine STIHL Replacement Parts
. . . . . . . . . . . . . . . .
28
24 Disposal
. . . . . . . . . . . . . . . . . . . . . . . . . . . . . . . . . . . . . . . . . . .
28
24.1 Battery Recycling
. . . . . . . . . . . . . . . . . . . . . . . . . . . . . . . . . .
28
25 Limited Warranty
. . . . . . . . . . . . . . . . . . . . . . . . . . . . . . . . . . .
28
25.1 STIHL Incorporated Limited Warranty Policy
. . . . . . .
28
26 Trademarks
. . . . . . . . . . . . . . . . . . . . . . . . . . . . . . . . . . . . . . . .
28
26.1 Registered Trademarks
. . . . . . . . . . . . . . . . . . . . . . . . . . . .
28
26.2 Common Law Trademarks
. . . . . . . . . . . . . . . . . . . . . . . . .
29
27 Addresses
. . . . . . . . . . . . . . . . . . . . . . . . . . . . . . . . . . . . . . . . .
29
27.1 STIHL Incorporated
. . . . . . . . . . . . . . . . . . . . . . . . . . . . . . . .
29
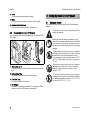
1 Introduction
It is important that you read and observe the
following information and warnings. Improper
use can cause serious injury.
Read this instruction manual thoroughly before
use and periodically thereafter. Follow all safety
precautions. Careless or improper use of the
backpack battery can cause serious or fatal
injury.
2 Guide to Using this Manual

0458-820-8621-A
3
English
3 Main Parts
WARNING
Indicates a hazardous situation that, if not avoided, could
result in death or serious injury.
NOTICE
Indicates a risk of property damage, including damage to the
machine or its individual components.
2.2 Symbols in Text
The following symbol is included to assist you with the use
of the manual:
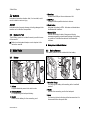
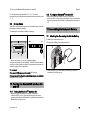
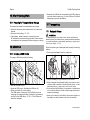
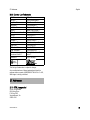
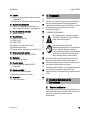
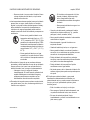
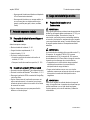
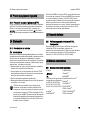
3.1 Battery
1 Battery
Supplies electrical power to the tool's motor.
2 Carrying Handle
For transporting the backpack battery.
3 Socket
Socket on the battery for the connecting cord.
4 Dust Cap
Protects the USB port from moisture and dirt.
5 USB Port
Charges USB compatible electronic devices.
6 Push Button
Activates the battery's LEDs. Activates and deactivates
the Bluetooth® interface.
7 Battery LEDs
Indicate the battery's state of charge and display
messages regarding potential malfunctions in the battery
or power tool. Indicate the status of the Bluetooth®
interface.
# Rating Label with Serial Number
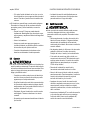
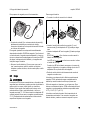
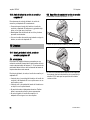
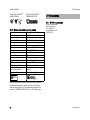
3.2 Battery Harness
The battery harness is not included with the battery.
1 Shoulder Straps
For carrying the battery while working with a handheld
product.
2 Guide
Secures the connecting cord to the backpack.
3 Loop
For securing the tool-side plug at the harness when it is
disconnected from the power tool.
Refers to a designated chapter or sub-chapter in this
instruction manual.
3Main Parts
#
1
7
6
5
4
2
3
0000-GXX-8331-A0
1
2 3
6
4
5
0000-GXX-9336-A0

0458-820-8621-A
4
English
4 Safety Symbols on the Product
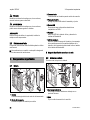
4Lever
For securing and releasing the battery.
5Slide
For adjusting the harness to suit the user’s height.
6 Hook and Eye Fasteners
Secure the connecting cord to the backpack.
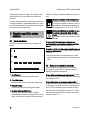
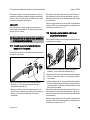
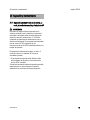
3.3 Connecting Cord and AP Adapter
The connecting cord and AP Adapter are not included with
the battery.
1 Connecting Cord
Transmits electric current from the battery to the power
tool.
2 Battery-Side Plug
Connects the connecting cord to the battery.
3 Tool-Side Plug
Fits into the power tool socket.
4 AP Adapter
Adapter for connecting the battery to a charger or STIHL
power tool with an AP battery compartment.
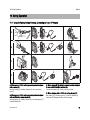
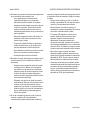
4.1 Backpack Battery
The following safety symbols are found on the backpack
battery:
1
3
4
2
0000-GXX-9337-A0
4 Safety Symbols on the Product
To reduce the risk of injury, follow the specified
safety precautions.
Read and follow all safety precautions in this
instruction manual and the manual for the STIHL
tool powered by this battery. Improper use can
lead to serious or fatal personal injury or property
damage.
To reduce the risk of personal injury or property
damage from fire, explosion or burns, including
chemical burns, do not disassemble, crush,
drop, damage or heat the battery above 212 °F
(100 °C). Never expose it to fire or incinerate,
@ 5.2.
To reduce the risk of personal injury or property
damage from a short circuit, fire or explosion,
keep dry. Never immerse in water or other
liquids, @ 5.2.
To reduce the risk of personal injury or property
damage from fire, never use or store the battery
at ambient temperatures below - 4 °F (- 20 °C)
or above 122 F (50 °C), @ 5.2.

0458-820-8621-A
5
English
5 IMPORTANT SAFETY INSTRUCTIONS
5.1 Intended Use
WARNING
■ Use of STIHL AR L batteries for any purpose other than
powering the STIHL tools listed below could lead to
personal injury and property damage. Use only with the
following STIHL power tools:
– STIHL MSA chain saws (see important exceptions
below)
– STIHL HTA pole pruners
– STIHL FSA trimmers and brush cutters
– STIHL HSA hedge trimmers
– STIHL HLA extended reach hedge trimmers
– STIHL BGA blowers
– STIHL RMA lawn mowers designed for use with STIHL
AR L batteries
■ Do not use STIHL AR L batteries with STIHL TSA cut-off
machines or STIHL RMA lawn mowers designed with an
AP battery compartment. Use with these products could
lead to severe personal injury and property damage from
entanglement of the connecting cord, loss of control, or
loss of balance.
■ Do not use STIHL AR L batteries with STIHL MSA
top
-
handle chain saws while climbing in a tree for in-tree
surgery and maintenance. Use could lead to severe
personal injury and property damage from entanglement
of the connecting cord, loss of control, or loss of balance.
Always use a lift bucket for in-tree surgery and
maintenance if using an AR L battery with a MSA top-
handle chain saw. Do not climb in the tree with an
AR L battery.
■ Use of unauthorized chargers can damage the battery and
result in fire, explosion and personal injury and property
damage.
– Charge STIHL AR L batteries only with genuine
STIHL AL 300 or STIHL AL 500 series chargers.
■ The STIHL battery harness is designed for carrying a
STIHL AR L series battery while working with a handheld
product. When using the harness, the battery is carried as
a backpack with the straps of the harness over both
shoulders.
The STIHL AR L battery uses Bluetooth
®
technology to
exchange information with mobile devices running the
STIHL connected App.
5.2 Battery Warnings and Instructions
WARNING
■ The battery contains safety features and devices which, if
damaged, may allow the battery to generate heat, rupture,
leak, ignite or explode.
– Never use or charge a malfunctioning, damaged,
cracked, leaking or deformed battery.
– Never open, disassemble, crush, drop, subject to
heavy impact or otherwise damage the battery.
– Never expose the battery to microwaves or high
pressures.
– Never insert objects into the battery's openings.
– Never sit or stand on the battery. Never place
objects on the battery or stack batteries on top of
one another.
5 IMPORTANT SAFETY
INSTRUCTIONS
– Never heat the battery above 212 °F
(100 °C).
– Never incinerate or place the battery on
or near fires, stoves or other high-
temperature locations.

0458-820-8621-A
6
English
5 IMPORTANT SAFETY INSTRUCTIONS
■ Extreme temperatures may cause the battery to generate
heat, rupture, leak, ignite or explode, resulting in severe or
fatal personal injury and property damage. Exposure to
temperatures outside the recommended temperature
range may also reduce battery life and performance.
■ To reduce the risk of personal injury and property damage
in the event the battery emits smoke, an unusual smell or
feels unusually hot while using, charging or storing:
– Immediately discontinue using or charging the
battery. If you are using it, remove it from your back.
Maintain a safe distance and prepare to contact the
authorities in the event of fire or explosion.
■ To reduce the risk of a short circuit, which could lead to
electric shock, fire and explosion:
– Keep a battery that is not in use away from metal
objects (e.g., paper clips, nails, coins, keys).
– Never store the battery connected to the power tool
or charger.
– Never transport or store the battery in a metal
container.
– Store the battery indoors in a dry room.
– Never store the battery in damp or corrosive
environments or in conditions that could lead to
corrosion of its metal components.
– Protect the battery from exposure to corrosive
agents such as garden chemicals and de-icing salts.
– Protect the battery from exposure to conductive
liquids such as salt water.
– Do not attempt to repair, open or disassemble the
battery. There are no user-serviceable parts inside.
■ Leaking battery fluid is potentially harmful and can cause
skin and eye irritation, chemical burns and other serious
personal injury.
– Avoid contact with skin and eyes.
– Use an inert absorbent such as sand on spilled
battery fluid.
– In the event of accidental contact, immediately rinse
the contact area thoroughly with mild soap and
water.
– If fluid gets into your eye(s): Do not rub. Rinse water
over the open eye(s) for at least 15 minutes and
seek medical attention.
■ A battery fire can be dangerous. To reduce the risk of
severe personal injury and property damage in the event
of fire:
– Evacuate the area. Fire can spread rapidly. Stay
clear of any vapors generated and maintain a safe
distance.
– Contact the fire department.
– Although water can be used to put out a battery fire,
use of a multi-purpose dry chemical fire extinguisher
is preferable.
– Consult the fire department regarding proper
disposal of the burned battery.
– Never use or store the battery at ambient
temperatures below - 4 °F (- 20 °C) or
above 122 °F (50 °C). For optimum
performance, STIHL recommends
using/storing the battery within an
ambient temperature range of 14 °F to
104 °F (- 10 °C to 40 °C).
– Never store the battery in direct sunlight
or inside a vehicle in hot weather.
– If the battery has been exposed to rain
during work, allow it to dry indoors. Make
sure it is completely dry before charging
or using.
– Never immerse the battery in water or
other liquids.

0458-820-8621-A
7
English
5 IMPORTANT SAFETY INSTRUCTIONS
5.3 Operator
WARNING
■ Operating a power tool with the backpack battery can be
strenuous. The operator must be in good physical
condition and mental health. To reduce the risk of
personal injury from fatigue and loss of control:
– Check with your doctor before using the backpack
battery if you have any health condition that may be
aggravated by strenuous work.
– Do not use the backpack battery while under the
influence of any substance (drug, alcohol or
medication, etc.) that might impair vision, balance,
dexterity or judgment.
– Be alert. Do not use the backpack battery when you
are tired. Take a break if you become tired.
– Do not permit minors to use the backpack battery.
– The backpack battery is designed to be operated by
one person only. Do not allow other persons in the
work area.
5.4 Connecting Cord
WARNING
■ Using a damaged connecting cord may result in fire,
electric shock and other personal injury or property
damage. To reduce these risks:
– Check the battery’s connecting cord regularly for
damage. If it becomes damaged, immediately
disconnect it from the power tool and battery. Never
use a damaged connecting cord.
– Do not abrade, crush, jerk, or otherwise abuse or
misuse the connecting cord. Protect it from heat, oil
and sharp edges.
– If the connecting cord becomes damaged, have it
replaced by an authorized STIHL servicing dealer
before use. A damaged connecting cord must be
replaced with an identical STIHL replacement part.
– Unplug the backpack battery from the power tool
when not in use.
– Never yank or jerk the connecting cord to
disconnect. To unplug the connecting cord from the
backpack battery, grasp the battery-side plug, not
the connecting cord.
– Make sure the connecting cord is positioned and
secured so that it will not be stepped on, tripped
over, come in contact with sharp objects or moving
parts, or otherwise be subjected to damage or
stress.
– Check the AP Adapter, the connecting cord and both
plugs for signs of damage. Never use a damaged AP
Adapter, connecting cord or plug.
– Make sure the insulation of the connecting cord and
plugs are in good condition.
– Straighten a twisted connecting cord before use.
– Position the connecting cord so that it cannot be
reached or damaged by the cutting or working
attachment of the power tool being used.
– Do not use the connecting cord for any purpose
other than providing an electrical connection
between the battery and your authorized STIHL
power tool. For example, do not use it for carrying or
hanging up the battery or power tool.
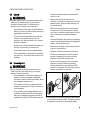
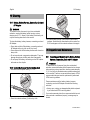
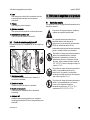
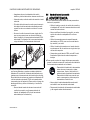
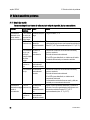
■
■ The two ends of the connecting cord are different shapes
and use different electrical contacts. The battery-side plug
is designed to be inserted into the backpack battery
0000-GXX-9301-A0

0458-820-8621-A
8
English
5 IMPORTANT SAFETY INSTRUCTIONS
socket. The plug on the other end is to be inserted into an
AP Adapter or STIHL power tool with an integrated socket
(see illustration). To reduce the risk of electric shock and
damage to the battery and connecting cord:
– Never attempt to insert the wrong end of the
connecting cord in the battery socket, AP Adapter or
power tool (see illustration).
5.5 Using the Backpack Battery
WARNING
■ Misuse may result in personal injury and property
damage.
– Use the battery, battery harness, connecting cord
and AP Adapter only as described in this instruction
manual.
– Never modify the backpack battery, battery harness,
connecting cord or AP Adapter in any way.
– Use only accessories specifically authorized by
STIHL for use with this backpack battery and battery
harness.
– Use the battery only with the harness described in
this manual. It must not be combined with any other
carrying straps.
– Make sure the STIHL AR L series battery is securely
connected to the battery harness before starting
work.
■ To help reduce the risk of serious personal injury or death
from unintentional activation of a power tool connected to
the battery:
– Never leave the battery unattended when it is
plugged in to a power tool.
– Disconnect the battery from the power tool and
charger before storing.
■ To reduce the risk of serious personal injury from loss of
control during operation:
– Read and follow all safety precautions and
instructions related to the power tool connected to
the battery.
– Make sure you have good balance and secure
footing at all times. Take special care in slippery
conditions (wet ground, snow) and in overgrown
terrain.
– Watch for hidden obstacles such as tree stumps,
roots, rocks, holes and ditches to avoid stumbling or
falling.
– Be extremely cautious when working on slopes or
uneven ground, as the backpack battery may alter
your center of balance.
– Never work with the backpack battery in trees, on
roofs or on ladders or any other insecure support.
– Do not overreach.
■ To reduce the risk of injury from tripping on the connecting
cord or losing control of the power tool:
– Always position and secure the connecting cord so
that it will not interfere with your power tool or proper
working technique. Secure the connecting cord with
the hook and eye fasteners at the battery harness.
Keep the connecting cord away from the cutting
attachment of the power tool.
– Remain aware of the location of the connecting cord
while working. Prevent it from contacting the power
tool's cutting attachment or catching on other
objects, which could cause you to lose balance or
control of the power tool, resulting in serious
personal injury and property damage.
– Unplug the battery from the power tool
before assembling, transporting,
adjusting, inspecting, cleaning,
servicing, maintaining or storing the tool.
Unplug the battery in the event of a
malfunction or emergency and any time
the tool is not in use.

0458-820-8621-A
9
English
6 Maintenance, Repair and Storage
■ Using a backpack battery, battery harness, connecting
cord or AP Adapter that is damaged or improperly
adjusted can lead to a malfunction and increase the risk of
serious personal injury and property damage. Before
starting work or charging the battery:
– Always check the battery, battery harness,
connecting cord and AP Adapter for proper condition
and operation.
– Check the battery, connecting cord, sockets, plugs
and AP Adapter for corrosion, foreign matter and
damage.
– If four LEDs flash red and a rapid succession of short
beeps sound for several seconds, the battery is not
functioning properly. Disconnect the battery from the
power tool, take it off your back and contact your
authorized STIHL servicing dealer immediately. Do
not attempt to use, charge or store the battery until
the problem has been corrected.
– Never attempt to use, charge or store a
malfunctioning, damaged, cracked, leaking or
deformed battery. Take it to your authorized STIHL
servicing dealer immediately. Do not use, charge or
store the battery until the problem has been
corrected.
– Make sure the shoulder straps and other features of
the battery harness are in good condition, properly
adjusted and secure. If they are worn, weakened,
cracked or damaged, contact your authorized STIHL
servicing dealer and have them replaced.
6.1 Warnings and Instructions
WARNING
■ There are no user-authorized repairs for the backpack
battery, battery harness, connecting cord or AP Adapter.
To reduce the risk of fire, electric shock or other personal
injury and property damage:
– Do not attempt to repair, open or disassemble the
battery, battery harness, connecting cord or
AP Adapter. There are no user-serviceable parts.
– Users may carry out only the cleaning and
maintenance operations described in this manual.
– Strictly follow the cleaning and maintenance
instructions in the appropriate sections of this
instruction manual.
– STIHL recommends that all repair work be
performed by authorized STIHL servicing dealers.
■ Unintentional starting may result in personal injury or
property damage. Always disconnect the battery from the
power tool:
– before inspecting, adjusting or cleaning the battery or
power tool
– before handling the power tool's cutting or working
attachment
– before leaving the battery or power tool unattended
– before transporting or storing the battery
– in the event of a malfunction or in an emergency
– any time the battery is not in use.
6 Maintenance, Repair and Storage

0458-820-8621-A
10
English
7 Before Starting Work
■ Use of parts that are not authorized or approved by STIHL
may cause serious or fatal injury or property damage.
– STIHL recommends that only identical STIHL
replacement parts be used for repair or
maintenance.
■ To reduce the risk of electric shock when charging:
– Unplug the charger from the electrical outlet before
inspecting or cleaning the charger.
– Regularly check the electrical contacts of the
charger and ensure that the insulation of the power
cord and plug are in good condition and show no
signs of aging (brittleness), wear or damage.
– Have a damaged power supply cord or AP Adapter
replaced by an authorized STIHL servicing dealer.
■ To reduce the risk of short circuit and fire:
– Keep the charger and the AP Adapter free of foreign
matter. Clean as necessary with a dry cloth or soft,
dry brush.
■ Improper storage can result in unauthorized use and
damage, which can increase the risk of fire, electric shock
and other personal injury or property damage. Before
storing:
– Remove the connecting cord from the power tool or
AP Adapter.
– Remove the AP Adapter from the power tool or
charger.
– Store the battery, battery harness, connecting cord
and AP Adapter indoors in a dry, secure place that
cannot be accessed by children or other
unauthorized users.
– Never store the battery, connecting cord or
AP Adapter in damp or corrosive environments or in
conditions that could lead to the corrosion of metal
components.
– Never store the battery plugged into the AP Adapter
or power tool.
– Never store the battery in a metal container or in a
container with metal objects (e.g., paper clips, nails,
coins, keys).
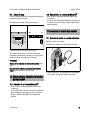
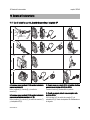
7.1 Preparing the Backpack Battery for Operation
Before starting work:
► Check the battery status, @ 9.1.
► Fully charge the battery, @ 8.
► Clean the battery, @ 19.
► If the connecting cord is used:
► Clean the contact surfaces on the connecting cord,
@ 19.2.
► Position the connecting cord, @ 12.2.
7.2 Connecting to the STIHL connected App
► Turn on your mobile device's Bluetooth
®
interface.
► Turn on the battery's Bluetooth
®
interface, @ 10.1
► Download the STIHL connected App from Google Play or
the App Store.
► Follow in-app instructions for creating a new user account.
Returning users should log in their existing account
information.
► Follow the step-by-step instructions for adding the battery
to your equipment list.
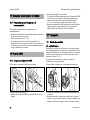
8.1 Setting up the Charger
WARNING
Read and follow the safety precautions on the battery and
charger and the warnings and instructions in this manual,
@ 5.2, and in the charger's manual. To reduce the risk of
short circuit, which could lead to electric shock, fire and
explosion, make sure the charger and its components are
dry and not damaged; operate the charger indoors at an
appropriate ambient temperature.
7 Before Starting Work
8 Charging the Backpack Battery

0458-820-8621-A
11
English
8 Charging the Backpack Battery
WARNING
A typical household electric circuit is between 15 and 20
amps. A single STIHL AL 500 charger draws approximately
4.8 amps. A single AL 300 charger draws approximately
4.4 amps. To reduce the risk of fire from overloading an
electrical circuit:
► Ensure the electrical system is rated to withstand the
expected electrical draw before charging your battery.
► Charge multiple batteries one at a time or on separate
circuits, unless you know your circuit can handle the total
expected draw from multiple chargers.
WARNING
Since the charger heats up during the charging process, do
not operate the charger on a combustible surface or in a
location where combustible gases, liquids, vapors, dusts or
other materials and substances are present.
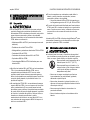
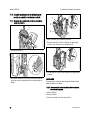
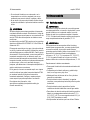
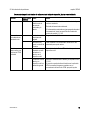
To set up the charger:
► Insert the plug (3) into a properly installed wall outlet (4)
matching the voltage and electrical frequency stated on
the rating plate on the charger.
The charger runs a self-test immediately after it is plugged
in. The charger LED (1) will glow green for about 1 second,
then it will glow red briefly before going out. Once the LED
goes out, the self-test is complete and the charger is ready
to charge the battery.
► Position the power supply cord (2) so that it will not be
stepped on, tripped over, come in contact with sharp
objects or moving parts or otherwise be subjected to
damage or stress.
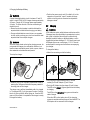
8.2 Charging
WARNING
STIHL batteries contain safety features and devices which,
if damaged, may allow the battery to generate heat, rupture,
leak, ignite or explode. Never charge a malfunctioning,
damaged, cracked, leaking or deformed battery or use a
charger that has been damaged, @ 5.2. Never insert a wet
AP Adapter. Never use a wet charger, @ 5.2. Follow all
product-specific warnings and instructions accompanying
your charger.
To charge the battery:
► Attach the connecting cord to the battery.
► Push the plug of the connecting cord (1) into the
socket (2) of the AP Adapter (3) until it stops.
► Push the AP Adapter into the charger (5) until it stops.
The LED on the charger (4) glows green when the battery
is charging.
The LEDs on the AR battery glow green and show the
state of charge.
When the LEDs on the battery turn off, the charging
process is complete and the charger will shut itself off. The
AP Adapter can be removed from the charger.
3
2
0000-GXX-3228-A1
4
1
3
2
1
0000-GXX-2680-A0
3
45

0458-820-8621-A
12
English
9 LED Diagnostics and Acoustic Signals
► Disconnect the power supply cord from the electrical
outlet when the charger is not in use.
A battery is not fully charged when it ships from the factory.
STIHL recommends that you fully charge the backpack
battery before using it the first time.
Operate the charger indoors in a dry room. For optimum
performance, STIHL recommends operating the charger
within an ambient temperature range of 41 °F to 104 °F
(5 °C to 40 °C).
The battery heats up during operation of the power tool. If a
hot battery is connected to the charger, it may be necessary
for it to cool down before charging starts. The charging
process begins only after the battery has cooled down
sufficiently.
Charging time depends on a number of factors, including
battery condition and the ambient temperature. For a
complete list of approximate charging times, see
www.stihl.com/charging-times.
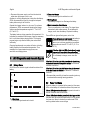
9.1 Battery Status
Six LEDs and an acoustic signal indicate the status of the
battery.
1 A short beep
The acoustic signal works as it should.
2 Three short beeps
The Bluetooth® signal is switched on or off.
3 Six long beeps
The battery's charge is low. Recharge the battery.
4 Rapid succession of short beeps
There is a malfunction in the battery. The signal stops
automatically after a few seconds. Do not attempt to
charge, use or store the battery. Replace the battery.
These LEDs can glow or flash green, red or blue.
If the first LED on the right side glows blue for about three
seconds and three short beeps are emitted: the Bluetooth
®
interface is turned on.
If the first LED on the right side flashes blue six times and
three short beeps are emitted: the Bluetooth
®
interface is
turned off.
► Be aware that your ability to hear the acoustic signal may
be reduced when wearing hearing protection.
9.2 Power Tool Status
When the battery is connected to the power tool, the same
LEDs on the battery will indicate the status of the power tool.
If three LEDs glow red continuously: the power tool motor is
too hot. Allow the motor to cool down.
If three LEDs flash red when you activate the trigger switch:
the power tool has an electrical malfunction. Do not operate
the power tool. Have it checked by an authorized STIHL
servicing dealer before use or storage.
9 LED Diagnostics and Acoustic Signals
1
3
4
.......
0000-GXX-9302-A0
2
If one LED glows red continuously: the battery is
either too hot or too cold. Allow the battery to
warm up or cool down gradually at an ambient
temperature of about 50 °F to 68 °F (10 °C to
20 °C).
If the four right side LEDs flash red and a rapid
succession of several short beeps is emitted: the
battery has a malfunction and must be replaced.
Do not attempt to charge, use or store the
battery.

0458-820-8621-A
13
English
10 Turning the Bluetooth® Interface On and Off
For troubleshooting information, @ 21. For more
information about transporting a malfunctioning battery, see
@ 17.
9.3 Charge Status
The LEDs and acoustic signals on the battery also indicate
the battery's state of charge.
To determine the battery's state of charge:
► Press the button (1) on the backpack battery.
A single short beep will be emitted. The LEDs on the battery
will glow or flash green for about 5 seconds and indicate the
state of charge (see illustration).
For example:
If six green LEDs glow continuously: full charge.
If one green LED is flashing and six long beeps are emitted:
less than 20 % charge.
10.1 Turning the Bluetooth
®
Interface On
► Press and hold the button for about 3 seconds.
If the first LED on the right side glows blue for about
3 seconds and three short beeps are emitted, the battery's
Bluetooth
®
interface is on.
10.2 Turning the Bluetooth
®
Interface Off
► Press and hold the button for about 3 seconds.
If the first LED on the right side flashes blue six times and
three short beeps are emitted, the Bluetooth
®
interface is
off.
11.1 Attaching the Connecting Cord to the Battery
To attach the connecting cord:
► Unplug the battery from the power tool.
► Insert the plug (1) in the battery's socket (2) with the
connecting cord facing up.
10 Turning the Bluetooth® Interface On
and Off
0000-GXX-2673-A0
100 % 0 %
11 Assembling the Backpack Battery
1
2
0000-GXX-9359-A0

0458-820-8621-A
14
English
11 Assembling the Backpack Battery
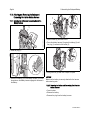
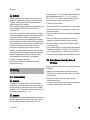
11.2 Attaching and Removing the Battery and
Connecting Cord to the Battery Harness
11.2.1 Attaching the Battery and Connecting Cord to the
Battery Harness
► Insert the plug (1).
► Position the battery (2) on the battery harness (3) so that
the guides on the battery harness engage the recesses in
the battery.
► Open the lever (4) and hold it there.
► Press the battery harness (3) against the battery (2) until
the plug (1) connects to the socket (5).
► Swing the lever (4) down until it snaps into place.
NOTICE
Make sure the battery is securely attached to the harness
before starting work.
11.2.2 Removing the Battery and Connecting Cord from the
Battery Harness
► Open the lever.
► Remove the battery.
► Remove the plug from the battery harness.
1
0000-GXX-9361-A0
32
0000-GXX-9360-A0
3
4
5
2
1
0000-GXX-9362-A0
4
0000-GXX-9357-A0

0458-820-8621-A
15
English
12 Adjusting the Backpack Battery
12.1 Adjusting the Battery Harness to Suit the
Operator’s Height
The battery harness can be set to positions S, M or L to suit
the operator’s height.
► Depress the locking tab (1) and push it in the direction of
the arrow.
► Remove the slide (2).
► Line up mark (3) with mark (4).
► Insert the slide (2).
► Pull the slide up (opposite the direction of the arrow).
It will engage with a click.
► Adjust the slide at the left and right shoulder straps to the
same position.
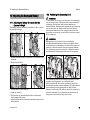
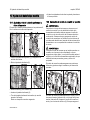
12.2 Positioning the Connecting Cord
WARNING
To reduce the risk of injury from tripping on the connecting
cord or losing control of the power tool, always secure the
connecting cord with the hook and eye fasteners as
described below. Always position and secure the connecting
cord so that it will not interfere with the proper working
technique as described in the instruction manual for the
power tool you are using, or your ability to maintain control
of the power tool.
WARNING
Manage the cord to prevent it from contacting the
cutting/working attachment or catching on objects, which
could cause you to lose balance or control of the power tool,
resulting in serious personal injury and property damage.
The connecting cord can be secured in different positions
and adjusted to suit the height and reach of the operator.
The connecting cord can run through the guide (1) on the
shoulder strap (Illustration A), or along the back
plate (Illustration B). Secure the connecting cord to the
harness with the hook and eye fasteners (2). Always secure
the connecting cord using the guide or hook and eye
fasteners on the side of the body on which the power tool is
held and controlled. Do not allow the connecting cord to
swing across your body or hang at your side.
12 Adjusting the Backpack Battery
1
2
2
0000-GXX-A271-A0
S
M
L
4
3
2
2
2
0000-GXX-A272-A1
1
2
2
2
2
A B
0000-GXX-9303-A0

0458-820-8621-A
16
English
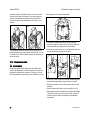
12 Adjusting the Backpack Battery
The length of the connecting cord can be adjusted by
making a loop around the top (Illustration C) or on the side
(Illustration D) of the backpack battery with the hook and eye
fasteners.
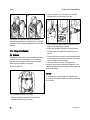
12.3 Putting on the Harness
WARNING
The operator must be able to remove the backpack battery
quickly in the event of an emergency. In an emergency,
open and remove the waist belt and chest strap quickly
before dropping the battery to the ground.
To ensure a proper fit:
► Put the backpack battery on your back.
► Fasten and adjust the waist belt (2) so that it rests
comfortably but securely on your hips.
► Fasten the chest strap (1) and adjust it so that it fits
comfortably but securely across your chest.
► Adjust the harness straps so that the back padding fits
snugly and securely against your back.
► Always wear the battery harness over both shoulders.
► Thread the end of the waist belt through the loops (3)
and (4).
► To remove the harness, open the quick-release fasteners
on the waist belt and chest strap and loosen the harness
straps by lifting the sliding adjusters.
To help reduce the risk of injury in the event of an
emergency, practice quickly opening the fasteners on the
waist belt and chest strap, loosening the shoulder straps and
removing the battery.
NOTICE
To avoid damage, ease the battery to the ground when
practicing. Do not allow the battery to drop to the ground and
do not throw it.
0000-GXX-9304-A0
C
D
1
0000-GXX-7803-A0
3
4
0000-GXX-A276-A0

0458-820-8621-A
17
English
13 Connecting the Backpack Battery to the Power Tool
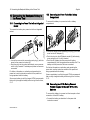
13.1 Connecting to a Power Tool with an Integrated
Socket
To connect the battery to a power tool with an integrated
socket:
► Line up the arrow on the connecting cord plug (1) with the
arrow on the power tool socket (2).
► Push the plug into the socket with steady, even pressure
until it is fully inserted. The battery and power tool are now
connected.
For further information on activating and operating the
power tool, see the instruction manual of the power tool
being operated with this battery.
Since a new battery is not fully charged, STIHL recommends
that you fully charge the battery before using it the first time,
@ 8.
13.2 Connecting to a Power Tool with a Battery
Compartment
To connect the battery to a power tool with a battery
compartment:
► Line up the arrow on the connecting cord plug (1) with the
arrow on the AP Adapter (3).
► Push the plug into the AP Adapter socket (2) with steady,
even pressure until it is fully inserted.
► Push the AP Adapter into the power tool's battery
compartment (4) until it engages with an audible click. The
battery and the power tool are now connected.
For further information on activating and operating the
power tool, see the instruction manual of the power tool
being operated with this battery.
Since a new battery is not fully charged, STIHL recommends
that you fully charge the battery before using it the first time,
@ 8.
13.3 Connecting to a STIHL Battery-Powered
Product Designed for Use with STIHL AR L
Batteries
To connect the battery to a power tool that accepts a direct
connection of the AR L battery:
► Connect the battery as described in the power tool
instruction manual.
13 Connecting the Backpack Battery to
the Power Tool
1
2
0000-GXX-2831-A0
3
0000-GXX-2830-A0
3
1
2

0458-820-8621-A
18
English
13 Connecting the Backpack Battery to the Power Tool
13.4 Disconnecting the Battery
► Switch off the power tool as described in its instruction
manual.
► If a power tool with an integrated socket is used, pull the
plug out of the power tool socket with steady, even
pressure.
► If a power tool with battery compartment is used, remove
the AP Adapter from power tool's battery compartment
and then pull the plug out of the AP Adapter socket with
steady, even pressure.
► If you are using power tool that accepts a direct
connection of the AR L battery: Disconnect the battery as
described in the power tool instruction manual.
NOTICE
Avoid exposing the battery to excessive heat or cold or
prolonged periods of direct sunlight. Use or storage outside
the recommended ambient temperature range can reduce
the performance and/or service life of the battery.
For further information on activating and operating the
power tool, see the instruction manual of the power tool
being operated with this battery.
Page is loading ...
Page is loading ...
Page is loading ...
Page is loading ...
Page is loading ...
Page is loading ...
Page is loading ...
Page is loading ...
Page is loading ...
Page is loading ...
Page is loading ...
Page is loading ...
Page is loading ...
Page is loading ...
Page is loading ...
Page is loading ...
Page is loading ...
Page is loading ...
Page is loading ...
Page is loading ...
Page is loading ...
Page is loading ...
Page is loading ...
Page is loading ...
Page is loading ...
Page is loading ...
Page is loading ...
Page is loading ...
Page is loading ...
Page is loading ...
Page is loading ...
Page is loading ...
Page is loading ...
Page is loading ...
Page is loading ...
Page is loading ...
Page is loading ...
Page is loading ...
Page is loading ...
Page is loading ...
Page is loading ...
Page is loading ...
Page is loading ...
Page is loading ...
-
 1
1
-
 2
2
-
 3
3
-
 4
4
-
 5
5
-
 6
6
-
 7
7
-
 8
8
-
 9
9
-
 10
10
-
 11
11
-
 12
12
-
 13
13
-
 14
14
-
 15
15
-
 16
16
-
 17
17
-
 18
18
-
 19
19
-
 20
20
-
 21
21
-
 22
22
-
 23
23
-
 24
24
-
 25
25
-
 26
26
-
 27
27
-
 28
28
-
 29
29
-
 30
30
-
 31
31
-
 32
32
-
 33
33
-
 34
34
-
 35
35
-
 36
36
-
 37
37
-
 38
38
-
 39
39
-
 40
40
-
 41
41
-
 42
42
-
 43
43
-
 44
44
-
 45
45
-
 46
46
-
 47
47
-
 48
48
-
 49
49
-
 50
50
-
 51
51
-
 52
52
-
 53
53
-
 54
54
-
 55
55
-
 56
56
-
 57
57
-
 58
58
-
 59
59
-
 60
60
-
 61
61
-
 62
62
-
 63
63
-
 64
64


STIHL AR 3000 L User manual
- Type
- User manual
- This manual is also suitable for
Ask a question and I''ll find the answer in the document
Finding information in a document is now easier with AI
in other languages
- español: STIHL AR 3000 L Manual de usuario
Related papers
-
STIHL S7512 AP 300 Li-ion 36V Battery User manual
-
STIHL AP 500 S User manual
-
STIHL Akku-Zubehör User manual
-
-
-
STIHL HSA 94 R User manual
-
STIHL AR 3000 User manual
-
-
-
STIHL AL 500 Owner's manual
Other documents
-
 MOBILE+ MB-1029 Owner's manual
-
Tellur TLL611222 User manual
-
 MOBILE+ MB-1028 Owner's manual
-
 MOBILE+ MB-1026 Owner's manual
-
Chicco Smart Support Owner's manual
-
OKAI SP10 User guide
-
Silvercrest SUNL 1.2 A1 User manual
-
 LugLoc 002 User manual
-
 Weinmann RESCUE-PACK Emergency Backpacks Operating instructions


