PRESONUS StudioLive AR12 USB Quick start guide

Type
Quick start guide

The PRESONUS StudioLive AR12 USB is a compact yet powerful 12-channel hybrid mixer that seamlessly blends analog warmth with state-of-the-art digital features, making it an ideal choice for a wide range of recording and live sound applications. With its 4 high-quality XMAX mic preamps and 24-bit/96kHz 2-in/2-out USB recording interface, the StudioLive AR12 USB allows you to capture pristine audio directly to your computer.

The PRESONUS StudioLive AR12 USB is a compact yet powerful 12-channel hybrid mixer that seamlessly blends analog warmth with state-of-the-art digital features, making it an ideal choice for a wide range of recording and live sound applications. With its 4 high-quality XMAX mic preamps and 24-bit/96kHz 2-in/2-out USB recording interface, the StudioLive AR12 USB allows you to capture pristine audio directly to your computer.

®
Getting Started • Para empezar • Erste Schritte • Pour commencer
Package Contents • Contenido del paquete • Lieferumfang • Contenu de l’emballage
StudioLive
AR-Series
Hybrid Digital/Analog Production Mixers
Quick Start Guide
StudioLive
serie AR
Consolas híbridas digitales/
analógicas para producción
Guía de inicio rápido
www.presonus.com
You must register online for software downloads,
the Owners Manual, and instructional videos.
Go online to my.presonus.com and create — or
log into — your My.PreSonus user account.
Debes registrarte en línea para bajar software, el
manual para el usuario y videos didácticos.
Visita my.presonus.com y regístrate — o entra
usando tu perfil de usuario My.PreSonus.
StudioLive
AR-Series
Hybrider Digital/Analog-Produktionsmixer
Kurzanleitung
StudioLive
AR
Mélangeurs de production hybrides
numériques/analogiques
Guide de prise en main
Bitte registrieren Sie sich auf unserer Webseite, um
auf die Software-Downloads, die Bedienungsanleitung
und die Anleitungsvideos zuzugreifen.
Öffnen Sie die Webseite my.presonus.com und
erstellen Sie ein neues Konto – oder loggen
Sie sich in Ihren My.PreSonus-Konto ein.
Vous devez vous enregistrer en ligne pour
les téléchargements de logiciels, le mode
d’emploi, et des vidéos de formation.
Allez sur my.presonus.com et créez – ou connectez-
vous à – votre compte utilisateur My.PreSonus.
Level Setting Procedure • Procedimiento de ajuste de nivel
Einstellen der Pegel • Procédure de réglage des niveaux
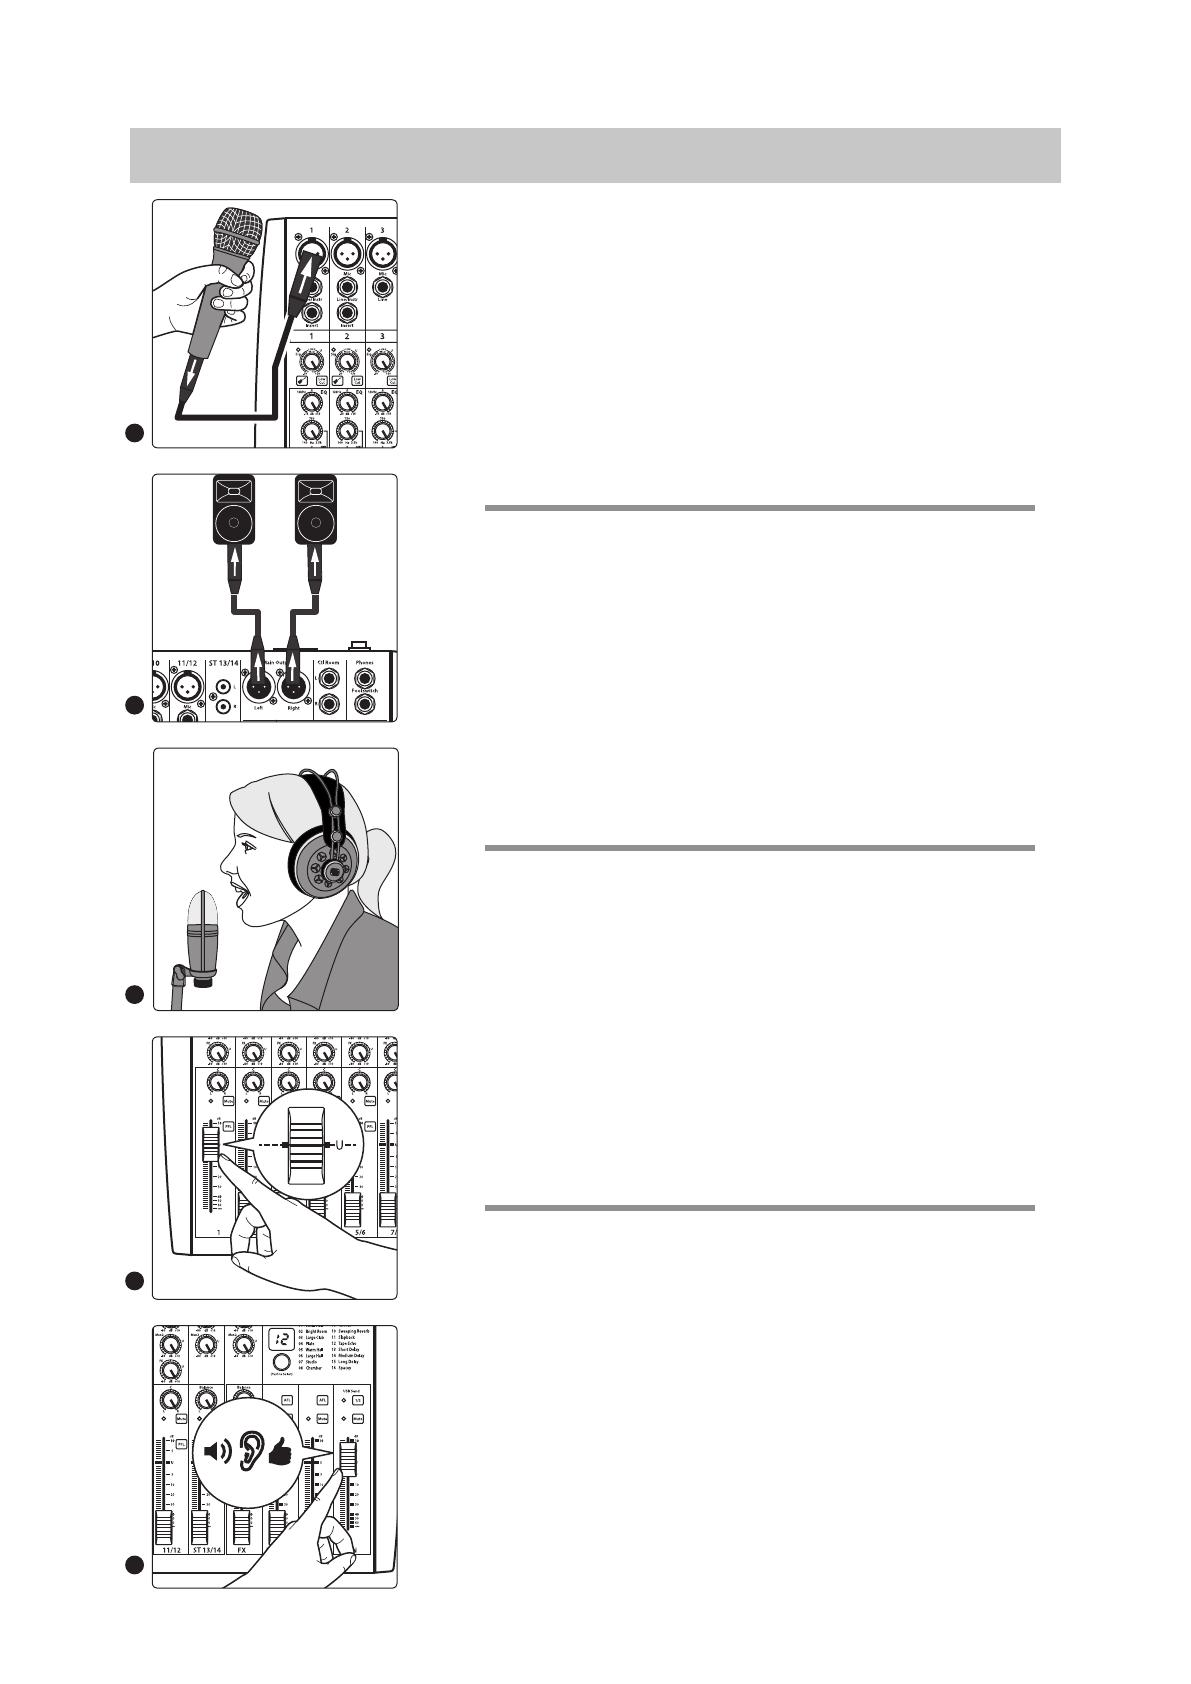
1. ENGLISH: Grab a microphone and a mic cable and
plug them into the Channel 1 mic input.
2. Connect the Main outputs of your StudioLive AR to your power amplifier
or powered monitors. Plug your StudioLive AR-series mixer into a power
outlet and turn it on. Turn on your amplifier or powered monitors.
3. Speak or sing into your microphone at approximately the same volume
you expect during the performance. Turn the trim knob on Channel
1 clockwise while watching the signal indicator. Adjust the Channel 1
trim knob until the signal/clip indicator is red, then back down until
it is green and just below clipping at the loudest input level.
4. Raise the Channel 1 level control to unity gain (denoted with a “U”).
5. Bring up the Main level until you can comfortably listen to your microphone
through your speakers. Sculpt the sound by adding EQ to taste.
1. ESPAÑOL: Tome un micrófono y un cable de micrófono,
conéctelo a la entrada Mic del canal 1
2. Conecte las salidas principales (Main) de su StudioLive AR a su amplificador
de potencia o monitores potenciados. Conecte su StudioLive AR a un toma
corriente y enciéndala. Encienda el amplificador o monitores potenciados
3. Hable o cante en su micrófono a un volumen similar al que usará durante
su presentación. Gire la perilla de ajuste (Trim) en el Canal 1 en sentido
horario, mientras observa el indicador de señal. Ajuste la perilla del
Canal 1 hasta que se ilumine el indicador señal/clip en rojo, luego baje
el nivel nuevamente hasta que se encienda en verde, justo por debajo
del nivel de clipping a su máximo nivel de entrada sin recorte.
4. Suba el control de nivel del Canal 1 hasta la marca “U” (Ganancia Unitaria).
5. Suba el nivel principal (Main) hasta que pueda escuchar cómodamente el audio de
su micrófono a través de los altavoces. Esculpa el sonido agregando EQ a gusto.
1. DEUTSCH: Nehmen Sie sich ein Mikrofon samt Kabel und
schließen Sie es am Mikrofoneingang in Kanal 1 an.
2. Schließen Sie die Main-Ausgänge Ihres StudioLive AR Mixers an Ihren
Leistungsverstärker oder Ihre aktiven Monitore an. Schließen Sie
Ihren StudioLive AR Mixer an einer Steckdose an und schalten Sie ihn
ein. Schalten Sie Ihre Endstufe bzw. Ihre Aktivmonitore ein.
3. Sprechen oder singen Sie in der gleichen Lautstärke, in der Sie auch live bzw.
bei der Aufnahme sprechen oder singen werden. Drehen Sie den Trim-Regler
in Kanal 1 im Uhrzeigersinn auf und beobachten Sie dabei die Signalanzeige.
Stellen Sie den Trim-Regler in Kanal 1 so ein, dass die Signal-Clip-Anzeige
rot leuchtet. Senken Sie die Aussteuerung nun ab, bis sie bei den lautesten
Eingangssignalen wieder grün leuchtet und gerade kein Clipping mehr auftritt.
4. Stellen Sie den Pegelregler in Kanal 1 auf Nominalpegel (mit einem „U“ markiert) ein.
5. Ziehen Sie den Summenpegel auf, bis Sie das Mikrofonsignal gut über die
Boxen hören können. Passen Sie den Klang nach Bedarf mit dem EQ an.
1. FRANÇAIS: Prenez un microphone et un câble de micro
et branchez-les à l’entrée micro de la voie 1.
2. Raccordez les sorties principales (Main) de votre StudioLive AR à votre
amplificateur de puissance ou à vos moniteurs amplifiés. Branchez
votre mélangeur StudioLive AR à une prise secteur et allumez-le.
Allumez votre amplificateur ou vos enceintes amplifiées.
3. Parlez ou chantez dans votre microphone à peu près au même volume
que durant votre future interprétation. Tournez le bouton de gain de la
voie 1 dans le sens horaire tout en regardant l’indicateur de signal. Réglez
le bouton de gain de la voie 1 de façon à ce que le voyant d’écrêtage
rouge du signal s’allume puis rabaissez-le jusqu’au retour dans le vert
juste en-dessous de l’écrêtage pour le niveau d’entrée le plus fort.
4. Montez la commande de niveau de la voie 1 jusqu’au
gain unitaire (repéré par un « U »).
5. Montez le niveau du mixage principal (Main) jusqu’à ce que
puissiez confortablement entendre votre microphone dans les
enceintes. Réglez le son à votre goût avec l’égaliseur.
1
2
3
4
5
SD Card
SD Recording • SD Recording • SD Recording • SD Recording
1. ENGLISH: Insert a FAT16-formatted SD card or FAT32-
formatted SDHC card into your StudioLive AR mixer.
2. Press the Record button. Recording will begin when the Play/
Pause and Record buttons are both illuminated. If no SD card
is detected, the Record button will flash three times
3. Press the Play/Pause button to stop the recording. Once complete, you can
transfer your recordings onto your computer by inserting the SD card into your
computer’s SD card reader and copying the files to your computer’s hard drive.
Each file will be labeled with an “SL-AR” heading, followed by a number.
1. ESPAÑOL: Inserte una tarjeta SD formateada en FAT16 o una tarjeta
SDHC formateada en FAT32 dentro de su consola StudioLive AR.
2. Presione el botón Record (Grabar). La grabación comenzará cuando
los botones (ambos) Play/Pause y Record estén iluminados. Si la tarjeta
SD no es reconocida, el botón Record parpadeará tres veces.
3. Presione el botón Record (Grabar). La grabación comenzará cuando
los botones (ambos) Play/Pause y Record estén iluminados. Si la tarjeta
SD no es reconocida, el botón Record parpadeará tres veces.
1. DEUTSCH: Führen Sie eine FAT16-formatierte SD- oder FAT32-
formatierte SDHC-Karte in Ihren StudioLive AR Mixer ein.
2. Drücken Sie die Record-Taste. Die Aufnahme startet, wenn die Play/
Pause- und die Record-Taste gleichzeitig leuchten. Sofern keine
SD-Karte erkannt wird, blinkt die Record-Taste dreimal.
3. Drücken Sie die Play-Taste, um die Aufnahme zu beenden. Sobald die
Aufnahme beendet ist, können Sie sie auf Ihren Computer übertragen:
Stecken Sie die SD-Karte in den SD-Kartenleser Ihres Computers und
kopieren Sie die Dateien auf die Festplatte des Computers. Die einzelnen
Dateien sind mit „SL-AR“ und einer nachfolgenden Nummer benannt.
1. FRANÇAIS: Insérez une carte SD formatée en FAT16 ou SDHC
formatée en FAT32 dans votre mélangeur StudioLive AR.
2. Pressez la touche Enregistrement. Lenregistrement démarrera lorsque les
touches Lecture/Pause et Enregistrement seront toutes deux allumés. Si
aucune carte SD n’est détectée, la touche Enregistrement clignote trois fois.
3. Pressez la touche Lecture/Pause pour arrêter l’enregistrement. Quand vous avez
terminé, vous pouvez transférer vos enregistrements sur votre ordinateur en
insérant la carte SD dans le lecteur de carte SD de celui-ci et en copiant les fichiers
sur son disque dur. Chaque fichier portera l’en-tête « SL-AR », suivi d’un nombre.
Hold 3 sec
Pairing a Bluetooth Device • Emparejando un dispositivo Bluetooth
Verbindung mit einem Bluetooth-Gerät • Appairage d’un appareil Bluetooth
ENGLISH: Press and hold the Bluetooth pairing button for three seconds. Select
“StudioLive AR22/AR16/AR12/AR8 USB” from the available Bluetooth devices list on the
pairing device. The Bluetooth button will illuminate solid when paired successfully.
ESPAÑOL: Presione y retenga presionado el botón Bluetooth durante
tres segundos. Seleccione “StudioLive AR22/AR16/AR12/AR8 USB” en la
lista de dispositivos Bluetooth disponibles mostrada en el dispositivo
Bluetooth a cual desea emparejar. El botón Bluetooth se iluminará sólido
cuando los dispositivos se hayan emparejado satisfactoriamente.
DEUTSCH: Drücken und halten Sie die Taste für das Bluetooth-Pairing für drei Sekunden.
Wählen Sie den Eintrag „StudioLive AR22/AR16/AR12/AR8 USB“ aus der Liste mit
den verfügbaren Bluetooth-Geräten, die in dem Gerät angeboten wird. Wenn die
Verbindung erfolgreich hergestellt wurde, leuchtet die Bluetooth-Taste dauerhaft.
FRANÇAIS: Maintenez pressée la touche d’appairage Bluetooth durant
trois secondes. Sélectionnez « StudioLive AR22/AR16/AR12/AR8 USB »
dans la liste des appareils Bluetooth disponibles sur l’appareil à appairer. La
touche Bluetooth s’allumera fixement après réussite de l’appairage.
1
2
3
Front of house speakers
Altavoces FOH
PA-
Lautsprecher
Enceintes de façade
Floor wedges
Monitores de piso
Bodenmonitore
Retours de scène
Keyboard • Teclado
Keyboard •
Clavier
Lead vocal
Voz líder
Lead-
Gesang
Chant principal
Drum kit • Batería
Drumkit •
Batterie
Bass • Bajo
Bass • Basse
Electric guitar amp
Amplificador de guitarra eléctrica
Gitarrenverstärker
Ampli pour guitare électrique
Music Playback
Reproducción de música
Musikquelle
Lecteur de musique
Laptop running Capture
Laptop ejecutando Capture
Laptop
mitCapture
Ordinateur avec Capture
®
Part# 70-22000030-D
18011 Grand Bay Ct. • Baton Rouge,
Louisiana 70809 USA• 1-225-216-7887
www.presonus.com
© 2017 PreSonus Audio Electronics, Inc. All Rights Reserved. PreSonus and StudioLive are trademarks or registered trademarks of PreSonus Audio Electronics, Inc. Android is a trademark of Google Inc., in the U.S. and other countries.
Mac, iPhone, iPod, and iPad are registered trademarks of Apple, Inc., in the U.S. and other countries. Windows is a registered trademark of Microsoft, Inc., in the U.S. and other countries. Other product names mentioned herein may be
trademarks of their respective companies. All specifications subject to change without notice.
  • Page 1 1
  • Page 2 2
  • Page 3 3
  • Page 4 4

PRESONUS StudioLive AR12 USB Quick start guide

Type
Quick start guide

The PRESONUS StudioLive AR12 USB is a compact yet powerful 12-channel hybrid mixer that seamlessly blends analog warmth with state-of-the-art digital features, making it an ideal choice for a wide range of recording and live sound applications. With its 4 high-quality XMAX mic preamps and 24-bit/96kHz 2-in/2-out USB recording interface, the StudioLive AR12 USB allows you to capture pristine audio directly to your computer.

Ask a question and I''ll find the answer in the document

Finding information in a document is now easier with AI