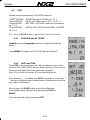
Nexus NX2 Operating instructions
- Category
- GPS receiver modules
- Type
- Operating instructions

- Mûszer -
Installációs és Kezelési Kézikönyv
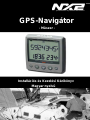
GPS-Navigátor
performance by NEXUS NETWORK
Magyar nyelvû

GPS INSTRUMENT English
6-1

Magyar GPS NAVIGÁTOR
Bevezetés
Köszönjük, hogy az NX2 GPS Navigátor mûszerünket választotta. Meg vagyunk gyõzõdve
arról, hogy hasznos és értékes segítõtársként használja majd túrái során, vagy akár versenyzéskor.
A beépítéssel és kezeléssel kapcsolatos alábbi információk fontosak lesznek az Ön számára.
A mûszer általában a Nexus Hálózat részét képezi, amikoris néhány rendszer-beállítás
elvégzésére szükség lesz attól függõen, hogy az egyes jeladók közvetlenül a mûszerre vannak-e
bekötve, vagy a szerverhez csatlakoznak.
Ez a kézikönyv az NX2 GPS Navigátor mûszer 1.00 verziójához készült
Szerkesztés lezárva: 2002 május
6-2

GPS NAVIGÁTOR magyar
1 Tartozékok .............................................................................................................................5
2 BEVEZETÉS ...........................................................................................................................7
2.1 Alap-jellemzõk ...............................................................................................................8
2.1.1 Pozició (POS) .......................................................................................................8
2.1.2 Navigáció (NAV)....................................................................................................8
2.1.3 Útipont (WP)..............................................................................................
............
8
2.1.4 Útvonal (ROUTE)..................................................................................................8
2.1.5 MAN OVER BOARD .............................................................................................8
2.1.6 IDÕ .......................................................................................................................8
2.2 Extra szolgáltatások .........................................................................................................................
9
3 Installáció.............................................................................................................................10
3.1 A mûszer beszerelése...................................................................................................11
3.2 Installációs lehetõségek.................................................................................................13
3.3 Kábelezés, bekötés ......................................................................................................16
4 ELSÕ BEINDÍTÁS.................................................................................................................17
4.1 Gyári alap-beállítások...................................................................................................18
4.2 GPS státusz és mûködés.............................................................................................19
5 HOGYAN HASZNÁLJUK AZ 5 NYOMÓGOMBOT................................................................20
5.1 PAGE GOMB ...............................................................................................................20
5.2 VILÁGÍTÁS SZABÁLYOZÁS........................................................................................20
5.3 MINUS GOMB..............................................................................................................20
5.4 PLUS GOMB................................................................................................................20
5.5 SET GOMB..................................................................................................................20
5.6 BELÉPÉS A BEÁLLÍTÁSOKHOZ.................................................................................21
5.7 CLEAR - egy WP (útipont) vagy érték törlése...............................................................21
5.8 MAN OVER BOARD ....................................................................................................21
5.9 KILÉPÉS a szerkesztési módból..................................................................................21
5.10 "BACK STEP" ..............................................................................................................21
5.11 ÚTPONT KERESÉS ÁLTALÁBAN................................................................................21
6 NAVIGÁCIÓS FUNKCIÓK.....................................................................................................23
6.1 POS - POZICIÓ............................................................................................................24
6.1.1 POZÍCIÓ és MAGASSÁG...................................................................................24
6.1.2 DÁTUM és IDÕ. ..................................................................................................24
6.1.3 AKKUFESZÜLTSÉG...........................................................................................25
6.1.4 MÛHOLDAK HELYZETE és JELERÕSSÉG......................................................25
6.2 WP - ÚTPONTOK......................................................................................................26
6.2.1 MARK WP - ÚTPONT KIJELÖLÉSE..................................................................26
6.2.2 EDIT WP - ÚTPONT SZERKESZTÉSE..............................................................26
6.2.3 COPY WP - ÚTPONT MÁSOLÁSA....................................................................27
6.2.4 MOVE WP - ÚTPONT MOZGATÁSA.................................................................28
6.2.5 DELETE - TÖRLÉS.............................................................................................28
6.2.6 ED B/R - IRÁNY SZERKESZTÉSE.....................................................................28
6.3 NAV - NAVIGÁLÁS......................................................................................................29
6.3.1 KOMBINÁLT KIJELZÕ és ÚTELHAGYÁSI HIBA (X~TRACK ERROR)...............29
6.3.2 ETA és TTG - ÚT IDÕTARTAMA és MEGÉRKEZÉSI IDÕ..................................29
6.3.3 DRIFT - ÁRAMLÁS..............................................................................................29
6.3.4 WCV és CTS.......................................................................................................30
6.3.5 GOTO WP...........................................................................................................31
6.4 ROUTE - ÚTVONAL....................................................................................................32
6.4.1 ÚTVONAL-TERVEZÉS (SAIL PLAN)..................................................................32
6.4.2 AZ ÚTVONAL ELÕHÍVÁSA.................................................................................35
6.4.3 VISSZAVEZETÕ ÚT............................................................................................36
6.4.4 TÖRLÉS..............................................................................................................36
6-3

magyar GPS NAVIGÁTOR
6.4.5 ÚTVONAL TÁROLÁSA..................................................................................... 36
7 BEÁLLÍTÁSOK................................................................................................................... 38
7.1 MÉRTÉKEGYSÉGEK................................................................................................ 38
7.2 RIASZTÁSOK............................................................................................................ 39
7.2.1 Megérkezési vonal BE/KI.................................................................................. 39
7.2.2 Automatikus váltás............................................................................................ 39
7.2.3 XTE (útelhagyási hiba) határérték..................................................................... 39
7.2.4 start-idõ............................................................................................................. 39
7.3 GPS Beállítások......................................................................................................... 40
7.3.1 SOG, COG csillapítása...................................................................................... 40
7.3.2 szélleségi korrekció........................................................................................... 40
7.3.3 hosszúsági korrekció......................................................................................... 40
7.3.4 magassági korrekció ......................................................................................... 40
7.3.5 Idõbeállítás........................................................................................................ 40
7.3.6 kezdeti pozíció................................................................................................... 40
7.4 DGPS ........................................................................................................................ 41
7.5 NMEA ........................................................................................................................ 41
7.5.1 NMEA output kiválasztása................................................................................. 41
7.6 OPCIÓK .................................................................................................................... 42
7.6.1 MÁGNESES VARIÁCIÓ.. .................................................................................. 42
7.6.2 Nyomógomb hangja.......................................................................................... 42
7.6.3 WP-BANK ......................................................................................................... 42
7.6.4 Chart Page........................................................................................................ 43
7.7 KONFIGURÁLÁS....................................................................................................... 44
7.7.1 POZÍCIÓKERESÉS KIVÁLASZTÁSA................................................................ 45
7.7.2 STANDARD NX2 NAVIGÁCIÓS SETUP........................................................... 45
7.7.3 NX2 REPEATER SETUP .................................................................................. 45
7.7.4 NMEA REPEATER SETUP............................................................................... 45
8 NMEA ADAT ....................................................................................................................... 46
9 SPECIÁLIS NMEA ÉS NEXUS ALKALMAZÁSOK.............................................................. 49
10 HIBAKERESÉS.. ............................................................................................................ 53
11 MÛSZAKI ADATOK........................................................................................................ 54
12 KARBANTARTÁS.......................................................................................................... 55
13 GARANCIA..................................................................................................................... 55
14 FÜGGELÉKEK..... .......................................................................................................... 56
15 Specifikációk................................................................................................................. 57
15.1 Mûszaki specifikációk.... ............................................................................................. 57
15.2 Nexus Network és a felhasználói politika.................................................................... 57
16 Kiegészítõ tartozékok................................................................................................... 58
17 Kifejezések és rövidítések............................................................................................ 60
18 Garancia. ........................................................................................................................61
6-4

GPS NAVIGÁTOR magyar
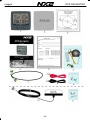
1 Tartozékok
Az NX2 GPS Navigator a szereléshez szükséges összes alkatrészt tartalmazza. Ellenõrizze!
GPS Navigátor mûszer
db Megnevezés Hiv. szám.
1 NX2 GPS Navigator mûszer 1
1 Mûszer takaró fedél 2
1 Fúrósablon 3
1 Beszerelési és kezelési kézikönyv 4
1 Garancia kártya 5
2 Csavarok a mûszer felerõsítéséhez 6
2 Alátétet a mûszer felerõsítéséhez 6
1 Szilikonzsír tubusban 6
1 Vezeték-összekötõ védõburok 6
2 4-pólusú csavaros vezeték-bekötõ terminál 6
1 Mûszerkábel 8m 7
1 Tápkábel (piros/fekete), 3 m 8
5 Extra vezetékvég-védõ, 0,25 mm 9
5 Extra vezetékvég-védõ, 0,75 mm 9
Kiegészítõ elemek, ha a GPS Navigator GPS Antennável együtt van
1 GPS Antenna 10
3 Rögzítõcsavarok az antennához 11
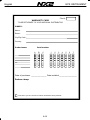
A termék regisztrálása
Miután ellenõrizte a listán szereplõ részegységeket, kérjük, szenteljen egy pár percet a garan-
cia-kártya kitöltésére és küldje azt vissza a magyar Silva képviseletnek.
E dokument visszaküldésével lehetõséget ad a képviseletünknek, hogy bármikor segítségére
legyen, ha valamilyen problémája van a termékünkkel. Õrizze meg a saját példányát és a
számlát is. Ugyancsak fontos, hogy adatait képviselõnk rögzíthesse adatbázisában, mert akkor
automatikusan meg fogja kapni új katalógusainkat és termékismertetõinket.
6-5

magyar GPS NAVIGÁTOR
6-6

GPS NAVIGÁTOR magyar
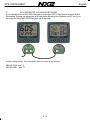
2 BEVEZETÉS
KÖSZÖNJÜK, HOGY AZ NX2 GPS NAVIGÁTORT VÁLASZTOTTA
A GPS rendszert az USA Védelmi Minisztériuma mûködteti és a rendszer pontossága és
karbantartása teljes egészében az õ felelõsségük.
Vegye tekintetbe, hogy a GPS csupán egy navigációt segítõ kiegészítõ eszköz és semmi-
képpen nem helyettesíti a hagyományos kompasz, térkép, stb. használatát.
A GPS rendszerrõl továbbiakat az NX2 GPS Antenna kézikönyvében talál.
Az NX2 GPS navigátor rendszer
A NEXUS GPS NAVIGATOR offers TRUE multiple nav-station operation. When
operating, ONLY ONE WP database is in use for the whole NEXUS system. Therefore,
you may store or delete waypoints, create or call up a route on any NEXUS GPS or
Multi Center instruments.
By adding this GPS navigator into the NEXUS series of instruments, you will benefit
from the high integration level that makes navigation simple, precise and reliable.
6-7

English GPS INSTRUMENT
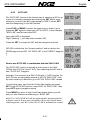
2.1 Basic Features
2.1.1 Position (POS)
Position is given in latitude and longitude to 3 decimal places with selectable set-up for
minutes and seconds or minutes and 1 000ths of minute. Altitude in METRES or FEET
can also be displayed.
2.1.2 Navigation (NAV)
Course and Speed Over Ground (COG/SOG) in knots, km/h or miles/h.
Select either magnetic or true, for both course over ground and bearing to waypoints.
This will be clearly "flagged" with the reversed text MAGNETIC on the LCD to prevent
confusion and uncertainty. Distance to WP is selectable in nautical miles, kilometres or
miles. Actual X-track error is displayed to 3 decimal places which is perfect for high
precision Differential GPS navigation.
2.1.3 Waypoint (WP)
Store up to maximum 399 WP in lat/long each with a 7 character name. You may
Copy, Move or Delete a single WP or in a block.
2.1.4 Route (ROUTE)
Up to 25 "named" routes can be stored with 24 WP in each route.
They can also be called and used "reversed" (e.g. return to harbour).
2.1.5 MAN OVER BOARD
For your safety, the M.O.B. (Man over board) function can be activated very easily.
Please see chapter 5.8.
2.1.6 TIME
Month, day and time is displayed (local time can be set). When navigating towards a
waypoint, both ETA (estimated time of arrival) and TTG (estimated time in hours and
minutes to go) is displayed.
6-8

GPS INSTRUMENT English
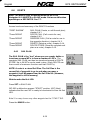
2.2 EXTRA NEXUS FEATURES
• For sailracing (with a complete NEXUS System), the built in race timer
clock become extra valuable. The exact GPS time is used to "trigger" the NEXUS
instruments start timer up to 1 8h and down to the last second (hh:mm:ss) before the
actual start.
• With the PC-interface and software, you may transmit receive
waypoints; log selected data to a file; monitor NEXUS information in real time, using a
PC.
GOOD LUCK AND HAPPY SAILING!
6-9

English GPS INSTRUMENT
3 Installation
You can install the NX2 GPS Navigator in two different ways:
• The GPS antenna connected directly to the NX2 GPS Navigator instrument
• The installation may also include a NX2 Server where all transducers may be
connected. All data including power will pass along one cable.
• The installation includes 6 major steps:
1. Read the installation and operation manual.
2. Plan where to install the transducers and instruments.
3. Run the cables.
4. Install the transducers and instruments.
5. Take a break and admire your installation.
6. Learn the functions and calibrate your system.
Before you begin drilling ... think about how you can make the installation as neat
and simple as your boat will allow. Plan where to position the transducers, Server
and instruments. Think about leaving space for additional instruments in the future.
• A few ”do nots” you should consider:
- Do not cut the cables too short. Allow extra cable length at the Server so it
can be disconnected for inspection without having to disconnect all
attached cables.
- Do not place sealant behind the display. The instrument gasket eliminates
the need for sealant.
- Do not run cables in the bilge, where water can appear.
- Do not run cables close to fluorescent light sources, engine or radio
transmitting equipment to avoid electrical disturbances.
- Do not rush, take your time. A neat installation is easy to do.
• The following material is needed:
Wire cutters and strippers.
Small and large Philips and small flat head screw driver.
Hole saw for the instrument clearance hole 63 mm (2½").
5 mm (
1
/
4
") drill for the mounting holes.
Plastic cable ties
If you are doubtful about the installation, obtain the services of an experienced
technician.
6-10

GPS INSTRUMENT English
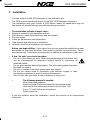
3.1 Mounting the instrument
• Place the adhesive drill template on the desired location for the instrument. Drill
the 2 holes using a 5 mm (
1
/
4
") drill for the two pin bolts. Use a 63 mm (2½") hole
saw to machine the clearance hole for the instrument connection socket. Remove
the template.
• Screw the two pinbolts to the instrument
• Put the instrument in place
• Screw the two nuts from the back
Note! The two nuts must just be tighten by hand
• Run the Nexus Network cable from the Server
to the instrument.
• If you want to cut the Nexus Network cable to
length, disconnect 4-pole jack plug and cut
the cable. Peel off about 35 mm (1,4") of the
cable insulation. Remove about 6 mm (1/4")
from the 3 isolated wires (the 4th wire is an
earth / screen). Attach the 4 cable protectors
to the wires using a pair of flat pliers.
• Connect the 4 cable protectors to the 4-pole
jack plug as shown. Apply silicon paste on all
locations as shown.
Silicon paste
Note: Must be done to avoid corrosion.
6-11

English GPS INSTRUMENT
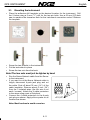
• Apply silicon paste to the instrument connection pins at the back of the instrument.
Press the jack plug onto the instrument pins. Press the cable in to the cable leads.
• Mount the connection back cover with the screw.
6-12

GPS INSTRUMENT English
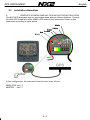
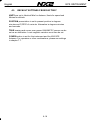
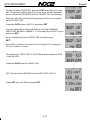
3.2 Installation alternatives
A. COMPLETE STANDALONE NX2 GPS NAVIGATOR INSTALLATION
The NX2 GPS Navigator may be used stand alone without a Nexus Network. Connect
the NX2 GPS Antenna or other NMEA GPS direct to the instrument. Power is also
connected according to figure below.
Green
Yellow
White
Screen
Red
Black
Green
Yellow
White
Screen
Red
Black
In this configuration, the instrument has to be set up as follows:
NMEA POS see 7.7
MASTER see 7.7
6-13

English GPS INSTRUMENT
B. IN A NEXUS NETWORK
The NX2 GPS Navigator may be used in a Nexus Network. Connect the NX2 GPS
Antenna or other NMEA GPS direct to the Server. Connect the Nexus Network cable to
the instrument. Power will be supplied via the Nexus Network Cable
Green
Yellow
White
Screen
In this configuration, the instrument has to be set up as follows:
NEXUS POS see 7.7
MASTER see 7.7
6-14

GPS INSTRUMENT English
C. AS A REPEATER IN A NEXUS NETWORK
If you already have a NX2 GPS Navigator or another GPS in the Nexus Network that is
Navigating (storing the waypoints and calculates Bearing and Distance to WP etc.) you
may use an other NX2 GPS Navigator as a repeater.
In this configuration, the instrument has to be set up as follows:
NEXUS POS see 7.7
REPEATER see 7.7
6-15

English GPS INSTRUMENT
3.3 CABLE CONNECTIONS
The 3 m red and black power cables connect 12 V supply, ALWAYS USE WITH 3A
FUSE.
Cable wiring on the instruments backside.
NEXUS databus and power. +12V GREEN
DATA YELLOW
DATA WHITE
GROUND SCREEN
NMEA 0183 output A. TERMINAL 1
(RS 422) output B. TERMINAL 2
NMEA 0183 input. TERMINAL 3
(Opto)return TERMINAL 4
6-16

GPS INSTRUMENT English
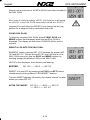
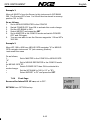
4 FIRST START
After installation and before switching the power on, make sure
that the GPS Antenna is away from anything that may obscure the
satellites.
The instrument will then ask you to press the button to be able to
give the instrument an ID or a "logical" NEXUS number.
You will then see the software VERSION and its ID number (Your
instruments version number may differ from this example).
If the instruments are accessed in random order, you may reset
the ID numbers for all NEXUS instruments and then start again by
pressing SET in preferred number (remote access) order.
Just press Clear during the time when VER ID is displayed. Then
press the SET in preferred number order (always wait for the OK
text before pressing the SET on the next instrument).
6-17

English GPS INSTRUMENT
4.1 DEFAULT SETTINGS FROM FACTORY
UNITS are set to Nautical Mile for distance, Knots for speed and
Metres for altitude.
POSITION presentation is set to present position in degrees
minutes and
1/1000 of a minute. Alternative is degrees minutes
and seconds.
TRUE bearing and course over ground. MAGNETIC course can be
set as an alternative. Local magnetic variation must then be set.
CONFIGuration is set for this instrument and the NX2 GPS
Antenna. For repeaters or other combinations, please see settings
in chapter 7.7.
6-18

GPS INSTRUMENT English
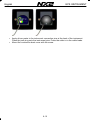
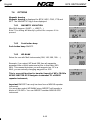
4.2 GPS STATUS and OPERATION
Non of the 2D or 3D flag will be lit during satellite search before
navigation can start. When the GPS is tracking satellites, the
status symbols 2D or 3D will be displayed at the top of the LCD, as
online information If a DGPS receiver is connected and working
correctly, the symbol text DGPS will also be displayed.
When 3 satellites have been found and tracked, the 2D symbol is
displayed; 3D when more that 3 satellites are tracked.
No Symbol Acquisition of data from satellites.
2D 2 dimensional position (with locked altitude) for
marine navigation.
3D 3 dimensional position for all land navigation.
DGPS differential GPS is active.
The initial GPS receiver start is called a COLD START and will be
performed if the GPS has been moved a large distance, or if used
for the first time. It will take about 3 minutes and is indicated by
neither of the 2D or 3D flag is on.
Warm start takes from 35 seconds up to 2 minutes depending on
the age of the emphemeris almanac and your position (within 4
hours).
6-19
Page is loading ...
Page is loading ...
Page is loading ...
Page is loading ...
Page is loading ...
Page is loading ...
Page is loading ...
Page is loading ...
Page is loading ...
Page is loading ...
Page is loading ...
Page is loading ...
Page is loading ...
Page is loading ...
Page is loading ...
Page is loading ...
Page is loading ...
Page is loading ...
Page is loading ...
Page is loading ...
Page is loading ...
Page is loading ...
Page is loading ...
Page is loading ...
Page is loading ...
Page is loading ...
Page is loading ...
Page is loading ...
Page is loading ...
Page is loading ...
Page is loading ...
Page is loading ...
Page is loading ...
Page is loading ...
Page is loading ...
Page is loading ...
Page is loading ...
Page is loading ...
Page is loading ...
Page is loading ...
Page is loading ...
Page is loading ...
Page is loading ...
Page is loading ...
-
 1
1
-
 2
2
-
 3
3
-
 4
4
-
 5
5
-
 6
6
-
 7
7
-
 8
8
-
 9
9
-
 10
10
-
 11
11
-
 12
12
-
 13
13
-
 14
14
-
 15
15
-
 16
16
-
 17
17
-
 18
18
-
 19
19
-
 20
20
-
 21
21
-
 22
22
-
 23
23
-
 24
24
-
 25
25
-
 26
26
-
 27
27
-
 28
28
-
 29
29
-
 30
30
-
 31
31
-
 32
32
-
 33
33
-
 34
34
-
 35
35
-
 36
36
-
 37
37
-
 38
38
-
 39
39
-
 40
40
-
 41
41
-
 42
42
-
 43
43
-
 44
44
-
 45
45
-
 46
46
-
 47
47
-
 48
48
-
 49
49
-
 50
50
-
 51
51
-
 52
52
-
 53
53
-
 54
54
-
 55
55
-
 56
56
-
 57
57
-
 58
58
-
 59
59
-
 60
60
-
 61
61
-
 62
62
-
 63
63
-
 64
64


Nexus NX2 Operating instructions
- Category
- GPS receiver modules
- Type
- Operating instructions
Ask a question and I''ll find the answer in the document
Finding information in a document is now easier with AI
Related papers
-
Nexus Nexus Owner's manual
-
Nexus Compass 45º Operating instructions
-
-
-
-
-
-
-
-