Page is loading ...

McIntosh Laboratory, Inc. 2 Chambers Street Binghamton, New York 13903-2699
Phone: 607-723-3512 FAX: 607-724-0549
Owners
Manual
UR12
UR12 Touch Screen Remote

2
IMPORTANT SAFETY
INSTRUCTIONS!
PLEASE READ THEM BEFORE
OPERATING THIS EQUIPMENT.
WARNING - TO REDUCE RISK
OF DAMAGE, DO NOT EXPOSE
THIS EQUIPMENT TO RAIN OR
MOISTURE.
NO USER-SERVICEABLE PARTS
INSIDE. REFER SERVICING TO
QUALIFIED PERSONNEL.
General:
1. Read these instructions.
2. Keep these instructions.
3. Heed all warnings.
4. Follow all instructions.
5. Warning: To reduce risk of damage,
do not expose this equipment to rain
or moisture.
6. Only use attachments/accessories
specified by the manufacturer.
Installation:
7. Use in accordance with the
manufacturers instructions.
8. Do not use near any heat sources such
as radiators, heat registers, stoves, or
other equipment (including amplifiers)
that produce heat.
9. Do not use this equipment near water.
10. Do not expose this equipment to drip-
ping or splashing and ensure that no
objects filled with liquids, are placed
on the equipment.
Care of Equipment:
11. Clean only with a dry cloth.
12. Do not permit objects or liquids of any
kind to be, spilled and/or fall onto the
equipment.
Repair of Equipment:
13. Refer all servicing to qualified service
personnel. Servicing is required when
the equipment has been damaged in
any way, liquid has been spilled or ob-
jects have fallen onto the equipment,
the equipment has been exposed to rain
or moisture, does not operate normally,
or has been dropped.
14. Do not attempt to service beyond that
described in the operating instructions.
All other service should be referred to
qualified service personnel.
15. When replacement parts are required,
be sure the service technician has used
replacement parts specified by McIn-
tosh or have the same characteristics as
the original part. Unauthorized substi-
tutions may result in damage other haz-
ards.
16. Upon completion of any service or re-
pairs to this product, ask the service
technician to perform safety checks to
determine that the product is in proper
operating condition.

3
Customer Service
Technical Assistance
Please Take A Moment
Thank You
The serial number, purchase date and
dealer name are important for possible in-
surance claim or future service. The spaces
below have been provided to record that
information:
Note: The Serial Number is located inside
the Battery Compartment on the left
side.
Thank you for your decision to own this
McIntosh UR12 Touch Screen Remote
Control. The McIntosh dedication to
Quality, is assurance that it will provide
you with many years of enjoyment.
Please take time to read this manual, as
it will help you to become more familiar
with your new McIntosh.
If your McIntosh product is in need of re-
pair, it can returned to your dealer or the
McIntosh Service Department. For assis-
tance on repair return procedure, contact
the McIntosh Service Department at:
McIntosh Laboratory, Inc.
2 Chambers Street
Binghamton, New York 13903
Phone: 607-723-3515
Fax: 607-723-1917
If you have questions about this product,
contact your McIntosh Dealer who is more
familiar with your component system. If
additional help is needed, you can receive
technical assistance at:
McIntosh Laboratory, Inc.
2 Chambers Street
Binghamton, New York 13903
Phone: 607-723-3512
Fax: 607-723-3636
Serial Number:
Purchase Date:
Dealer Name:
Copyright 2001 © by McIntosh Laboratory, Inc.

4
Table of Contents
Safety Instructions ................................ 2
Thank You, Please Take a Moment,
Technical Assistance and
Customer Service.................................. 3
Table of Contents and General Notes ... 4
Introduction .......................................... 5
Performance Features ........................... 5
Installing Batteries ................................ 6
Initial Start-up ....................................... 7
Touch Screen and Push-buttons ............ 8
How to Operate the Remote Control .... 9
MAC Touch Screen Pages .................. 10
System Settings
Overview ........................................................... 14
Touch Screen Contrast ....................................... 14
Entering the System Settings ............................. 14
Clock Setting ..................................................... 15
Touch Screen Alignment ................................... 15
System and Options ........................................... 15
Introduction Macro and Punch Through
Programming ..................................................... 16
Program Macro Functions ................................. 16
Device Buttons .................................................. 17
Favorite Channel Button ................................... 17
Erase Function ................................................... 17
Punch-Through Functions ................................. 17
Programming Punch-though .............................. 17
Preprogram ........................................................ 18
Auto Scan with Brand Names ........................... 19
Learning Method ............................................... 20
Erasing the Learned Buttons ............................. 21
Edit Touch-buttons ............................................ 23
Setting the Date and Clock ................................ 28
Program Loading ............................................... 28
Erasing all the Programs.................................... 29
Alternate Button Functions................. 30
Seup Code Tables ............................... 32
Specifications and Packing ................. 44
Warranty ............................................. 45
General Notes
Caution: The UR12s LCD Screen is made
of glass and is breakable, please
handle with care.
1. The Upload Data Cable is available from
the McIntosh Parts Department:
Upload Data Cable Part No. 171-437
Six foot, 2 conductor shielded, with a
DB9 connector and one 1/8 inch stereo
mini phone plug.
2. For additional operational information,
refer to the owners manual(s) for any
component(s) that are controlled by the
UR12.
3. McIntosh Source Component(s) need to be
connected to a McIntosh Control Center via
Data Cable(s) to allow control of the
component(s) via the UR12s built-in
McIntosh Touch Screen Menus and Push-
buttons.
4. The UR12 contains Control Codes for some
of the most popular remote controlable
Audio/Video Component Products. If the
component you would like to control is not
listed in the Control Code Tables, they can
be learned by following the instructions in
the Learning Section of this manual.
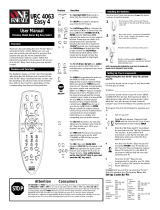
5. In certain situations, the supplied Upload
Data Cable may not be long enough to
connect the UR12 to a computer. Below is
the PIN Outs of the DB9 and Stereo Mini
Phone Plug:
RS232 DB9 Connector Pin Layout
1. N/C 6. N/C
2. Data Out (TXD)In (RXD) 7. N/C
3. Data In (RXD) 8. N/C
4. N/C 9. N/C
5. Gnd.

5
Performance Features
Introduction
The McIntosh UR12 is a very powerful
and flexible learning remote control with a
LCD Touch Screen. The UR12 has many
advanced operating features that can add
convenience and enjoyment of your home
entertainment system. It is designed to op-
erate up to twelve components. The UR12
is preprogrammed for most McIntosh Con-
trol Centers. You can program it for your
other components either from the
preprogrammed code library in the remote
control or you can teach up to 780 buttons
into the UR12 from your original remote
controls. It also allows you to change the
button size and shape and edit the text on
the button in the LCD. You can also make
these changes with the aid of your personal
computer. Setting up the UR12 to work
with your components is very easy.
Introduction and Performance Features
· Controls up to Twelve Components
Features fifty LCD touch screens, 13 con-
venient rubber buttons and a joystick.
· Preprogrammed for quick set up
Contains codes for most of the A/V com-
ponents on the market.
· Learning Capability
Learns up to 780 commands head to head
with other remote controls.
· Customizable LCD Screens
A wide selection of button sizes and
shapes combine with the ability to write
your own text to the LCD.
· Operational Flexibility
15 programmable macro buttons, 60 pro-
grammable favorite channel buttons as
well as volume and transport punch
through operations are available.
· PC Interface
Simplifies editing and downloading pro-
grams.
· Ergonomic Design
Provides strategic button and joystick lay-
out with backlit LCD screen.
· Memory Lock
The UR12 has an internal memory lock
system that retains all the programs and
learned functions.
Stereo Mini Phone Plug
Tip - Data In (RXD)
Ring - Data Out (TXD)
Sleeve - Gnd.
Tip
Ring
Sleeve
Pin 1 Pin 5
Pin 6 Pin 9

6
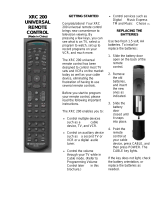
Installing Batteries
Figure 3
Figure 4
The UR12 uses four AA batteries. Please
be sure to match the batteries with the (+)
and (-) markings inside the battery com-
partment during installation. Refer to fig-
ures 1, 2, 3 and 4
Note: Please do not mix old batteries with
new ones or mix different types of
batteries.
Installing Batteries
Figure 1
Release Latch
Figure 2

7
The remote control goes through self-test-
ing for three seconds after the batteries are
installed and automatically switches to
Setting Mode for programming. Refer to
figures 5 & 6.
1. Exit the System Setting Mode by sim-
ply pressing the MAIN push-button.
Initial Start-up
Initial Start-up
2. To start controlling McIntosh Compo-
nents, press the MAC Touch-button on
the MAIN LCD Screen.
Main
Push-button
Figure 5 Figure 6
MAC
Touch-Button
SYSTEM SETTING
1. TOUCH PAD ALIGNMENT
2. SYSTEMS & OPTIONS
3. PREPROGRAM
4. LEARNING
5. EDIT BUTTONS
6. SET DATE & CLOCK
7. PROGRAM LOADING
8. TO EXIT
SELECT : JOY STICK
ENTER : JOY STICK

8
Adjusts the
VOLume level Up
Turns Power
ON or OFF
Selects Transport
Functions of a
DVD/CD player,
DVD/CD changer
or tape recorder
Touch Screen and Push-buttons
Adjusts the
VOLume level Down
Selects the Main
Touch Screen Menu
Selects the different
Pages of Touch
Screen Menus
MUTEs the audio
Touch Screen with
Pages of Menus
IR Sensor for send-
ing and receiving
IR Signals
Selects the Next
AM/FM or TV Sta-
tion and the next
Selection, Track or
Chapter
Press the push-but-
ton to illuminate the
Touch Screen and
Touch-buttons
Moves the Cursor
and selects the En-
ter Function
Selects the
PREvious CHannel
viewed
Selects the Previous
AM/FM or TV Sta-
tion and the next
Selection, Track or
Chapter

9
Touch Screen
The Touch Screen allows for the selection
and controlling of different components
through multiple On-Screen Pages.
Mute
Press the MUTE Push-button to mute the
audio and a second time to unmute. The
MUTE Push-button is also used in
conjuction with other push-buttons to per-
form programing and other functions.
Transport Functions
Use the PLAY, FAST-FOWARD
,
FAST REVERSE
and STOP¡ Push-
buttons to operate a DVD/CD player,
DVD/CD changer or tape recorder.
Channel Functions
Press and release the CHannel Up or
Down Push-button to move from station
to station on both the AM and FM Dial. In
a similar fashion, use the CHannel Up or
Down Push-button to select the next
available TV Channel. When playing a
DVD, CD or Tape the CHannel Up
Push-button will select the Next Selec-
tion, Track or Chapter and the CHannel
Down will select the Previous
(Back) Selection, Track or Chapter.
Main
Press the MAIN Push-button to select the
Main Touch Screen Menu. The MAIN
Push-button is also used in conjuction with
other push-buttons to perform program-
ming and other functions.
How to Operate the Remote Control
Previous Channel
When viewing TV Channels, pressing the
PREvious CHannel Push-button will select
the last TV Channel Selected.
Volume
Press the UP or DOWN VOLume
Push-button to raise or lower the listening
volume level.
Power
Switches AC Power ON or OFF for a
McIntosh Control Center or Preamplifier.
If a non-McIntosh Component is being
controlled (ie. TV), then the UR12 will
switch AC Power ON or OFF for that com-
ponent.
Lighting
Press and release the LIGHT Push-button
to momentarily illuminate the Touch
Screen and the UR12 Push-buttons.
Page
Press the PAGE Push-button to select dif-
ferent Pages of Menus displayed on the
Touch Screen. The MAIN Push-button is
also used in conjuction with other push-
buttons to perform programming and other
functions.
Joystick
The Joystick allows, the cursor to move in
four directions, selects different Touch
Screen Menu Options and the On-Screen
Menus of Source Components. By press-
ing the Joystick down, it also functions as
an Enter key to select the displayed func-
tion.

10
Input Source Selection
Select one of the six Audio Inputs or six
Audio/Video Inputs from the available In-
put Sources on your McIntosh Control
Center or Preamplifier.
Note: If your McIntosh Control Center or
Preamplifier has additional Inputs
that you would like to select and
control, contact your McIntosh Dealer
for assistance.
Touch Screen Menu Page 1

11
MAC Touch Screen Pages
Touch Screen Menu Page 2
Tuner Functions
Select AM or FM broadcast band. Press
and release SEEK Up or Down to move
from station to station. Press and hold a
SEEK Push-button to move continuously
from station to station. Press REVIEW to
start the automatic brief audition of each of
the presets stored in the tuner memory.
Press REVIEW a second time to stop on a
station preset and exit the Review process.
Note: The UR12s CHannel Push-buttons
may also be used to tune to the next
station. Press and release the
CHannel Up or Down Push-
button to move from station to station
on both the AM and FM Dial.

12
Touch Screen Menu Page 3
Numbered and +10 Push-buttons
Press push-buttons 0 through 9 to access
tuner station presets, DVD chapters, DVD/
CD tracks or DVD/CD discs. When using
a McIntosh DVD/CD player, access track
numbers higher than 10 by first pressing
+10 and then a number push-button.
Home
Allows remote operation of the McIntosh
HC-1 Home Controller, which in turn will
control power to accessories. Press the
Home Push-button and within 5 seconds,
the appropriate number Push-buttons (0
through 9) to operate the selected device.
Enter
Press ENTER to perform various functions
on a variety of McIntosh Components. It
will also pause the playing of a DVD/CD
disc or tape player.

13
Power On and Off
Switches AC Power ON or OFF.
Note: Provides discrete commands for use in
Macros.
Listen and Record Processors
Accesses the external LISTEN and/or
RECORD PROCESSOR(s) on some
McIntosh Control Centers or Preamplifi-
ers.
Speakers 1 and 2
Switches the two pairs of SPEAKERS/
OUTPUTS On or Off.
Mode
Changes the Sound Processing Modes.
Mono/Stereo
Allows the combining of left and right sig-
nals into Mono.
System Off
Switches Off all Zones of a McIntosh Sys-
tem.
Level
The LEVEL Up or Down Touch-buttons
allows Trim Adjustments of various func-
tions.
Trim
Activates the TRIM Mode and the adjust-
ments are performed with the LEVEL
Touch-buttons. Touch TRIM a second time
to cycle through the TRIM Modes.
MAC Touch Screen Pages
Touch Screen Menu Page 4

14
Touch Screen Contrast
All the programming is done by first enter-
ing the SYSTEM SETTING Mode in the
remote control. Press both the MAIN and
PAGE buttons simultaneously for five sec-
onds to enter the SYSTEM SETTING
mode. Refer to figure 7. Move the cursor
on the screen with the joystick to your se-
lection in the list. Enter the selection by
pushing down the joystick. You can exit
Figure 7
SYSTEM SETTING
1. TOUCH PAD ALIGNMENT
2. SYSTEMS & OPTIONS
3. PREPROGRAM
4. LEARNING
5. EDIT BUTTONS
6. SET DATE & CLOCK
7. PROGRAM LOADING
8. TO EXIT
SELECT : JOY STICK
ENTER : JOY STICK
The UR12 is designed to operate up to
twelve components. They are Control Cen-
ter (labeled MAC), CATV, Satellite, TV,
DVD, VCR1, VCR2, Laser Disc, Tuner,
CD, Tape and AUX. However, the device
button name can be changed to meet your
exact needs. You can also create a favorite
device page and transfer the frequently
used devices to the favorite device page in
order to change the device button sizes and
shapes. Once you create the favorite de-
vice page, it will appear as a default device
page. There are also four pages of the LCD
screen for each device and you can use
them to create, delete or edit any func-
tional buttons to customize with your au-
dio/video components.
Overview
The contrast of the TOUCH SCREEN can
be adjusted by pressing either the CHAN-
NEL UP or DOWN button while holding
down the MAIN button. Release the but-
tons when you reach the optimal level of
contrast. Refer to figure 7.
Entering the System Settings

15
System Settings
the setting mode by simply pressing the
MAIN button or bring the cursor to 8. TO
EXIT with the joystick and push the joy-
stick down.
Enter the Clock Setting Mode by moving
the cursor on the TOUCH SCREEN to 6.
SET DATE & CLOCK by using the joy-
stick. Enter this mode by pushing the joy-
stick down. Press the selection you wish to
change from the TOUCH SCREEN and
change them using the UP and DOWN
buttons. Once you complete the setting,
store them by pressing the SAVE button.
Move the cursor on the TOUCH SCREEN
to 1. TOUCH PAD ALIGNMENT with the
joystick. Press the joystick down to enter
the mode. Align the screen by pressing the
three points that appear on TOUCH
SCREEN one point at a time. Follow the
On-Screen instructions.
Note: If a new version of the Normal Modes
of Operation Firmware has been
uploaded into the UR12, a Touch
Screen Aligment Procedure must be
performed inorder for the Touch-
buttons to become active.
Move the cursor on the TOUCH SCREEN
to 2. SYSTEM & OPTIONS with the joy-
stick. Enter this mode by pushing the joy-
Clock Setting
Touch Screen Alignment
Systems and Options
stick down and the following can be set.
Refer to figure 9.
The TOUCH SCREEN (LCD) will list the
following choices:
Settings Range Default
Beep Status: High, Low, Off High
Light On Time: 0 120 20
(in seconds)
LCD On Time: 5 - 120 30
(in seconds)
Low Battery Warning: 10 - 50 10
(in percentage)
Select the button you wish to change from
the list first. Press the UP or DOWN but-
tons on the TOUCH SCREEN to set them
up. Once you set them up, press the SAVE
button to store them. You will be in the set-
ting mode once again. To return to the
main menu, move the cursor to 8. TO
EXIT and press the cursor down or simply
press the MAIN button to exit to main
menu.
C D
Figure 9

16
The MACRO and PUNCH THROUGH
can be programmed. There are three types
of macro functions you can program. The
M1, M2 and M3 in the Main Menu are de-
signed to send out up to twenty eight com-
mands from each of the three Touch-but-
tons. There are Twelve Device Touch-but-
tons in the Main Menu and fourteen avail-
able commands from each device button.
With the Favorite Channel Buttons you
can create and design up to 60 buttons for
your Favorite Button in the Video Modes.
Each favorite channel button can send out
up to fourteen commands with one button
press. Refer to figures 9 and 10.
Programming Macro Functions
Press MACRO PROGRAM button in 2.
SYSTEM & OPTIONS Move the cursor
on the LCD either to the COMMON BUT-
Introduction Macro and Punch
Through Programming
TON to program M1, M2 and M3 and fa-
vorite channel buttons or to the DEVICE
BUTTON to program the device buttons
by using MUTE button. Press the button
you wish to program and follow proce-
dures shown below:
M1, M2 and M3 Buttons
1. Select one of the three Macro Touch-
buttons, M1 M3, with the cursor on
DEVICE BUTTON.
2. Select functional buttons you wish to
store in the Macro Touch-button. You
can store up to 28 commands.
3. Store the commands you selected to
the macro button by pressing CH (UP)
push-button. To cancel the macro com-
mands, press CH (DOWN) Push-but-
ton.
Figure 10
C D
Figure 9

17
System Settings
Device Buttons
1. Select one of the twelve Device But-
tons you wish to store macro functions
with the cursor on DEVICE BUTTON.
2. Move the cursor to COMMON BUT-
TON and select again either the same
or another device button whose func-
tional buttons you wish to store in the
device Macro Touch-button you se-
lected first. You can store up to 14
commands into the device Macro
Touch-buttons.
3. Store the commands you selected to
the Macro Touch-button by pressing
CH (UP) Push-button. To cancel the
macro commands, press CH (DOWN)
Push-button.
Favorite Channel Button
1. Select the device you wish to program
Favorite Channels with the cursor on
COMMON BUTTON.
2. Select one of the Favorite Channel
Touch-buttons and enter the channel
number you wish to store in the FA-
VORITE Channel Touch-button. You
can store up to 14 commands.
3. Store the commands you selected in
the Favorite channel button by press-
ing Channel UP button. To cancel the
macro commands, press CH (DOWN).
Once you complete the macro pro-
gramming and wish to exit, press both
the MAIN and PAGE buttons simulta-
neously. This will take you to the set-
ting mode. Move the cursor to 8. TO
EXIT in setting mode and press the
cursor down to exit or simply press the
MAIN button to exit to main menu.
Note: Pressing the Volume Up button
during the macro programming
will add a time delay of 0.5
seconds between the commands
(e.g. Pressing the Volume Up
button twice will cause a pause of
1 second between the commands
where the delay was inserted).
Erase Function
To erase a Macro, Device or Favorite
Channel Programmed Function that has
been stored, press the Channel UP Push-
button without entering any commands
during the above Programming Modes.
Punch through Functions
You can use audio receiver volume control
in a different mode (eg. Audio receiver
Volume Up and Volume Down and Mute
in Satellite Mode) using a volume Punch-
through feature. You can also have four
VCR (or DVD) transport buttons, Play,
Stop, Fast Forward and Rewind, operate in
another mode such as in Satellite, Cable
and Audio modes. You can also make
CHANNEL Punch-through.
Programming Punch-through
1. Press PUNCH THROUGH in the
Touch Screen in 2. SYSTEMS & OP-
TIONS Mode.
2. Press VOLUME UP button for Volume
Punch Through or press the PLAY but-
ton for Transport Punch Through or

18
CHANNEL up button for Channel
Punch Through.
3. Select the device you wish to Punch-
through to (1st device).
4. Select the device you wish to Punch-
through from (2nd device).
5. Repeat from Step 2 to program Punch-
through to other devices. Once you
complete the Punch-through Program-
ming and wish to exit, press both the
MAIN and PAGE buttons simulta-
neously. This will take you to the set-
ting mode. Move the cursor to 8. TO
EXIT in the setting mode and press
down the cursor to exit or simply press
the MAIN button to exit to main
menu.
To Erase Punch Through Functions
Press the same device button in the
PUNCH THROUGH TO and PUNCH
THROUGH FROM during the Punch
Through programming.
Preprogram
You can program the UR12 to make it
compatible with all of your components by
following either the preprogramming
method or teaching it with your original
remote controls. Refer to figures 11 and
12.
Using a three-digit code number
1. Turn on the component you plan to op-
erate manually.
2. Go to the program setting mode by
pressing both the MAIN and PAGE
buttons simultaneously for five sec-
onds
3. Using the joystick, move the cursor
down in the Touch Screen to 3. PRE-
PROGRAM.
4. Push the joystick down to enter the
preprogramming mode.
5. Select the device on the Touch Screen
that you wish to program (eg. To pro-
gram TV, press the TV Device Touch-
button).
6. Select the device from which the three
digit code number table will be se-
lected from (eg. If it is from the TV
code table, press the TV Device
Touch-button).
7. Point the remote control toward the
component and enter the three-digit
code number you selected for your
component from the Code Table on
pages 32-43. Please enter the code
number within 20 seconds of program-
Figure 11

19
System Settings
ming. If there is more than one code
number assigned to your brand, try one
code number at a time until you find
the right code number. If you entered
the right code number, the component
will turn off right after you entered the
number. When the right code number
is entered, save the code by pressing
the SAVE button on Touch-button.
8. Confirm that you entered the right
code number that matches your com-
ponent by pressing other buttons such
as POWER, VOLUME, MUTE and
CHANNEL. If any of the buttons do
not operate as they should, please re-
peat from Step 5.
9. Continue to program other components
by repeating from the above step 5.
10. Once you complete programming all
the devices, exit from the program-
ming mode by pressing both the
MAIN and PAGE buttons simulta-
neously.
11. You will be in the setting mode once
again. Move the cursor to 8. TO EXIT
and press the cursor down or simply
press the MAIN button to exit to main
menu.
Auto Scan with Brand Names
1. Manually turn on the component you
plan to operate.
2. Go to program setting mode in the re-
mote control by pressing both the
MAIN and PAGE buttons simulta-
neously for five seconds.
3. Using the joystick, move the cursor
down in the Touch Screen to 3. PRE-
PROGRAM.
4. Push the joystick down to enter the
preprogram mode.
5. Select the device you wish to program
in the Touch Screen (eg. To program
TV, press the TV Device Touch-but-
ton).
6. Select the device from which the three
digit code number will be selected
from (eg. If it is from the TV code
table, press the TV Device Touch-but-
ton).
7. Point the remote control to the compo-
nent and press the BRAND button.
8. Press the number button on the Touch
Screen that corresponds with the first
alphabetical character of your brand
name. Please press the number button
within 20 seconds of programming.
Please note that pressing the number
Figure 12

20
button will only show the first brand
(in alphabetical order) in that alphabet
group.
9. If the first code number assigned to the
brand is the right one, it will turn off
the component. If it is not the right one
or if it is not the right brand name,
press the Channel Up button. It will
automatically send out a POWER OFF
command either from the next code
number from the same brand or the
code from the next brand. Keep the
Channel Up button pressed until it
turns off the component. When the
component turns off, save the code by
pressing the SAVE button on the
Touch-button.
Note: It is quite possible that the code
number that works with your
component may have a different
brand name because of the way it
was made by its manufacturer.
Confirm that it is the right code
number for your component by
pressing other buttons such as
POWER, VOLUME, MUTE and
CHANNEL, etc. If any of the
buttons do not operate as they
should, please repeat from Step 5.
10. Continue to program other compo-
nents by repeating from Step 5.
11. Once you have completed program-
ming all the devices, exit from the
programming mode by pressing both
the MAIN and PAGE buttons simul-
taneously.
12. You will be in the setting mode. Move
the cursor to 8. TO EXIT and press
the cursor down or simply press the
MAIN button to exit to the main
menu.
Learning Method
1. Go to the program setting mode by
pressing both the MAIN and PAGE
buttons simultaneously for five sec-
onds.
Note: Any of the Touch-buttons may be
used except the MAIN and PAGE
Push-buttons.
2. Move the cursor to 4. LEARNING
with the joystick and then push the
joystick down to enter the learning
mode. Refer to figure 13.
3. If you wish to teach any of the func-
tional buttons in the device, keep the
cursor at COMMON BUTTON and
select the device that you wish to en-
ter. If you wish to teach the twelve de-
vice buttons shown on the Touch-but-
ton, press the MUTE button to move
the cursor to the DEVICE BUTTON
Figure 13
/