VTech Sit-to-Race Smart Wheels User manual

Category
Toys & accessories
Type
User manual

This manual is also suitable for

Sit-to-Race Smart Wheels
91-002768-007
© 2012 VTech
Printed in China
User’s Manual
US
TM
Dear Parent,
Ever nice the look on your baby’s face when th learn something
new through their own discovery? ese self-accomplished
moments are a parent’s greatest reward. To help fulfill them,
VTech® created the Infant Learning® series  ts.
ese unique interactive learning ts directly respond to what
children do naturally – play! Using innovative technology, these
ts react to baby’s interactions, making each play perience fun
and unique as th learn age-appropriate concepts like first words,
numbers, shapes, colors and music. More importantly, VTech®’s
Infant Learning® ts develop baby’s mental and physical abilities
by inspiring, engaging and teaching.
At VTech®, we know that a child has the ability to do great things.
at’s why all  our electronic learning products are uniquely
designed to develop a child’s mind and allow them to learn to the
best  their ability. We thank you for trusting VTech® with the
important job  helping your child learn and grow!
Sincerely,
Your iends at VTech®
To learn more about the Infant Learning® series and her VTech® ts, visit www.vtechkids.com
2
Introduction
INTRODUCTION
Thank you for purchasing the VTech
®
Sit-to-Race Smart Wheels
TM
learning toy!
Rock, ride and learn with the Sit-to-Race Smart Wheels
TM
by VTech
®
!
This ride-on toy grows with your child and helps them learn numbers,
gross motor skills, pretend play, and more! For the younger child, the
dashboard activity panel can be played with on the floor and features a
horn button, twisting knob, two handle bars, and four number buttons.
As your child grows, they can sit on the bike, which can be used as a
rocker or as a ride-on that can be pushed by parents.
HORN
BUTTON
TWIST KNOB
ROCKER BECOMES
OPTIONAL PARENT HANDLE
MODE SELECTOR
FOUR NUMBER BUTTONS
VOLUME CONTROL SWITCH
HANDLE
BARS
3
Included in This Package
INCLUDED IN THIS PACKAGE
– One electronic dashboard activity panel – Two handle bars
– One body – Rocker/parent handle pieces
– Four wheels, two axles, four cylinders, fasteners and spindles
– One user’s manual
4
WARNING:
All packing materials, such as tape, plastic sheets, packaging
locks and tags are not part of this toy, and should be discarded
for your child’s safety.
ATTENTION
Pour la sécurité de votre enfant, débarrassez-vous de tous
les produits d’emballage tels que rubans adhésifs, feuilles de
plastique, attaches et étiquettes. Ils ne font pas partie du jouet.
NOTE:
Please keep this instruction manual as it contains important
information.
INSTRUCTIONS
BATTERY INSTALLATION
1. Make sure the unit is turned OFF.
2. Locate the battery cover on the bottom
of the dashboard activity panel. Use a
screwdriver to loosen the screw.
3. Inst all 2 new AA ( AM-3 /LR6 )
batteries following the diagram inside
the battery box. (The use of new
alkaline batteries is recommended for
maximum performance.)
4. Replace the battery cover and tighten
the screw to secure.
BATTERY NOTICE
Use new alkaline batteries for maximum performance.
Use only batteries of the same or equivalent type as
recommended.
Do not mix different types of batteries: alkaline, standard (carbon-
Instructions
5
zinc) or rechargeable (Ni-Cd, Ni-MH), or new and used batteries.
Do not use damaged batteries.
Insert batteries with the correct polarity.
Do not short-circuit the battery terminals.
Remove exhausted batteries from the toy.
Remove batteries during long periods of non-use.
Do not dispose of batteries in fire.
Do not charge non-rechargeable batteries.
Remove rechargeable batteries from the toy before charging (if
removable).
Rechargeable batteries are only to be charged under adult
supervision.
PRODUCT ASSEMBLY
CAUTION: With the VTech
®
Sit-to-Race Smart
Wheels
TM
, safety comes first. To ensure your child’s safety, please
only assemble this product by an adult. This package contains four
small screws. For your child’s safety, do not let your child play with
the toy until it is fully assembled. Adult supervision required.
ASSEMBLY INSTRUCTIONS
1. To install the four wheels onto the body, first insert an axle through
one wheel and one yellow cylinder. Please be sure the deeper hole
in the wheel faces out, and the larger end of the yellow cylinder goes
inside the body. Maneuver the cylinder until it locks into place.
Product Assembly
6
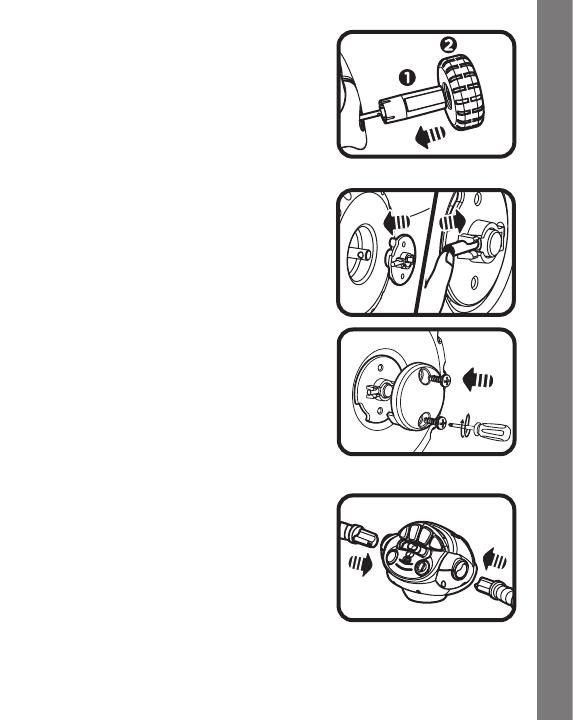
Insert another yellow cylinder and
one wheel onto the open end of the
axle. Please be sure the deeper hole
in the wheel faces out, and the larger
end of the yellow cylinder goes inside
the body. Maneuver the cylinder until
it locks into place.
Cover with a fastener, with the spindle
side up and aligned with the hole
in the axle, then insert the spindle
through the hole in the axle. Put a
cover over the fastener, aligning the
holes in the cover with the holes in the
fastener. Insert two screws into the
cover and tighten with a screwdriver.
Repeat this process for the second
wheel.
2. To attach the left and right handle
bars to the dashboard activity panel,
insert them into the holes on the
sides. You will hear a loud click’
sound. This indicates that the handle
bars are securely fixed into the
dashboard activity panel.
Product Assembly
7
3. Attach the dashboard activity panel to
the body by snapping the dashboard
activity panel onto the body. You
will hear it click into place. Please
ensure the dashboard activity panel
is attached securely to the body.
4. To assemble the parent handle, first
insert the handle grip into the middle
support. Attach each side piece by
pushing down the locks on the side
piece and inserting the male parts of
the handle grip and middle support
into the corresponding female parts
of the side piece. You will hear the
side pieces click into place.
5. Place the bottom of the parent handle onto the back axle at a
45-degree angle, then rotate the handle up to connect to the rear
of the seat. Lock the parent handle in place by tightening the large
screw.
Product Assembly
8
WARNING!
Not to be used by children over 36 months due to insufficient
strength. 42 pounds max.
ATTENTION !
This toy should be operated in a safe area.
Please ensure young children are supervised by an adult.
Please ensure your child is positioned correctly on the seat
when in ride-on or rocker mode.
This toy should be used with caution to avoid falls or collisions
that cause injury to your child or others.
CONVERTING THE SIT-TO-RACE SMART
WHEELS
TM
1. To convert to rocker mode, press and
hold the green button on the side of
the seat, loosen the large screw on
the handle, then rotate the handle to a
horizontal position under the body.
Push the handle into the two locks
under the front wheels. You will hear
a click to indicate the parent handle
is secure and can be used as rocker
blades.
Product Conversion
9
2. To convert to ride-on mode, squeeze the two locks under the front
wheels to disconnect the handle. Rotate the handle to a vertical
position behind the body.
Secure the handle by tightening the
large screw.
PLEASE NOTE:
The handle is designed for parental use only. This product
should not be used by a child as a push toy.
3. To remove the handle in ride-on mode, press and hold the green
button on the seat and unscrew the large screw. Then, move the
handle to a 45-degree angle and remove it from the axle.
Product Conversion
10
4. To remove the dashboard activity
panel from the body, turn over the
body and squeeze the green locks
inside, under the activity panel.
Remove the dashboard activity panel
from the body.
To avoid injury caused by the lock on
the neck of the body, please keep the
body out of your child’s reach when
playing with the dashboard activity
panel by itself on the floor.
PRODUCT FEATURES
1. MODE SELECTOR
To turn the unit ON, slide the MODE
SELECTOR to the LEARNING
MODE ( ) or the DISCOVERY
MODE ( ) position. To turn the unit
OFF, slide the MODE SELECTOR to
the OFF ( ) position.
Product Features
11
2. VOLUME CONTROL SWITCH
To adjust the volume, slide the
VOLUME CONTROL SWITCH on the
dashboard activity panel to the LOW
VOLUME ( )or the HIGH VOLUME
( ) position.
3. AUTOMATIC SHUT-OFF
To preserve battery life, the VTech
®
Sit-to-Race Smart Wheels
TM
will automatically power-down after approximately 45 seconds
without input. The unit can be turned on again by pressing any
button.
ACTIVITIES
1. Slide the mode selector to the
learning mode or discovery mode
position to turn the unit on. You will
hear a song, a playful phrase and the
horn sound. The light will flash with
the sounds.
2. Press the
horn button to hear fun
horn sounds. The light will flash with
the sounds.
Activities
12
3. Twist the twist knob to hear fun
engine sounds. The light will ash
with the sounds.
4. Press the
four number buttons to
learn numbers, objects and places,
Youll also hear sounds and an
encouraging phrase. The light will
flash with the sounds.
5. Rock and ride the bike to hear fun
sounds and melodies. The light will
flash with the sounds.
6. If there is no input to the unit after approximately 8 seconds, you
will hear a question, which will encourage you to find the correct
object. After another 8 seconds if there is still no input, you will
hear a fun sung song or an encouraging phrase. After another
8 seconds if there is still no input, you will hear a short tune, then
the unit will automatically power-down.
Activities
13
MELODY LIST:
1. I’ve Been Working on the Railroad
2. The Glow Worm
3. Three Blind Mice
4. The Wheels on the Bus
5. Oh, Where, Oh, Where Has My Little Dog Gone?
6. Twinkle, Twinkle, Little Star
7. Three Little Kittens
8. Polly Wolly Doodle
9. This Old Man
10. Jack & Jill
11. Here We Go ‘Round the Mulberry Bush
12. London Bridge
13. Skip to My Lou
14. Hey Diddle Diddle
15. It’s Raining, It’s Pouring
16. Pease Porridge Hot
SING-ALONG SONGS
Song 1
We’re on our way,
Riding all around town.
1-2-3-4,
Wheels go round and round!
Melody List
14
Song 2
It’s time to ride.
Let’s ride and play.
Where would you like to ride today?
Ride to the park?
Ride to the zoo?
Ride to the places we like to go to!
CARE & MAINTENANCE
1. Keep the unit clean by wiping it with a slightly damp cloth.
2. Keep the unit out of direct sunlight and away from any direct heat
source.
3. Remove the batteries when the unit is not in use for an extended
period of time.
4. Do not drop the unit on a hard surface and do not expose the unit
to moisture or water.
Care & Maintenance
15
TROUBLESHOOTING
If for some reason the program/activity stops working or malfunctions,
please follow these steps:
1. Turn the unit
OFF.
2. Interrupt the power supply by removing the batteries.
3. Let the unit stand for a few minutes, then replace the batteries.
4. Turn the unit
ON. The unit should now be ready to play again.
5. If the product still does not work, replace with an entire set of new
batteries.
If the problem persists, please call our Consumer Services Department
at 1-800-521-2010 in the U.S. or 1-877-352-8697 in Canada, and a
service representative will be happy to help you.
IMPORTANT NOTE:
Creating and developing Infant Learning products is accompanied
by a responsibility that we at VTech
®
take very seriously. We make
every effort to ensure the accuracy of the information which forms
the value of our products. However, errors sometimes can occur.
It is important for you to know that we stand behind our products
and encourage you to call our Consumer Services Department at
1-800-521-2010 in the U.S., or 1-877-352-8697 in Canada with
any problems and/or suggestions that you might have. A service
representative will be happy to help you.
Troubleshooting
16
NOTE:
This equipment has been tested and found to comply with the limits for
a Class B digital device, pursuant to Part 15 of the FCC Rules. These
limits are designed to provide reasonable protection against harmful
interference in a residential installation. This equipment generates and
uses radio frequency energy and if not installed and used in accordance
with the manufacturer’s instructions, may cause interference to radio
communications. However, there is no guarantee that interference
will not occur in a particular installation. If this equipment does cause
interference with radio or television reception, which can be determined
by turning the equipment on and off, the user is encouraged to try to
correct the interference by one or more of the following measures:
Reorient the receiving antenna.
Increase the separation between the equipment and receiver.
Connect the equipment into an outlet on a circuit different from that
to which the receiver is connected.
Consult the dealer or an experienced radio/TV technician for
help.
Caution: changes or modifications not expressly approved by the party
responsible for compliance could void the user’s authority to operate
the equipment.
Other info
PLEASE NOTE:
Please assemble the product according to the above
image.
Please be sure the handle bars are correctly attached
to the dashboard activity panel. The handle bars should
not be removable once attached.
91-002804-000
The left handle bar The right handle bar
80-138600-001-001 HANDLE BAR SHEET
P/N: 91-002804-000
COLOR: B/W
SIZE:101X127MM
  • Page 1 1
  • Page 2 2
  • Page 3 3
  • Page 4 4
  • Page 5 5
  • Page 6 6
  • Page 7 7
  • Page 8 8
  • Page 9 9
  • Page 10 10
  • Page 11 11
  • Page 12 12
  • Page 13 13
  • Page 14 14
  • Page 15 15
  • Page 16 16
  • Page 17 17
  • Page 18 18

VTech Sit-to-Race Smart Wheels User manual

Category
Toys & accessories
Type
User manual
This manual is also suitable for

Ask a question and I''ll find the answer in the document

Finding information in a document is now easier with AI