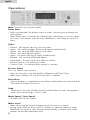
Haier GWT900AW is a top load clothes washer that provides 12 wash cycles and 7 wash options to effectively clean different types of fabrics and soil levels. It features a delay start option, allowing you to set the wash cycle to begin at a later time. Additionally, the washer has a soak function for heavily soiled clothes, extra rinse option for better rinsing performance, and adjustable wash and spin speeds. With its user-friendly control panel, you can easily select the desired settings and customize the wash cycle according to your laundry needs.
Haier GWT900AW is a top load clothes washer that provides 12 wash cycles and 7 wash options to effectively clean different types of fabrics and soil levels. It features a delay start option, allowing you to set the wash cycle to begin at a later time. Additionally, the washer has a soak function for heavily soiled clothes, extra rinse option for better rinsing performance, and adjustable wash and spin speeds. With its user-friendly control panel, you can easily select the desired settings and customize the wash cycle according to your laundry needs.


-
 1
1
-
 2
2
-
 3
3
-
 4
4
-
 5
5
-
 6
6
-
 7
7
-
 8
8
-
 9
9
-
 10
10
-
 11
11
-
 12
12
-
 13
13
-
 14
14
-
 15
15
-
 16
16
-
 17
17
-
 18
18
-
 19
19


Haier GWT900AW User manual
- Category
- Washing machines
- Type
- User manual
Haier GWT900AW is a top load clothes washer that provides 12 wash cycles and 7 wash options to effectively clean different types of fabrics and soil levels. It features a delay start option, allowing you to set the wash cycle to begin at a later time. Additionally, the washer has a soak function for heavily soiled clothes, extra rinse option for better rinsing performance, and adjustable wash and spin speeds. With its user-friendly control panel, you can easily select the desired settings and customize the wash cycle according to your laundry needs.
Ask a question and I''ll find the answer in the document
Finding information in a document is now easier with AI
Related papers
-
Haier ESL-T21 User manual
-
-
-
-
Haier HLP21N Owner's manual
-
-
-
-
Haier HWM130-0677 User manual
-
Haier HLT364XXQ - Genesis Washer User manual
Other documents
-
GE GUD24GSSM1WW Owner's manual
-
-
Whirlpool MAVT446AW User manual
-
Amana Top Loading Washer Owner's manual
-
-
-
LG WT7900HBA Owner's manual
-
LG WT7100CW Owner's manual
-
Maytag MAV-1 User manual
-
Pyle PUCWM11 User manual