Microtek ArtixScan DI 2015c User manual
- Category
- Copiers
- Type
- User manual
This manual is also suitable for
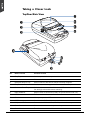
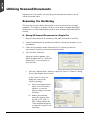
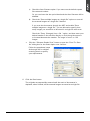
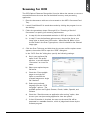
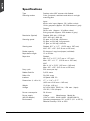
Microtek ArtixScan DI 2015c is a color document scanner that provides high-quality scans with an optical resolution of 600 x 1200 dpi. It features an Automatic Document Feeder (ADF) with a capacity of up to 50 sheets, allowing for unattended scanning of multiple documents. The scanner's Hi-Speed USB port ensures fast data transfer rates, and the included Microtek ScanWizard DI software offers advanced scanning features and customization options. With its user-friendly design and versatile capabilities, the ArtixScan DI 2015c is an ideal choice for home or office use.
Microtek ArtixScan DI 2015c is a color document scanner that provides high-quality scans with an optical resolution of 600 x 1200 dpi. It features an Automatic Document Feeder (ADF) with a capacity of up to 50 sheets, allowing for unattended scanning of multiple documents. The scanner's Hi-Speed USB port ensures fast data transfer rates, and the included Microtek ScanWizard DI software offers advanced scanning features and customization options. With its user-friendly design and versatile capabilities, the ArtixScan DI 2015c is an ideal choice for home or office use.


-
 1
1
-
 2
2
-
 3
3
-
 4
4
-
 5
5
-
 6
6
-
 7
7
-
 8
8
-
 9
9
-
 10
10
-
 11
11
-
 12
12
-
 13
13
-
 14
14
-
 15
15
-
 16
16
-
 17
17
-
 18
18
-
 19
19
-
 20
20
-
 21
21
-
 22
22
-
 23
23
-
 24
24
-
 25
25
-
 26
26
-
 27
27
-
 28
28
-
 29
29
-
 30
30
-
 31
31
-
 32
32
-
 33
33
-
 34
34
-
 35
35
-
 36
36
-
 37
37
-
 38
38
-
 39
39
-
 40
40
-
 41
41
-
 42
42


Microtek ArtixScan DI 2015c User manual
- Category
- Copiers
- Type
- User manual
- This manual is also suitable for
Microtek ArtixScan DI 2015c is a color document scanner that provides high-quality scans with an optical resolution of 600 x 1200 dpi. It features an Automatic Document Feeder (ADF) with a capacity of up to 50 sheets, allowing for unattended scanning of multiple documents. The scanner's Hi-Speed USB port ensures fast data transfer rates, and the included Microtek ScanWizard DI software offers advanced scanning features and customization options. With its user-friendly design and versatile capabilities, the ArtixScan DI 2015c is an ideal choice for home or office use.
Ask a question and I''ll find the answer in the document
Finding information in a document is now easier with AI
Related papers
-
Microtek ArtixScan DI 2015c User manual
-
-
Microtek XT5820 HS User manual
-
-
-
-
-
-
-
Other documents
-
Epson Auto Document Feeder User manual
-
Medion USB 2.0 Flatbed Scanner MD 90090 User manual
-
Medion USB 2.0 Flatbed Scanner MD 90009 User manual
-
-
Mustek iDocScan D20 User guide
-
Mustek iDocScan S20 User guide
-
-
Mustek iDocScan D50 User guide
-
EINHELL GC-GR 57 Product Sheet
-