Sunny SF-E3919 User manual
- Type
- User manual
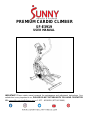
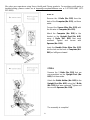
Sunny SF-E3919 is a versatile cardio climber designed to provide an effective full-body workout in the comfort of your home. Its sturdy construction, with a maximum weight capacity of 260 pounds, ensures stability during your exercise sessions. The adjustable tension control knob allows you to customize your workout intensity, making it suitable for users of varying fitness levels. With its compact design and built-in transportation wheels, the Sunny SF-E3919 is easy to move and store, making it a great space-saving option for your home gym.
Sunny SF-E3919 is a versatile cardio climber designed to provide an effective full-body workout in the comfort of your home. Its sturdy construction, with a maximum weight capacity of 260 pounds, ensures stability during your exercise sessions. The adjustable tension control knob allows you to customize your workout intensity, making it suitable for users of varying fitness levels. With its compact design and built-in transportation wheels, the Sunny SF-E3919 is easy to move and store, making it a great space-saving option for your home gym.


-
 1
1
-
 2
2
-
 3
3
-
 4
4
-
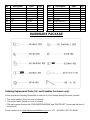 5
5
-
 6
6
-
 7
7
-
 8
8
-
 9
9
-
 10
10
-
 11
11
-
 12
12
-
 13
13
-
 14
14
-
 15
15
-
 16
16


Sunny SF-E3919 User manual
- Type
- User manual
Sunny SF-E3919 is a versatile cardio climber designed to provide an effective full-body workout in the comfort of your home. Its sturdy construction, with a maximum weight capacity of 260 pounds, ensures stability during your exercise sessions. The adjustable tension control knob allows you to customize your workout intensity, making it suitable for users of varying fitness levels. With its compact design and built-in transportation wheels, the Sunny SF-E3919 is easy to move and store, making it a great space-saving option for your home gym.
Ask a question and I''ll find the answer in the document
Finding information in a document is now easier with AI
Related papers
-
Sunny SF-E320047 User manual
-
-
-
Sunny SF-RB4876 User manual
-
-
Sunny SF-T7945 User manual
-
Sunny SF-B1423 User manual
-
-
Sunny SF-B1877 User manual
-
Other documents
-
 SUNNY Health Fitness SF-B223011 User manual
-
 SUNNY Health Fitness E321003 User manual
-
 Sunny Health & Fitness SF-T7632 User manual
-
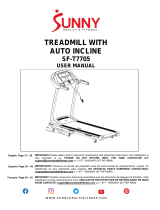 SUNNY Health Fitness SF-T7705 User manual
-
 SUNNY Health Fitness SF-E320002 User manual
-
Orbit Power Stride 23 Elliptical OBE655T Owner's manual
-
BodyCraft SCT400G Owner's manual
-
-
-


