Power Fist 8535072 Owner's manual
- Category
- Power tools
- Type
- Owner's manual

User Manual
V 4.0 8535072
Please read and understand all instructions before use.
Retain this manual for future reference.
7 in.
Angle
Grinder
90SM
E205586
Page is loading ...

V 4.0 8535072
Visit www.princessauto.com for more information 3
7 in.
Angle
Grinder
SPECIFICATIONS
Model 8535072
Input 120V AC, 60 Hz, 15.0 Amp
No-Load Speed 8,000 RPM
Wheel Size 7 in. (178mm)
Arbor Size 5/8 in. - 11
Net Weight 10.5 lbs.
Includes: One 7 in. Metal Grinding Wheel, Auxiliary Handle, and Wrench.
WARNING: To reduce the risk of injury, user must read and understand this operator’s
manual before operating this tool. Save this manual for future reference.
SAFETY
GENERAL SAFETY RULES
WARNING: Some dust created by power sanding, sawing, grinding, drilling, and other
construction activities contains chemicals known to cause cancer, birth defects or other
reproductive harm. Some examples of these chemicals are:
• Lead from lead-based paints.
• Crystalline silica from bricks and cement and other masonry products.
• Arsenic and chromium from chemically treated lumber.
Your risk from these exposures varies, depending on how often you do this type of work. To reduce
your exposure to these chemicals: work in a well ventilated area, and work with approved safety
equipment, such as those dust masks that are specially designed to filter out microscopic particles.

V 4.0 8535072
4 For technical questions call 1-800-665-8685
7 in. Angle Grinder
WARNING: READ AND UNDERSTAND ALL WARNINGS, CAUTIONS AND OPERATING
INSTRUCTIONS BEFORE USING THIS EQUIPMENT. Failure to follow all instructions listed
below may result in electric shock, fire and/or serious personal injury.
1. READ THE INSTRUCTION MANUAL BEFORE OPERATING THE MACHINE. To minimize
the possible occurrence of accidents and personal injury, learn the tool’s application,
limitations, and specific potential hazards peculiar to this tool.
2. WEAR EYE AND HEARING PROTECTION. ALWAYS USE SAFETY GLASSES WITH SIDE
SHIELDS. Unless otherwise specified, everyday glasses provide only limited impact
resistance, they are NOT safety glasses. Use only certified safety equipment; eye
protection equipment should comply with ANSI Z87.1 standards. Protective hearing
equipment should comply with ANSI S3.19 standards.
3. DO NOT USE THIS OR ANY OTHER MACHINE WHEN YOU ARE TIRED, UNDER THE
INFLUENCE OF DRUGS, ALCOHOL, OR MEDICATION. WATCH WHAT YOU ARE
DOING, STAY ALERT AND USE COMMON SENSE.
4. WEAR PROPER CLOTHING. Do not wear loose clothing, gloves, neckties, rings,
bracelets, wrist watches or other jewelry which may get caught in moving parts.
Wearing nonskid footwear is recommended as well as wearing protective hair
covering to contain long hair.
5. USE AND KEEP GUARDS IN PLACE and in good working order. Never operate the
machine with any guard or cover removed. Check that all guards are in place, secured,
and working correctly before each use to reduce the risk of injury.
6. DO NOT USE THE TOOL IN DANGEROUS ENVIRONMENTS. Keep the work area
well lighted to prevent tripping or inadvertently placing arms, hands,or fingers in
dangerous positions. Do not use power tools in damp or wet locations or in the rain
which can cause shock or electrocution.
7. KEEP THE WORK AREA CLEAN. Cluttered areas and benches invite accidents.
8. CHECK THE TOOL FOR DAMAGED PARTS before using the machine. Check for proper
alignment of moving parts, binding of moving parts, component breakage, and any
other conditions that may affect the tool’s operation. A guard or any other part that
is damaged must be properly repaired or replaced by an authorized service center to
avoid risk of personal injury.
9. REMOVE ADJUSTING KEYS AND WRENCHES BEFORE STARTING THE TOOL. Keys,
wrenches, scrap, and other debris can be thrown at high speed, possibly causing
serious personal injury.
10. KEEP CHILDREN AND VISITORS AWAY. Your shop is a potentially dangerous
environment and visitors should not be allowed to contact any tools, extension cords,
or roam about unsupervised. All visitors should wear safety glasses and be kept a safe
distance from the work area.
11. MAKE THE WORKSHOP CHILDPROOF by using padlocks, master switches, and by
removing starter keys from tools.
12. MAINTAIN ALL TOOLS AND MACHINES WITH CARE. Keep tools sharp and clean for best
and safest performance. Follow instructions for lubricating and changing accessories.
13. DISCONNECT TOOLS WHEN NOT IN USE, before servicing, or when changing
attachments, blades, bits, cutters, etc.

Visit www.princessauto.com for more information 5
8535072 V 4.0
7 in. Angle Grinder
14. REDUCE THE RISK OF UNINTENTIONAL STARTING. Check to be sure that the tool’s
switch is in the “OFF” position before plugging in the power cord. Should a power
failure occur, move the switch to the “OFF” position. Accidental start-ups can cause
serious personal injury.
15. USE THE CORRECT TOOL FOR THE JOB. Don’t force the tool or attachment to do a
job for which it was not designed. Don’t use the tool for a purpose not intended as
damage to the machine and/or personal injury may result.
16. USE RECOMMENDED ACCESSORIES. Using accessories and attachments not
recommended by the manufacturer or intended for use on this type tool, may cause
damage to the machine or result in personal injury to the user. Consult the instruction
manual for recommended accessories.
17. MAKE SURE YOUR EXTENSION CORD IS THE PROPER SIZE AND IS IN GOOD
CONDITION. When using an extension cord, be sure to use one heavy enough to
carry the current your product will draw. An undersized cord will cause a drop in line
voltage resulting in loss of power and tool overheating. Consult the Extension Cord
Chart for the correct size based on the cord length and nameplate ampere rating. If
ever in doubt, use the next heavier wire gauge cord. The smaller the gauge number,
the heavier the cord.
18. SECURE THE WORK-PIECE. Use clamps or a vise to hold the work-piece when
practical. Using clamps or similar mechanical device is safer than using your hand(s)
and allows you to use both hands to operate the tool. Losing control of the work-piece
can cause personal injury.
19. DON’T OVERREACH. Maintain proper footing and balance at all times; loss of balance
can cause you to fall into the working machine, possibly causing an injury.
20. NEVER STAND ON THE TOOL. An injury may occur if the machine is tipped or if you
should unintentionally contact the cutting tool.
21. DO NOT FORCE THE TOOL. The tool will perform the job better and safer at the feed
rate for which it was designed. Forcing the tool could possibly damage the machine
and may result in personal injury.
22. FEED THE WORK-PIECE IN THE CORRECT DIRECTION AND SPEED. Feed the work-
piece into a blade, cutter, or abrasive surface against the direction of the cutting tool’s
direction of rotation only. Incorrectly feeding the work-piece in the same direction as
the cutting tool rotates causes the work-piece to be thrown out at high speed.
23. NEVER LEAVE THE TOOL RUNNING UNATTENDED. TURN THE POWER OFF. Don’t
leave the machine until it comes to a complete stop.
24. TURN THE MACHINE “OFF”, AND DISCONNECT THE MACHINE FROM THE POWER
SOURCE before adjusting or changing set-ups, or when making repairs. An accidental
start-up may occur causing personal injury.
25. NEVER USE THE TOOL IN AN EXPLOSIVE ATMOSPHERE. Normal sparking of the
motor could ignite fumes.
26. KEEP THE TOOL DRY, CLEAN, AND FREE FROM OIL AND GREASE. Always use a clean
cloth when cleaning. Never use brake fluids, gasoline, petroleum-based products, or
any solvents to clean the tool.
27. DO NOT USE THE TOOL IF SWITCH DOES NOT TURN IT ON AND OFF. Have defective
switches replaced by an authorized service center.
28. USE ONLY CORRECT BLADES. Do not use blades with incorrectly sized arbor holes.
Never use blade washers or blade bolts that are defective or incorrect.

V 4.0 8535072
6 For technical questions call 1-800-665-8685
7 in. Angle Grinder
29. BEFORE MAKING A CUT, BE SURE ALL ADJUSTMENTS ARE SECURE. DOUBLE
CHECK ALL SETUPS. Make sure the blade is tight and not making contact with the
saw or work-piece before connecting to the power supply.
30. AVOID CUTTING NAILS. Inspect for and remove all nails from lumber before cutting.
31. NEVER TOUCH THE BLADE OR OTHER MOVING PARTS DURING USE.
32. NEVER START A TOOL WHEN ANY ROTATING COMPONENT IS IN CONTACT WITH
THE WORK-PIECE.
33. MAKE SURE THE WORK AREA HAS AMPLE LIGHTING to see the work and that no
obstructions will interfere with safe operation BEFORE performing any work.
34. INSPECT TOOL CORDS PERIODICALLY. If a damaged cord is found, have it repaired
by a qualified service technician at an authorized service facility. The conductor with
insulation having an outer surface that is green with or without yellow stripes is the
equipment-grounding conductor. If repair or replacement of the electric cord or plug
is required, do not connect the equipment-grounding conductor to a live terminal.
Repair/replace damaged or worn cords immediately. Be constantly aware of the cord
location and keep it well away from the rotating blade.
35. POLARIZED PLUGS. To reduce the risk of electric shock, this tool has a polarized plug
(one blade is wider than the other). This plug will fit in a polarized outlet only one way.
If the plug does not fit fully in the outlet, reverse the plug. If it still does not fit, contact
a qualified electrician to install the proper outlet. Do not change the plug in any way.
WARNING: USE OF THIS TOOL CAN GENERATE AND DISBURSE DUST OR OTHER AIRBORNE
PARTICLES, INCLUDING WOOD DUST, CRYSTALLINE SILICA DUST AND ASBESTOS. Direct
particles away from face and body. Always operate tool in a well ventilated area and provide
for proper dust removal. Use dust collection system wherever possible. Exposure to the dust
may cause serious and permanent respiratory or other injury, including silicosis (a serious
lung disease), cancer, and death. Avoid breathing the dust, and avoid prolonged contact
with the dust. Allowing dust to get into your mouth or eyes, or lay on your skin may promote
absorption of harmful material. Always use properly fitting NIOSH/OSHA approved respiratory
protection appropriate for dust exposure, and wash exposed areas with soap and water.
EXTENSION CORDS
Grounded tools require a three wire extension cord. Double insulated tools can use either a
two or three wire extension cord. As the distance from the power supply outlet increases, you
must use a heavier gauge extension cord. Using extension cords with inadequately sized wire
causes a serious drop in voltage, resulting in loss of power and possible tool damage. Refer to
the table shown below to determine the required minimum wire size.
The smaller the gauge number of the wire, the greater the capacity of the cord. For example:
a 14-gauge cord can carry a higher current than a 16-gauge cord. When using more than one
extension cord to make up the total length, be sure each cord contains at least the minimum
wire size required. If you are using one extension cord for more than one tool, add the
nameplate amperes and use the sum to determine the required minimum wire size.

Visit www.princessauto.com for more information 7
8535072 V 4.0
7 in. Angle Grinder
Guidelines for Using Extension Cords
1. If you are using an extension cord outdoors, be sure it is marked with the suffix “W-A”
(“W” in Canada) to indicate that it is acceptable for outdoor use.
2. Be sure your extension cord is properly wired and in good electrical condition. Always
replace a damaged extension cord or have it repaired by a qualified person before
using it.
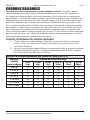
Recommended Minimum Wire Gauge for Extension Cords (120 Volt)
Nameplate
Amperes
(At Full Load)
Extension Cord Length
25 Feet 50 Feet 75 Feet 100 Feet 150 Feet 200 Feet
0–2.0
18 18 18 18 16 16
2.1–3.4
18 18 18 16 14 14
3.5–5.0
18 18 16 14 12 12
5.1–7.0
18 16 14 12 10 10
7.1–12.0
18 14 12 10 8 8
12.1–16.0
14 12 10 8 6 6
16.1–20.0
12 10 8 6 4 6
SPECIFIC SAFETY RULES FOR ANGLE GRINDERS
WARNING: DO NOT let comfort or familiarity with your angle grinder (gained from repeated
use) replace strict adherence to angle grinder safety rules. If you use this tool unsafely or
incorrectly, you can suffer serious personal injury.
WARNING: Hold tool by insulated gripping surfaces when performing an operation where the
cutting tool may contact hidden wiring or its own cord. Contact with a “live” wire will also
make exposed metal parts of the tool “live” and shock the operator.
1. Always use proper guard with grinding wheel. A guard protects operator from broken
wheel fragments.
2. Accessories must be rated for at least the speed recommended on the tool warning label.
Wheels and other accessories running over rated speed can flay apart and cause injury.
3. Hold the tool by insulated gripping surfaces when performing an operation where the
cutting tool may contact hidden wiring or its own cord. Contact with a “live” wire will
make exposed metal parts of the tool “live” and shock the operator.
4. Grinding wheel and guard must be securely attached as described in this manual
before connecting the grinder to a power source. Make sure that the guard is in good
operating condition before operating the grinder.
5. Check the grinding wheel carefully for visible defects before operation. Replace
cracked, chipped, or warped wheels immediately. Run the tool (with guard) at no load
speed for about a minute, holding tool away from others. If wheel is flawed, it will
likely separate during this test.
6. Always use safety glasses or goggles. Ordinary eye or sun glasses are NOT safety glasses.

V 4.0 8535072
8 For technical questions call 1-800-665-8685
7 in. Angle Grinder
7. When using depressed center grinding wheels, be sure to use only fiberglass
reinforced wheels.
8. Use only flanges and clamp nut specified for this tool; do not over tighten the clamp nut
on the grinding wheel. Excessive tightening can cause the wheel to crack during operation.
9. Be careful not to damage the spindle, the flange, or clamp nut (especially the installing
surface) or the lock nut. Damage to these parts could result in wheel breakage.
10. NEVER use tool with wood cutting blades or other saw blades. Such blades when
used on a grinder frequently kick and cause loss of control leading to personal injury.
11. Hold the tool firmly with both hands.
12. Keep hands away from rotating parts.
13. Make sure cord is clear of wheel. Do not wrap cord around your arm or wrist. If control
of tool is lost, cord may become wrapped around you and cause personal injury.
14. Make sure the wheel is not contacting the workpiece before the switch is turned on.
15. Before using the tool on an actual workpiece, let it run for a while. Watch for vibration
or wobbling that could indicate poor installation or a poorly balanced wheel.
16. Use the specified surface of the wheel to perform the grinding. Never use the side or
upper surfaces for cutting.
17. Watch out for flying sparks. Hold the tool so that sparks fly away from you and other
persons or flammable materials.
18. Do not leave the tool running. Operate the tool only when hand-held.
19. Do not touch the workpiece immediately after operation; it may be extremely hot and
could burn your skin.
20. ALWAYS wear proper apparel including long sleeve shirts, leather gloves and shop
aprons to protect skin from contact with hot grindings.
21. Use of this tool to grind or sand some products, paints and wood could expose user
to hazardous substances. Use appropriate respiratory protection.
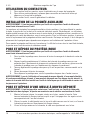
YOUR GRINDER
1
4
6
7
2
3
5
FIG. 1
1. Trigger Switch
2. Wheel Guard
3. Spindle Lock
4. Inner Flange
5. Side Handle
6. Grinding Wheel
7. (2) Brush Caps (Under Label)

Visit www.princessauto.com for more information 9
8535072 V 4.0
7 in. Angle Grinder
OPERATION
WARNING: MISUSE or failure to follow the safety rules stated in this instruction manual may
cause serious personal injury.
WARNING: Before plugging in the tool, always check to see that the tool is switched off.
WARNING: The switch can be locked in “ON” position for ease of operator comfort during
extended use. Apply caution when locking tool in “ON” position and maintain a firm grasp
on the tool.
SWITCH ACTION
1. To start the tool, squeeze the trigger switch toward the handle body.
2. For continuous operation, push the projecting lever on the front side of the trigger
switch foreward to lock it on.
3. To stop the tool, squeeze the trigger switch and release.
INSTALLING THE AUXILLARY HANDLE
WARNING: Always be sure that the tool is switched off and unplugged before performing any
work on the tool.
Your grinder is equipped with a two position auxillary handle; it can be mounted on either the
left, or right side of the die cast gear housing. Generally, a right handed operator will grip the
body of the grinder with their right hand and grip auxillary handle, mounted to the left side of
the gear housing, with their left hand. The opposite gripping and auxillary handle placement is
generally used by a left handed operator. Occasionally, auxillary handle placement needs to be
changed to accommodate the requirements or restrictions of the operation being performed.
To mount the auxillary handle to the grinder, simply securely screw the handle into the threaded
hole on the left, or right side of the die cast gear housing.
INSTALLING OR REMOVING WHEEL GUARD
WARNING: Always be sure that the tool is switched off and unplugged before performing any
work on the tool.
1. To mount the wheel guard, loosen the clamp lever on wheel guard's band.
2. Align the small protrusion on the inside of the wheel guard band with the notch on the
grinder's bearing cap shoulder, then slip the guard's band onto the shoulder of the
bearing cap.
3. Slightly rotate the guard so that it is positioned as shown in the figure 1.
4. Tighten the clamp lever securely.
5. To remove the guard, follow the installation procedure in reverse.
WARNING: When using a depressed center grinding wheel, flex wheel, wire wheel, cut-off
wheel, or abrasive mop disc, the wheel guard must be fitted on the tool so that the closed
side of the guard always points towards the operator.

V 4.0 8535072
10 For technical questions call 1-800-665-8685
7 in. Angle Grinder
INSTALLING OR REMOVING DEPRESSED CENTER
GRINDING WHEELS
WARNING: Always be sure that the tool is switched off and unplugged before adjusting,
adding accessories, or checking a function on the tool.
1. Mount the inner flange with the machined "flats" side down onto the spindle. Slowly
rotate the inner flange until it engages the corresponding matching machined “flats”
on the spindle shaft.
2. Slide the wheel, crown side down and depressed side up, over the spindle shaft and
over the raised shoulder on the inner flange.
3. Screw the outer flange onto the spindle with the shouldered side down.
4. Firmly depress the spindle lock so the spindle cannot revolve; then use the lock nut
wrench, turning it clockwise, to securely tighten the outer flange.
5. To remove the wheel, follow the installation procedure in reverse.
WARNING: Always install grinding wheel with the depressed center against the disc flange.
Failure to do so will cause the grinding wheel to crack when tightening the clamp nut. This
could result in serious personal injury because of loose particles breaking off and being
thrown from the grinder. Never use a grinding wheel with a mounting hole larger than 5/8 in.
Do not overtighten.
WARNING: Always use the supplied guard when a depressed center grinding wheel is
on the tool. The wheel can shatter during use and the guard helps reduce the chances of
personal injury.
INSTALLING OR REMOVING AN ABRASIVE DISC
WARNING: Always be sure that the tool is switched off and unplugged before adjusting,
adding accessories, or checking a function on the tool.
1. Mount the rubber backing pad onto the spindle.
2. Place abrasive disc onto the spindle, then fit the disc onto rubber pad and begin to
screw the outer flange onto the spindle.
3. Firmly depress the spindle lock so that the spindle cannot rotate, then use the lock nut
wrench and securely tighten clockwise.
4. To remove the disc, follow the installation procedure in reverse.
GRINDING AND SANDING OPERATION
WARNING: Never force the tool; the weight of the tool applies adequate pressure. Forcing
and excessive pressure could cause dangerous wheel breakage.
ALWAYS replace the wheel if the tool is dropped while grinding.
NEVER bang or hit the grinding wheel or disc onto the work.
Avoid bouncing and snagging the wheel, especially when working on corners, sharp edges, etc.
This can cause loss of control and kickback.
NEVER use the tool with wood carving blades or other saw blades. It is only designed for
grinding, sanding, or wire brushing.
WARNING: After operation, always switch off the tool and wait until the wheel comes to a
complete stop before putting the tool down.

Visit www.princessauto.com for more information 11
8535072 V 4.0
7 in. Angle Grinder
ALWAYS select and use grinding wheels that are recommended for the material to be ground.
Ensure that the minimum operating speed of any accessory wheel selected for use.
ALWAYS hold the tool firmly with one hand on the motor housing and the other on the side
handle. Turn the tool on and then apply the wheel or disc to the workpiece. The key to efficient
operation begins by controlling the pressure and surface contact between grinding wheel and
the workpiece.
Flat surfaces are usually best ground by keeping the edge of the wheel at an angle of 5
to 15 degrees. Maintaining the proper angle of 5 to 15 degrees by tilting the grinder and
continuously moving the grinder back and forth or up and down over the work area. Keep the
grinder moving to avoid removing a excessive amount of material from one area.
Use just enough pressure to keep the tool from chattering or bouncing; normally the weight
of the tool alone is adequate for most grinding jobs. Where there is a chance that the grinding
wheel may get snagged by the workpiece, such as loose bolts or jagged edges, causing loss of
tool control, use lighter pressure.
OPERATION WITH WIRE BRUSHES
WARNING: In normal wire brushing operations, the material being removed and brush
bristles will fly off, going great distances with extreme force. The potential for serious injury
exists. To protect against this hazard, the operator and others in the work area must wear
protective clothing and safety goggles. Wearing a full face mask over safety glasses with
side shields is highly suggested.
WARNING: Always be sure that the tool is switched off and unplugged before adjusting,
adding accessories, or checking a function on the tool.
Do not use a brush that is damaged or is out of balance. Use of a damaged brush increases the
potential for injury from contact with broken brush wires.
Wire brushes designed for grinder use are available in a variety of shapes, sizes, and wire types.
Unlike grinding wheels which are held in place with inner and flange washers, wire brushes
screw onto the spindle; for this grinder, wire brushes utilizing a 5/8 in.-11unc thread are
required. The flat brush styles must also be of a diameter and thickness which allows their use
with the guard in place.
To install the wire brush, unplug the tool and place it upside down allowing easy access to the
spindle. Remove any accessories on the spindle, then thread the wire brush onto the spindle and
tighten securely with an adjustable wrench while depressing the spindle lock.
Perform wire brush operations in a fashion similar to grinding as described in the previous
section. Tip the grinder from 5 to 15 degrees and allow the weight of the tool to remove material
as desired. Excessive pressure causes premature wire breakage and bending over of the wires.
Page is loading ...
Page is loading ...
Page is loading ...
Page is loading ...
Page is loading ...
Page is loading ...
Page is loading ...
Page is loading ...
Page is loading ...
Page is loading ...
Page is loading ...
Page is loading ...
Page is loading ...
-
 1
1
-
 2
2
-
 3
3
-
 4
4
-
 5
5
-
 6
6
-
 7
7
-
 8
8
-
 9
9
-
 10
10
-
 11
11
-
 12
12
-
 13
13
-
 14
14
-
 15
15
-
 16
16
-
 17
17
-
 18
18
-
 19
19
-
 20
20
-
 21
21
-
 22
22
-
 23
23
-
 24
24


Power Fist 8535072 Owner's manual
- Category
- Power tools
- Type
- Owner's manual
Ask a question and I''ll find the answer in the document
Finding information in a document is now easier with AI
in other languages
Related papers
-
Power Fist 8395907 Owner's manual
-
-
-
-
-
-
-
-
Power Fist 12 in. Electric Concrete Saw User manual
-
