Beyerdynamic Fox User manual

Category
Microphones
Type
User manual

This manual is also suitable for

Beyerdynamic Fox is a professional USB studio microphone with a cardioid pickup pattern, ensuring it only picks up sound in front of it. It features a headphone output and volume control, allowing you to monitor your recordings in real-time. With adjustable gain and mute functions, you can tailor the microphone's sensitivity and eliminate unwanted noise. Its versatility makes it suitable for various applications, including podcasting, streaming, gaming, and music production.

Beyerdynamic Fox is a professional USB studio microphone with a cardioid pickup pattern, ensuring it only picks up sound in front of it. It features a headphone output and volume control, allowing you to monitor your recordings in real-time. With adjustable gain and mute functions, you can tailor the microphone's sensitivity and eliminate unwanted noise. Its versatility makes it suitable for various applications, including podcasting, streaming, gaming, and music production.

FOX
PROFESSIONAL USB STUDIO MICROPHONE
PROFESSIONELLES USB STUDIOMIKROFON
USER MANUAL
BEDIENUNGSANLEITUNG
FOX – Professional USB studio microphone
3
English . . . . . . . . . . . . . . . . . . . . . . . . . . . . . . . . . . . . . . . . . . . . . . . . . . . . . . . . . . . . . . . . . . . 4
Deutsch . . . . . . . . . . . . . . . . . . . . . . . . . . . . . . . . . . . . . . . . . . . . . . . . . . . . . . . . . . . . . . . . . 12
FOX – Professional USB studio microphone
4
Maintenance
Use a so, damp cloth for cleaning the microphone. If necessary, you can use a
gentle cleansing agent (such as washing-up liquid). Make sure not to allow any
water to enter the transducer element and never use any solvent cleansers.
Service
Servicing mu be carried out by qualified service personnel only. Dismantling
the microphone yourself will invalidate the guarantee.
Disposal
This symbol on the product, in the inructions or on the packaging
means that your electrical and electronic equip- ment should be
disposed at the end of its life separately from your household wae.
There are separate collection syems for recycling in the EU. For
more information, please contact the local authority or your retailer
where you purchased the product.
FOX – Professional USB studio microphone
5
english
1. Controls
Headphone Volume
Monitor Mix
Headphone Output
Microphone Mute
Microphone Gain (Sensitivity)
USB Jack
Ring Mount
Desk Stand
Mix
Mute
Volume
Gain
lowhigh
FOX – Professional USB studio microphone
6
2. How to mount the microphone onto the desk and
Li the and adapter of the desk and.
Place the microphone so that the internal thread of the
microphone faces the thread of the screw.
Use a small screwdriver to turn and tighten the screw
clockwise into the microphone thread. .
Impoant:
When the microphone is mounted onto the desk and,
we recommend not to tilt the microphone more than 50°
to avoid raining the connector.
FOX – Professional USB studio microphone
7
english
3. How to mount the microphone on a and
Loosen the screw on the desk and (e.g. with a coin or a small screwdriver)
and remove the and adapter.
Use the thread of the and adapter to mount it onto a
and (3/8").
Attach the microphone to the and adapter with the
upper screw.
Stand adapter
FOX – Professional USB studio microphone
8
4. Application
Gain Sensitivity: In case you are
recording loud sources or positioned the
microphone close to you´re mouth,
switch to „Low“ Gain. Are you recording
quiet sources or from a diance, switch
to “High” Gain.
Monitor Mix: Turn the Mix Control to the
le if you only want to lien to your
computers signals. Fully turn it to the right
if you only want to lien to your own
recording signal. Mix both signal
seamlessly until they’re balanced for the
peect recording.
Mute: To mute the microphone signal,
press the „Mute“ button. The LED blinks as
long as the microphone is muted. The
headphone output works during it’s
muted.
Pick Up Direction: Due to the cardioid
pickup pattern, the microphone only
picks up sound in front of it, therefore
please only address the front side (Head-
phone Volume, Headphone Output, …).
Gain
lowhigh
Gain
lowhigh
5 cm
Gain
lowhigh
Gain
lowhigh
40 cm
FOX – Professional USB studio microphone
9
english
5. Use with PC / use FOX with Window
Use the supplied USB-C cable to connect the microphone to a PC.
The device driver will inall automatically.
A message will appear that the device is set up.
Aer a few seconds FOX is ready for use.
For more settings, open the “Sound Settings” menu (click with the right mouse
button onto the loudspeaker symbol) and select “Recorders”.
If the audio signal is not automatically recorded via FOX, select FOX as
default.
6. Use with a Mac® / FOX auf macOS® einrichten
Use the supplied USB-C cable to connect the microphone to a Mac®.
The device driver will inall automatically.
A message will appear that the device is set up.
Aer a few seconds FOX is ready for use.
For more settings, open the “Sound Settings” menu (click with the le mouse
button onto the loudspeaker symbol) and select “Sound”.
In the “Sound” menu you can select input and output devices. Select FOX.
7. Use with a smaphone
Use an appropriate adapter (not included in the delivery) to connect FOX to a
smaphone.
For USB devices Apple® provides an “Camera Adapter’ or “Camera
Connection Kit”.
Android® devices require an “OTG adapter” (On The Go).
Now you should be able to record with an app of your choice.
FOX – Professional USB studio microphone
10
Please note:
Not every smaphone is suitable for the use with a USB device.
Please check in advance whether your smaphone is compatible with USB
microphones.
8. How to adju the level
Set the microphone gain to “Low” when recording close up or very loud sound
sources. This will reduce the level by 20 dB in general.
Detailed level settings can be made in the “Sound settings” menu (Windows®)
or “Syem settings” (Mac®). Simply select FOX.
In the detailed overview (Windows and Mac) the level can be set separately.
A level setting also has an eect if “ASIO4ALL” is used.
9. Setting up FOX in a DAW
Attention: Windows® audio drivers are oen not compatible with DAWs (Digi-
tal Audio Workations).
When using FOX with a DAW, we recommend to download the “ASIO4ALL
driver at http://www.asio4all.org/.
Sta DAW.
Opent the input/output options (IO settings).
Here, you can create new inputs and outputs or define them.
Set up a mono channel for the input and select FOX.
Set up a ereo channel for the output and also select FOX.
FOX – Professional USB studio microphone
11
english
10. Trademarks
Apple®, Mac® and mac OS® are trademarks of Apple Inc. regiered in the USA
and other countries.
Windows® is a regiered trademark or trademark of Microso Corporation in
the United States and/or other countries.
Android™ is a trademark of Google LLC.
FOX – Professional USB studio microphone
12
Pflege
Zum Reinigen der Obeläche nehmen Sie ein feuchtes, weiches Tuch. Bei Beda
nnen Sie ein mildes Reinigungsmittel (z.B. Geschirrspülmittel) verwenden. Auf
keinen Fallsemittelhaltige Reiniger. Achten Sie darauf, dass kein Wasser in das
Mikrofon eindringt.
Service
Im Servicefall wenden Sie sich bitte an autorisiees Fachpersonal. Önen Sie
das Mikrofon auf keinen Fall selb, Sie könnten son alle Garantieansprüche
verlieren.
Entsorgung
Dieses Produkt da am Ende seiner Lebensdauer nicht über den
normalen Haushaltsabfall entsorgt werden, sondern muss an einem
Sammelpunkt r das Recycling von elektrischen und elektronischen
Geräten abgegeben werden. Das Symbol auf dem Produkt, der
Gebrauchsanweisung oder der Verpackung wei darauf hin.
FOX – Professional USB studio microphone
13
deutsch
1. Bedienelemente
Kopfhörer Lautärke
Monitor Mischregler
Kopfhörerausgang
Mikrofon ummschalten
Mikrofon Empfindlichkeit
USB Buchse
Stativ Adapter
Tischfuß
Mix
Mute
Volume
Gain
lowhigh
FOX – Professional USB studio microphone
14
2. Mikrofon auf Tischfuß befeigen
Stativadapter des Tischfußes aufklappen.
Mikrofon so hinlegen, dass das Innengewinde des
Mikrofons zum Gewinde der Schraube zeigt.
Schraube mit einem kleinen Schraubendreher im
Uhrzeigersinn in das Gewinde des Mikrofons drehen
und feziehen.
Wichtig:
Wenn das Mikrofon auf dem Tischfuß befeigt i, emp-
fehlen wir, das Mikrofon nicht weiter als 50° zu neigen, um
den Anschlussecker nicht zu rapazieren.
FOX – Professional USB studio microphone
15
deutsch
3. Mikrofon auf Stativ befeigen
Untere Schraube am Tischfuß lösen (z.B. mit einer Münze oder einem kleinen
Schraubendreher) und Stativadapter abnehmen.
Über das vorhandene Gewinde Stativadapter auf
einem Stativ (3/8") befeigen.
Mikrofon mit der oberen Schraube am Stativadapter
befeigen.
Stativadapter
FOX – Professional USB studio microphone
16
4. Bedienung
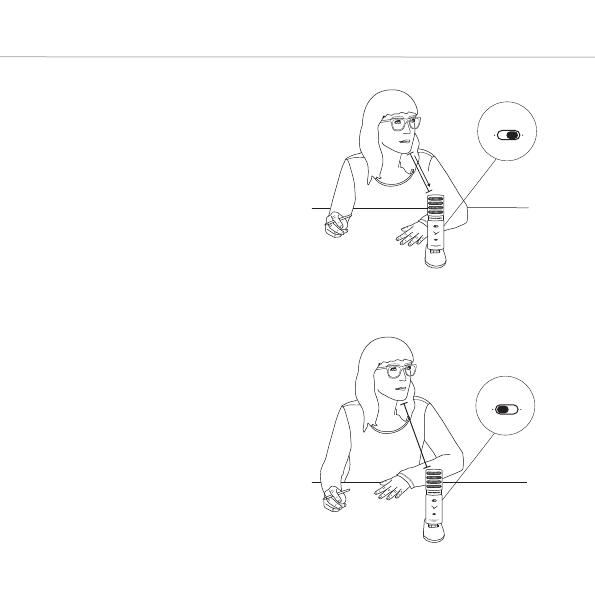
Empfindlichkeit: Falls Sie laute Schallquel-
len aufnehmen oder das Mikrofon nah be-
sprechen, schalten Sie auf “Low”. Nehmen
Sie leise Quellen auf oder besprechen Sie
das Mikrofon mit gßerem Aband,
schalten Sie aufHigh“.
Monitor Mix: Drehen Sie den „Mix“ Regler
nach links, wenn Sie nur das Signal von
Ihrem Computerren möchten. Drehen
Sie den Regler komplett nach rechts, wenn
Sie nur Ihr Aufnahmesignal hören möchten.
Mischen Sie beide Signale bis sie ausge-
wogenen sind für die peekte Aufnahme.
Stummschaltung: Um das Mikrofonsignal
umm zu schalten, drücken Sie den „Mute
Taer. Die LED blinkt solange das Mikrofon
umm geschaltet i. Der Kopfhöreraus-
gang funktionie weiterhin.
Einsprechrichtung: Durch die Nierencha-
rakteriik nimmt das Mikrofon nur Schall
von vorne auf, besprechen Sie es daher
nur auf der Vorderseite (Kopfhöreraus-
gang, Laufärkeregler,…)
Gain
lowhigh
Gain
lowhigh
5 cm
Gain
lowhigh
Gain
lowhigh
40 cm
FOX – Professional USB studio microphone
17
deutsch
5. Betrieb am PC / FOX auf Windows® einrichten
Mikrofon mit dem mitgeliefeen USB-C Kabel an einem PC anschließen.
Gerätetreiber inallie sich automatisch.
Benachrichtung erscheint, dass das Gerät eingerichtet wird.
FOX i nach wenigen Sekunden einsatzbereit.
Für weitere Einellungen das Menü „Soundeinellungen“ önen (Klick mit
rechter Mauae auf das Lautsprechersymbol) und „Aufnahmegeräte“ aus-
wählen.
Sollte das Audiosignal nicht automatisch über FOX aufgenommen werden,
FOX als Standard auswählen.
6. Betrieb am Mac® / FOX auf macOS® einrichten
Mikrofon mit dem mitgeliefeen USB-C Kabel an einem Mac® anschließen.
Gerätetreiber inallie sich automatisch.
Benachrichtung erscheint, dass das Gerät eingerichtet wird.
FOX i nach wenigen Sekunden einsatzbereit.
Für weitere Einellungen das Menü „Syemeinellungen“ önen und das
Menü „Ton“ auswählen.
Im Menü „Ton“ können Ein- und Ausgabegeräte ausgewählt werden. Hier FOX
auswählen.
7. Betrieb am Smaphone
FOX mit dem entsprechenden Adapter (nicht im Lieferumfang enthalten) an
ein Smaphone anschließen.
Apple® bietet für USB-Geräte den „Kamera-Adapter“ oderCamera Connec-
tion Kit“ an.
FOX – Professional USB studio microphone
18
Android™ Geräte benötigen einen „OTG-Adapter“ (On The Go).
Sie sollten jetzt in der Lage sein, mit einer App Ihrer Wahl aufzunehmen.
Bitte beachten Sie:
Nicht jedes Smaphone i für die Nutzung eines USB-Geräts ausgelegt.
Bitte informieren Sie sich im Voeld, ob ihr Smaphone mit USB-Mikrofonen
kompatibel i.
8. Pegel einellen
Bei Aufnahmen aus nächer Nähe oder sehr lauten Schallquellen, Mikrofon-
empfindlichkeit auf „Low“ einellen. Dies senkt den Pegel generell um 20 dB
ab.
Detailliee Pegeleinellungen können im Menü „Soundeinellungen“
(Windows®) bzw. „Syemeinellungen“ (Mac®) vorgenommen werden. Einfach
FOX auswählen.
In der Detailübersicht (Windows® und Mac®) kann der Pegel separat einge-
ellt werden.
Eine Pegeleinellung hat auch Auswirkungen, falls ASIO4ALL verwendet wird.
9. FOX in einer DAW einrichten
Achtung: Windows® Audio-Treiber sind o nicht mit DAWs (Digital Audio Work-
ations) kompatibel.
Für die Verwendung von FOX mit einer DAW empfehlen wir, den Treiber
„ASIO4ALL“ unter http://www.asio4all.org/ herunterzuladen.
DAW aen.
Input/Output Optionen (IO-Einellungen) aufrufen.
Hier können Eingänge und Ausgänge neu angelegt oder definie werden.
FOX – Professional USB studio microphone
19
deutsch
Für den Input einen Monokanal einrichten und FOX auswählen.
Für den Output einen Stereokanal einrichten und ebenfalls FOX auswählen.
10. Warenzeichen
Apple®, Mac® und mac OS® sind Warenzeichen der Apple Inc., die in den USA
und anderen Ländern eingetragen sind.
Windows® i eingetragenes Warenzeichen oder Warenzeichen der Microso
Corporation in den USA und/oder anderen Ländern.
Android™ i eine Marke von Google LLC.
www.beyerdynamic.com
beyerdynamic GmbH & Co. KG
Theresienraße 8 • 74072 Heilbronn • Germany
Phone +49 7131 617-300 • info@beyerdynamic.de
For fuher diributors worldwide, please go to www.beyerdynamic.com
Non-contractual illurations. Subject to change without notice.
Weitere Veriebspaner weltweit finden Sie im Internet unter www.beyerdynamic.com
Abbildungen nicht veragsbindend. Änderungen vorbehalten.
EN-DE 1 / FOX (03.19)
  • Page 1 1
  • Page 2 2
  • Page 3 3
  • Page 4 4
  • Page 5 5
  • Page 6 6
  • Page 7 7
  • Page 8 8
  • Page 9 9
  • Page 10 10
  • Page 11 11
  • Page 12 12
  • Page 13 13
  • Page 14 14
  • Page 15 15
  • Page 16 16
  • Page 17 17
  • Page 18 18
  • Page 19 19
  • Page 20 20

Beyerdynamic Fox User manual

Category
Microphones
Type
User manual
This manual is also suitable for

Beyerdynamic Fox is a professional USB studio microphone with a cardioid pickup pattern, ensuring it only picks up sound in front of it. It features a headphone output and volume control, allowing you to monitor your recordings in real-time. With adjustable gain and mute functions, you can tailor the microphone's sensitivity and eliminate unwanted noise. Its versatility makes it suitable for various applications, including podcasting, streaming, gaming, and music production.

Ask a question and I''ll find the answer in the document

Finding information in a document is now easier with AI

in other languages