3
1
2
4
16
17
8
9
10
11
12
14
15
18
13
5
19
20
21
6
7
ELECTRONIC LABELING SYSTEM
PT-1090
User’s Guide
/ Español/ Español
English
CONCEPTOS BÁSICOS
INTRODUCCIÓN
La PT-1090 le permite crear etiquetas para
cualquier aplicación. Seleccione entre los
diversos marcos, tamaños y estilos de
caracteres para crear etiquetas
personalizadas. Además, la diversidad de
cartuchos de cinta le permite imprimir
etiquetas de distintos anchos y colores.
Lea detenidamente esta guía antes de
empezar y manténgala a mano para
utilizarla como referencia en el futuro.
Los contenidos de esta guía y las
especificaciones de este producto están
sujetos a cambios sin previo aviso.
AVISO DE LA FCC
Este dispositivo cumple la parte 15 de las normas de la FCC. Su
funcionamiento está sujeto a las siguientes condiciones: (1) este
dispositivo no puede causar interferencias nocivas y (2) este dispositivo
debe aceptar todas las interferencias recibidas, incluidas aquellas que
puedan causar un funcionamiento no deseado.
Este equipo ha sido sometido a pruebas y se ha demostrado que
cumple los límites establecidos para un dispositivo digital de clase B, de
acuerdo con la parte 15 de las normas de la FCC. Estos límites están
diseñados para proporcionar una protección razonable frente a las
interferencias nocivas en una instalación doméstica. Este equipo
genera, utiliza y puede emitir energía de radiofrecuencia. Si no se
instala y se utiliza de acuerdo con las instrucciones, puede causar
interferencias nocivas a las comunicaciones por radio. No obstante, no
se garantiza que no vayan a producirse interferencias en una
instalación determinada. Si el equipo causa interferencias nocivas a la
recepción de radio o de televisión (esto puede determinarse apagando
y volviendo a encender el equipo), el usuario puede intentar corregir la
interferencia con alguna de las siguientes medidas:
• Cambie la orientación o la ubicación de la antena receptora.
• Aumente la distancia entre el equipo y el receptor.
• Conecte el equipo en un tomacorriente de un circuito distinto al que
está conectado el receptor.
• Consulte al distribuidor o a un técnico de radio/TV con experiencia.
Importante
• Los cambios o modificaciones que no estén expresamente
aprobados por Brother Industries, Ltd. podrían anular la autorización
del usuario para utilizar el equipo.
PRECAUCIONES DE SEGURIDAD
ADVERTENCIA
Siga estas pautas para evitar riesgo de
incendios, quemaduras, lesiones, descargas
eléctricas, rupturas, calor, olores extraños o
humo.
• Utilice siempre el voltaje especificado y el adaptador
de CA recomendado (AD-24ES) a fin de evitar daños o
averías.
• Desenchufe inmediatamente el cable de alimentación
eléctrica y no utilice la P-touch durante una tormenta
eléctrica.
•
No utilice la etiquetadora P-touch o el adaptador en
lugares donde haya mucha humedad, como en el baño.
No permita que se moje la P-touch, el adaptador de CA
ni el enchufe, por ejemplo al manipularlos con las
manos mojadas o al verter bebidas sobre ellos.
• No sobrecargue el cable de alimentación eléctrica. No
tuerza ni tire con fuerza del cable de alimentación. No
dañe ni coloque objetos pesados sobre el cable de
alimentación ni el enchufe.
• Cuando desconecte el cable de alimentación del
tomacorriente, sujete siempre el enchufe. No utilice un
tomacorriente flojo.
• No ingiera el tope del cortador.
• No desarme ni modifique la P-touch, el adaptador ni las
baterías. No use objetos metálicos, como pinzas o un
bolígrafo, al cambiar las baterías. No tire las baterías al
fuego ni las exponga al calor.
• Desconecte el adaptador, quite las baterías y deje de
utilizar la etiquetadora P-touch de inmediato si detecta
algún olor, calor, decoloración o deformación extraños
o algo inusual durante el uso o almacenamiento.
PRECAUCIÓN
Siga estas pautas para evitar lesiones
personales, escapes de la batería,
quemaduras y calor.
• No toque el borde del cortador ni ninguna pieza
metálica cerca del cabezal de impresión.
• Quite las baterías y desconecte el adaptador si no
piensa utilizar la P-touch durante un periodo de tiempo
largo.
• No use baterías nuevas y usadas al mismo tiempo, ni
mezcle baterías alcalinas con baterías de otro tipo.
• No deje caer ni golpee la P-touch ni el adaptador. No
ejerza presión sobre la pantalla LCD.
• No ponga los dedos entre las cubiertas cuando cierre
la cubierta del casete.
PRECAUCIONES GENERALES
• Dependiendo de la ubicación, el material y las
condiciones ambientales, la etiqueta podría no
despegarse o no poder quitarse, y el color de la
etiqueta podría cambiar o transferirse a otros objetos.
Antes de pegar la etiqueta, compruebe la condición
ambiental y el material.
• No utilice la etiquetadora de otra manera o para fines
distintos de los descritos en esta guía. Si lo hace, la
máquina podría sufrir accidentes o daños.
• Utilice solamente un paño suave y seco para limpiar la
etiquetadora; nunca utilice alcohol ni ningún otro
solvente orgánico.
• Utilice una toallita suave para limpiar el cabezal de
impresión; nunca toque el cabezal.
• No coloque ningún objeto extraño en la ranura de
salida de la cinta, en el adaptador, etc.
• No coloque la etiquetadora ni las baterías de forma que
queden expuestas a la luz solar directa o a la lluvia,
cerca de calentadores u otros focos de calor, ni en
ningún lugar expuesto a temperaturas
extremadamente altas o bajas (ej. el tablero o la parte
trasera de un automóvil), donde haya humedad
elevada o mucho polvo.
• No ejerza presión excesiva en la palanca del cortador
de cinta.
• No intente imprimir si el casete está vacío; esto dañará
el cabezal de impresión.
• No tire de la cinta durante la impresión o la
alimentación; esto dañará la cinta y la etiquetadora.
• Los datos almacenados en la memoria se perderán si
se produce una avería, se repara la etiquetadora o se
descarga la batería.
SOLUCIÓN DE PROBLEMAS
Mensaje de error Causa/Solución
¡Batería! Las baterías están a punto de descargarse. Reemplace
todas las baterías.
¡Inválido! -
Se seleccionó un número inválido para la longitud de la etiqueta.
¡Sin texto! - Intentó imprimir un archivo de texto cuando no había
datos almacenados en la memoria.
- Se presionó sin haber introducido texto.
-
Intentó seleccionar [Copias], [Vista previa] o [Cable] sin
haber introducido texto.
Límite línea
- Intentó introducir una tercera línea presionando .
Nota: Utilice cinta de 3/8" (9 mm) o 1/2" (12 mm) de
ancho para imprimir texto en dos líneas.
Error corte Usó la palanca del cortador de cinta a mitad de un
proceso de impresión.
Nota: No toque la palanca del cortador de cinta durante
la impresión.
¡Lleno!
Ya escribió el número máximo de caracteres (80 caracteres
para texto normal, 50 caracteres para DECO MODE).
Texto la r g .!
-
La longitud del texto supera la longitud de la etiqueta seleccionada.
-
La longitud del texto supera los 7,8" (200 mm) cuando la
"
Longitud
"
se ajusta como [Automático] en DECO MODE.
-Si se selecciona la longitud mínima de la etiqueta (1,2"/
30 mm), algunos tipos de marcos (Hoja o Estrella) no le
permitirán introducir más texto.
OK no marco? Los marcos no se pueden imprimir en una cinta de 9/64"
(3,5 mm).
Seleccione para imprimir sin marco o para cancelar.
OK aliment.?
Sale cinta después de imprimir cuando se selecciona
[Imp.cadena]. Consulte “Configurar margen (margen de la cinta)”.
Enfriar
Si el cabezal de impresión se recalienta, la etiquetadora dejará
de imprimir y automáticamente empezará a enfriarse.
Aparecerá el tiempo del proceso de enfriamiento. Cuando el
cabezal de impresión se enfríe, la impresión continuará
automáticamente. No toque la etiquetadora mientras se enfría.
¡Inserta 1/2" (12 mm)!
Sólo el casete de cinta de 1/2" (12 mm) está disponible para
DECO MODE.
¡Sin cinta! Introduzca un casete
.
Problema Solución posible
La pantalla aparece en blanco después
de encender la máquina.
-
Compruebe que las baterías estén correctamente introducidas.
- Si las baterías están bajas, reemplácelas.
-
Compruebe que el adaptador AD-24ES esté
correctamente conectado.
La máquina se apaga al tratar de imprimir. - Las baterías están bajas; reemplace todas las baterías.
-
Compruebe que las baterías estén correctamente introducidas.
Cuando la etiqueta se imprime, queda
demasiado margen a ambos lados del
texto.
Consulte "Configurar margen (margen de la cinta)" en
esta guía del usuario y seleccione [Mitad] o [Estrecho]
para que la etiqueta tenga márgenes más pequeños.
La máquina está “bloqueada” (es decir,
no responde al presionar ninguna tecla,
aunque esté encendida).
Consulte ‘Restablecimiento de la P-touch’.
Deben borrarse todos los ajustes de texto y
los formatos para crear una nueva etiqueta.
Presione y seleccione [Txt&Format].
La máquina no imprime o la impresión
sale borrosa.
- Compruebe que el casete de la cinta esté
correctamente introducido.
- Si el casete de cinta está vacío, reemplácelo.
- Compruebe que la cubierta del casete esté
correctamente cerrada.
El ajuste se ha borrado solo. - Las baterías pueden estar bajas; reemplácelas.
- Si se apaga el equipo durante más de dos minutos, se
perderán todo el texto y los formatos. También se
borrará la configuración de Idioma y Unidad.
La cinta no avanza correctamente o se
atasca en el interior de la etiquetadora.
Compruebe si el extremo de la cinta sale por debajo de
las guías de la cinta. La palanca del cortador se presiona
durante la impresión. No toque la palanca del cortador
de cinta durante la impresión.
Para cambiar el ajuste de idioma Consulte ‘AJUSTES INICIALES’.
Si tiene algún problema con el producto, no lo de-
vuelva a la tienda. Después de consultar la guía del
usuario, si todavía necesita ayuda, llame al Depar-
tamento de atención al cliente de Brother:
Voz: 1-877-BROTHER I Fax 1-901-379-1210
Sitio web: www.brother-usa.com
Si necesita encontrar un centro de servicios,
llame al 1-877-BROTHER o visite nuestro sitio web.
PREPARACIÓN
A : Cubierta del casete
B : Palanca del cortador de cinta
• Abra la cubierta del casete presionando en el área
que se indica arriba en el extremo superior de la
máquina.
A : Borde del cortador
B : Tope del cortador
C : Cabezal de impresión
• Introduzca seis baterías alcalinas AAA.
• Asegúrese de que los polos positivo y negativo
de las baterías estén en la posición correcta.
Nota: use solamente baterías nuevas.
A : Rueda dentada
• Asegúrese de que el extremo de la cinta pase
por debajo de las guías de la cinta.
•
Si la cinta del casete está suelta, haga girar con
el dedo la rueda dentada del casete en la
dirección que marca la flecha hasta que la cinta
quede tensa.
A : Ranura de salida de la cinta
• Introduzca un casete de cinta.
• Asegúrese de que quede colocado en su lugar.
• Cierre la cubierta del casete.
• Una vez instalada la cinta, aliméntela una vez
(consulte “Alimentación”) y presione la palanca
del cortador de cinta para cortarla.
Nota:
Utilice únicamente cintas Brother TZ con
esta máquina.
RESTABLECIMIENTO de LA P-TOUCH
Restablezca la P-touch si quiere inicializar
los ajustes o en el caso de que la
etiquetadora no esté funcionando
adecuadamente.
• Apague la etiquetadora.
• Presione y .
• Mientras mantiene presionado y
, presione una vez para
ENCENDER la etiquetadora.
• Suelte las teclas y .
Nota:
La etiquetadora se enciende con los
ajustes internos de fábrica.
Se borrarán todos los textos, ajustes y
archivos almacenados.
A
B
A
C
B
A
A
IMPRESIÓN DE ETIQUETAS
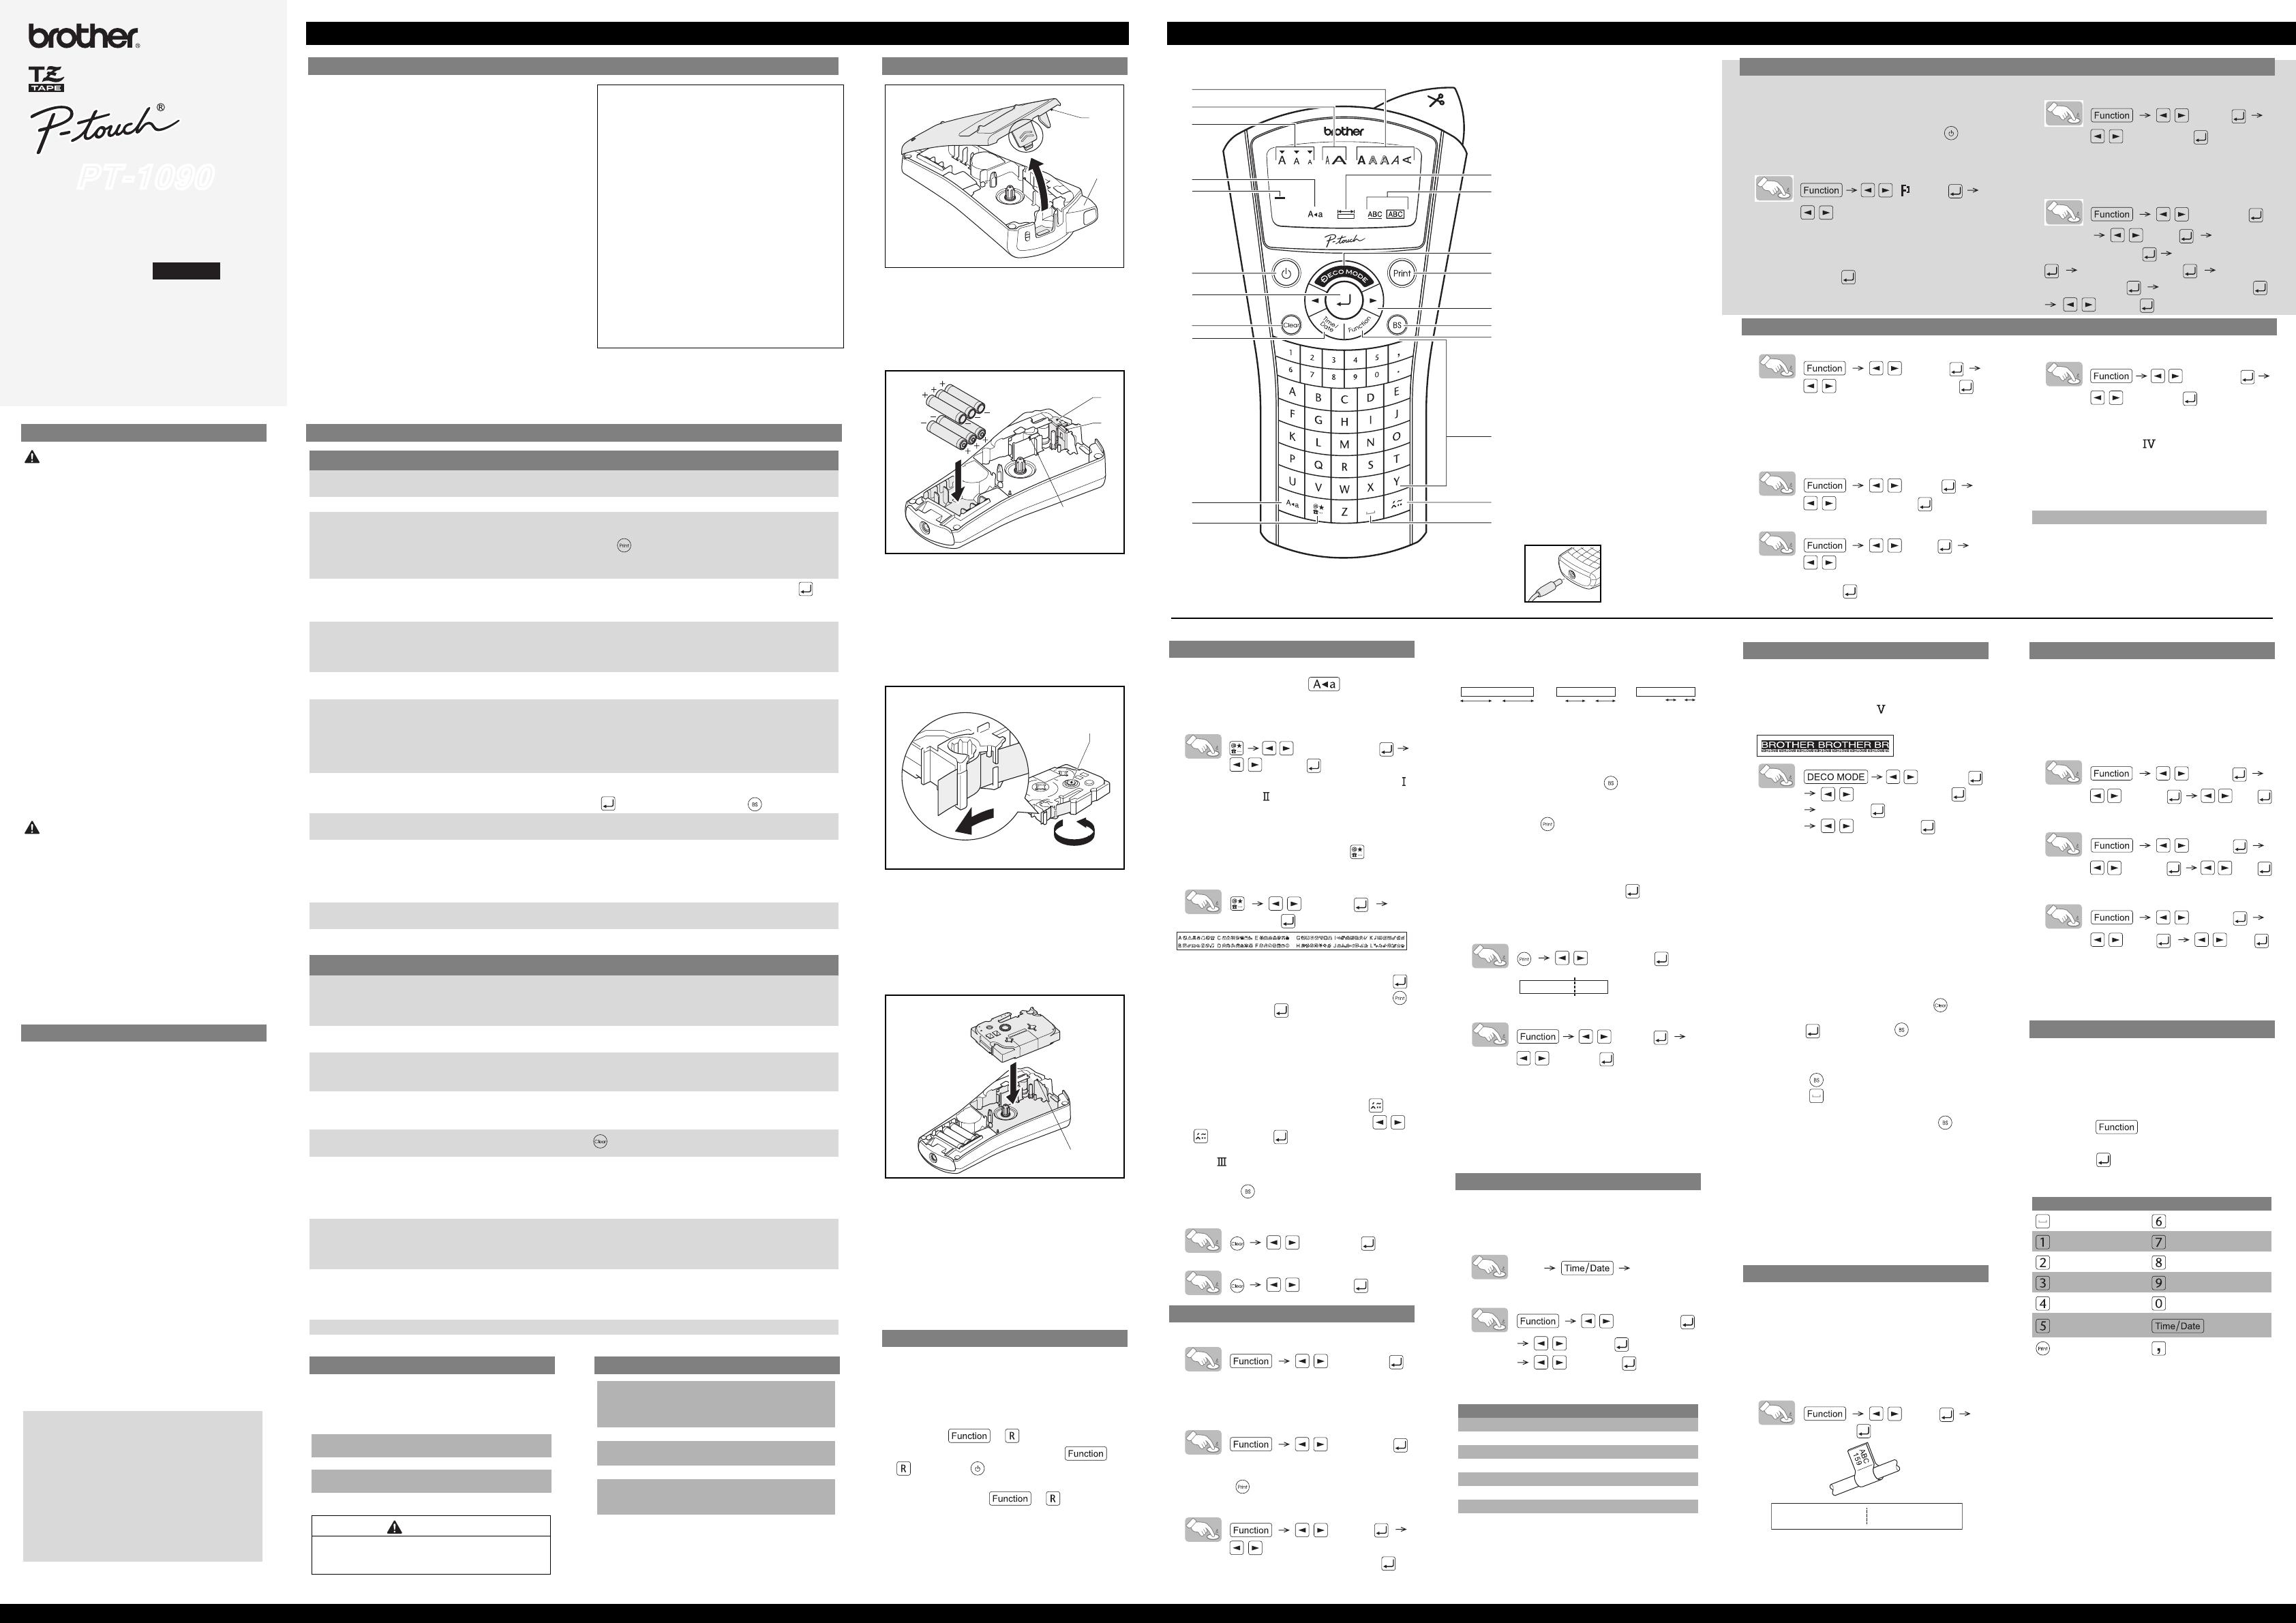
Pantalla
1. Mayúsculas
2. Cursor
3. Tamaño
4. Ancho
5. Estilo
6. Longitud de la etiqueta
7. Subrayado/Marco
Teclado
8. DECO MODE
9. Imprimir
10.Teclas del cursor
11.Retroceso (BS)/Cancelar
12.Función
13.Teclado alfabético
14.Acento
15.Espacio
16.Símbolo
17.Mayúsculas
18.Fecha/Hora
19.Borrar
20.Enter
21.Encendido/Apagado
Pantalla: 12 caracteres.
Búfer de texto: máximo de 80
caracteres.
Adaptador (opcional)
Se recomienda utilizar las baterías
junto con el adaptador (opcional) de
CA (AD-24ES) para proteger la
memoria.
AJUSTES INICIALES
1. Encienda la máquina.
• Suministre alimentación mediante las
baterías o el adaptador y presione .
2. Defina el idioma.
[ Idioma]
[English/Español/Français/Hrvatski/
Italiano/Magyar/Nederlands/Norsk/Polski/
Português/Română/Slovenski/Slovenský/
Suomi/Svenska/Türkçe/Čeština/Dansk/
Deutsch]
3.
Defina la unidad de medida: pulgadas o mm
[Unidad]
[pulgadas/mm]
4. Defina la fecha (MM/DD/AA) y la hora
(hh:mm)
Ejemplo: Definición de fecha y hora para el 21 de
noviembre de 2009, 10:30 AM.
[Hora Fecha]
[Reloj]
[MM/01/10] Ingrese “11” [11/DD/10] Ingrese “21”
[11/21/AA] Ingrese “09”
[hh:00] Ingrese “10” [10:mm] Ingrese “30”
[AM/PM]
CONFIGURACIÓN (DISEÑOS DE ETIQUETA)
Tamaño
[Tamaño]
[Grande/Mediano/Pequeño]
Además de este ajuste, el tamaño del texto se ajusta
automáticamente al ancho de la cinta. El tamaño real de
la impresión varía según el ancho de la cinta. El tamaño
real de la impresión varía según el ancho de la cinta.
Ancho
[Ancho]
[Normal/x 2/x 1/2]
Estilo
[Estilo]
[Normal/Negrita/Contorno/Sombra/
Cursiva/C+Negrita/ C+Contorno/ C+Sombra/
Vertical/]
Subrayado/Marco
[Subr/Marco]
[Subrayado]
Nota:
- Hay ocho tipos de marco disponibles.
Consulte la tabla ( ) en la hoja adjunta
para ver tipos de marcos (C).
- Los marcos no se pueden imprimir en una
cinta de 9/64" (3,5 mm).
1 Subrayado 3 Hoja 5 Estrella 7 Burbuja
2
Redondeado
4
Placa
6
Corazón
8 Flor
INTRODUCCIÓN DE TEXTO
Mayúsculas/Minúsculas
Mayúsculas/Minúsculas: está
ENCENDIDO/APAGADO.
Símbolos
-
Básico/Pictograma:
Para introducir símbolos.
[Básico/Pictograma]
[. , : ; " ' •]
•
Consulte la tabla de símbolos (Básico: /
Pictograma: ) en la hoja adjunta.
•
Pueden seleccionarse las filas de
símbolos (A a L) en la tabla de pictogramas
si se presiona el carácter correspondiente.
•
Para ir al siguiente grupo, presione (otra vez).
- Lista de impresión: Para imprimir todos
los símbolos de la tabla de pictogramas.
[Lista imp.]
[¿Imprimir?]
Texto de dos líneas
•
Introduzca el texto para la primera línea y presione .
•
Introduzca el texto para la segunda línea y presione
.
Nota: No presione después de la
segunda línea. De lo contrario,
aparecerá el mensaje de error "Límite
línea".
Nota:
Utilice cinta de 3/8" (9 mm) o 1/2" (12 mm)
de ancho para imprimir texto en dos líneas.
Caracteres con acento.
• Introduzca un carácter y presione .
• Escoja un carácter con acento con
o y presione . Para ver una lista de
los caracteres disponibles, consulte la
tabla ( ) en la hoja adjunta.
Borrar
Al presionar , los caracteres se borrarán
uno por uno.
• Borrar todo el texto y los ajustes
[Txt&Format]
• Borrar sólo texto
[Sólo texto]
IMPRESIÓN DE ETIQUETAS
Vista previa del texto
[Vista previa]
Nota: Puede obtenerse sólo una vista previa del
texto, no del tamaño, la tipografía o ninguna
característica adicional.
Alimentar (alimentar cinta)
[Alimentación]
Imprimir
• Presione .
Configurar margen (margen de la cinta)
[Margen]
[Lleno/Mitad/Estrecha/Imp.cadena]
- Lleno/Mitad/Estrecha:
Para dejar
márgenes iguales a ambos lados del texto.
- Impresión en cadena: Para crear
etiquetas con texto de varios estilos.
1. Cuando aparezca el mensaje "OK
aliment.?" después de haber impreso
la etiqueta, presione .
2. Borre el texto, introduzca el texto para
la siguiente etiqueta y a continuación
presione .
3. Repita los pasos 1 y 2 para cada
etiqueta adicional.
4.
Cuando aparezca el mensaje "OK
aliment.?" después de haber impreso la
última etiqueta, presione .
5. Después de que salga la cinta,
presione la palanca del cortador para
cortar la cadena de etiquetas.
[OK aliment.?]
Cómo hacer copias
[Copias]
[¿De 1-9?]
Puede imprimir hasta 9 copias de una
etiqueta.
Cuando quiera imprimir las mismas
etiquetas con el margen más estrecho,
ponga el margen en Estrecho.
HORA/FECHA
Puede imprimir la hora y la fecha con un toque
del botón. Hay ocho formatos disponibles.
Agregar Hora/Fecha
[abc_] [abc 11/21/09_ ]
Cómo seleccionar un formato
[Hora y Fecha]
[Formato]
[M/D/A hm]
Están disponibles los siguientes formatos.
Cambiar el ajuste del reloj
• Consulte AJUSTES INICIALES, paso 4.
Formato Noviembre 21 2009, 3:30 PM
M/D/A 11/21/09
M/D/A hm 11/21/09 03:30PM
D/M/A 21/11/09
D/M/A hm 21/11/09 03:30PM
D.M.A 21.11.09
D.M.A hm 21.11.09 03:30PM
A-M-D 09-11-21
A-M-D hm 09-11-21 03:30PM
[Lleno]
1” 1”
1/2” 1/2”
1/6” 1/6”
ABC ABC ABC::
[Mitad] [Estrecha]
ABC
ABC
DEF
DECO MODE
Esta función le permite crear etiquetas únicas
mediante plantillas incorporadas. Para ver una
lista de los diseños disponibles consulte la tabla
de formato DECO MODE ( ) en la hoja adjunta.
Ejemplo: (diseño/formato 10)
[Diseño 10]
[Automático/1,2”-7,8”]
BROTHER
[Imprimir/Salir]
•
Algunos diseños de la tabla tienen una tilde cerca
de ellos. Si se seleccionan, la máquina puede
dejar de imprimir automáticamente cuando el
cabezal de impresión se recalienta para permitir
que se enfríe. Aparecerá el tiempo del
enfriamiento. Cuando el cabezal de impresión se
enfría, la impresión continuará automáticamente.
•
Dependiendo del formato seleccionado, es posible
que no se imprima todo el contenido del texto.
• No se pueden cambiar los formatos de las
plantillas.
•
Los símbolos resaltados en la hoja adjunta
están disponibles en DECO MODE.
•
Para borrar todo el texto, presione .
Aparecerá "¿Borrar?".
Presione para borrar o para cancelar.
• Cuando acceda a DECO MODE, se le
recordará su texto impreso más reciente y
la longitud de la etiqueta.
• Presione para volver al paso anterior.
• Presione para que el modo “Longitud”
vuelva a [Automático].
•
Para salir de DECO MODE, presione hasta
que en la pantalla aparezca la pantalla de
ingreso de texto. Alternativa: seleccione [Salir]
en la pantalla de selección [Imprimir]/[Salir].
Nota:
La función DECO MODE sólo está disponible si se
utilizan casetes de cinta de 1/2" (12 mm) de ancho.
La longitud máxima de la etiqueta es de 7,8"
(200 mm) para DECO MODE. Cuando se
selecciona [Automático], la máquina ajusta
automáticamente la longitud para que el
texto aparezca en la etiqueta una vez.
ROTULADO DE CABLES
Para crear etiquetas similares a las de esta
imagen, siga los siguientes pasos: Introduzca
hasta 2 líneas de texto. Imprima la etiqueta y
envuélvala alrededor del cable. Siempre
utilice cinta Flexible de Identificación Brother
para este procedimiento.
Consulte el manual incluido con la cinta flexible
de identificación para ver las condiciones
recomendadas de uso.
[Cable]
[¿Imprimir?]
La longitud de la etiqueta y los ajustes del margen
se pondrán automáticamente en [Automático]
cuando se haga etiquetado de cables.
ABC
159
ABC
159
GUARDADO DE ETIQUETAS
Pueden guardarse hasta nueve etiquetas y
recuperarse para imprimirlas otro día.
También se puede editar y sobrescribir una
etiqueta almacenada.
Guardar
[Archivo]
[Guardar]
[1-9]
Imprimir
[Archivo]
[Imprimir]
[1-9]
Abrir
[Archivo]
[Abrir] [1-9]
Nota: Si intenta almacenar una etiqueta
cuando ya hay una con ese número,
aparecerá el mensaje "¿Sobrescribir.?".
ACCESO DIRECTO
Además de los pasos básicos para buscar
una función, la etiquetadora también le
brinda al usuario las teclas de acceso
directo, que facilitan el acceso a una función
de uso frecuente.
• Presione y a continuación la tecla
de acceso directo.
• Presione para confirmar.
Teclas de acceso directo y funciones
Tecla Función Tecla Función
Idioma Archivo
Tamaño Cable
Ancho
Vista previa
Estilo Alimentar
Subr/Marco Unidad
Longitud de
la etiqueta
Hora
Fecha
Copias Margen
ACCESORIOS
Si la hoja de la cuchilla pierde filo con el uso y la
cinta no se puede cortar correctamente, cambie la
unidad de corte (N.º de cat. TC-5) por otra nueva;
adquiérala de un distribuidor autorizado de Brother.
Casetes de cinta Consulte la ‘Supplies and
Accessories Guide’ adjunta.
Adaptador de CA AD-24ES
Unidad de
cortador
TC-5 (repuesto)
Casete de limpieza
TZ-CL3
PRECAUCIÓN
• No toque la hoja de la cuchilla directamente con los
dedos.
• No ingiera el tope del cortador.
ESPECIFICACIONES
Dimensiones
(ancho x
profundidad x
altura)
4,25" × 8,24" × 2,27"
(107,9 × 209,4 × 57,6 mm)
Peso Aprox. 0,69 lb (Aprox. 315 g)
Fuente de
alimentación
Seis baterías alcalinas AAA
(LR03)
Adaptador de CA Modelo AD-24ES
Casete de cinta Cinta Brother TZ (ancho)
9/64" (3,5 mm), 1/4" (6 mm),
3/8" (9 mm), 1/2" (12 mm)


