
Manual C300/C310...C340 English
Page 1 of 21
C300/C310-C340
Version V3 (01/2010)

Manual C300/C310...C340 English
Page 2 of 21
Contents
1
READ BEFORE OPERATING FOR THE FIRST TIME 4
2
C300/C310…C340 6
3
THE DISPLAY 8
4
OPERATION 9
5
THE UPPER MENU 11
6
THE LOWER MENU 12

Manual C300/C310...C340 English
Page 3 of 21
7
SINGLE-POINT CALIBRATION, C300 15
8
CALIBRATION, C310…C340 17
8.1 Z
ERO POINT CALIBRATION 17
8.2 G
RADIENT CALIBRATION 18
9
REPLACING BATTERIES 20
10
MAINTENANCE AND ADJUSTMENT 21

Manual C300/C310...C340 English
Page 4 of 21
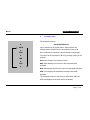
1 Read before operating for the first time
• The operating instructions should be read carefully before
the device is used and followed in every detail.
• Never take any measurements of electrically live
components
• Remain within the measuring ranges of the sensors
(overheating can lead to their destruction)
• Observe storage and transport requirements (protect the
device from direct sunlight)
• Carry out pressure equalisation only with appropriate
reference.
• When moved from one location to another with different
climatic conditions, the device needs an acclimatisation
period of several minutes.
• Technical data, storage and transport requirements can
be found on the data sheet.
• Warranty: Device, 12 months

Manual C300/C310...C340 English
Page 5 of 21
Appropriate use:
• The measuring device must only be operated within the
specified technical parameters.
• The measuring device can only be used for non-
corrosive gas, such as dry air and dry gases.
• The measuring device must only be used under the
conditions and for the purposes for which it was
designed.
• Operational safety can no longer be guaranteed in the
case of modifications or adaptations.

Manual C300/C310...C340 English
Page 6 of 21
C300
C310... C340
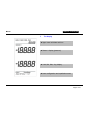
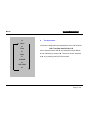
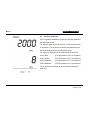
2 C300/C310…C340
The new Compact series of hand-held measuring devices for
the measurement of barometric pressure and differential
pressure is characterised by:
• a large display with background lighting
• simple operation by means of a thumb wheel
• a robust and attractively shaped housing
• high precision
• low price
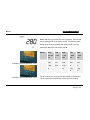
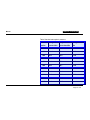
C300 C310 C320 C330 C340
Range 300...1100
hPa
+/- 500
Pa
0...100
mbar
0…2000
mbar
0…5000
mbar
Absolute
pressure
Differential
pressure
Differential
pressure
Differential
pressure
Differential
pressure
Table: Measuring ranges of the different models

Manual C300/C310...C340 English
Page 7 of 21
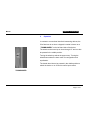
The differential pressure models C310…C340 are equipped
with two pressure ports (P1 and P2):
In the case of C310 models, the higher pressure is
connected to P1. For all the other models, the higher
pressure must be connected to P2.
Please also observe the maximum overload on ports P1
and P2. Higher pressures may damage or destroy the
sensor.

Manual C300/C310...C340 English
Page 8 of 21
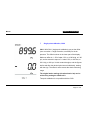
3 The display
◄ Upper menu with date and time
◄ Sensor 1 display (pressure)
◄ Hold, Min, Max, Avg. display
◄ Lower configuration and equalisation menu

Manual C300/C310...C340 English
Page 9 of 21
THUMB-WHEEL
4 Operation
In contrast to conventional hand-held measuring devices, the
C3x0 devices do not have a keypad, but what is known as a
"THUMB-WHEEL" on the left-hand side of the device.
The wheel can be turned up or down through 15° and can also
be pressed in the middle position.
Turning the wheel up selects the upper menu. Turning the
wheel down selects the lower menu for configuration and
equalisation.
The thumb-wheel has to be pressed in the middle position to
switch the device on or off and to confirm input values.

Manual C300/C310...C340 English
Page 10 of 21
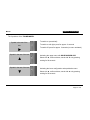
The 3 positions of the THUMB-WHEEL
To switch on: press briefly
To switch on with light: press for approx. 2 seconds
To switch off: press for approx. 2 seconds (no menu activated)
Activating the upper menu with HOLD MAX MIN AVG.
Select with ▲, confirm with ►, cancel with ▼ or by pressing
nothing for 20 seconds.
Activating the lower configuration and equalisation menu
Select with ▲, confirm with ►, cancel with ▲ or by pressing
nothing for 20 seconds.
Symbol in the rest of the
text
►
Symbol in the rest of the text
▲
Symbol in the rest of the text
▼

Manual C300/C310...C340 English
Page 11 of 21
5 The upper menu
The standard functions:
HOLD MAX MIN AVG
can be selected in the uppper menu. Select with ▲, the
selected function flashes and is confirmed by means of ►.
Once confirmed, the function is shown steady on the display.
The menu can be cancelled by ▼ or by pressing nothing for 20
seconds.
Hold: Hold "freezes" the measured value.
MAX: MAX displays the maximum value recorded while
activated.
MIN: MIN displays the minimum value recorded while activated.
AVG: AVG displays the arithmetical average value while
activated.
The measured values for the functions Hold, MAX, MIN and
AVG are displayed in the lower half of the display.
▲
HOLD
▲
MAX
▲
MIN
▲
AVG
▲

Manual C300/C310...C340 English
Page 12 of 21
6 The lower menu
In the lower configuration and equalisation menu, the functions:
Unit1 Time Date AutoOff CAL 1LH
can be selected. Select with ▼, the selected function flashes
and is confirmed by means of ►. The menu can be cancelled
by ▲ or by pressing nothing for 20 seconds.
▼
Unit 1
▼
Time
▼
Date
▼
AutoOff
▼
CAL 12LH
▼

Manual C300/C310...C340 English
Page 13 of 21
Illustration: Housing pressure, C300
Illustration: Housing pressure, C310
Unit1: With Unit1 you select the unit of pressure. The unit that
can be set depends on the device model. The following table
shows which units are possible with which model. You can
select with ▲ and ▼, and confirm with ►.
Model C300
300..1100
hPa
C310
+/- 500
Pa
C320
0…100
mbar
C330
0…2000
mbar
C340
0…5000
mbar
Units hPa,
mbar,
In.Hg
psi
Pa
hPa
mbar
hPa
mbar
in.Hg
psi
hPa
mbar
bar
in.Hg
psi
hPa
mbar
bar
in.Hg
psi
The units mbar, bar, in.Hg and psi are printed on the housing.
The unit selected is indicated by means of arrow symbols.

Manual C300/C310...C340 English
Page 14 of 21
Time: Time is used to set the time. Hours and minutes are one
after another. Select by means of
▲ and ▼; and confirm with ►.
Date: Date is used to set the date. Day, month end year are
entered one after another. Select by means of
▲ and ▼; and confirm with ►.
AutoOff: AutoOff is used to set the period in minutes for
automatic switching off. If OFF (<1) is set, the device will not
switch off automatically. Select by means of
▲ and ▼; and confirm with ►.

Manual C300/C310...C340 English
Page 15 of 21
7 Single-point calibration, C300
CAL1: With CAL1 (single-point calibration) you set the offset
(error correction + height correction, see table) for the air
pressure. The offset is shown in the lower part of the display.
Maximum offset is +/- 250.0 mbar / hPa, or 10.00 inHg, or 5.00
psi, and be entered in steps of 0.1 mbar / hPa, or 0.01 bar, or
0.01 inHg, or 0.01 psi. In this context the signs, and the figures
before and after the decimal point are set individually, starting
with the sign. The offset is active across the whole measuring
range.
The original works settings (elevation head = 0m) can be
achieved by setting the offset to 0.0.
Two-point calibration is not possible with the C300.

Manual C300/C310...C340 English
Page 16 of 21
Table: Standard atmospheric pressure
Elevation
head/m
Average air
pressure/hPa
Height
correction/hPa
Change/m
hPa
0 1013.25 0 0.120
100 1001.3 12 0.118
200 989.5 23.8 0.118
300 977.7 35.6 0.116
400 966.1 47.2 0.115
500 954.6 58.7 0.114
600 943.2 70.1 0.113
700 931.9 81.4 0.111
800 920.8 92.5 0.111
900 909.7 103.6 0.109
1000 898.8 114.5

Manual C300/C310...C340 English
Page 17 of 21
8 Calibration, C310…C340
8.1 Zero point calibration
CAL1 L: CAL1 L (zero point calibration) is used to adjust the
zero point of the differential sensor. To do this, please remove
the connecting hoses from pressure ports P1 and P2.
Select the CAL1 L menu with ▼,
and confirm with ►.
Then the value 0.0 is displayed (+/- 1 digit).

Manual C300/C310...C340 English
Page 18 of 21
8.2 Gradient calibration
CAL1 H (gradient calibration) is used to adjust the gradient of
the differential sensor.
The adjusted value should be over 50 % of the terminal value
of the sensor. The values are entered at the calibration point
not as absolute values but as differential values.
The maximum difference at the calibration point is for the
C310: 50Pa (P1=high pressure, P2= low pressure)
C320: 10mbar (P2=high pressure, P1= low pressure)
C330: 2000mbar (P2=high pressure, P1= low pressure)
C340: 5000mbar (P2=high pressure, P1= low pressure)
The original works settings can be achieved by setting the
offset to 0.

Manual C300/C310...C340 English
Page 19 of 21
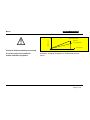
Important: Gradient calibrations must only
be carried out by trained staff with
suitable calibration equipment.
Illustration: Changing the gradient on a differential pressure
sensor
Measured value
Displayed value
Original works calibration
Offset input
New characteristic line

Manual C300/C310...C340 English
Page 20 of 21
Open battery compartment of a C3x0
9 Replacing batteries
When the message BAT appears on the display you have a
few hours of battery life left. Open the battery cover on the back
of the device. Remove the discharged batteries and replace
them with new ones.
Please use only IEC LR6 AA batteries.
Do not use rechargeable batteries!
When inserting the batteries please ensure that they are the
right way round, and use only high-quality batteries.
Page is loading ...
-
 1
1
-
 2
2
-
 3
3
-
 4
4
-
 5
5
-
 6
6
-
 7
7
-
 8
8
-
 9
9
-
 10
10
-
 11
11
-
 12
12
-
 13
13
-
 14
14
-
 15
15
-
 16
16
-
 17
17
-
 18
18
-
 19
19
-
 20
20
-
 21
21


Lufft C340 Operating Instructions Manual
- Type
- Operating Instructions Manual
Ask a question and I''ll find the answer in the document
Finding information in a document is now easier with AI
Other documents
-
ZTE C310 Hard reset manual
-
Garmin StreetPilot StreetPilot® c340 Owner's manual
-
NAD C340 User manual
-
Garmin StreetPilot c330 User manual
-
Garmin StreetPilot® c310 User manual
-
-
Garmin StreetPilot C330 User manual
-
 Waste King Cool Water User manual
-
-
Garmin StreetPilot® c320 User guide
