Page is loading ...

EN1888 from birth – 20kg
HE / HR / EN
CYBEX ONYX/TOPAZ
USER GUIDE
CYBEX Industrial Ltd.
1/F. Sunning Plaza | 10 Hysan Avenue | Hong Kong
/ www.cybex-online.com
CY 170-0023-F0811
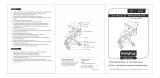
II.-II a) II.-II b) II.-II b) II.-II c) Delivery Status
1. a)
2. 2. 3. 3. 4. 4.
1. a) 1. b) 1. c) 1. c) 2. 2.
5. 4. 4.

1
PUNO HVALA ZA KUPNJU CYBEX ONYX/TOPAZ.OVAJ PROIZVOD NAMIJENJEN JE ZA DJECU OD ROĐENJA DO CCA 20KG. OVAJ PROIZVOD
NAMIJENJEN JE ZA SAMO JEDNO DIJETE. KOLICA SU OPREMLJENA KUPOLOM-SVE KARAKTERISTIKE OPISANE SU U UPUTSTVIMA. U RAZVOJU
CYBEX ONYX/TOPAZ-A NAŠ GLAVNI INTERES BIO JE SIGURNOST, UDOBNOST I LAKO UPRAVLJANJE. PROIZVOD JE RAZVIJEN UZ STROGU
KONTROLU KVALITETE I UDOVOLJAVA SVIM RELEVANTNIM SIGURNOSNIM STANDARDIMA. UKOLIKO IMATE BILO KAKVIH PITANJA SLOBODNO
NAS KONTAKTIRAJTE U BILO KOJEM TRENUTKU.
Pažljivo pročitajte ova uputstva prije korištenja i sačuvajte ih za buduću upotrebu.Ne slijedite li ove upute sigurnost Vašeg djeteta može
biti ugrožena.
Dragi kupci
THANK YOU VERY MUCH FOR PURCHASING THE CYBEX ONYX/TOPAZ. THIS PRODUCT IS A STROLLER FOR CHILDREN SUITABLE FROM BIRTH
AND UP TO 20 KG. IT IS SUITABLE FOR ONE CHILD ONLY. THE STROLLER IS EQUIPPED WITH A HOOD – ALL FEATURES ARE EXPLAINED IN THE
INSTRUCTIONS. IN DEVELOPING THE CYBEX ONYX/TOPAZ WE CAN ASSURE YOU THAT OUR MAIN FOCUS WAS BOTH SAFETY, COMFORT AND
EASY OPERATION. THE PRODUCT HAS BEEN DEVELOPED UNDER STRICT QUALITY CONTROL AND MEETS ALL RELEVANT SAFETY STANDARDS.
SHOULD YOU HAVE ANY QUESTIONS, PLEASE FEEL FREE TO CONTACT US AT ANY TIME.
Read these instructions carefully before use and keep them for future reference. Your child‘s safety may be affected if you do not follow
these instructions.
Dear Customer

2
3
3.............................................................................................................................................
3.............................................................................................................................................
2.............................................................................................................................................
2.............................................................................................................................................
2.............................................................................................................................................
2.............................................................................................................................................
2.............................................................................................................................................
2.............................................................................................................................................
2.............................................................................................................................................
2.............................................................................................................................................
2.............................................................................................................................................
2.............................................................................................................................................
2.............................................................................................................................................
2.............................................................................................................................................
5.............................................................................................................................................
5.............................................................................................................................................
5.............................................................................................................................................
5.............................................................................................................................................
5.............................................................................................................................................
5.............................................................................................................................................
5.............................................................................................................................................
5.............................................................................................................................................
5.............................................................................................................................................

4
5

6
7
HR SADRŽAJ
I. Opći podaci i sigurnost ..................................................................6
II. Upute za održavanje i servisiranje .................................................7
III. Uputstva za upotrebu .....................................................................7
1. Rasklapanje kolica radi sastavljanja .......................................................... 7
2. Sastavljanje ručki .......................................................................................... 7
3. Sastavljanje prednjih kotača ...................................................................... 8
4. Sastavljanje stražnjih kotača ....................................................................... 8
5. Postavljanje odbojnika ................................................................................. 8
6. Sklapanje kolica ........................................................................................... 8
7. Rasklapanje kolica ....................................................................................... 8
8. Korištenje kočnica ........................................................................................ 8
9. Automatsko zaključavanje rotiranja prednjih kotača .............................. 8
10. Kupola ........................................................................................................... 8
11. Korištenje sustava sigurnosnih pojasa ........................................................ 8
12. Podešavanje pojaseva za novorođenčad ............................................... 8
13. Uklanjanje zaštite za glavu i ramena (Topaz) ............................................ 8
14. Uklanjanje presvlake sjedala ...................................................................... 9
15. Podešavanje naslona za noge ................................................................... 9
16. Spuštanje naslona za leđa .......................................................................... 9
17. Prenošenje kolica ......................................................................................... 9
18. Pričvršćivanje zaštite za kišu (opcionalno) ................................................. 9
19. Garancija ...................................................................................................... 9
20. Uputstva za održavanje ............................................................................... 9
SERVIS
Općenito, Cybex kolica će funkcionirati bez ikakvih problema. Suha i / ili prašnjava
okolina može imati negativan utjecaj na sustavima kotača. Kako biste ovo izbjegli
vrlo je važno da sustavi kotača budu redovito provjeravani, očišćeni i podmazani.
Ovo će osigurati nesmetano funkcioniranje kolica u svakodnevnoj uporabi.
Molimo slijedite upute u nastavku za održavanje sustava kotača (osovina kotača
i sustav ovjesa).
II.-I Provjerite sustav kotača
a) sustav kotača mora biti očišćen prije primjene maziva
b) Sustav kotača ne smije biti slomljen ili oštećen Za uklanjanje zvuka škripanja
koristite samo WD 40 i slijedite navedene slike u nastavku. Nemojte koristiti bilo
koje druge vrste maziva! Kako se ne bi ostavljale mrlje ulja uvijek umetnite krpu
ili karton. Molimo vas da obratite posebnu pozornost da ne koristite maziva na
bilo kojem drugom dijelu kolica (tkanine, cijevi, itd.).
II.-II Primjena maziva
a) stražnji kotač - Poprskajte sprej sa stražnje strane kolica u prostor između ruba i
kućišta na obje strane. Neka mazivo djeluje cca. 10 sekundi, a zatim okrenite
kotače.
b) prednji kotač - poprskajte sprej u prostor između ruba i kućišta na obje strane.
Neka mazivo djeluje cca. 10 sekundi, a zatim okrenite kotače. Ukoliko to ne
spriječi škripanje, uklonite poklopac i primijenite sprej na osovinu.
c) Ovjes - Nanesite malo maziva između ovjesa i kućišta klizača.
ODLAGANJE
Kada se gotovi sa korištenjem CYBEX ONYX, vrlo je važno pravilno odlaganje.
Odlaganje otpada mogu biti različita u različitim zemljama. Molimo kontaktirajte
Vašu lokalnu kompaniju koja se bavi djelatnosti odlaganja otpada.Uvijek poštujte
propise o odlaganju otpada Vaše zemlje.
III. UPUTE ZA KORIŠTENJE
VAŽNO: PAŽLJIVO PROČITAJTE OVE UPUTE PRIJE UPOTREBE I SAČUVAJTE IH ZA
BUDUĆE POTREBE. SIGURNOST VAŠE DJECE MOŽE BITI UGROŽENA AKO NE SLIJEDITE
OVE UPUTE. MOLIMO DA OTVORITE STRANICE SA SLIKAMA KOJE SE NALAZE NA
POČETKU OVOG PRIRUČNIKA, A ZATIM SE KONZULTIRAJTE S UPUTAMA.
ONYX UPUTE ZA SASTAVLJANJE
ISPORUKA
1. RASKLAPANJE KOLICA
a) Oslobodite polugu za rasklapanje.
b) Rasklopite kolica.
c) Pritisnite dolje tipku pedale dok mehanizam nije pravilno aktiviran.
2. SASTAVLJANJE RUČKI
PAŽNJA: KONEKTORI NA OBJE STRANE MORAJU BITI AKTIVIRANI.
I. OPĆI PODACI I SIGURNOST
UPOZORENJE: MOŽE BITI OPASNO OSTAVITI VAŠE DIJETE BEZ NADZORA.
Sigurnost Vašeg djeteta je Vaša odgovornost. Uvijek koristite sustav sigurnosnih
pojaseva kako bi spriječili ispadanje ili klizanje Vašeg djeteta iz kolica.
Ova kolica namijenjena su transportu samo jednog djeteta. Pažljivo slijedite sva
uputstva kako bi izbjegli nepravilno korištenje i neispravno funkcioniranje kolica.
OVA KOLICA NAMIJENJENA SU DJECI DO 20 kg (NOSIVOST DO 22,5 KG )
Korištenje ovih kolica za djecu težu od 20 kg rezultirat će pretjeranim trošenjem i
oštećenjima kolica.
UPOZORENJE: UVIJEK KORISTITE POJAS NA PREPONAMA U KOMBINACIJI SA
POJASOM NA STRUKU.
Sustav sigurnosnih pojaseva mora uvijek biti pravilno pričvršćen i podešen. Ako
sustav nije pravilno podešen, prema ovim uputama, stabilnost kolica biti će
ugrožena.
UPOZORENJE: KORISTITE SUSTAV SIGURNOSNIH POJASEVA ČIM DIJETE MOŽE SJEDITI
BEZ POMOĆI.
Sustav sigurnosnih pojaseva ne može zamijeniti stalni nadzora od strane odraslih.
UPOZORENJE: OVAJ PROIZVOD NIJE POGODAN ZA TRČANJE ILI ROLANJE.
– Za pričvršćenje dodatnih sigurnosnih pojaseva iz sigurnosnih razloga priloženi
su „D“ prstenovi (prema EN13210 ili BS6684) .
– Dijete treba biti udaljeno od bilo kakvih pokretnih dijelova, pogotovo dok
izvodite prilagodbe. Spriječite djecu da hvataju kolica dok ih sklapate ili
rasklapate,jer na taj način mogu ozlijediti prste djeteta.
UPOZORENJE: BILO KAKAV TERET OKAČEN NA RUČKE UTJEČE NA STABILNOST
KOLICA.
Nemojte voziti više od jednog djeteta, ne vješajte vrećice na drške upravljača i
ne prevozite vrećice u kolicima, osim u za to predviđenoj košari. Maksimalno
opterećenje košare je 2 kg. Inače kolica mogu postati nestabilna. Preopterećenje
također može oštetiti kolica. Maksimalno opterećenje košare na kupoli 0,5 kg.
– Štete nastale korištenjem dodatne opreme koju nije odobrio Cybex, kao što je
kabanica, kukice za torbe i sl, neće biti pokrivene uvjetima jamstva.
– Opasno je korištenje zamjenskih dijelova koji nisu odobreni od strane Cybexa.
– Prije uporabe kolica, uvijek provjerite je li pribor dobro osiguran.
– Osigurajte da su kolica uvijek zakočena prije nego stavite dijete u kolica.
– Nikada ne podižite kolica s djetetom, nikada se ne penjite ili spuštajte
stepenicama ili pokretnim stepenicama s djetetom unutra ili kada koristite
druge oblike prijevoza.
– Pri otvaranju i zatvaranju kolica, ne koriste pretjeranu silu, jer nepravilno
sklapanje može oštetiti ili slomiti kolica. Provjerite u uputama za uporabu ako je
potrebno.
– Vozite pažljivo preko rubnika i šljunčanim cestama. Ponovljeni udarci mogu
oštetiti kolica.
– Pobrinite se da dijete ne koristi oslonac za noge za stajanje.
– Ne izlažite kolica izvorima umjetne topline ili izravnog sunčevog svjetla.
II. Upute za održavanje i servisiranje
– Korisnik je odgovoran za redovito održavanje kolica. Svi spojni dijelovi i
zakovice moraju biti pravilno stegnuti i osigurani. Posebno je važno osigurati
da se mehanizam za zaključavanje i rotirajući mehanizam tretira redovito
s Tefl on sprejem (suho podmazivanje). Važno je da kočnice, kotači i gume
nisu oštećeni za vrijeme korištenja. Pregledavajte ih redovito, te popravite ili
zamijenite ako je potrebno. Prestate koristiti bilo koji proizvod koji se ne čini
dovoljno čvrstim.
– Nemojte raditi bilo kakve izmjene na proizvodu. Ako imate bilo kakvih pritužbi ili
problema, obratite se svom dobavljaču ili uvozniku.
– Redovni servis bi trebalo obaviti svakih 12 mjeseci.
– Također možete tretirati i druge pokretne dijelove s Tefl on sprejem (suho
podmazivanje). Nakon što je prskanje tefl onom završeno, obrišite proizvod s
mekom krpom.
– Koristite samo originalne CYBEX zamjenske dijelove. Korištenje neoriginalnih
zamijenskih dijelova može biti opasno.
– Cijevi okvira sa mehanizmom za zaključavanje i rotiranje također treba
redovito čistiti i poprskati. Ovim ćete osigurati korištenje Vaših kolica bez ikakvih
problema.
ČIŠĆENJE
– Nemojte koristiti abrazivna sredstva za čišćenje okvira! Koristite vlažnu krpu i
blagi deterdžent i dobro osušite.
– Ako su kolica bila izložena slanoj vodi, molimo vas da ih što prije isperete
slatkom vodom.
– Presvlake se mogu ručno prati blagim deterdžentom (ne toplije od 30 ° C).
– Pogledajte ušivenu etiketu za održavanje za detalje. Nemojte koristiti stroj za
pranje ili sušenje rublja. Temeljito osušite prije ponovne upotrebe.
– Svi CYBEX materijali su testirani, ali kad su kolica vrlo mokra, voda može prodrijeti
obloge kroz dno rubova i šavova i ostaviti mrlje na presvlakama. Savjetujemo
vam da koristite zaštitu od kiše kako bi se to izbjeglo. Također nemojte sklapati
ili pohraniti proizvod dok je mokar. Ako se kolica smoče, ostavite ih da se osuše
s produženom kupolom. Nikada ih ne spremajte u vlažnoj okolini jer to može
uzrokovati pojavu plijesni.
Napomena! Molimo oprati presvlake odvojeno prije prve upotrebe. Ne koristiti
sušilicu i ne izlagati izravnom suncu!
NE PEGLATI! OVAJ PROIZVOD JE ODOBREN JE U SKLADU S EN 1888:2003 + A1/A2/
A3: 2005 STANDARDU.

8
9
– Ležeća pozicija: Stavite stražnji zaklopac preko naslona sjedišta i pričvrstite ga s
dva čička.
– Kupola je podesiva na različite pozicije.
Kupola s mogućnošću razvlačenja:Kupola ima mogućnost potpunog
razvlačenja, kako bi se sjedište kolica moglo natkriti u potpunosti. Jednostavno
povucite prednji dio kupole na željenu poziciju. Visina se lako može podesiti
jednostavnim povlačenjem gore ili dolje duž okvira. Cijela se kupola također
može nagnuti prema naprijed.
Za maksimalnu pokrivenost, raspakirajte dodatni
panel na vrhu kupole i povucite ga prema naprijed.
– Pokrov kupole na stražnjem dijelu kolica se, u slučaju potrebe, može smotati i
učvrstiti „čičkom“.
11. KORIŠTENJE SUSTAVA SIGURNOSNIH POJASEVA
a) za učvrstiti pojas umetnite lijevi i desni konektor u središnju kopču sigurnosnog
pojasa.
b) Za stezanje remena povucite traku na prednjoj strani središnje kopče.
c) Za oslobađanje sustava pojasa pritisnite tipku za otpuštanje koja se nalazi na
sjedalu ispred kopče dok istovremeno povlačite ramene pojase.
d) Za oslobađanje konektora pritisnite tipke na lijevoj i desnoj strani središnje
kopče.
e) Podesite duljinu remena s odgovarajućim klizačem.
UPOZORENJE: UVIJEK KORISTITE POJAS NA PREPONAMA U KOMBINACIJI SA
POJASOM NA STRUKU.
12 . PODEŠAVANJE POJASEVA ZA NOVOROĐENČAD
a) Otpustite petlje na kraju pojasa na ramenu od trokuta koji se nalazi na dnu
naslona ispod sjedala.
b) Potpuno izvucite trake pojasa na ramenu iz rupe u naslonu.
c) Provucite trake ramena kroz dvije rupe na dnu. Pobrinite se da provučete trake
natrag kroz rupe u mehanizmu naslona i ponovno ih pričvrstite na trokut.
d) Kako biste podesili duljinu pojasa na ramenu za novorođenčad pričvrstite
unutarnju petlju na kraju pojasa na ramenu na trokutasti prsten. Prebacite se
natrag na gornje rupe čim pojasevi na ramenu više ne pristaju preko djetetovih
ramena.
13. UKLANJANJE ZAŠTITE ZA GLAVU I RAMENA (TOPAZ)
Izvadite zaštitu za glavu čim ona više ne pristaje preko ramena djeteta.
a) Uklonite „čičke“ štitnika za glavu na vrhu lijeve i desne strane na poleđini
sjedala.
b) Oslobodite petlje na kraju ramenih pojasa od trokuta u sustavu pojasa, koji se
nalazi na dnu naslona ispod sjedala.
c) Potpuno izvucite ramene pojaseve iz rupe u naslonu.
d) Provucite ramene pojaseve kroz ramene jastučiće i zaštitu za glavu. Pobrinite
3. SKLAPANJE PREDNJIH KOTAČA
– Pričvrsite prednje kotače na kraj okvira dok ne začujete „klik“.
4. SKLAPANJE STRAŽNJIH KOTAČA
PAŽNJA: SUSTAV KOTAČA S PAPUČICOM KOČNICE MORA BITI POSTAVLJEN NA
DESNOJ STRANI KOLICA (GLEDANO IZA KOLICA).
PAŽNJA: KONEKTORI NA OBJE STRANE MORAJU BITI AKTIVIRANI.
Pogledajte da je kabel postavljen u kopče na obje strane.
5. POSTAVLJANJE ODBOJNIKA
a) Postavite krajeve odbojnika u utore na lijevoj i desnoj strani ušivene u tkaninu
sjedala.
b) Pritisnite tipke na lijevom i desnom kraju branika kako bi ga uklonili.
6. SKLAPANJE KOLICA
Uklonite sve sadržaje iz košare. Zatvorite kupolu. Uklonite odbojnik.
a) Gurnite glavnu polugu za zaključavanje ispod tipke pedala.
b) Podignite aktiviranu glavnu polugu za zaključavanje kako biste oslobodili
mehanizam rasklapanja.
c) Pritisnite dolje sporednu polugu za zaključavanje (produžena šipka na desnoj
strani sustava zaključavanja, vidi sliku 3).
d) Uhvatite ručke i gurnite ih prema naprijed na kolica kako biste ih sklopili.
e) Pritisnite sklopljena kolica dok se ne aktivira zaključavanje. Preporučuje se
učvrstiti sustav sigurnosnih pojaseva prije sklapanja kolica.
7. RASKLAPANJE KOLICA
a) Oslobodite polugu za rasklapanje.
b) Rasklopite kolica.
c) Pritisnite dolje tipku pedale dok mehanizam nije pravilno aktiviran.
UPOZORENJE: PRIJE UPOTREBE PROVJERITE DA SU SVI DIJELOVI AKTIVIRANI I DA
PRAVILNO FUNKCIONIRAJU.
8 . KORIŠTENJE KOČNICA
a) Aktivirajte kočnicu
b) Otpustite kočnicu
9 . AUTOMATSKI ZAKLJUČAVANJE ROTIRANJA PREDNJIH KOTAČA - LOCK - UNLOCK
a) Gurnite polugu zaključavanja prednjeg kotača dok ne „klikne“ ( oznaka Lock).
Može se aktivirati u bilo kojem položaju kotača. Zaključavanje će se obaviti
automatski kada kotač dođe na pravo mjesto.
b) Za oslobađanje kotača podignite polugu zaključavanja prednjih kotača.
10. KUPOLA
– Pričvrstite adapter kupole unutar cijevi okvira.
– Za uklanjanje kupole postupite obrnuto.
– Produžite kupolu i postavite stražnji zaklopac kupole iza sjedišta. - Koristite
zatvarač za pričvršćivanje ili odvajanje nastavka za zimu.
se da provučete natrag trake kroz rupe u mehanizmu naslona i pričvrstite ih u
trokut. Zaštitu za glavu i zaštitu za ramena možete koristiti zasebno.
14. UKLANJANJE PRESVLAKE
a) Lagano savijte kolica kako bi se smanjila napetost.
b) Skinite kupolu s kolica, ako je pričvršćena .
c) Skinite kukice presvlaka (3) iz okvira na lijevoj i desnoj strani.
d) Otkopčajte drukere (4) na trakama koje su spojene na strane sjedala i stražnju
stranu naslona.
e) Otvorite preklopce (5) koji su „čičkom“ pričvršćeni preko cijevi, po jedan na
svakoj strani.
f) Provucite traku sa klizačem (6) centralne kopče kroz rupu na presvlaci sjedala.
g) Provucite petlje na kraju ramenih pojasa kroz trokut na naslonu za leđa (7).
h) Provucite ramene pojase kroz rupe na presvlaci sjedala (8).
i) Otkopčajte drukere na lijevoj i desnoj strani sjedala na dnu tkanine.
j) Povucite presvlaku sjedala preko tipke za podešavanje pojasa na sjedalu.
k) Povucite tkaninu sa cijevi sjedala.
l) Za ponovo postavljanje presvlaka i sustava sigurnosnih pojaseva obrnite ovaj
postupak. Provjerite da se cijevi sjedala pravilno postavljene u utore unutar
presvlake.
15. PODEŠAVANJE NASLONA ZA NOGE
a) Pritisnite naslon za noge na oba prednja ruba i gurnite prema dolje.
b) Jednostavno podignite naslon za noge da ga stavite natrag u početni položaj.
16. PODEŠAVANJE NASLONA ZA LEĐA
a) Povucite polugu na stražnjoj stani sjedala kako biste podesili naslon za leđa u 4
različite pozicije.
b) Za podizanje naslona za leđa podignite kompletni naslon za leđa u željeni
položaj.
17. PRENOŠENJE KOLICA
– Povucite fleksibilnu ručku za nošenje na stražnjoj desnoj strani i podignite kolica.
18. PRIČVRŠĆIVANJE ZAŠTITE ZA KIŠU (opcionalno)
a) Rastegnite zaštitu od kiše iznad kolica kao što je prikazano na slici.
b) Za učvrstiti kabanicu koristite „čičak“ trake oko okvira na vrhu i na dnu s obje
strane kolica.
19. GARANCIJA
Ova garancija vrijedi samo u državi u kojoj je CYBEX proizvod kupljen. Jamstvo
pokriva besplatnu dobavu dijelova i popravak, koji su posljedica tvorničke greške.
Jamstvo vrijedi u razdoblju od dvije (2) godine od datuma kupnje. Jamstvo
počinje teći danom kupovine proizvoda na malo, što ćete dokazati potvrđenim
jamstvenim listom (ime i sjedište prodavača proizvoda na malo, pečat, datum
prodaje, potpis prodavača). Ako se nesto dogodi za vrijeme jamstvenog perioda
proizvodnje i materijalne nedostatke, proizvod ce biti popravljen ili zamijenjen u
našem nahođenju za novu. Za usluge u okviru ovog jamstva da se zahtjev, proizvod
mora biti vraćen trgovac, koji ga je prodao prvi put i dokaz o prodaji će se donijeti
u originalu. Dokument za prikaz datuma kupnje, ime trgovaca i naziv proizvoda.
Ako je kvar nastao uslijed nepravilnog rukovanja od strane kupca. Ako se proizvod
koristi u prostorijama s nepravilnim uvjetima i zbog velikog opterećenja proizvoda -
Ako na Jamstvenom listu nema datuma prodaje, žiga i potpisa prodavača, ili ako
je vidljivo da su navedeni podaci krivotvoreni - Ako kupac ne predoči Jamstveni
list U slučaju bilo kakvih oštećenja ne koristite CYBEX proizvod, nego ga odmah
provjerite. Naglašavamo da je dozvoljeno koristiti samo originalne dodatke i
rezervne dijelove. CYBEX proizvod se mora koristiti i njime rukovati u skladu sa
priručnikom s uputstvima.
20. UPUTSTVO ZA ČIŠĆENJE
– perite odvojeno
– ne izbjeljivati
– ne peglati
– prati toplom vodom blagim deterdžentom
– ne koristiti sušilicu
– ne koristiti kemijsko čišćenje

10
11
EN CONTENT
I. General Information & Safety .......................................................10
II. Instructions for maintenance and service ..................................11
III. Instructions for use ......................................................................... 11
1. Opening the stroller for assembling .......................................................... 11
2. Assembling the handles ............................................................................. 12
3. Assembling the front wheels ...................................................................... 12
4. Assembling the rear wheels ....................................................................... 12
5. Attaching the bumperbar ........................................................................ 12
6. Folding the stroller ....................................................................................... 12
7. Opening the stroller .................................................................................... 12
8. Using the brakes .......................................................................................... 12
9. Automatic front wheels swivel locks ......................................................... 12
10. Canopy ........................................................................................................ 12
11. Using the harness system ............................................................................ 12
12. Adjusting the harness system for newborns .............................................. 12
13. Removing the haedhugger and the shoulder pads (Topaz only) ......... 12
14. Removing the seatcover ............................................................................ 13
15. Reclining the leg rest .................................................................................. 13
16. Reclining the seat ....................................................................................... 13
17. Carrying the stroller ..................................................................................... 13
18. Attaching the raincover ............................................................................. 13
19. Guarantee ................................................................................................... 13
20. Care instructions ......................................................................................... 13
SERVICE
In general the Cybex pushchairs will run smooth without any problems. A dry and/
or dusty environment can have a negative effect on the wheel systems. To avoid
this it is very important that the wheel systems will be regularly checked, cleaned
and lubricated. This will ensure a smooth operation of the stroller in daily use.
Please follow the instruction below to maintain the wheel systems (wheel axles &
suspension system).
II.-I Check of wheel systems
a) Wheel system must be cleaned before applying the lubricant.
b) Wheel system must not be broken or damaged.
For eliminate squeaking on you CYBEX buggy take only WD 40 and follow the
mentioned pictures below. Do not use any other kind of lubricant! Insert always
a cloth or a carton in order to leave no oil stains. Please pay special attention
to not apply the lubricant on any other part of the stroller (fabrics, tubes, etc.).
II.-II Applying of the lubricant
a) Rear Wheel - Spray from the rear side of the buggy in the space between the rim
and the housing on both sides. Let the lubricant get into the system for approx.
10 seconds, and then turn the wheels.
b) Front Wheel - Spray in the space between the rim and the housing on both
sides. Let the lubricant get into the system for approx. 10 seconds, and then turn
the wheels. Should this not avoid the squeaking, please remove the rim cap
and apply the spray on the axle.
c) Suspension - Apply some lubricant between the suspension slider and the
housings.
DISPOSAL
When you are done using your CYBEX ONYX/TOPAZ, a proper disposal is important.
Garbage disposal can be different in every country. Please contact your local
waste management company to make sure you are taking the right steps to
dispose of the CYBEX ONYX/TOPAZ. Always follow the disposal regulations of your
country.
III. INSTRUCTIONS FOR USE
IMPORTANT: READ THESE INSTRUCTIONS CAREFULLY BEFORE USE AND KEEP THEM
FOR FUTURE REFERENCE. YOUR CHILDREN’S SAFETY MAY BE AFFECTED IF YOU DO
NOT FOLLOW THESE INSTRUCTIONS.
ONYX/TOPAZ ASSEMBLY INSTRUCTION
DELIVERY STATUS
1. OPENING THE STROLLER
a) Release the folding lock lever.
b) Open the stroller.
c) Push the pedal button down until the locking system is engaged.
I. GENERAL INFORMATION & SAFETY
WARNING: IT MAY BE DANGEROUS TO LEAVE YOUR CHILD UNATTENDED.
Your child´s safety is your responsibility. Always use the harness system to prevent
your child from falling or sliding out of the seat. This vehicle is suitable for one child
only.
Follow all instructions carefully to avoid incorrect handling as this can impair the
stroller’s correct function.
THIS VEHICLE IS INTENDED FOR CHILDREN UP TO 20 kg (UP TO 22,5KG LOAD CAPACITY. )
Use of this stroller with a child weighing more than 20 kg will cause excessive wear
and tear on the stroller.
WARNING: ALWAYS USE THE CROTCH STRAP IN COMBINATION WITH THE WAIST BELT.
The harness always needs to be attached and adjusted correctly. If not adjusted
correctly according to the instructions the stability of the stroller will be affected.
WARNING: USE A HARNESS SYSTEM AS SOON AS THE CHILD CAN SIT UNAIDED
The harness and seat belt do not replace the permanent supervision by an adult.
WARNING: THIS PRODUCT IS NOT SUITABLE FOR RUNNING OR SKATING.
– To attach an additional full harness system for safety reasons ‘D’ rings
(according to EN13210 or BS6684) are provided.
– The child should be clear of any moving parts while making adjustments.
Prevent children from grabbing the stroller while folding and unfolding, as
fi ngers can become trapped and scissoring actions are unavoidable.
WARNING: ANY LOAD ATTACHED TO THE HANDLES AFFECTS THE STABILITY OF THE
STROLLER.
Do not carry additional children, do not hang shopping bags from the handlebars
or carry shopping bags on the stroller except in the stroller’s basket. Maximum
load 2 kg. Otherwise the stroller is likely to become unstable. Overloading can also
damage the vehicle. Maximum load canopy bag 0,5 kg.
– Damages caused by the use of accessories not approved by CYBEX, such as
rain covers, buggy boards, bag hooks, etc. will not be covered by the terms of
our warranty.
– It may be unsafe to use replacement parts other than those approved by
CYBEX.
– Before using the stroller, always check whether the accessories are well
secured.
– Ensure that the stroller is always in the brake position when you put your child
into the seat.
– Never lift the stroller with the child inside; never ascend or descend stairs or
escalators with the child inside or when traveling on other forms of transport.
– When opening and closing the stroller, do not use force, as incorrect folding
can damage or break the stroller. Check the instruction manual if necessary.
– Drive carefully over curbs and gravel roads. The vehicle will be damaged by
repeated impact.
– Make sure your child does not use the footrest to stand on.
– Do not expose the stroller to any artifi cial heat or direct sunlight.
II. INSTRUCTIONS FOR MAINTENANCE
– The user is responsible for the regular maintenance of the stroller. All connecting
parts and rivets have to be tightened and secured properly. It is particularly
important to ensure that the locking mechanism and swiveling mechanism are
treated regularly with Tefl on spray (dry lubricant). It is important that brakes,
wheels and tyres are not impaired during use. Inspect them regularly and
repair or replace if necessary. STOP using any product that does not appear
structurally sound.
– Do not make any modifi cations to the product. If you have any complaints or
problems, please contact your supplier or importer.
– A service should be scheduled every 12 months.
– You can also treat the other moving parts with Tefl on spray (dry lubricant). After
spraying on the Tefl on, wipe the product with a soft cloth.
– Use only original CYBEX replacement parts. It may be unsafe to use substitutes.
– The frame tubes covered by the locking mechanism and turning mechanism
should also be regularly cleaned and sprayed. This will ensure that you enjoy
your stroller without any problems.
CLEANING
– Do not use abrasives to clean the frame! Use a damp cloth and a mild
detergent and dry thoroughly.
– Should the stroller be exposed to salt water, please rinse it down with fresh (tap)
water as soon as possible afterwards.
– The seatcover and the canopy can be washed by hand with mild detergent
(not warmer than 30°C).
– The seatcover is maschine washable (See care label for details). Do not use the
tumble drier. Dry thoroughly before reuse.
– All CYBEX fabrics have been tested, but when the stroller is very wet, the water
may permeate the lining through the bottom edges and seams and leave
water stains on the upholstery. We advise you to use a rain cover to avoid this.
Also please do not fold or store the product while wet. If the stroller is wet, allow
to dry with the hood extended. Never store in a damp environment as this can
cause mildew to form.
Note! Please wash the cover separately before you use it the fi rst time. Do not
tumble dry and do not expose to direct sunlight! Do not iron!
This product was approved according to the EN 1888:2003 + A1/A2/A3:2005
standard.

12
13
2. ASSEMBLING THE HANDLES
ATTENTION: THE PINS ON BOTH SIDES MUST BE ENGAGED.
3. ASSEMBLING THE FRONT WHEELS
– Fit the front wheels to the end of the frame until they engage with a “click”.
4. ASSEMBLING THE REAR WHEELS
ATTENTION: THE WHEEL SYSTEM WITH THE BRAKE PEDAL MUST BE FITTED TO THE RIGHT
SIDE OF THE BUGGY (VIEWED FROM BEHIND THE BUGGY).
ATTENTION: THE PINS ON BOTH SIDES MUST BE ENGAGED.
ENSURE THE BOWDEN CABLE IS INSERTED INTO THE CLIPS ON BOTH SIDES.
5. ATTACHING THE BUMPER BAR
a) Slide in latches on left and right side into gadgets sewn into the seat fabric.
b) Press the buttons on left and right side of the bumper bar to take it off.
6. FOLDING THE STROLLER
Remove all contents from the basket. Close the canopy. Remove the bumperbar.
a) Push forward the primary lock lever underneath the pedal button.
b) Lift the activated primary lock lever to release the stretching system.
c) Push down the secondary lock lever (extended bar on the right side of the
locking system).
d) Grip handles and push forward on the stroller to fold it.
e) Press folded stroller until the fold lock is engaged. Its recommended to fasten
the harness before folding the stroller.
7. OPENING THE STROLLER
a) Release the fold lock lever.
b) Open the stroller
c) Push the pedal button down until the locking system is engaged.
WARNING: ENSURE THAT ALL LOCKING DEVICES ARE ENGAGED BEFORE USE.
8 . USING THE BRAKES
a) Engage Brake
b) Release Brake
9 . AUTOMATIC FRONT WHEEL SWIVEL LOCKS – LOCK – UNLOCK
a) Push the Front Swivel Lock Lever until it “clicks”. It can be activated in any wheel
positions. The swivel Lock will engage automatically when it reaches the right
position.
b) Lift the Front Swivel Lock Lever up again to release the Swivel Lock.
10. EXTENDABLE CANOPY
– Attach the canopy adaptor on to the inside of the frame tubes of the buggy.
– To remove the canopy reverse procedure.
– Extend the canopy and place canopy rear flap behind the seat.
– Lie-flat position: Put the rear flap over the seat’s back rest and fixate it with the
two velcros underneath.
– The canopy is adjustable to various positions. The Canopy has a height
adjustment and a forward rotation function. To rotate open the zip located at
the top of the canopy.
The canopy has a fully ratcheting function to create complete coverage. Simply
pull on the front of the canopy to the desired position. The height can be easily
adjusted by simply sliding the canopy up or down the frame. The entire canopy
can also be tilted forward. For maximum coverage, unzip the extra panel on top
of canopy and pull forward.
– The canopy flap at the rear of the stroller can be rolled up and fixed with a
velcro fastener, if required.
11. USING THE HARNESS SYSTEM
a) To fasten the harness system insert left and right side fasteners into the central
harness buckle.
b) To tighten the belts pull the strap on the front of the central harness buckle.
c) To release the belt system press the release button located on the seat in front
of the belt lock while pulling at the shoulder belts.
d) To release the fasteners squeeze the grooves on left and right side of the central
harness buckle.
e) Adjust the length of the crotch strap with the corresponding slider.
WARNING: ALWAYS USE THE CROTCH STRAP IN COMBINATION WITH THE WAIST BELT.
12 . ADJUSTING THE HARNESS SYSTEM FOR NEWBORNS
a) Release the loops at the end of the shoulder straps from the triangle in the belt
system, situated at the bottom of the backrest under the seat cover.
b) Completely pull the shoulder straps out of the holes in the backrest.
c) Feed the shoulder straps through the two bottom holes. Make sure to feed the
straps back through the holes in the backrest mechanism and re-attach them
to the triangle.
d) To adjust the length of the shoulder straps to newborns please attach the inner
loop of the shoulder strap ends to the triangular ring. Switch back to the upper
holes as soon as the shoulder straps do no longer fit over the child´s shoulders.
13. REMOVING THE HEADHUGGER AND SHOULDER PADS (TOPAZ ONLY)
Remove the headhugger as soon as the headhugger does no longer fit over the
child´s shoulders.
a) Remove the velcros of the headhugger on the top leh and right side on the
back of the seat cover.
b) Release the loops at the end of the shoulder straps from the triangle in the belt
system, situated at the bottom of the backrest under the seat cover.
c) Completely pull the shoulder straps out of the holes in the backrest.
d) Pull the shoulder straps through the shoulder pads and the headhugger. Make
sure to feed the straps back through the holes in the backrest mechanism and
attach them to the triangle. You can use the headhugger and the shoulder
pads separately.
14. REMOVING THE SEATCOVER
a) Slightly fold the stroller to reduce tension.
b) Remove the canopy from the stroller, if attached.
c) Take the seat cover’s hooks (3) off the frame on left and right side
d) Open the press buttons (4) of the straps connected to the seat side panels and
the basket rear tube.
e) Open the fl aps (5) which are fi xed with velcro over the tubes, one on each side.
f) Feed the strap with the slider (6) of the central harness buckle through the hole
in the seat fabric.
g) Feed the loops on the end of the shoulder straps through the triangle in the
backrest (7).
h) Feed the shoulder straps through the holes in the seat fabric (8).
i) Open the press buttons which are on the left and the right side from the seat on
the bottom from the fabric.
j) Pull the seat cover over the belt shifting button on the seat.
k) Slide the fabrics from the seat base tubes.
l) Reverse this procedure to refi t the seat cover and the harness. Make sure that
the seat tubes slide back into the pockets inside the seat cover.
15. RECLINING THE LEG REST
a) Press the leg rest on both front edges and push down.
b) Simply lift the leg rest to put it back to the starting position.
16. RECLINING THE SEAT
a) Pull the recline lever at the back of the seat in order to recline the backrest to
the 4 different positions.
b) To raise lift the complete backrest up to required position.
17. CARRYING THE STROLLER
– Pull the flexible carring handle on right rear tube and lift the stroller.
18. ATTACHING THE RAINCOVER (OPTIONAL)
a) Extend the rain cover over the stroller like shown in the image
b) To fit the rain cover fasten the velcro strips around the frame at the top and
bottom on both sides of the buggy.
19. WARRANTY
The following warranty applies solely in the country where this product was initially
sold by a retailer to a customer. The warranty covers all manufacturing and material
defects, existing and appearing, at the date of purchase or appearing within
a term of two (2) years from the date of purchase from the retailer who initially
sold the product to a consumer (manufacturer’s warranty). In the event that a
manufacturing or material defect should appear, we will – at our own discretion –
either repair the product free of charge or replace it with a new product. To obtain
such warranty it is required to take or ship the product to the retailer, who initially
sold this product to a customer and to submit an original proof of purchase (sales
receipt or invoice) that contains the date of purchase, the name of the retailer and
the type designation of this product. This warranty shall not apply in the event that
this product is taken or shipped to the manufacturer or any other person other than
the retailer who initially sold this product to a consumer. Please check the product
with respect to completeness and manufacturing or material defects immediately
at the date of purchase or, in the event that the product was purchased in distance
selling, immediately after receipt. In case of a defect stop using the product and
take or ship it immediately to the retailer who initially sold it. In a warranty case the
product has to be returned in a clean and complete condition. Prior to contacting
the retailer, please read this instruction manual carefully. This warranty does not
cover any damages caused by misuse, environmental influence (water, fire, road
accidents etc.) or normal wear and tear. It does solely apply in the event that the
use of the product was always in compliance with the operating instructions, if any
and all modifications and services were performed by authorized persons and if
original components and accessories were used. This warranty does not exclude,
limit or otherwise affect any statutory consumer rights, including claims in tort and
claims with respect to a breach of contract, which the buyer may have against
the seller or the manufacturer of the product.
20. CARE INSTRUCTIONS
– wash separately
– gentle action wash warm water
– do not bleach
– do not tumble dry
– do not iron
– do not dry clean
/