Page is loading ...

Single Handle Kitchen Faucet
Grifo de cocina de una manija
Robinet d’évier à une manette
Tools You Will Need
Herramientas Necesarias
Outils dont vous aurez besoin
D409012
Hex wrench
Llave hexagonal
Clé hexagonale
Phillips screwdriver
Destornillador
cruciforme
Tournevis Phillips
Adjustable wrench
Llave ajustable
Clé à molette
Pipe tape
Cinta selladora
para rosca
Ruban pour tuyau
Groove joint pliers
Pinzas ajustables
Pince multiprise
Before Your Installation
Antes de Instalar
Avant l’installation
Check to make sure you have the following parts indicated below:
Verifique que tenga todas las partes indicadas:
Vérifier pour vous assurer que vous possédez les pièces au bas:
®
Less than 0.25% lead content

1. Remove
adaptor
assembly
from spout
shank.
Quite el conjunto del adaptador del
vástago del vertedor.
Enlever l’assemblage de l’adaptateur
de la tige du bec.
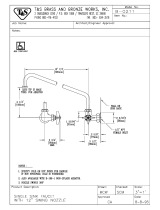
2. Position the spout shank in the second hole of
sink. Secure with rubber seal, metal washer,
and tighten the spout shank with lock nut.
Posicione el cuello de goma, la arandela de
metal y la contratuerca de la rosca del cuello.
Placer le bec dans le deuxième orifice de l’évier.
Fixer à l’aide de la rondelle étanche et de la
rondelle de métal, puis serrer la tige du bec à
l’aide de l’écrou de blocage.
4.
Place the body in the third hole of sink. From underneath the sink,
replace the washer and lock nut.
Ponga el cuerpo en el tercer orificio del fregadero. Por debajo del
fregadero, reemplace la arandela y la contratuerca.
Mettre le corps dans le troisième orifice de l’évier. Replacer la rondelle
et l’écrou de blocage à partir du dessous de l’évier.
3.
Install adaptor to the spout shank and secure
with the nut to fix up.
Instale el adaptador en el vástago del
vertedor y sujételo con la tuerca para
instalarlo.
Installer l’adaptateur à la tige du bec et visser
l’écrou solidement en place.
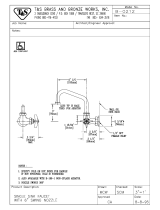
5.
Install the quick connect hoses between the side of the spout tube adapter
and the valves. Push onto the fitting to lock. Pull down to check for secure
connection.
Instale las mangueras de conexión rápida entre el lado del adaptador del
tubo del vertedor y las válvulas. Empuje la conexión para que se bloquee,
empújela hacia abajo para verificar que esté bien afianzada.
Relier le tuyau souple à raccords rapides à l'adaptateur de la tige du bec
et au robinet. Pousser sur le raccord pour le verrouiller et tirer dessus pour
vérifier qu’il est solidement fixé.
Spout/
Vertedor/
bec
Handle/
Manija/
Manette
Faucet Installation Procedures/Instalación del Grifo/Procédures d’installation du robinet
Shut off main water supply before installation.
Cierre el suministro de agua antes de instalar.
Couper l’alimentation d’eau principale avant l’installation.
Danze always recommends that plumbing products be installed by a licensed professional.
Danze aconseja siempre que sea un profesional autorizado quien instale los productos de plomería.
Danze recommande que les articles de plomberie soient toujours installés par un professionnel qualifié.
Maintenance Your new faucet is designed for years of trouble-free performance. Keep it looking new by cleaning it periodically with a soft
cloth.Avoid abrasive cleaners, steel wool and harsh chemicals as these will dull the finish and void your warranty.

Maintenance Your new faucet is designed for years of trouble-free performance. Keep it looking new by cleaning it periodically with a soft
cloth.Avoid abrasive cleaners, steel wool and harsh chemicals as these will dull the finish and void your warranty.
9.
Insert spray hose down through hole in spray holder. Screw spray head
onto spray hose.
Ponga la manguera del rociador por el orificio del soporte del
rociador.Atornille la cabeza del rociador a la manguera del rociador.
Insérer le boyau d’arroseur dans l’orifice du support d’arroseur en le
dirigeant vers le bas. Visser la tête d’arroseur sur le boyau d’arroseur .
10.
Attach the supply hoses to the adaptor of the spout shank.
Una la manguera de alimentación al adaptador del vástago
del vertedor.
Fixer le tuyau d’alimentation à l’adaptateur de la tige du bec.
A.
B.
11.
Connect valves to hot and cold water supply. (Supply hoses are not included).
Apply pipe sealant tape to thread of the valve.
A. Attach water supply hoses to the faucet.
B. Attach water supply tubes to the faucet. To avoid twisting the copper supply
tube, use two wrenches. Use one to hold the fitting stable and the other to
tighten the nut to fitting.
Conecte la válvula a la alimentación de agua caliente y fría. (Las mangueras
de alimentación no están incluidas). Ponga cinta obturadora para tubos en la
rosca de la válvula.
A. Sujete las mangueras de alimentación de agua al grifo.
B. Sujete los tubos de alimentación de agua al grifo. Para evitar que el tubo
de alimentación de cobre gire, utilice dos llaves, una para sujetar el empalme
y la otra para enroscar la tuerca al empalme.
Relier le robinet aux tuyaux d’alimentation en eau chaude et froide. (Les
tuyaux ne sont pas fournis.) Appliquer du ruban d’étanchéité pour tuyau sur
les filets de l’orifice d’entrée.
A. Fixer les tuyaux d’alimentation flexibles au robinet.
B. Fixer les tuyaux d’alimentation rigides au robinet. Pour éviter de tordre le
tuyau d’alimentation en cuivre, utiliser deux clés, l'une pour tenir le tuyau en
place et l’autre pour visser l’écrou.
The supply hoses/tubes provided with this faucet will fit 3/8” supply
valves. Apply pipe sealant tape to threads on valve before attaching
the supply hoses/tubes.
A. Tighten the hoses onto water supply.
B. Tighten the tubes to the water supply with nut.
Las mangueras y tubos de alimentación van con válvulas de
alimentación de 3/8”. Ponga cinta obturadora para tubos en la
rosca de la válvula antes de sujetar las mangueras o tubos de
alimentación.
A. Enrosque las mangueras a la alimentación de agua.
B. Enrosque los tubos a la alimentación de agua con la tuerca.
Les tuyaux flexibles/rigides s’adaptent à des orifices d’entrée de
3/8 po. Appliquer du ruban d’étanchéité pour tuyau sur les filets de
l’orifice avant de fixer les tuyaux d’alimentation flexibles/rigides.
A. Fixer les tuyaux flexibles à l’orifice d’entrée.
B. Fixer les tuyaux rigides à l’orifice d’entrée avec un écrou.
12.
A. B.

17.
Pour in liquid soap (or hand lotion).
Vierta el jabón liquido (o loción para manos).
Verser du savon liquide (ou de la lotion pour
les mains) dans la bouteille.
18.
Re-assemble the chrome pump nozzle and
plastic pump onto connector.
Regrese el canuto de la bomba de cromo
y la bomba de plástico al conectador.
Remettre le bec chromé de pompe et la
pompe de plastique dans le raccord.
16.
Insert the bottle and tighten with lock nut.
Introduzca la botella y apriete con la
contratuerca.
Insérer la bouteille et serrer à l’aide de
l’écrou de blocage.
Problem/Problema/Problème
Cause/Causa
Action/Solución/Correctif
Leaks underneath handle.
Goteo debajo de la manija.
Fuites sous la manette.
Aerator leaks or has an inconsistent
water flow pattern.
El aireador gotea o el chorro de agua
está irregular.
Le brise-jet fuit ou la diffusion des jets
qui s’en écoulent n’est pas uniforme.
Aerator is dirty or misfitted.
El aireador está sucio o mal puesto.
Le brise-jet est mal ajusté ou sale.
/Cause
Lock nut or trim cap have come loose.
O-ring is dirty or damaged.
Contratuerca o tapa ornamental se han
suelto.
La écrou de blocage ou le capuchon de
garniture est desserré. Le joint torique est
sale ou endommagé.
Tighten the lock nut or trim cap.
Clean or replace o-ring.
Apriete el contratuerca o tapa ornamental. Limpie
ó reemplace el empaque circular.
Serrer la écrou de blocage ou le capuchon de
garniture. Nettoyer ou remplacer le joint torique.
Unscrew the aerator to check rubber packing
or replace the aerator.
Destornille el aireador para chequear el empaque
de caucho. Vuelva a instalar el aireador.
Dévisser le brise-jet pour vérifier le joint en
caoutchouc. Réassembler le brise-jet
If you've followed the instructions carefully and your faucet still does not work properly, take these corrective steps.
Si usted ha seguido las instrucciones cuidadosamente y su grifo todavía no funciona correctamente, sigue estos pasos
correctivos.
Si vous avez suivi attentivement les instructions et que votre robinet ne fonctionne toujours pas correctement, apporter
les correctifs suivants :
Trouble-Shooting/Guía de Solucionar Problemas/Dépannage
Need Help? Please call our toll-free Customer service line at 1-888-328-2383 or WWW.DANZE.COM for additional assistance or service.
Requiere asistencia? Favor llamar a nuestro servicio a clientes sin costo al 1-888-328-2383 o WWW.DANZE.COM para asistencia adicional o servicio.
Besoin d’aide? Veuillez communiquer avec notre service à la clientèle au numéro sans frais 1-888-328-2383 ou WWW.DANZE.COM pour obtenir du
service ou de l’aide additionnels.
/