Peg-Perego John Deere UTILITY TRACTOR IGED1069 User guide
- Category
- Baby furniture
- Type
- User guide

FIUS0701G106
Model Number IGED1064
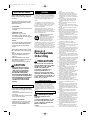
USE AND CARE
UTILISATION ET ENTRETIEN
EN
FR
ES
EMPLEO Y MANUTENCION
6V
Requires 2 AA batteries (not included)
Requerir 2 AA batería (no inclusa)
Exige 2 batteries de AA (ne pas inclus)
John Deere
UTILITY TRACTOR
56065_PegPerego.qxp 2/8/07 10:34 AM Page 1

12
11
1
2 3
1
1
2
2
4
5
6 7
A
8
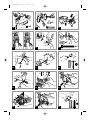
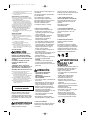
ASSEMBLY
MONTAJE
MONTAGE
SEE VERBAL INSTRUCTIONS
AFTER THE PICTURES
VER LAS INSTRUCCIONES
DESPUÉS DE LOS DISEÑOS
VOIR LES INSTRUCTIONS
APRÈS LES DESSINS
9
10
a
13
2 AA batteries
2 AA batería
2 batteries de AA
56065_PegPerego.qxp 1/25/07 1:10 PM Page 2
Page is loading ...

40
41
39
37
38
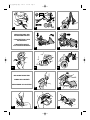
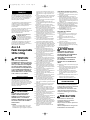
REPLACING THE BATTERY
CAMBIO DE LA BATERÍA
REPLACEMENT DE LA BATTERIE
34
35
32
33
VEHICLE FEATURES AND
INSTRUCTIONS FOR USE
CARACTERÍSTICAS Y USO
DEL VEHÍCULO
CARACTERÍSTIQUES ET
UTILISATION DU VEHICULE
29
30 31
x2
36
56065_PegPerego.qxp 1/25/07 1:10 PM Page 4

C
B
44
C
B
45
43
A
B
46
A
B
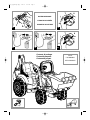
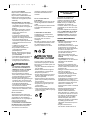
BATTERY RECHARGE
CARGA DE LA BATERÍA
CHARGE DE LA BATTERIE
42
A
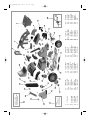
Contents of package:
Contenido paquete:
Contenu de paquet:
DECAL
CALCOMANIAS
DECALCOMANIES
56065_PegPerego.qxp 1/25/07 1:10 PM Page 5

bk
r
MEPU0005
SAGI9992
b
w
PEREGO
MEIE0042
b = blue
bk = black
r = red
w = white
b = azul
bk = negro
r = rojo
w = blanco
b = bleu
bk = noir
r = rouge
w = blanc
56065_PegPerego.qxp 1/25/07 1:10 PM Page 6
Page is loading ...

the figure. Close and screw on the cover.
7 • Snap on the 2 rear lights.
8 • Press on the 2 headlights as shown in detail A.
9 • Unscrew the door on the back of the electronic
unit. Insert the two AA batteries -Not included-
into their holder, taking care to respect correct
polarity. Close the door and screw shut.
10 • Attach the electronic unit by inserting the two
tabs into the openings in the chassis, as shown
in the figure. Fasten with the screw.
11 • Position the steering wheel. Fix the steering
wheel with the screw and washer provided.
12 • Push on the steering wheel cap as shown in the
figure.
13 • On the underside of the scoop frame, find the
end with the slot and insert the spring through
the slot as shown in figure.
14 • Position large front scoop under frame as
shown in figure.While pressing down on spring
(a), insert pin screw through bracket holes and
spring (b). Repeat process, except without
spring, on opposite side(c).
15 • Attach nut to end of pin screw and use
included tool to hold nut while turning
opposite end with screwdriver. Repeat
operation on other side.
16 • Place the handlebar on the loader arms,
slanting it downward slightly in order to
correctly position the two pins on the
handlebar (see detail in the next figure).
17 • The two pins on the handle must be kept on
the outside of the hooks that protrude from the
loader arms.The figure shows one of the two
pins in both the wrong position (NO) and the
right position (OK).
18 • Insert the tabs on the front part of the
handlebar into the openings in the loader arms.
19 • Fasten the handlebar using the screws and
nuts, inserting the nuts into the hexagonal
housings inside the loader arms, and the screws
through the circular holes from the outside.
(The figure shows the bottom of the loader
arms).
20 • Finish fastening the handlebar by holding the
nuts in place while tightening the screws.
21 • Insert the rod for the shovel command lever
into the hole in the shovel.
22 • Place a large stud in the special tool (see detail
A).
23 • Fasten the rod by pushing the stud all the way
in. (If this is difficult to do, use a hammer).
24 • Press the two loader-arm rests into place on the
sides of the grill, as shown in the figure.The two
pieces are shaped to fit the grill, so make sure
to position them carefully, inserting the pin
marked “L”on the left and the pin marked “R”
on the right.
25 • Remove the pin that fastens the loader to the
tractor. NOTE: Pin is taped to front scoop.
26 • Place the loader on the tractor, lining up point
A on both sides with the previously attached
rests. Press on the back of the loader arms on
both sides to fasten them at point B.
27 • Push the pin that fastens the loader to the
tractor through its hole and out the opposite
side of the tractor.
28 • Place a small stud in the special tool (see detail
A).
29 • Fasten the pin by pushing the stud all the way
in. (If this is difficult to do, use a hammer).
30 • Insert filler piece into end of arm (a). Using 2
black plastic plugs, attach smaller rear scoop to
arm (b).Then using screw and screwdriver,
attach black plastic handle to scoop (c).
31 • Insert rear scoop arm into hole on back end of
vehicle.
VEHICLE FEATURES AND INSTRUCTIONS FOR USE
32 • To dump the front scoop, lower the lever.
33 • To lower the entire front loader, push the
handlebar forward.
34 • ELECTRONIC UNIT: to activate the electronic
unit, turn the key.To sound the horn, press the
right button on the dash.To turn the flashers
on, press the left button on the dash.
To avoid draining the battery, turn the key
counterclockwise when the vehicle is not in
use.
35 • ACCELERATOR PEDAL/ELECTRIC BRAKE: when
the foot is lifted from the accelerator pedal,the
electric brake automatically stops the tractor.
36 • REAR SCOOP: To operate the rear scoop, grasp
the black handle.
• PEG PEREGO® thanks you for choosing this
product. For over 50 years, PEG PEREGO has been
taking children for an outing: first with its famous
baby carriages and strollers,later with its pedal and
battery operated toy vehicles.
• Read this instruction manual carefully to learn the
use of the vehicle and to teach your child safe and
enjoyable driving.Please keep this manual for use
as a reference in the future.
• Our toys conform with the safety requirements
provided by the Council of the EEC, of the T.Ü.V.; of
the I.I.S.G. Istituto Italiano Sicurezza Giocattoli, and
the U.S. Consumer Toy Safety Specification F963.
Peg-Pérego S.p.A. is an ISO 9001
certified company.
The fact that we are certified provides
a guarantee of our honesty for our
customers, and fosters trust in the
company’s way of working.
• Learning Curve and Peg-Pérego reserve the right
to modify or change its product. Price, literature,
manufacturing processes or locations or any
combination of the above mentioned entities may
change at any time for any reason without notice
with impunity.
Years 2-4
Weight capacity
55 lbs
CAUTION:
ELECTRIC VEHICLE NOT
RECOMMENDED FOR CHILDREN
UNDER 2 YEARS OF AGE. AS WITH
ALL ELECTRIC PRODUCTS,
PRECAUTIONS SHOULD BE
OBSERVED DURING HANDLING
AND USE TO PREVENT ELECTRIC
SHOCK. RECHARGER INCLUDED.120
VOLTS, 60Hz, 15W INPUT, 6 VOLTS
(DC) OUTPUT.
PEG-PÉREGO offers after-sales services, directly or
through a network of authorized service centers for
repairs or replacement parts. See the back cover of
this instruction manual for contact information.
CAUTION:
ADULT ASSEMBLY REQUIRED.
USE CARE WHEN UNPACKING AS
COMPONENTS TO BE ASSEMBLED
MAY POSE A SMALL PARTS/SHARP
EDGE HAZARD.
ASSEMBLY
1 • Unscrew the 2 knobs under the seat.
2 • Position the seat as shown in the figure.
3 • IMPORTANT: the seat can be adjusted to 2
positions depending on the height of the child
(see figure). Position 1: the seat is higher and
further back. Position 2: the seat is lower and
further forward.
4 • Turn the vehicle on its side, keeping the seat in
position. Unscrew the cover under the vehicle.
5 • Open the cover to access the seat fixing screws.
6 • Screw on the two seat fixing knobs as shown in
ENGLISH
CUSTOMER SERVICE
ASSEMBLY INSTRUCTIONS
REPLACING THE BATTERY
37 • Unscrew the hood.
38 • Pull the hood towards you while lifting and
turning it to remove (see figure).
39 • Loosen the 2 screws that hold the battery in
place.
40 • Disconnect the 2 plugs and remove the battery
supplied with the vehicle.
41 • Insert a new 6V-8Ah battery and connect the
two plugs.
42 • Screw the battery clamp into place again,
turning it upside down as shown in the figure.
Close the hood as described above (fig. 18) and
fasten with the screw.
BATTERY RECHARGE
WARNING:
WARNING: BATTERY CHARGING
AND ANY OTHER OPERATION ON
THE ELECTRICAL SYSTEM MUST BE
CARRIED OUT BY ADULTS ONLY.
THE BATTERY CAN ALSO BE CHARGED
WITHOUT REMOVING IT FROM THE
VEHICLE.
43 • Unplug vehicle wiring terminal A from battery
terminal B, by pressing terminals on side and
pulling apart.
44 • Plug the battery charger terminal to a wall
outlet following the instructions enclosed.
Connect the plug B to the battery charger plug
C.
45 • Once the charge is completed unplug
recharger from wall outlet. Unplug recharger
cord terminal C from battery terminal B.
46 • Plug battery terminal A into vehicle wiring
terminal B. Close hood.
Before riding, charge your batteries
for 18 hours to initiate them. Failure
to do this will result in permanent
battery damage.
CAUTION:
Only adults should recharge
batteries, never children.
Never allow children to handle
batteries.
Only use the batteries specified by
the manufacturer. Only use the
charger specified by the
manufacturer.
Do not mix old and new batteries.
Do not mix alkaline, standard
(carbon-zinc), or rechargeable
(nickel-cadmium) batteries.
CHARGING THE BATTERY
• Charge the batteries no longer
than 24 hours, following the
instructions enclosed with the
battery charger.
• Charge the battery, as the vehicle
shows low power, in this way you
will avoid damage to the battery.
• If you don’t use your vehicle for a
long period of time unplug the
battery from the main wire
harness of the vehicle. Remember
to charge the battery at least every
BATTERY MAINTENANCE
AND SAFETY
56065_PegPerego.qxp 1/25/07 1:10 PM Page 8

three months.
• Never charge the battery upside
down.
• Do not forget batteries during
charging! Check them periodically.
• Never use a replacement recharger
or batteries unless they are
approved by PEG PEREGO.
• Batteries are sealed and
maintenance free.
• Battery polarity must be observed
when connecting battery to
wiring.
WARNING:
• BATTERIES CONTAIN TOXIC AND
CORROSIVE SUBSTANCES. DO NOT
TAMPER WITH THEM.
• Batteries contain an acid-based
electrolyte.
• Do not make direct contact
between battery terminals, as this
can cause an explosion or fire.
• Charging produces explosive
gases. Charge batteries in a well
ventilated area away from sources
of heat and flammable materials.
• Exhausted batteries are to be
removed from the vehicle.
• Do not place the batteries near
clothing to avoid damage.
IF A LEAK DEVELOPS
Shield your eyes. Avoid direct
contact with the electrolyte, protect
your hands.
Place battery in a plastic bag and
follow directions listed below.
IF ELECTROLYTE COMES IN
CONTACT WITH SKIN OR CLOTHING
Flush with cool water for at least 15
minutes.
See a physician at once.
IF ELECTROLYTE IS INGESTED
Give tap water, milk of magnesia or
egg whites at once.
Do not induce vomiting.
See a physician at once.
DISPOSAL OF BATTERIES
Help protect the environment!
Do not throw used batteries in your
regular, household trash.
Dispose of the old batteries in an
approved dumping station; contact
your local environmental protection
agency office for further
information.
CAUTION AA
BATTERIES
The insertion of batteries must only
be carried out or supervised by
adults. Do not let children play with
the batteries.
• The batteries should be replaced
by an adult.
• Use only the type of battery
specified by the manufacturer.
• Respect the polarity +/-
• Do not allow the batteries to be in
contact with metal parts (risk of
fire or explosion).
• Always remove the batteries if the
toy is not in use for a long period.
• Do not throw batteries on the fire.
• Never attempt to charge batteries
that are not rechargeable.
• Remove dead batteries from the
toy.
• Dispose of dead batteries into
containers provided for the
recycling of dead batteries.
This product conforms to EN 71 and
conforms to EN 50088 safety
standard for electric toys.
This vehicle is not intended for use
on streets, around traffic or parked
cars.
This product meets and/or exceeds
all ASTM TOY SAFETY STANDARDS,
including F 963, Consumer Toy
Safety Specifications.
MAINTENANCE AND CARE
• Regularly check the conditions of
the vehicle, particularly the
electrical system, the plug
connections, the covering caps
and the charger. In case of fault, do
not try to use the vehicle and the
charger. For repair use only
original PEG-PÉREGO’s spare parts.
• PEG-PÉREGO assumes no liability if
the electrical system is tampered
with.
• Do not leave vehicle or batteries
near sources of heat such as
radiators, stoves, fireplaces, etc.
• Protect vehicle from water, rain,
snow, etc.
• When operating in overload
conditions, such as soft deep sand,
mud or rough uneven terrain, the
overload circuit breaker will
automatically disconnect the
power. After 10 or more
seconds,the circuit breaker will
automatically reset, however you
must eliminate overload
conditions to resume normal
driving.
• Periodically lubricate (with a light
weight oil) moving parts, such as
wheel bearings, steering linkages,
where they rotate or touch one
another.
• The vehicle’s surface can be
cleaned with a dampcloth. Do not
use abrasive cleaners.The cleaning
must be carried out by adults only.
• Never disassemble the vehicle
mechanisms or motor unless
authorized by PEG-PÉREGO.
Conforms to EN 50088
Rechargeable battery 6V 4,5Ah
sealed lead-acid battery.
One 60W motor
SAFETY
WARNING:
• To reduce the risk of injury, adult
supervision is required. Never use
in roadways, near motor vehicles,
on or near steep inclines or steps,
swimming pools or other bodies
of water; always wear shoes, and
never allow more than one rider.
• Surfaces that are appropriate for
safe use: asphalt, cement, tiles.
• A child must be 2 years of age or
older for the necessary
coordination and maturation to
operate this motorized vehicle
safely.
• Never use the vehicle on steep
slopes or near steps or stairs.This
vehicle is not suitable for use on
public highways.
• Do not allow children to place
their hands, feet or any part of
their body, clothing or other
articles near the moving parts
while vehicle is in operation.
• Do not allow the electrical
components, motors, wiring,
switches of your motorized vehicle
to become wet and never wash it
with a hose.
• Never use gasoline or other
flammable substances near the
vehicle.
VEHICLE MAINTENANCE
AND SAFETY
56065_PegPerego.qxp 1/25/07 1:10 PM Page 9
Page is loading ...
Page is loading ...
Page is loading ...
Page is loading ...
Page is loading ...
Page is loading ...

www.pegperego.com
Model Number IGED1064
PEG-PÉREGO U.S.A Inc.
3625 INDEPENDENCE Dr. FORT WAYNE IN 46808
phone 260·4828191 fax 260·4842940
call us toll free 1·800·728·2108
llame USA gratis 1·800·225·1558
llame Mexico gratis 1·800·710·1369
PEG-PÉREGO CANADA Inc.
585 GRANITE COURT PICKERING ONT. CANADA L1W3K1
phone 905·8393371 fax 905·8399542
call us toll free 1·800·661·5050
For Customer Service, please see the contact information below:
John Deere
UTILITY TRACTOR
56065_PegPerego.qxp 2/8/07 10:34 AM Page 16
-
 1
1
-
 2
2
-
 3
3
-
 4
4
-
 5
5
-
 6
6
-
 7
7
-
 8
8
-
 9
9
-
 10
10
-
 11
11
-
 12
12
-
 13
13
-
 14
14
-
 15
15
-
 16
16


Peg-Perego John Deere UTILITY TRACTOR IGED1069 User guide
- Category
- Baby furniture
- Type
- User guide
Ask a question and I''ll find the answer in the document
Finding information in a document is now easier with AI
in other languages
Related papers
-
Peg-Perego IGED1061 6V User manual
-
-
-
-
Peg-Perego Mini Loader IGCD0524 User manual
-
-
-
-
-
Peg-Perego John Deere User guide
Other documents
-
-
Peg Perego John Deere Construction Loader User guide
-
-
-
-
Peg Perego John Deere Ground Loader User guide
-
-
-
Peg Perego Polaris RZR 900 User manual
-
Qaba 312-050GY User guide