Canon PIXMA iP4920 Owner's manual

Category
Label printers
Type
Owner's manual

Canon PIXMA iP4920: Unleash your creativity with this versatile inkjet photo printer designed for stunning photo prints and crisp documents. Experience borderless printing up to 8.5" x 11" and utilize five individual ink tanks for exceptional color accuracy and detail. Connect seamlessly with your devices via Wi-Fi or PictBridge for effortless printing from anywhere.

Canon PIXMA iP4920: Unleash your creativity with this versatile inkjet photo printer designed for stunning photo prints and crisp documents. Experience borderless printing up to 8.5" x 11" and utilize five individual ink tanks for exceptional color accuracy and detail. Connect seamlessly with your devices via Wi-Fi or PictBridge for effortless printing from anywhere.

1
XXXXXXXX ©CANON INC.2011
4
5
(BK/M/C/PGBK/Y)
1
2
3
1
2
3
series
Retire las hojas y la cinta (tape) protectoras.
Compruebe que se le han suministrado los siguientes elementos.
Adaptador de disco de
3,15 pulgadas (8 cm)
(3.15 inches (8 cm) disc adapter)
Cable de alimentación
Depósitos de tinta
(Ink tanks)
Bandeja de disco
(Disc tray)
CD-ROM de instalación
(Setup CD-ROM)
Manuales y otros documentos Papel Fotográco Mate (Matte Photo Paper)
MP-101 (para la Alineación de cabezales
(Print Head Alignment) automática)
Es necesario un cable USB
(no suministrado).
Evite que caigan objetos dentro de la impresora. Podrían provocar fallos en el funcionamiento.
No conecte aún el cable USB.
Conecte el cable de alimentación.
44
Pulse el botón ACTIVADO (ON).
55
Abra la bandeja de salida del papel
(Paper Output Tray).
11
Levante la tapa superior (Top Cover), retire la cinta naranja (orange tape) y el material de protección
(protective material).
22
Cierre la tapa superior (Top Cover).
33
Preparación
Elementos
suministrados
ESPAÑOL
Guía de inicio
Léame en primer lugar
Consérvelo a mano para utilizarlo
como referencia en el futuro.
Para llevar a cabo la instalación, coloque el equipo cerca del ordenador.
Windows es una marca comercial o una marca comercial registrada de Microsoft
Corporation en EE. UU. y/u otros países.
Windows Vista es una marca comercial o una marca comercial registrada de Microsoft
Corporation en EE. UU. y/u otros países.
Macintosh, Mac y Mac OS son marcas registradas de Apple Inc., registradas en EE.
UU. y/u otros países.
Número de modelo: K10367 (iP4920)
Impresora fotográca Canon Inkjet
Solicitar ayuda a Canon
Correo electrónico del servicio técnico:
www.usa.canon.com/support
Teléfono gratuito del servicio técnico: 1-800-OK-CANON
Este servicio ofrece asistencia técnica telefónica gratuita, de lunes
a viernes (excepto festivos), durante el período de garantía.
El dispositivo telefónico para decientes auditivos (TDD) está
disponible en el 1-866-251-3752.
Remove the protective sheets and tape.
Check the included items.
3.15 inches (8 cm)
disc adapter
A USB cable (not included) is
required.
Manuals and other documents
Power cord
Ink tanks
Setup CD-ROM
Matte Photo Paper MP-101 (for Automatic
Print Head Alignment)
Disc tray
Do not allow objects to fall inside the printer. These could cause malfunction.
Do not connect the USB cable yet.
Connect the power cord.
44
Press the ON button.
55
Open the Paper Output Tray.
11
Lift the Top Cover, then remove the orange tape and protective material.
22
Close the Top Cover.
33
Preparation
Included Items
Getting Started
Read me rst!
Keep me handy for future reference.
Windows is a trademark or registered trademark of Microsoft Corporation in the U.S.
and/or other countries.
Windows Vista is a trademark or registered trademark of Microsoft Corporation in the
U.S. and/or other countries.
Macintosh, Mac and Mac OS are trademarks of Apple Inc., registered in the U.S. and
other countries.
Model Number: K10367 (iP4920)
To perform setup, place the printer near the computer.
ENGLISH
Canon Inkjet Photo Printer
Getting Help from Canon
Email Tech Support — www.usa.canon.com/support
Toll-Free Tech Support— 1-800-OK-CANON
This option provides live telephone technical support, free of
service charges, Monday-Friday (excluding holidays), during the
warranty period.
Telephone Device for the Deaf (TDD) support is available at
1-866-251-3752.
QT5-4321-V01
PRINTED IN XXXXXXXX
2
2
1
(B)
(A)
1
2
4
5
6
1
2
2
BK:CLI-226BK 4546B001
M: CLI-226M 4548B001
C: CLI-226C 4547B001
PGBK: PGI-225PGBK 4530B001
Y: CLI-226Y 4549B001
Compruebe que la luz de
ENCENDIDO (POWER) se ilumina
en verde.
66
Abra la tapa superior (Top Cover).
11
Gire y retire la tapa naranja.
(A) No presione los laterales si la ranura en forma de L está bloqueada.
(B) ¡No tocar!
33
Introduzca y empuje hacia abajo el depósito de tinta (ink tank) en la ranura del color correspondiente.
Compruebe que la lámpara de tinta (ink lamp) está encendida y coloque el siguiente depósito de tinta (ink tank).
44
Compruebe que todas las
lámparas están encendidas.
55
Si la luz de Alarma (Alarm) parpadea
en naranja, compruebe que el depósito
de tinta (ink tank) están instalados
correctamente.
Compruebe que la cubierta interior
(Inner Cover) está cerrada y cierre la
tapa superior (Top Cover).
Espere aproximadamente 4 minutos,
hasta que la luz de ENCENDIDO
(POWER) parpadee y se quede
encendida en verde; continúe con el paso
siguiente.
66
Retire totalmente la cinta naranja
(orange tape).
Retire el envoltorio protector.
22
Cubierta interior
(Inner Cover)
Aquí deben instalarse los depósitos de tinta
(ink tanks).
No tocar hasta que se detenga.
Si la luz de Alarma (Alarm)
parpadea en naranja, pulse
el botón ACTIVADO (ON)
para apagar la impresora
y repita desde el paso 2.
Los depósitos de tinta (ink tanks) siguientes son compatibles con esta impresora.
Consulte en 1-800-OK-CANON cuáles son sus distribuidores más próximos o visite
la tienda en línea de Canon en www.shop.usa.canon.com
Número de pedido
Información
sobre pedidos
Open the Top Cover.
11
Twist and remove the orange cap.
(A) Do not press the sides when the L-shaped groove is blocked.
(B) Do not touch!
33
Insert and push down the ink tank into the matching color slot.
Check that the ink lamp is lit, then install the next ink tank.
44
Check that all lamps are lit.
55
If the Alarm lamp ashes orange,
check that the ink tank is installed
correctly.
Check that the Inner Cover is
closed, then close the Top Cover.
Wait for about 4 minutes until the
POWER lamp ashes and stays lit green,
then proceed.
66
Check that the POWER lamp lights
green.
66
Remove the orange tape completely.
Remove the protective wrap.
22
Inner Cover
This is where the ink tanks are to be installed.
Do not touch it until it stops.
If the Alarm lamp ashes
orange, press the ON
button to turn OFF the
printer, then redo from
step 2.
The following ink tanks are compatible with this printer.
Call 1-800-OK-CANON to locate a dealer near you, or visit the Canon online store at
www.shop.usa.canon.com
Order #
Ordering
Information
3
4
4
1
3
1
2
1
2
1
5
3
4
2
3
1
2
2
3
1
2
3
Realice la Alineación de cabezales (Print Head Alignment).
Abra y extienda el soporte del
papel (Paper Support).
Extraiga y abra la extensión de
la bandeja de salida (Output Tray
Extension).
11
Deslice la guía del papel (Paper
Guide) a ambos lados.
22
Cargue el MP-101 papel
suministrado en la bandeja posterior
(Rear Tray).
33
Ajuste la guía del papel (Paper
Guide) a la anchura del papel.
44
Pulse el botón REANUDAR/
CANCELAR (RESUME/CANCEL).
55
Cierre la extensión de la bandeja
de salida (Output Tray Extension)
y la bandeja de salida del papel
(Paper Output Tray), extraiga el
cassette (Cassette) y retire la tapa
de éste.
11
Deslice la guía del papel (Paper
Guide) a ambos lados y ajuste la
guía frontal al tamaño del papel.
33
Coloque el papel en el lado
derecho y ajuste la guía izquierda
al tamaño del papel utilizado.
44
Al cabo de 5 o 6 minutos, se
imprime el patrón en negro y
azul. La Alineación de cabezales
(Print Head Alignment) naliza.
66
Si la luz de Alarma (Alarm)
parpadea en naranja, pulse
el botón REANUDAR/
CANCELAR (RESUME/
CANCEL) y continúe con el
capítulo 4. Cuando nalice la
instalación, consulte el Manual
en pantalla para repetir la
Alineación de cabezales (Print
Head Alignment).
Coloque la cubierta del cassette
(Cassette Cover).
Deslice el cassette (Cassette)
hacia dentro hasta que haga clic
en su lugar.
55
Para obtener más información sobre el
papel, consulte el Manual en pantalla
que se instalará posteriormente.
Tire de la palanca en la dirección
de la echa y extienda el cassette
(Cassette).
22
Conguración
para papel normal
Perform the Print Head Alignment.
Open and extend the Paper
Support.
Draw out and open the Output Tray
Extension.
11
Slide the Paper Guide to both
ends.
22
Load the supplied MP-101 paper in
the Rear Tray.
33
Adjust the Paper Guide to t the
paper width.
44
Press the RESUME/CANCEL
button.
55
Close the Output Tray Extension
and the Paper Output Tray, then
pull out the Cassette and remove
its cover.
11
Slide the Paper Guide to the sides,
then adjust the front guide to the
paper size.
33
Place paper on the right side and
adjust the left guide to t the paper
size used.
44
Attach the Cassette Cover.
Slide the Cassette back in until it
clicks into place.
55
For information about paper, refer to
the On-screen Manual which will be
installed later.
In about 5 to 6 minutes, the blue-
black pattern is printed. Print Head
Alignment is complete.
66
If the Alarm lamp
ashes orange, press
the RESUME/CANCEL
button, then proceed to
Chapter 4. After installation
is complete, refer to the
On-screen Manual to redo
Print Head Alignment.
Pull the lever in the direction of the
arrow and extend the Cassette.
22
Setting Plain
Paper
5
3
2
1
No conecte aún el cable USB.
El sistema le solicitará que lo conecte durante la instalación utilizando el CD-ROM de instalación
(Setup CD-ROM)
.
Cierre todas las aplicaciones antes de la instalación.
Inicie una sesión con una cuenta de administrador.
Durante la instalación, es posible que se tenga que conectar a Internet. Esto puede implicar gastos de conexión.
Las pantallas se basan en Windows 7 operating system Home Premium y Mac OS X v.10.6.x. Las pantallas
reales pueden diferir en función de la versión del sistema operativo.
Pulse el botón ACTIVADO (ON)
para apagar la impresora.
El ruido de funcionamiento se detiene al
cabo de aproximadamente 1 minuto.
11
Introduzca el CD-ROM de
instalación en el ordenador.
22
Si el cable USB ya está conectado,
desconéctelo. Si aparece un mensaje
en el ordenador, haga clic en Cancelar
(Cancel).
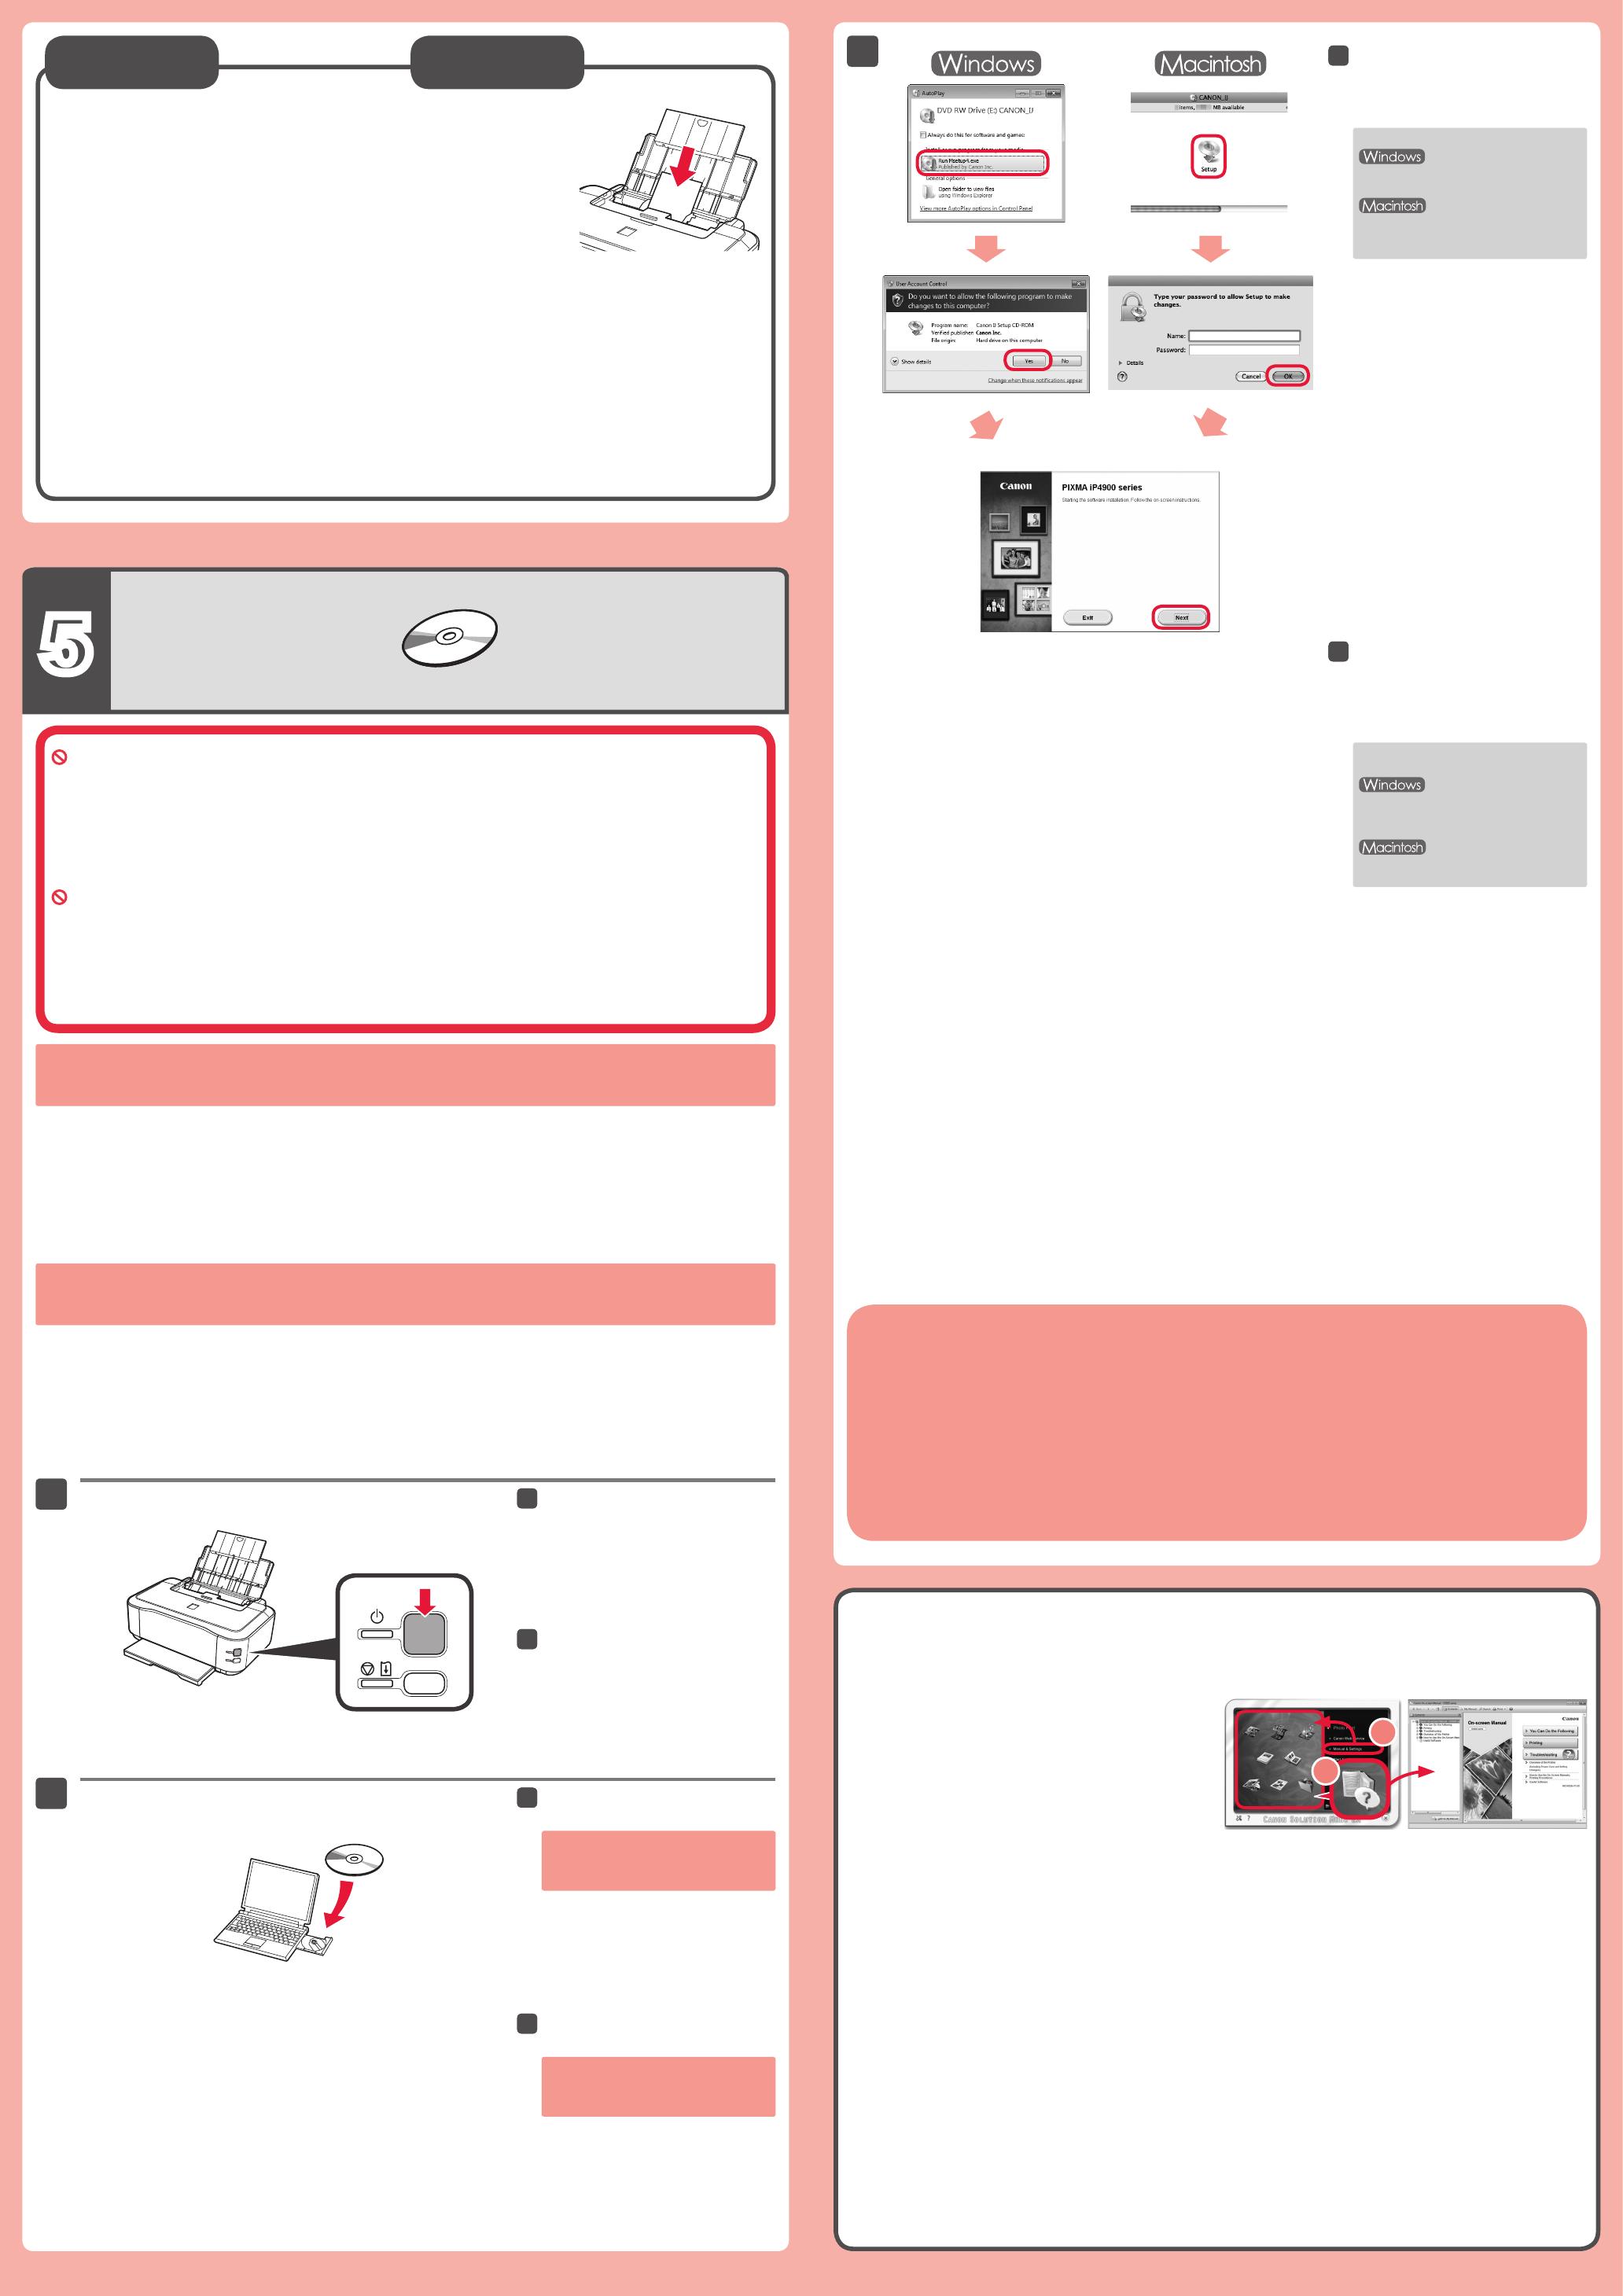
Para continuar, siga las
instrucciones que aparecen en
pantalla.
Si aparece la pantalla Seleccionar
idioma (Select Language), elija uno.
33
Si el CD-ROM no se ejecuta
automáticamente:
Haga doble clic en Mi (PC)
((My) Computer)
> icono de CD-ROM
> MSETUP4.EXE.
Haga doble clic en el icono de CD-ROM
del escritorio.
Para finalizar la instalación, siga las instrucciones que
aparezcan en la pantalla del ordenador.
Después de la instalación, se inicia “Solution Menu EX”.
Para abrir el Manual en pantalla, haga clic en Manual y conguración (Manual & Settings) > Manual en pantalla (On-screen
Manual). Consúltelo para detalles sobre las funciones, las operaciones y la resolución de problemas.
Deben estar seleccionados Solution Menu EX y el Manual en pantalla.
Léase el Manual en pantalla en el
ordenador
Cargue el papel fotográco en la bandeja posterior (Rear Tray) únicamente. Cuando use papel
fotográco, deberá ajustar la conguración de la impresora al tipo y al tamaño del soporte. Para obtener
más detalles, consulte el Manual en pantalla que se instalará posteriormente.
Cargar papel
fotográfico
Do not connect the USB cable yet.
You will be prompted to connect it during the installation using the Setup CD-ROM.
Quit all applications before installation.
Log on using an administrator account.
Internet connection may be required during the installation. Connection fees apply.
Screens are based on Windows 7 operating system Home Premium and Mac OS X v.10.6.x. Actual screens
may differ depending on the OS version.
Press the ON button to turn off the
printer.
Operating noise stops after about 1
minute.
11
Insert the CD-ROM into the
computer.
22
If the USB cable is already connected,
unplug it. If a message appears on the
computer, click Cancel.
Follow the on-screen instructions
to proceed.
If the Select Language screen appears,
select a language.
33
If the CD-ROM does not autorun:
Double-click (My) Computer > CD-
ROM icon > MSETUP4.EXE.
Double-click the CD-ROM icon on the
desktop.
To complete the installation, follow the on-screen instructions
on the computer.
Read the On-screen Manual on
the Computer
After the installation, “Solution Menu EX” starts.
To open the On-screen Manual, click Manual & Settings > On-screen Manual. Refer to it for details on the functions, operations,
and troubleshooting tips.
Solution Menu EX and the On-screen Manual need to be selected for installation.
Load photo paper in the Rear Tray only. When using photo paper, printer
settings for media type and size should be adjusted. For details, refer to the
On-screen Manual which will be installed later.
Loading Photo
Paper
  • Page 1 1
  • Page 2 2
  • Page 3 3
  • Page 4 4

Canon PIXMA iP4920 Owner's manual

Category
Label printers
Type
Owner's manual

Canon PIXMA iP4920: Unleash your creativity with this versatile inkjet photo printer designed for stunning photo prints and crisp documents. Experience borderless printing up to 8.5" x 11" and utilize five individual ink tanks for exceptional color accuracy and detail. Connect seamlessly with your devices via Wi-Fi or PictBridge for effortless printing from anywhere.

Ask a question and I''ll find the answer in the document

Finding information in a document is now easier with AI

in other languages