De Dietrich DHD1160X Owner's manual
- Category
- Cooker hoods
- Type
- Owner's manual

1
FR GUIDE D'UTILISATION
EN GUIDE TO INSTALLATION
ES MANUAL DE UTILIZACIÓN
PT GUIA DE UTILIZAÇÃO
DE BETRIEBSANLEITUNG
Hotte décorative
Decorative Hood
Campana extractora decorativa
Exaustor decorativo
Dekor-Dunstabzugshaube

2
EN
18
FR
02
ES
34
PT
52
DE
68
Dear Customer,
When you discover De Dietrich products you experience the same feel-
ings that only objects of value can arouse.
You are immediately attracted as soon as you see them. The quality of the
design is illustrated by its timelessness, degree of refinement and ele-
gance, and high standard of finish, resulting in perfect harmony between
different appliances.
Then comes the irresistible urge to touch. De Dietrich design
makes the most of sturdy and high-quality materials; priority is given to
authenticity.
By combining the most advanced technologies with the best materials, De
Dietrich makes products of the highest quality for the benefit of all those
who love cooking.
We hope you are extremely satisfied with this new appliance and will be
happy to receive your suggestions and to answer your questions. Please
contact our customer service department or use our Internet site.
We invite you to register your product at www.de-dietrich.com
to take
advantage of all the benefits the brand has to offer.
Thanking you for your confidence.
De Dietrich
Find further details on the brand at www.de-dietrich.com
Visit La Galerie De Dietrich, 6 rue de la Pépinière in Paris VIII
Open Tuesday to Saturday 10 a.m. to 7 p.m.
De Dietrich Customer Service 0892 02 88 04

3
1 / USER NOTICES
• Safety guidelines
___________________________________________
04
• Care for the environment
____________________________________
05
• Description of your appliance
________________________________
06
2 / INSTALLING YOUR APPLIANCE
• Using the recycling mode
___________________________________
07
• Electrical connection
_______________________________________
08
• Assembling the hood
_______________________________________
09
3 / USING YOUR APPLIANCE
• Control panel description
____________________________________
10
4 / CARING FOR AND CLEANING YOUR APPLIANCE
• Cleaning the filter and the fat drip tray
_________________________
13
• Changing the carbon filter
___________________________________
13
• Cleaning the outer surfaces
__________________________________
13
• Changing a bulb
___________________________________________
13
5 / TROUBLESHOOTING
__________________________________________
14
6 / AFTER-SALES SERVICE
________________________________________
15
CONTENTS
EN

4
11
/ USER NOTICES
SAFETY GUIDELINES
- This appliance was designed for use by pri-
vate individuals in their homes.
-This appliance is not intended for use by per-
sons (including children) with impaired phys-
ical, sensory or mental capacities, or by inex-
perienced or untrained persons, unless they
have received prior instruction or supervi-
sion in its operation by a person responsible
for their safety. Children must be supervised
to prevent them from playing with the appli-
ance.
-When you receive the appliance, unpack it or
have it unpacked immediately. Check its
overall condition. Make note of any concerns
or reservations on the delivery slip and make
sure that you keep a copy of this form.
-Your appliance is intended for standard
household use. Do not use it for commercial
or industrial purposes or for any other pur-
pose than that for which it was designed.
-Do not modify or attempt to modify any of the
characteristics of this appliance. That would
be dangerous to your safety.
-Repairs must only be performed by an ap-
proved specialist.
-Always unplug the hood before cleaning it or
performing other maintenance work.
-Provide adequate ventilation for the room in
the case of simultaneous use of the hood
and other appliances powered by an energy
source other than electricity. This will pre-
vent the hood from aspirating the combus-
tion gases.
-You should never “flambé” dishes under the
hood or operate gas rings under the hood
without placing cookware on them (the
flames sucked up into the hood can damage
the appliance).
-When frying food under the appliance, you
must carefully monitor the preparation at all
times. Oils and grease brought to very high
temperatures can catch fire.
-Respect the recommended cleaning and fil-
ter replacement frequency. The accumula-
tion of grease deposits may cause a fire.
-The hood should never be used over a com-
bustible fuel burning stove (wood, coal, etc.).
-Never use steam or high-pressure devices to
clean your appliance (requirement imposed
by electrical safety concerns).
-As part of our commitment to constantly im-
proving our products, we reserve the right to
make changes to them based on technologi-
cal advances to their technical, functional
and/or aesthetic properties.
-In order to easily locate the reference infor-
mation for your appliance, we recommend
that you note them on the “After-Sales Ser-
vice Department and Customer Relations”
page. (This page also explains to you where
to find this information on your appliance.)
•
Important
Keep this user guide with your appli-
ance. If the appliance is ever sold or trans-
ferred to another person, ensure that the
new owner receives this user guide. Please
become familiar with these recommenda-
tions before installing and using your oven.
They were written for your safety and the
safety of others.
Note
In the case of a kitchen heated by a
device connected to a chimney (a stove, for
example) the “recycling” version of the hood
should be installed. Do not use the hood
without the cartridge filters.
Suitable ventilation should be provided in
the room when the hood is used at the same
time as appliances operated by gas or
another combustible fuel.
EN

5
Note
Installation should only be undertaken by qualified fitters and technicians.
Note
Before using the carbon filter for the first time, remove the protective film.
CARE FOR THE ENVIRONMENT
•
—This appliance’s packing materials are recyclable. Please recycle the packaging and help pro-
tect the environment by placing it in the recycling bins provided by your local council.
— Your appliance also contains various recyclable materials. It therefore carries this lo-
go to indicate that used appliances should not be disposed of together with other
waste. The manufacturer will arrange for the appliance to be recycled properly, in ac-
cordance with European directive 2002/96/EC on Waste Electrical and Electronic
Equipment. Consult your local authority or your retailer to find the drop-off points for
used appliances nearest to your home.
— We thank you for your help in protecting the environment.
11
/ USER NOTICES
EN
Note
The accessible parts of this appliance can become hot when used with cooking appli-
ances.

6
•
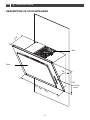
DESCRIPTION OF YOUR APPLIANCE
11
/ USER NOTICES
EN
370
557
600 - 900 - 1200
24°
Grid
Control
panel
Door

7
22
/ INSTALLING YOUR APPLIANCE
EN
- The appliance must be unplugged during installation or when any repair or maintenance work
is being carried out.
- Ensure that the network voltage corresponds to the voltage noted on the identification plate
located inside the hood.
- If the electrical installation at your residence requires any changes in order to hook up your
appliance, call upon a professional electrician.
- This cooker hood is used in recycling mode with an activated carbon filter which traps cook-
ing smells (section 4: changing the carbon filter). It can be used in evacuation mode with the
addition of optional ducts.

8
22
/ INSTALLING YOUR APPLIANCE
EN
Note
This appliance is delivered with a H 05 VVF power cord that has three 0.75-mm
2
con-
ductors (neutral, phase and ground). It must be connected to the 220-240V single phase mains
supply via an IEC 60083 standard socket which must remain accessible after installation or by
incorporating a switch in the fixed wiring, as required by installation regulations.
We cannot be held responsible for any accident resulting from an non-existent, defective or
incorrect ground lead. The fuse in your set-up must be 10 or 16 amperes. If the power cable
is damaged, call the after-sales service department in order to avoid danger.
Note
If the electrical installation in your residence requires any changes in order to hook up
your appliance, call upon a professional electrician.
Note
If the hood displays any malfunctions, unplug the appliance or remove the fuse corre-
sponding to the electrical socket where your appliance is plugged in.
•
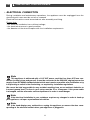
ELECTRICAL CONNECTION
During installation and maintenance operations, the appliance must be unplugged from the
electrical grid; fuses must be cut off or removed.
Electrical connections must be carried out after assembly and fixing.
Ensur
e that:
- the electrical installation has sufficient voltage,
- the electrical wires are in good condition
- the diameter of the wires complies with the installation requirements.

9
22
/ INSTALLING YOUR APPLIANCE
EN
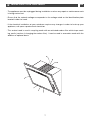
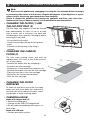
ASSEMBLING THE HOOD
Note
The hood must be installed in compliance with all applicable regulations concerning the
ventilation of premises. In France these regulations are described in DTU 61.1 from the CSTB.
In particular, the evacuated air should never be carried to a duct used to evacuate smoke from
appliances that use gas or other combustible fuels. Disused ducts may only be used after
approval from a competent specialist.
The distance between the hob and the lowest part of the cooker hood must be between 50 and
65 cm (use the template supplied with your appliance).
- Draw a horizontal line at the chosen height.
- Position the drilling template against the wall, use wall plugs and screws suitable for your type of
wall.
- Drill the holes. Insert the wall plugs.
- Screw the attachment strip to the wall.
- Fully unscrew screws 2 to withdraw the hook as far as it will go.
- Locate the appliance on the strip.
- Tighten screws 2 up again until the appliance is clamped flat against the wall.
- Screw 1 is used to adjust the horizontal positioning of the cooker hood.
- Open the door of the hood, remove the cartridge filter, and put the anti-lift screws (3) in place.
-Place the carbon filter in the filter cartridge with the 2 metal attachment brackets (see section
on changing the carbon filter).
-Secure the grid (4) in place with the 2 screws provided.
•
1
2
1
2
3
4

10
Tip
This Guide to Installation and Use is valid for several models. There may be minor dif-
ferences between the details and fittings on your appliance and the description provided.
33
/ USING YOUR APPLIANCE
EN
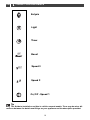
Speed 2
Speed 3
Boost
Timer
Light
Eolysis
On/Off - Speed 1

11
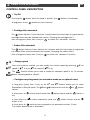
CONTROL PANEL DESCRIPTION
• On/Off
33
/ USING YOUR APPLIANCE EN
Pressing the button starts the hood in speed 1 (the button is illuminated).
A long press on the button turns the hood off.
Once the hood has started, you can modify the suction speed by pressing for
speed 2 ( is lit) or for speed 3 ( is lit).
The function allows your hood to remain at maximum speed 4 for 10 minutes,
before switching back to speed 2.
• Change speed
• Configure recycling mode (or evacuation mode as an optional extra)
A long press (more than 2 sec) on the and buttons allows you to select
Evacuation or Recycle mode. The and buttons are lit and the or button
flashes.
A short press on selects recycle mode (the button flashes and the button is
off).
A short press on selects evacuation mode (the button flashes and the
button is off.
A short press on confirms the configuration (or automatic set after 10 sec).
The hood’s default mode is evacuation.
• Cartridge filter saturated
The button flashes (1 short flash) for 2 minutes after the hood stops to signal that the
cartridge filters must be cleaned (see section “Cleaning the cartridge filter”).
Give a long press (more than 2 sec) on to unlock the “saturation” function.
• Carbon filter saturated
The button flashes (2 short flashes) for 2 minutes after the hood stops to signal that
the carbon filters must be cleaned (see section “Changing the carbon filter”).
Give a long press (more than 2 sec) on to unlock the “saturation” function.

12
33
/ USING YOUR APPLIANCE
EN
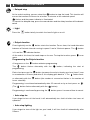
• Delayed stop
• Light
• Eolysis function
Pressing briefly on the button starts the function. For an hour, the hood alternates
between a 5-minute interval running in speed 1 and a 10-minute pause.. The button
is lit and the indicator flashes.
At the end of this time, the hood stops on its own. To stop the function, press once
more.
Programming the Eolysis function
A long press on the button activates programming.
The button flashes alternately with the button, indicating the start of
programming.
Each short press on the button increases the eolysis time by one hour (from 1 hour
to a maximum of 9 hours) and after 9, this display goes back to 1. The button flash-
es alternately with the button (the number of successive flashes is the number of
hours selected).
Programming is confirmed automatically after 25 seconds or by a short press on .
(The button flashes alternately with the button).
Programming is confirmed by pressing the button; press it a second time to cancel.
• Auto stop fan
•
Auto stop lighting
If you forget to turn off the hood, it will automatically turn itself off after nine hours of
operation.
If you forget to turn off the light on your hood, it will turn itself off automatically after
9 hours.
Press the button briefly to switch the hood’s light on or off.
At the end of cooking, you can select the button to stop the hood. This function will
ensure that suction continues for a further 10 minutes at the selected speed.
flashes and the power indicator is illuminated.
To cancel the delayed stop, press the same button and the delay function will be deacti-
vated.

13
44
/ CARING FOR AND CLEANING YOUR APPLIANCE
EN
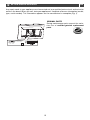
CHANGING A BULB
•
Model with halogen bulb (4)
— Remove the lamp glass
— Change the G4-20W-12V halogen bulb.
— Re-assemble by repeating these steps in re-
verse order.
Model with LED bulb
— Contact after-sales service
4
CLEANING THE OUTER
SURFACES
To clean the outside of your hood, use soapy
water, rinse with fresh water then wipe with a
soft cloth (do not use abrasive creams, scour-
ing sponges or metal scouring pads).
•
Note
Disconnect the appliance by unplugging it or using the circuit breaker before cleaning it
or performing other forms of maintenance. Regular maintenance of your appliance is a guar-
antee of proper functioning, good performance and durability.
Failure to respect the guidelines for cleaning the appliance and filters may cause fires.
Please ensure that you adhere carefully to the maintenance recommendations.
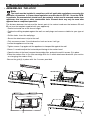
CLEANING THE FILTER (1) AND
THE FAT DRIP TRAY (2)
The filter traps fatty vapours. It must be cleaned
after approximately 30 hours of use or at least
once a month. Use a soft brush, hot water and
mild detergent. Rinse and dry it thoroughly before
returning it to the hood.
- Lift and hold the the door.
- Unclip the cartridge filter by pressing down-
ward.
- Remove the fat drip tray (2) by lifting it
upwards.
•
CHANGING THE CARBON
FILTER (3)
The filter traps cooking smells and must be
replaced every 120 hours of use. Order these fil-
ters at your retailer.
- Remove the carbon filter by unclipping it.
- Dismantle the filter cartridge
- Remove the 2 metal attachment brackets (4)
- Remove the carbon filter from the filter cartridge
- Place the new filter in the filter cartridge
- Reposition the 2 attachment brackets
- Refit the filter cartridge
•
1
2
3
4

14
55
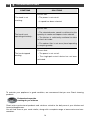
/ TROUBLESHOOTING
The hood is not
operating effectively...
Ensure that:
• The selected motor speed is sufficient for the
quantity of smoke and vapours to be cleared.
• The kitchen is sufficiently ventilated to allow
for fresh air intake.
• The carbon filter is not worn (hood operating
in recycling mode).
The hood is not
working...
Ensure that:
• The power is not cut off.
• A speed has been selected.
The hood stopped
working
Ensure that:
• The power is not cut off.
• The single-pole cut-off device has not been
activated.
SOLUTIONSSYMPTOMS
EN
To maintain your appliance in good condition, we recommend that you use Clearit cleaning
products.
Clearit offers professional products and solutions suited to the daily care of your kitchen and
household appliances.
You will find them at your usual retailer, along with a complete range of accessories and con-
sumables.
Professional expertise
working for you at home

15
Any repair made to your appliance must be carried out by a qualified professional, authorised to
work on the brand. When you call, state your appliance’s complete reference information (model,
type, serial number). This information appears on the manufacturer’s nameplate
(Fig. 1).
66
/ AFTER-SALES SERVICE
EN
ORIGINAL PARTS
During maintenance work, request the exclu-
sive use of
certified genuine replacement
parts.
BRANDT APPLIANCES SAS
7 rue Henri Becquerel
92500 RUEIL MALMAISON
230V ~ 50 Hz
MADE IN FRANCE

16
CZ5700919_01 - 09/11
-
 1
1
-
 2
2
-
 3
3
-
 4
4
-
 5
5
-
 6
6
-
 7
7
-
 8
8
-
 9
9
-
 10
10
-
 11
11
-
 12
12
-
 13
13
-
 14
14
-
 15
15
-
 16
16


De Dietrich DHD1160X Owner's manual
- Category
- Cooker hoods
- Type
- Owner's manual
Ask a question and I''ll find the answer in the document
Finding information in a document is now easier with AI
Related papers
-
De Dietrich DHD1187X Owner's manual
-
 De Dietrich CFB-90AX Owner's manual
-
De Dietrich DHD1127B Owner's manual
-
 De Dietrich DHD1154X Owner's manual
-
 De Dietrich CFB-90AX Owner's manual
-
De Dietrich DHD1534X Owner's manual
-
 De Dietrich DHB7963XC Owner's manual
-
 De Dietrich DHD1527B Owner's manual
-
De Dietrich DHD1524X Owner's manual


Other documents
-
Groupe Brandt AD1118X User manual
-
Groupe Brandt DHT1119X Owner's manual
-
-
Groupe Brandt DBT9470XI Owner's manual
-
Groupe Brandt DHD509XU1 Owner's manual
-
-
-
-
-