Ferm LTM1007 Owner's manual
- Category
- Grass trimmers
- Type
- Owner's manual
This manual is also suitable for

Art. no. LTM1007
FGT-12V
www.ferm.com
GB
D
NL
F
E
P
I
USERS MANUAL 06
GEBRAUCHSANWEISUNG 15
GEBRUIKSAANWIJZING 25
MODE D’EMPLOI 34
MANUAL DE INSTRUCCIONES 43
MANUAL DE INSTRUÇÕES 52
MANUALE UTILIZZATI 61
РУКОВОДСТВО ПО ЭКСПЛУАТАЦИИ 71
O¢∏°π∂™ Ã∏™∂ø™ 80
www.ferm.com 0604-27.1
GB Subject to change
D Änderungen vorbehalten
NL Wijzigingen voorbehouden
F Sous réserve de modifications
E Reservado el derecho de
modificaciones técnicas
P Reservado o direito a modificações
I Con riserva di modifiche
RUS Комлания Ferm постоянно
совершенству ет выпускаему ю ею
проедукцию. Позтому в техничесие
характеристики могут вноситься
без предварительного
уведомления.
GR HÚԇ̠ÙÔ ‰Èη›ˆÌ· ·ÏÏ·ÁÒÓ
RUS
GR
Page is loading ...

Ferm 03
Fig.4
Fig.5
Fig.6
90 Ferm
Spare parts list FGT-12V
Ferm nr. Description Position no.
501567 Switch 7
501568 Side handle 14, 15, 16, 18, 19
501569 Protective cover (set) 43, 44, 45, 46, 47
LTA1002 Spare blade FHGT-6V, 10 pcs 48
501493 Charger 52
Page is loading ...
Page is loading ...
Page is loading ...
Page is loading ...

Ferm 85
£· Ú¤ÂÈ ¿ÓÙÔÙ ӷ ·ÔıË·ÂÙ ÙÔÓ ÊÔÚÙÈÛÙ‹, ÙË Ì·Ù·Ú›· Î·È ÙÔ Ì˯¿ÓËÌ· Û ¤Ó·
·ÛʷϤ˜ ÛÙÂÁÓfi ̤ÚÔ˜, Ì·ÎÚÈ¿ ·fi Ù· ·È‰È¿. ∏ ıÂÚÌÔÎÚ·Û›· ÛÙÔÓ ¯ÒÚÔ ·Ôı‹Î¢Û˘ ‰ÂÓ
ı· Ú¤ÂÈ Ó· ÍÂÂÚÓ¿ ÙÔ˘˜ 40Æ CØ ÁÈ· ÙÔÓ ÏfiÁÔ ·˘Ùfi ÔÈ Û˘Û΢¤˜ ‰ÂÓ ı· Ú¤ÂÈ Ó· ̤ÓÔ˘Ó
ÂÎÙÂıÂÈ̤Ó˜ ÛÙÔ Êˆ˜ ÙÔ˘ ‹ÏÈÔ˘ ›Ûˆ ·fi Ù˙¿ÌÈ· ‹ Ó· ÙÔÔıÂÙÔ‡ÓÙ·È ‰›Ï· Û ÌÂÙ·ÏÏÈΤ˜
ηٷÛ΢¤˜.
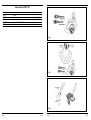
3. ™À§§√°∏ º√ƒ∆π™∏™ ∫∞π ∂¶∞¡∞º√ƒ∆π™∏™ ∆ø¡ ª¶∞∆∞ƒπø¡
¶ÚÈÓ ÙËÓ ÚÒÙË ¯Ú‹ÛË ÊÔÚÙ›ÛÙ ÙË Û˘ÏÏÔÁ‹ Ì·Ù·ÚÈÒÓ Â› 16 ÒÚ˜!
™˘ÏÏÔÁ‹ ÊfiÚÙÈÛ˘ Ì·Ù·ÚÈÒÓ
∂ÈÎ. 2
ñ ∏ Û˘ÏÏÔÁ‹ Ì·Ù·ÚÈÒÓ Î·Ù¿ ÙË ÊfiÚÙÈÛË Ú¤ÂÈ Ó· ·ÔÛ˘Ó‰ÂıÔ‡Ó ·fi ÙË Ì˯·Ó‹.
ñ ∞ÔÛ˘Ó‰¤ÛÙ ÙË Û˘ÏÏÔÁ‹ Ì·Ù·ÚÈÒÓ ÛÙÚ¤ÊÔÓÙ·˜ ÙÔ ÌÂÙ·ÏÏÈÎfi ‰·¯Ù˘Ï›‰È
Û˘ÁÎÚ¿ÙËÛ˘ ηٿ ÙËÓ Î·Ù‡ı˘ÓÛË ÙˆÓ ˆÚÔ‰ÂȯÙÒÓ. ªÂÙ¿ ÌÔÚ› ÙÔ Û˘Ó‰ÂÙÈÎfi
ÂÚ›‚ÏËÌ· Ó· ·Ê·ÈÚÂı› ·fi ÙË Û˘ÏÏÔÁ‹ Ì·Ù·ÚÈÒÓ. ¶ÚÔÛı¤ÛÙ ÙÔÓ ÚÔÌËıÂ˘Ì¤ÓÔ
ÊÔÚÙÈÛÙ‹ Ì·Ù·ÚÈÒÓ ÛÙËÓ Ú›˙· Ù˘ Û˘ÏÏÔÁ‹˜ Ì·Ù·ÚÈÒÓ, Û˘Ó‰¤ÛÙ ÙÔÓ ÊÔÚÙÈÛÙ‹
ÛÙËÓ ·ÚÔ¯‹ ÙÔ˘ ËÏÂÎÙÚÈÛÌÔ‡ Î·È ‚¿ÏÙ ÙËÓ ÌÚÔ˜.
ñ ∏ Û˘ÏÏÔÁ‹ ÙˆÓ ÂÓÙÂÏÒ˜ ¿‰ÂÈˆÓ Ì·Ù·ÚÈÒÓ ¯ÚÂÈ¿˙ÂÙ·È ÔÏfiÎÏËÚ˜ 12 ÒÚ˜ Ó·
ÊÔÚÙÈÛÙ›. °È· ÙËÓ Ù‹ÚËÛË Ù˘ Û˘ÏÏÔÁ‹˜ Ì·Ù·ÚÈÒÓ Û ÈÔ Î·Ï‡ÙÂÚË Î·Ù¿ÛÙ·ÛË ÙÔ
ηχÙÂÚÔ Â›Ó·È Ó· ÊÔÚÙ›˙ÂÙ·È ÌÂÙ¿ ÙËÓ Î¿ı ¯Ú‹ÛË Ë Â¿Ó Ë Ì˯·Ó‹ ‰Â ¯ÚËÛÈÌÔÔÈÔ‡Ù·Ó
ÂÚÈÛÛfiÙÂÚÔ ·fi 6 Ì‹Ó˜.
µÂ‚·Èˆı›ÙÂ, fiÙÈ ÔÈ ‰È·ÎfiÙ˜ ‰ÂÓ Â›Ó·È Û˘Ó‰Â̤ÓÔÈ ÛÙËÓ ÛÙ¿ÛË „On“, ÚÈÓ
Û˘Ó‰¤ÛÂÙ ÙË Û˘ÏÏÔÁ‹ Ì·Ù·ÚÈÒÓ ÛÙË Ì˯·Ó‹.
™ËÌ·ÓÙÈÎfi! ¶ÔÙ¤ ÌËÓ ·ÔıË·ÂÙ ÙËÓ ¯ÔÚÙÔÎÔÙÈ΋ Ì˯·Ó‹ Ì ÙË Û˘ÏÏÔÁ‹
Ì·Ù·ÚÈÒÓ. ºÔÚÙ›ÛÙ ÙË Û˘ÏÏÔÁ‹ Ì·Ù·ÚÈÒÓ ÌÂÙ¿ ÙËÓ Î¿ı ¯Ú‹ÛË Ë ÌÂÙ¿ ·fi
οı 6 Ì‹Ó˜ ·Ôı‹Î¢Û˘.
¶·Ú·Ù‹ÚËÛË: ∏ Û˘ÏÏÔÁ‹ Ì·Ù·ÚÈÒÓ ‰ÂÓ ı· ˙ËÌȈı›, Â¿Ó ı· ÊÔÚÙ›˙ÂÙ·È ÂÚÈÛÛfiÙÂÚÔ ·fi
12 ÒÚ˜.
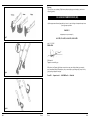
4. ™À¡∞ƒª√§√°∏™∏
∏ ÚfiÛıÂÛË Ù˘ ÚÔÊ˘Ï·ÎÙÈ΋˜ ¤Ӊ˘Û˘ Ù˘ ¯ÔÚÙÔÎÔÙÈ΋˜ Ì˯·Ó‹˜ ÛÙË ‚¿ÛË Ù˘
ÎÂÊ·Ï‹˜
∂ÈÎ. 3
• ∆ÔÔıÂÙ‹ÛÙ ÙËÓ ÚÔÊ˘Ï·ÎÙÈ΋ ¤Ӊ˘ÛË Ù˘ ¯ÔÚÙÔÎÔÙÈ΋˜ Ì˯·Ó‹˜ Ì ÙËÓ ·ÓÔȯً
ÛÙÚÔÁÁ˘ÏÂ̤ÓË ¿ÎÚË Ù˘ ÎÂÊ·Ï‹˜ Ù˘ ¯ÔÚÙÔÎÔÙÈ΋˜ Ì˯·Ó‹˜ Î·È ÛÙÂÚÂÒÛÙ ٷ
ÙÛÈÁÁÂÏ¿ÎÈ· ÛÙÔÓ ¿ÙÔ Ù˘ ÚÔÊ˘Ï·ÎÙÈ΋˜ ¤Ӊ˘Û˘ ̤ÛÔÓ ÙˆÓ ÔÒÓ ÛÙÔÓ ¿ÙÔ Ù˘
‚¿Û˘ Ù˘ ÎÂÊ·Ï‹˜ Ù˘ ¯ÔÚÙÔÎÔÙÈ΋˜ Ì˯·Ó‹˜.
08 Ferm
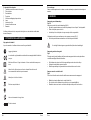
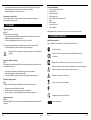
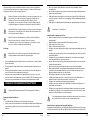
Do not use in rain.
Wear eye and ear protection.
Wear protection gloves
Keep bystanders away
Sound power level
Faulty and/or discarded electrical or electronic apparatus have to be collected at
the appropriate recycling locations.
Safety instructions
• Dispose of plastic bags safely - they are a suffocation hazard for young children.
• Keep the area you are working in clean and tidy.
• Do not use power tools in the rain or wet environments.
• Do not use power tools where there is a risk of fire or explosion - i.e. near flammable liquids
or gases.
• Do not allow children into the area where you are working.
• Do not expose tools to rain.
• Do not let children or other people touch power tools.
• Do not leave the power tool unattended and always remove the battery pack from the
appliance after use.
• Store in a dry place well out of reach of children.
• Always use safety glasses. We also recommend the use of ear protectors.
• Wear the right clothes - not loose fitting or jewellery and ensure garments cannot come
into contact with moving parts.
• Wear non-slip shoes. Do not wear sandals or open-toed shoes.
• Before using any power tool, check first for damaged parts and if found do not use it
before the part or parts have been replaced with new ones.
• Do not use power tools when you are tired or have been drinking alcohol.
• Never carry the tool / charger by the cord or yank it to disconnect it from the socket. Keep
the cord away from heat, oil and sharp edges.
• Do not force the appliance - let it work at the rate for which it was intended
• Do not overreach while working - you may lose your balance.
• Never use this appliance without the safety guard fitted. It must always remain fitted.
• Only use spare parts and attachments supplied by Ferm. Use of attachments other than
those supplied or recommended by Ferm will invalidate your guarantee and could be
dangerous.
• Only use this appliance for its intended purpose - trimming grass and light bushes.

Ferm 09
Above all - Be careful
Specific safety instructions
• Keep your hands and feet away from the cutting area at all times. Keep your second (front)
hand on the auxilary handle.
• Always hold the trimmer at a safe distance from the body.
• Always wear protective goggles.
• Only use the trimmer in daylight.
• Ensure the ventilation openings are clear of debris at all times.
• Ensure there are no people or animals within 3 metres of your trimming area.
• Ensure that the terminals cannot be shorted by other metal parts such as screws nail etc.
• Before using the trimmer, remove any stones, sticks, toys or other foreign objects from the
area.
• Never reach into the underside of the appliance with the battery pack still attached.
• Keep the cutting tools sharp and clean for better performance. Follow instructions for
lubrication and cleaning accessories. Keep handles dry and clean free from oil and
grease.
• do not carry the trimmer with a finger on the switch.
• The use of any accessory or attachment, other than those recommended in this
instruction manual, may present a risk of personal injury.
• Ensure that the battery pack is correct for the tool.
• Ensure that the outside surface of the battery pack or tool is clean and dry before plugging
into charger.
• Ensure that batteries are charged using the correct charger recommended by the
manufacturer. Incorrect use may result in a risk of electric shock, overheating or leakage
of corrosive liquid from the battery pack.
Should you experience any problems at all with this product or require spare parts,
contact your nearest authorized service centre or dealer.
Safety instructions for the battery charger
The charger is specifically designed for use from a standard domestic electricity supply (230 V
- 240 V). Do not attempt to connect it to any other power supply. Please read and follow the
instructions printed on the charger and battery pack. The battery pack must be charged
indoors only, in a clean dry place.
Warning! If the battery pack is cracked or damaged or has received a heavy knock
you must not insert it into the charger. There is a risk of electric shock or
electrocution. The battery pack must be replaced and the damaged battery pack
disposed of safely. Ensure the charger and the charger lead is not placed where it
can be tripped over or stepped upon.
Warning! Do not allow liquid of any kind to come into contact with the charger.
There is a risk of electric shock. The battery pack must be completely dry before
being inserted into the charger.
84 Ferm
Ô˘ Û˘ÓÈÛÙ¿Ù·È ·fi ÙÔÓ Î·Ù·Û΢·ÛÙ‹. ∏ Ï·Óı·Ṳ̂ÓË ¯Ú‹ÛË ÌÔÚ› Ó· ¤¯ÂÈ ˆ˜
·ÔÙ¤ÏÂÛÌ· ÙÔÓ Î›Ó‰˘ÓÔ ËÏÂÎÙÚÔÏËÍ›·˜, ˘ÂÚÊfiÚÙÈÛ˘ ‹ ‰È·ÚÚÔ‹˜ ÂÈ‚Ï·‚ÒÓ
˘ÁÚÒÓ ·fi ÙË Ì·Ù·Ú›·.
∂¿Ó ·ÓÙÈÌÂÙˆ›ÛÂÙ ÔÔÈÔ‰‹ÔÙ Úfi‚ÏËÌ· Ì ÙÔ ÚÔ˚fiÓ ·˘Ùfi ‹ ¿Ó
¯ÚÂÈ¿˙ÂÛÙ ·ÓÙ·ÏÏ·ÎÙÈο, Û·˜ ·Ú·Î·Ïԇ̠ӷ ¤ÚıÂÙ Û ·ʋ Ì ÙÔ
ÂÍÔ˘ÛÈÔ‰ÔÙË̤ÓÔ Î¤ÓÙÚÔ Ù¯ÓÈ΋˜ ˘ÔÛÙ‹ÚÈ͢ ‹ Ì ÙÔÓ ·ÓÙÈÚfiÛˆÔ Ù˘
ÂÚÈÔ¯‹˜ Û·˜.
¶ÚÔÂȉÔÔÈ‹ÛÂȘ ·ÛÊ·Ï›·˜ ÁÈ· ÙÔÓ ÊÔÚÙÈÛÙ‹ Ù˘ Ì·Ù·Ú›·˜
√ ÊÔÚÙÈÛÙ‹˜ ¤¯ÂÈ Û¯Â‰È·ÛÙ› ÂȉÈο ÒÛÙ ӷ ¯ÚËÛÈÌÔÔÈÂ›Ù·È ÙÚÔÊÔ‰ÔÙÔ‡ÌÂÓÔ˜ ·fi ÌÈ·
Û˘Ó‹ıË ÔÈÎȷ΋ ËÏÂÎÙÚÈ΋ ÂÁηٿÛÙ·ÛË (230 - 240 volt). ªËÓ ÚÔÛ·ı‹ÛÂÙ ӷ ÙÔÓ
Û˘Ó‰¤ÛÂÙ Û ÔÔÈ·‰‹ÔÙ ¿ÏÏË ËÁ‹ ÙÚÔÊÔ‰ÔÛ›·˜ ËÏÂÎÙÚÈÎÔ‡ Ú‡̷ÙÔ˜. ™·˜
·Ú·Î·Ïԇ̠ÚÈÓ ·fi ÙË ¯Ú‹ÛË Ó· ‰È·‚¿ÛÂÙÂ Î·È Ó· ·ÎÔÏÔ˘ı‹ÛÂÙ ÙȘ Ô‰ËÁ›Â˜ Ô˘
·Ó·ÁÚ¿ÊÔÓÙ·È ÛÙÔÓ ÊÔÚÙÈÛÙ‹ Î·È ÛÙË Ì·Ù·Ú›·.
∏ Ì·Ù·Ú›· ı· Ú¤ÂÈ Ó· ÊÔÚÙ›˙ÂÙ·È ÌfiÓÔ Û ÂÛˆÙÂÚÈÎÔ‡˜ ¯ÒÚÔ˘˜ - Û ¤Ó·Ó ηı·Úfi ηÈ
ÛÙÂÁÓfi ÛËÌ›Ô.
¶ÚÔÂȉÔÔÈËÛË! ¢ÂÓ ı· Ú¤ÂÈ Ó· ‚¿˙ÂÙ ÙË Ì·Ù·Ú›· ÛÙÔÓ ÊÔÚÙÈÛÙ‹ Â¿Ó Ë
Ì·Ù·Ú›· ¤¯ÂÈ Î¿ÔÈ· ÚˆÁÌ‹, ÊıÔÚ¿ ‹ ‚Ï¿‚Ë, ‹ Â¿Ó ¤¯ÂÈ ˘ÔÛÙ› οÔÈÔ ÌÂÁ¿ÏÔ
ÎÙ‡ËÌ·. À¿Ú¯ÂÈ Î›Ó‰˘ÓÔ˜ Ó· Û·˜ ÎÙ˘‹ÛÂÈ ÙÔ Ú‡̷ ‹ Ó· ¿ıÂÙÂ
ËÏÂÎÙÚÔÏËÍ›·. £· Ú¤ÂÈ Ó· ·ÓÙÈηٷÛÙ‹ÛÂÙ ÙË Ì·Ù·Ú›· Ì Ӥ· Î·È Ó·
ÚÔ¯ˆÚ‹ÛÂÙ ÛÙËÓ ·ÛÊ·Ï‹ ·ÔÎÔÌȉ‹ Î·È ·fiÚÚÈ„Ë Ù˘ ¯·Ï·Ṳ̂Ó˘
Ì·Ù·Ú›·˜. £· Ú¤ÂÈ Ó· ÙÔÔıÂÙ›Ù ÙÔÓ ÊÔÚÙÈÛÙ‹ Î·È ÙÔ Î·ÏÒ‰ÈÔ ÙÔ˘
ÊÔÚÙÈÛÙ‹ Û ·ÛʷϤ˜ ÛËÌ›Ô, ÒÛÙ ӷ ÌËÓ ÛÎÔÓÙ¿ÊÙÂÙ ¿ӈ ÙÔ˘˜ Î·È Ó· ÌËÓ
Ù· ·Ù¿ÙÂ.
¶ÚÔÂȉÔÔÈËÛË! ªËÓ ·Ê‹ÓÂÙ ηÓÂÓfi˜ ›‰Ô˘˜ ˘ÁÚ¿ Ó· ¤Ú¯ÔÓÙ·È Û ·ʋ ÌÂ
ÙÔÓ ÊÔÚÙÈÛÙ‹. À¿Ú¯ÂÈ Î›Ó‰˘ÓÔ˜ ËÏÂÎÙÚÔÏËÍ›·˜. ∏ Ì·Ù·Ú›· ı· Ú¤ÂÈ Ó·
Â›Ó·È ·Ôχو˜ ÛÙÂÁÓ‹ ÚÈÓ ÌÂÈ ÛÙÔÓ ÊÔÚÙÈÛÙ‹.
¶ÚÔÂȉÔÔÈËÛË! ∂¿Ó ÁÈ· ÔÔÈÔÓ‰‹ÔÙ ÏfiÁÔ ‚Á·›ÓÔ˘Ó ˘ÁÚ¿ ·fi ÙË Ì·Ù·Ú›·,
ÌËÓ ¤Ú¯ÂÛÙ Û ·ʋ Ì ·˘Ù¿. ∂¿Ó ˘¿ÚÍÂÈ Î·Ù¿ Ï¿ıÔ˜ ·ʋ Ì ·˘Ù¿ Ù· Ôͤ·
Ù˘ Ì·Ù·Ú›·˜, ÍÂχÓÙ ٷ Ì ÓÂÚfi. ∂¿Ó Ù· Ôͤ· ¤ÚıÔ˘Ó Û ·ʋ Ì ٷ Ì¿ÙÈ·
Û·˜, ˙ËÙ‹ÛÙ ȷÙÚÈ΋ ‚Ô‹ıÂÈ·.
∫·ı·ÚÈÛÌÔ˜
°È· ÙË Ì›ˆÛË ÙÔ˘ ÎÈÓ‰‡ÓÔ˘ ËÏÂÎÙÚÔÏËÍ›·˜, ÚÈÓ ·fi ÙÔÓ Î·ı·ÚÈÛÌfi ÙÔ˘
ÊÔÚÙÈÛÙ‹ ÙÔ ÊȘ ÙÔ˘ ÊÔÚÙÈÛÙ‹ ı· Ú¤ÂÈ Ó· ·ÔÛ˘Ó‰¤ÂÙ·È ·fi ÙËÓ Ú›˙· Î·È Ó·
‚Á·›ÓÂÈ Ë Ì·Ù·Ú›·.
∞Ê‹ÛÙ ÙË Ì·Ù·Ú›· Ó· ÎÚ˘ÒÛÂÈ ÌÂÙ¿ ÙË ¯Ú‹ÛË Û ¤Ó· ·ÛʷϤ˜, ‰ÚÔÛÂÚfi Î·È Î·Ï¿
·ÂÚÈ˙fiÌÂÓÔ Ì¤ÚÔ˜, Ì·ÎÚÈ¿ ·fi Ù· ·È‰È¿.
ªËÓ ÂȯÂÈÚ‹ÛÂÙ ӷ ÊÔÚÙ›ÛÂÙ ÙË Ì·Ù·Ú›· Ì ¿ÏÏÔ˘˜ ÊÔÚÙÈÛÙ¤˜, ·ÏÏ¿ ÌfiÓÔ Ì ÙÔÓ
ÊÔÚÙÈÛÙ‹ Ô˘ Û˘Ì·Ú·‰›‰ÂÙ·È Ì ÙÔ ÚÔ˚fiÓ ·˘Ùfi. ªËÓ ÚÔÛ·ı‹ÛÂÙ ӷ
·ÔÛ˘Ó·ÚÌÔÏÔÁ‹ÛÂÙ ÙÔÓ ÊÔÚÙÈÛÙ‹ - ·Ó ‰ÂÓ ÏÂÈÙÔ˘ÚÁ›, ı· Ú¤ÂÈ Ó· ÙÔÓ ·Ú·‰ÒÛÂÙ ÛÙÔ
ÏËÛȤÛÙÂÚÔ ÂÍÔ˘ÛÈÔ‰ÔÙË̤ÓÔ Î¤ÓÙÚÔ Ù¯ÓÈ΋˜ ˘ÔÛÙ‹ÚÈ͢ ÁÈ· ÂÈÛ΢‹.
Page is loading ...
Page is loading ...

Ferm 81
13. ªÂÙ·Û¯ËÌ·ÙÈÛÙ‹˜ ÊÔÚÙ›Ûˆ˜
14. ºÈ˜ ÙÔ˘ ÊÔÚÙÈÛÙ‹
¶ÂÚȯÔÌÂÓ· Ù˘ Û˘Û΢·ÛÈ·˜
1 ÃÔÚÙÔÎÔÙÈ΋ Ì˯·Ó‹ Ì ¯ÔÚ‰‹ ‰›¯ˆ˜ ηÏÒ‰ÈÔ
1 ™˘ÏÏÔÁ‹ Ì·Ù·ÚÈÒÓ
1 ºÔÚÙÈÛÙ‹˜ Ì·Ù·ÚÈÒÓ
1 ¶ÚÔÊ˘Ï·ÎÙÈÎfi˜ ÂÍÔÏÈÛÌfi˜
1 ™ÂÙ ‚ȉÒÓ ÙÔ˘ ÚÔÊ˘Ï·ÎÙÈÎÔ‡ ÂÍÔÏÈÛÌÔ‡
6 §Â›‰Â˜
1 √‰ËÁȘ ¯ÚËÛˆ˜
1 √‰ËÁ›Â˜ ·ÛÊ·Ï›·˜
1 ∫¿ÚÙ· ÂÁÁ‡ËÛ˘
∂ϤÁÍÙÂ, Â¿Ó Ë Ì˯·Ó‹, Ù· ÂχıÂÚ· ÂÍ·ÚÙ‹Ì·Ù· Î·È Ù· ·ÍÂÛÔ˘¿Ú ‰ÂÓ ¤·ı·Ó ‚Ï¿‚˜ ηٿ
ÙË ÌÂÙ·ÊÔÚ¿.
2. √¢∏°π∂™ ∞™º∞§∂π∞™
∂ÂÍ‹ÊËÛË Û˘Ì‚fiψÓ
™’ ·˘Ùfi ÙÔ ÂÁ¯ÂÈÚ›‰ÈÔ Î·È/‹ ÛÙÔ Ì˯¿ÓËÌ· ¯ÚËÛÈÌÔÔÈÔ‡ÓÙ·È Ù· ·ÎfiÏÔ˘ı· ۇ̂ÔÏ·:
¢È·‚¿ÛÙ ÙȘ Ô‰ËÁ›Â˜.
™Â ÂÓ·ÚÌfiÓÈÛË Ì ԢÛÈÒ‰Ë ÈÛ¯‡ÔÓÙ· ÚfiÙ˘· ·ÛÊ·Ï›·˜ ÙˆÓ ∂˘Úˆ·˚ÎÒÓ
√‰ËÁÈÒÓ.
ªË¯·Ó‹ ÎÏ¿Û˘ πI – ¢ÈÏ‹ ÌfiÓˆÛË - ¢ÂÓ ··ÈÙÂ›Ù·È ÁÂȈ̤ÓÔ˜ ÚÂ˘Ì·ÙÔÏ‹Ù˘.
ÀÔ‰ËÏÒÓÂÈ Î›Ó‰˘ÓÔ ÙÚ·˘Ì·ÙÈÛÌÔ‡, ı·Ó¿ÙÔ˘ ‹ ˙ËÌÈ¿˜ ÙÔ˘ ÂÚÁ·Ï›Ԣ, ÛÂ
ÂÚ›ÙˆÛË Ô˘ ‰ÂÓ ·ÎÔÏÔ˘ı‹ÛÂÙ ÙȘ Ô‰ËÁ›Â˜ Ô˘ ·Ó·Ê¤ÚÔÓÙ·È Û ·˘Ùfi ÙÔ
ÂÁ¯ÂÈÚ›‰ÈÔ.
ÀÔ‰ËÏÒÓÂÈ Î›Ó‰˘ÓÔ ËÏÂÎÙÚÔÏËÍ›·˜.
¡· ·Ó·Î˘ÎÏÒÓÂÙ ¿ÓÙÔÙ ÙȘ ̷ٷڛ˜.
ªfiÓÔÓ ÁÈ· ÂÛˆÙÂÚÈÎÔ‡˜ ¯ÒÚÔ˘˜.
12 Ferm
5. USE
Head adjustment
Fig. 6 + 7
Adjusting the angle of the head (Fig. 6):
• Grip the head of the trimmer and press and hold the button which has the word “push”
printed on it.
• Adjust the head to the desired angle.
• Release the button to lock the head in your selected position.
Rotating the head to switch from trimming position to edging position (Fig. 7):
• Grasp the head of the trimmer and twist it half a turn around the handle.
Caution! Ensure that your keep your fingers clear of the trigger during these
operations!
Extension tube adjustment
Fig. 8
The handle length on this product can be varied, allowing you to reach difficult places without
the use of a ladder.
• Grip the trimmer firmly and lift the latch on the lower handle.
• Extend the handle to the required length.
• Press the lever firmly down again to lock the handle.
Central handle adjustment
Fig. 9
The angle and the reach of the central handle can be adjusted to your preference.
• Loosen the bolt on the side of the central handle.
• Adjust the angle and reach to the position that is most comfortable.
• Tighten the bolt again to fix the central handle in its new position.
Starting and stopping
Fig. 10
The handle of this product is designed with a safety button to prevent accidental starting.
• Press and hold the safety button located on either side of the handle, then press the start
button. You can now release the safety button.
• Release the start/stop lever to stop the blades.
Note: The blades continue to spin after the trigger is released, wait for it to stop before putting
your feet or hands near the cutting area.

Ferm 13
6. MAINTENANCE
Always disconnect the battery pack after use!
Maintenance
Your trimmer requires only minimum maintenance.
• After each use remove any build up of grass or debris from the blade area. Check the
blades for wear and replace if necessary.
• Don't use abrasive materials to clean the product or immerse it in water.
• If parts need to be replaced or repaired, only use parts which have been
deemed acceptable replacements by Ferm.
• If your product needs servicing or repair then return it to your point of
purchase.
Storage
When storing the trimmer for longer than 6 weeks:
• Fully discharge the battery pack (by running the product) and then recharge the battery
pack for 12 hours.
• Remove any build up of debris, and wipe all exterior surfaces with a dry lint free cloth or a
soft brush.
• Store in a dry place away from children.
• If stored in a shed pack the appliance into a polythene bag to prevent damp.
Note: It is not necessary to oil the product.
Troubleshooting
If the product is not working properly, you may need to:
• Clean any build up of grass or debris from the product.
• Fully recharge for 12 hours.
• Check the cables and electrical connections for damage and replace if necessary.
Faults
Should a fault occur, e.g. after wear of a part, please contact the service address on the
warranty card. In the back of this manual you find an exploded view showing the parts that can
be ordered.
Environment
To prevent damage during transport, the appliance is delivered in a solid packaging which
consists largely of reusable material. Therefore please make use of options for recycling the
packaging.
Faulty and/or discarded electrical or electronic apparatus have to be collected at
the appropriate recycling locations.
80 Ferm
∞™Àƒª∞∆∏ ∆∏§∂™∫√¶π∫∏ Ã√ƒ∆√∫√¶∆π∫∏ ª∏Ã∞¡∏
√È ·ÚÈıÌÔÈ ÛÙÔ ·Ú·Î·Ùˆ ÎÂÈÌÂÓÔ ·Ó·ÊÂÚÔÓÙ·È ÛÙȘ ÂÈÎÔÓ˜ Ù˘ ÛÂÏȉ·˜ 2 - 5.
°È· ÙËÓ ·ÛÊ¿ÏÂÈ¿ Û·˜ ·ÏÏ¿ Î·È ÁÈ· ÙËÓ ·ÛÊ¿ÏÂÈ· ÙˆÓ ¿ÏψÓ, Û·˜ ·Ú·Î·ÏÔ‡ÌÂ
Ó· ‰È·‚¿ÛÂÙ ÚÔÛÂÎÙÈο ·˘Ù¤˜ ÙȘ Ô‰ËÁ›Â˜ ÚÈÓ ¯ÚËÛÈÌÔÔÈ‹ÛÂÙ ÙÔ Ì˯¿ÓËÌ·
·˘Ùfi. º˘Ï¿ÍÙ ÙȘ Ô‰ËÁ›Â˜ Û ¤Ó· ·ÛʷϤ˜ ̤ÚÔ˜ ÁÈ· Ó· ÌÔÚ›Ù ӷ ÙȘ
Û˘Ì‚Ô˘Ï‡ÂÛÙ ÛÙÔ Ì¤ÏÏÔÓ.
¶ÂÚȯÔÌÂÓ·
1. ¢Â‰Ô̤ӷ Ì˯·Ó‹Ì·ÙÔ˜
2. √‰ËÁ›Â˜ ·ÛÊ·Ï›·˜
3. ™˘ÏÏÔÁ‹ ÊfiÚÙÈÛ˘ Î·È Â·Ó·ÊfiÚÙÈÛ˘ ÙˆÓ Ì·Ù·ÚÈÒÓ
4. ™˘Ó·ÚÌÔÏfiÁËÛË
5. ÃÚ‹ÛÈÌÔÔÈËÛË
6. ™˘ÓÙ‹ÚËÛË
1. ¢∂¢√ª∂¡∞ ª∏Ã∞¡∏ª∞∆√™
∆¯ÓÈΘ ÚԉȷÁڷʘ
* ∂Í·ÚÙÈ¤Ù·È ·fi ÙÔ Ì‹ÎÔ˜ Î·È ¿¯Ô˜ ÙÔ˘ ÎÔÌ̤ÓÔ˘ ˘ÏÈÎÔ‡
¶ÏËÚÔÊÔÚȘ ÁÈ· ÙÔ ÚÔ˚ÔÓ
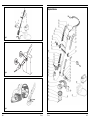
∂ÈÎ. 1
1. ∫‡ÚÈ· Û˘Û΢‹
2. ¢È·ÎfiÙ˘ – Û‡Ó‰ÂÛË (On)/ ·ÔÛ‡Ó‰ÂÛË (Off)
3. ∫Ô˘Ì› ·ÛÊ·Ï›·˜
4. ªÂÛ·›· Ï·‚‹
5. ∆ËÏÂÛÎÔÈÎfi ÊÚ¿ÁÌ·
6. ºÚ¿ÁÌ· Ù˘ ÁˆÓ›·˜ Ù˘ ÎÂÊ·Ï‹˜
7. ¶ÚÔÊ˘Ï·ÎÙÈ΋ ¤Ӊ˘ÛË Ù˘ ¯ÔÚÙÔÎÔÙÈ΋˜ Ì˯·Ó‹˜
8. ∫ÔÙÈ΋ Ï›‰·
9. ºÈ˜ Ù˘ Û˘Û΢‹˜
10. ™˘ÏÏÔÁ‹ Ì·Ù·ÚÈÒÓ
11. ºÈ˜ Ù˘ Û˘ÏÏÔÁ‹˜ Ì·Ù·ÚÈÒÓ
12. πÌ¿ÓÙ·˜ ÌÂÙ·ÊÔÚ¿˜
∞fi‰ÔÛË ÙÔ˘ ÊÔÚÙÈÛÙ‹ Ì·Ù·ÚÈÒÓ 230 V~, 50 Hz, 450 mA, 11 W
∞fi‰ÔÛË Ù˘ Û˘ÏÏÔÁ‹˜ Ì·Ù·ÚÈÒÓ 12 V, 3 Ah
ÃÚfiÓÔ˜ ÊfiÚÙÈÛ˘ Ù˘ Û˘ÏÏÔÁ‹˜ Ì·Ù·ÚÈÒÓ 12 ÒÚ˜
ÃÚfiÓÔ˜ ÏÂÈÙÔ˘ÚÁ›·˜ 40 ÏÂÊÙ¿ *
∆·¯‡ÙËÙ· ¿ÂÚÁÔ˜ 8000/ÏÂÙfi
∫ÔÙÈÎfi˜ ·ÎÏÔ˜ 230 mm
µ¿ÚÔ˜ 1,2 ÎÈÏ¿

Ferm 79
CE
ДЕКЛАРАЦИЯ О СООТВЕТСТВИИ
(RUS)
Под нашу исключительную ответственность удостоверяем, что данное изделие
удовлетворяет следующим стандартам и нормативным документам
EN60745-1
согласно следующим предписаниям:
98/37/EEC,73/23/EEC,89/336/EEC,2000/14/EEC
начиная с 01-01-2006
ZWOLLE NL
В. Капмхоф
Отдел контроля качества
Постоянное улучшение нашей продукции является нашей политикой и, поэтому, мы
оставляем за собой право на изменение технических характеристик продукции без
предварительного уведомления.
Ferm BV • Lingenstraat 6 • 8028 PM Zwolle • Нидерланды
14 Ferm
Warranty
The warranty conditions can be found on the separately enclosed warranty card. Wear of the
hedge trimmer is not covered by the warranty.
CE DECLARATION OF CONFORMITY (GB)
We declare under our sole responsibility that this product conforms with the following
standards or standardised documents:
EN 60745-1
in accordance with regulations:
98/37/EEC, 73/23/EEC, 89/336/EEC, 2000/14/EEC
from 01-01-2006
ZWOLLE NL
W. Kamphof
Quality department
It is our policy to continuously improve our products and we therefore reserve the right to
change the product specification without prior notice.
Ferm BV • Lingenstraat 6 • 8028 PM Zwolle • The Netherlands
Page is loading ...
Page is loading ...
Page is loading ...
Page is loading ...
Page is loading ...
Page is loading ...
Page is loading ...
Page is loading ...
Page is loading ...
Page is loading ...
Page is loading ...
Page is loading ...
Page is loading ...
Page is loading ...
Page is loading ...
Page is loading ...
Page is loading ...
Page is loading ...
Page is loading ...
Page is loading ...
Page is loading ...
Page is loading ...
Page is loading ...
Page is loading ...
Page is loading ...
Page is loading ...
Page is loading ...
Page is loading ...
Page is loading ...
Page is loading ...
Page is loading ...
Page is loading ...
-
 1
1
-
 2
2
-
 3
3
-
 4
4
-
 5
5
-
 6
6
-
 7
7
-
 8
8
-
 9
9
-
 10
10
-
 11
11
-
 12
12
-
 13
13
-
 14
14
-
 15
15
-
 16
16
-
 17
17
-
 18
18
-
 19
19
-
 20
20
-
 21
21
-
 22
22
-
 23
23
-
 24
24
-
 25
25
-
 26
26
-
 27
27
-
 28
28
-
 29
29
-
 30
30
-
 31
31
-
 32
32
-
 33
33
-
 34
34
-
 35
35
-
 36
36
-
 37
37
-
 38
38
-
 39
39
-
 40
40
-
 41
41
-
 42
42
-
 43
43
-
 44
44
-
 45
45
-
 46
46


Ferm LTM1007 Owner's manual
- Category
- Grass trimmers
- Type
- Owner's manual
- This manual is also suitable for
Ask a question and I''ll find the answer in the document
Finding information in a document is now easier with AI
in other languages
- italiano: Ferm LTM1007 Manuale del proprietario
- français: Ferm LTM1007 Le manuel du propriétaire
- español: Ferm LTM1007 El manual del propietario
- Deutsch: Ferm LTM1007 Bedienungsanleitung
- русский: Ferm LTM1007 Инструкция по применению
- Nederlands: Ferm LTM1007 de handleiding
- português: Ferm LTM1007 Manual do proprietário