Page is loading ...


3
Contents
Page
1 General Information .......................................................................... 5
1.1 Important safety advice ............................................................. 5
1.2 Guidelines for the operator ........................................................ 5
1.3 Transporting the machine .......................................................... 5
1.4 Electrical connection .................................................................. 5
2 Preparing for use ............................................................................... 6
2.1 Fitting the handle ....................................................................... 6
2.2 Fitting the dust bag .................................................................... 6
3 Controls ............................................................................................. 6
3.1 Fitting a brush or drive disc ........................................................ 6
3.2 Adjusting the handle height ........................................................ 6
4 Operation ........................................................................................... 6
4.1 Starting the machine .................................................................. 6
4.2 Model 452/400 dual speed.......................................................... 7
4.3 Polishing .................................................................................... 7
4.4 Scrubbing and shampooing........................................................ 7
4.5 Fitting the solution tank............................................................... 7
4.6 Removing the solution tank........................................................ 7
4.7 The vacuum unit ........................................................................ 7
4.8 Fitting the vacuum skirt ............................................................. 7
4.9 Fitting the vacuum unit............................................................... 8
4.10 Using the vacuum unit ............................................................... 8
5 Storage ............................................................................................... 8
6 Maintenance ...................................................................................... 8
7 After sales service ............................................................................. 8
8 Guarantee .......................................................................................... 8
9 Technical specification ..................................................................... 9
10 Accessories ....................................................................................... 10
11 Fault diagnosis .................................................................................. 11

4
IMPORTANT
READ THESE INSTRUCTIONS CAREFULLY AND RETAIN FOR FUTURE REFERENCE
1 General Information
These floor cleaning machines are designed for the
scrubbing and polishing of hard floors and/or
shampooing of carpets in indoor areas. They should
not be used in outdoor areas or where excessive
moisture is present.
The following instructions contain important
information about the machines and safety advice for
the operator.
NOTE - To protect the machine from possible
damage during transit, the machine base and handle
are packed seperately. Ensure that both items are
present and follow the simple assembly instructions to
bring the machine into service.
Equipment must be operated, serviced and
maintained in accordance with the manufacturer’s
instructions.
If in doubt contact the supplier of your machine.
These instructions are valid for the following models.
Orbis – OB45200, OB45400, OB452/400
1.1 Important Safety Advice
When using electrical equipment basic safety
precautions should be followed including the
following.
• Read all instructions carefully before use.
• Keep children and unauthorised persons away from
the machine when in use.
• Do not leave the machine connected to the
electricity supply when not in use, always remove
the plug from the socket-outlet.
• Switch off the machine before removing the plug.
• When unplugging pull the plug, not the supply cord.
• Keep the power supply cord clear of moving parts.
During operation hazard may occur when running
the machine over the power supply cord.
• Do not operate the machine with a damaged
supply cord or plug, or after the machine
malfunctions or is damaged in any way. Contact an
authorised Service Agent for repair or adjustment.
• The plug of the power supply cord must be
removed from the socket-outlet before
commencing cleaning of the machine or
undertaking maintenance operations.
• The power supply cord is to be regularly inspected
for signs of damage. If the power supply cord is
damaged, it has to be replaced.
• Do not use where hazardous dust is present.
• Do not use in an explosive atmosphere.
• Take care when using a machine near the top of
stairs to avoid overbalancing.
1.2 Guidelines for the operator
• Operators must be fully trained in the use of the
machine in accordance with these instructions, able
to perform user maintenance and the correct
selection of accessories, i.e. brushes and pads etc.
• Operators should be physically capable to
manoeuvre, transport and operate the machines.
• Operators should be able to recognise unusual
operation of the machine and report any problems.
• Let the machine do the work. Grip the handle as
lightly as possible.
• Stand with feet slightly apart to maintain good
balance. Avoid twisting the body more than 45
degrees.
• Wear suitable footwear to avoid slipping.
• Wear suitable clothing to keep dry and warm.
• Where possible implement job rotation and
adequate rest periods to avoid continuous use
of the same muscles.
• Do not smoke when using the machine.
• CAUTION - This machine is for dry use only and
should not be used or stored outdoors in wet
conditions.
1.3 Transporting the machine
CAUTION - THIS MACHINE IS HEAVY
Do not attempt to lift the machine without
assistance. Incorrect lifting techniques may result in
personal injury.
When transporting the machine the handle should be
locked in the upright position.
1.4 Electrical connection
Before connecting the machine to the power supply,
check that your supply voltage corresponds with that
marked on the rating label on the handle of the
machine.
The supply cord is fitted with a non-rewireable plug
containing a 13 amp fuse. Should the fuse require
replacement it must only be replaced by a 13 amp
fuse conforming to BS1362, and the fuse cover must
be refitted. If the fuse cover is lost the plug must not
be used until the correct replacement cover is fitted.
IMPORTANT - If the supply cord is damaged, it must
only be replaced by a special cord available from the
manufacturer or an authorised service agent.
WARNING -THIS APPLIANCE MUST BE EARTHED

5
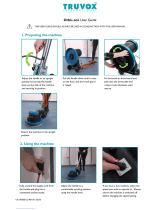
2 Preparing for use
2.1 Fitting the handle
1. Carefully remove the machine base and handle
from their respective packaging.
2. Check that the following items are present with
the base and remove them from their transit
position.
M8 x 70 Hex.Hd. bolt (3)
M8 Nyloc Hex. nut (3)
M8 Plain washer (6)
13mm A/F Spanner (2)
3. Take handle and check that ‘O’ rings on either
side of the knuckle pivot are seated in their
grooves, and that the datum mark on the pivot
gear is aligned with the handle tube. If this is not
the case, raise the handle adjustment lever and
rotate the pivot gear until the datum mark is in
line with the handle tube, and release the
adjustment lever.
4. With the handle held vertically and cable winder
to the rear, lower pivot between the raised flanges
on the machine base.
5. Align holes in pivot with those on base and fit the
three M8 bolts, washers and nuts, and tighten
using the spanners supplied (Fig.1).
6. Connect supply lead from handle to socket on
motor housing.
3 Controls
The operating controls for all models are located on
the handle (Fig. 2).
1 - Switch trigger, left hand
Used to switch motor ON and OFF. Can only be
operated with handle in working position, and if left
hand interlock button (2) has previously been
depressed.
2 - Interlock button, left hand
This must be depressed initially to enable left hand
switch trigger to switch motor on.
3 - Switch trigger, right hand
Used to switch motor ON and OFF. Can only be
operated with handle in working position, and if
right hand interlock button (4) has previously been
depressed.
4 - Interlock button, right hand
This must be depressed initially to enable right
hand switch trigger to switch motor on.
5 - Handle adjustment lever
Used to adjust handle to comfortable working
height. Note for safety reasons the machine
cannot be operated unless the handle is moved to
a working height.
6 - Solution feed lever
Operates flow valve in solution tank (if fitted).
- Pull lever to release solution.
- Release lever to stop flow.
7 - Socket connector
Connection point for vacuum unit lead.
Drive plate
Attachment point for brush or drive disc and pad.
Cable winder
Used to hold supply cord in place on handle when
machine is not in use. Can be turned to enable
quick release of cord.
Motor overload cut-out
Protects motor from overload and possible
damage. The cut-out will reset automatically when
cooled sufficiently, enabling the motor to restart.
Neon indicator (on handle)
Lights when the machine is connected to the
power supply.
3.1 Fitting a brush or drive disc
Always ensure machine is unplugged before fitting or
removing parts.
• Adjust handle to the fully upright position.
• Pull handle down until it rests on the floor and the
brush guard is raised.
• Fit the brush/drive disc onto the drive plate and
rotate it anti-clockwise until secure.
• Return machine to its normal upright position in
readiness for starting.
3.2 Adjusting the handle height
Select the most comfortable handle height using the
adjustment lever as previously described (see
Controls) and lock in position.
4 Operation
The normal movement of a machine in use is from
side to side across the floor. This is achieved
automatically by raising or lowering the handle whilst
it is engaged in the normal working position.
Lowering the handle thereby increasing the pressure
at the rear of the brush/drive disc, moves the
machine to the left. Raising the handle increasing the
pressure on the front of the brush/drive disc moves
the machine to the right.
Effective cleaning and polishing is achieved by
moving the machine in a backwards direction.
Do not leave the machine standing on a brush or pad
when not in use.
4.1 Starting the machine
• Fully unwind the supply cord from the handle and
plug into a convenient socket outlet. The neon
indicator on the handle should light showing that
power is available.
• With the handle set at a convenient working height
and with both left and right hands on the handle,
depress both interlock buttons with the thumbs and
squeeze both switch triggers to start the machine
(Fig.3).

6
• Once the machine has started the interlock buttons
should be released.
• To stop the machine release both switch triggers.
4.2 Orbis 452/400 dual speed
The speed selector switch on the dual speed model is
located on the motor housing. Ensure machine is
switched off before changing the speed setting.
4.3 Polishing
• Fit polishing brush or drive disc and pad suitable for
the speed of the machine and the surface to be
polished. (see Accessories).
• Apply polish to the floor in accordance with the
manufacturers instructions.
• Do not keep the machine rotating on one spot for
more than 3 seconds, as this could cause
overheating and damage the floor surface.
4.4 Scrubbing and Shampooing
• For scrubbing or shampooing the solution tank must
be fitted as described (see Fitting the solution
tank).
• Fit a brush or drive disc and pad suitable for the
surface to be cleaned. (see Accessories).
• WARNING - This appliance has been designed
for use with the brushes specified by the
manufacturer. The fitting of other brushes may
affect its safety.
• Fill the solution tank with water and an appropriate
measure of detergent.
• IMPORTANT - Use only cleaning agents suitable
for automatic machines i.e. low foaming, and follow
the chemical manufactuers’ directions regarding
use, handling, disposal and health and safety
provisions.
• Before starting the machine release a liberal
amount of cleaning solution from the tank to the
floor. The flow of solution from the tank is controlled
by moving the left hand lever. Releasing the lever
stops the flow.
• Proceed to operate the machine in the normal
manner, releasing more cleaning solution from time
to time as required.
• Do not keep the machine rotating on one spot for
more than 3 seconds, as this could cause
overheating and damage the floor surface.
• Dirty water should not be allowed to accumulate on
the floor, it should be removed to prevent dirt from
settling. We suggest using a suction dryer for this
purpose.
• When scrubbing/shampooing is complete, unplug
the machine from the power supply, empty the
solution tank and clean and dry the machine.
• IMPORTANT - Dispose of unused cleaning solution
in accordance with the manufacturer’s directions.
4.5 Fitting the solution tank
NOTE - The solution tank is supplied as an accessory
item, complete with attachments and fitting
instructions.
• Move the handle to the upright position and clamp
the tank support bracket to the handle tube in the
specified position (Fig.4). (Refer to the instructions
supplied with the tank).
• Take the solution tank and pass the ring on the tank
chain over the left hand operating lever and locate
the ring in the inside slot on the top of the lever.
Rest the solution tank on the support bracket with
the handle tube in the groove on the back of the
tank.
• To secure the tank in position, engage the locking
bar on the back of the tank.
• Adjust the length of the chain by means of the
screw and nut adjuster to ensure there is no tension
on the chain when the flow control lever is not being
used.
• Take the plastic tube supplied and push rigid end of
tube into the connector on the underside of the
solution tank, and the other end onto the tube at the
rear of the motor housing. The tank connector is of
the sealed lock-in type once the tube is connected.
To release, press down on the orange collar of the
connector with the finger tips and pull out tube.
4.6 Removing the solution tank
• Pull off plastic tube from machine base.
• Raise locking bar on back of tank.
• Lift off tank and detach chain ring from lever.
4.7 The vacuum unit
NOTE - The vacuum unit and vacuum skirt are
supplied as accessory items, complete with
attachments and fitting instructions.The vacuum unit
combined with the vacuum skirt provides full dust
control, eliminating the need to pre-dust or post dust
the floor. The unit is designed to fit readily to all Orbis
models.
IMPORTANT - The vacuum unit is NOT suitable
for any form of wet cleaning.
4.8 Fitting the vacuum skirt
• Unplug and lay the machine down with the
handlebar resting on the floor. Remove the brush or
drive disc.
• Stretch and fit the rubber buffer around the brush
guard.
• The flexible section of the skirt has a special spring
sewn into the fabric. Fit this spring section into the
groove in the rubber buffer.
• The spring is a reasonably tight fit to prevent
accidental movement in use and therefore must be
pulled onto the buffer by stretching.
• With the skirt on the buffer it can be moved in its
groove to bring the hose connector to the rear,
ensuring the base moulding lies in the cut-out

7
provided in the outer ring of the skirt, enabling free
movement when in use (Fig.5).
4.9 Fitting the vacuum unit
• Stand machine upright, and clamp the vacuum unit
support bracket to the handle tube in the specified
position. (Refer to the instructions supplied with the
unit).
• Rest the vacuum unit on the support bracket with
the control switch to the rear, and engage the
locking bar on the back of the unit to secure it in
position.
• Push the flexible hose on to the vacuum unit and
skirt.
• Plug the electrical lead from the vacuum unit into
the socket situated on the left side of the handle
moulding.
• The machine is now ready for use. The switch
controlling the vacuum unit is located on the back of
the unit. The OFF position is marked O.
4.10 Using the vacuum unit
IMPORTANT - For maximum suction the sliding
shutter on the top of the unit must be closed.
• Dust collected by the unit is contained within the
filter bag located behind the front cover.
• To replace the filter bag, switch off vacuum unit,
release front cover catch and lift off cover.
• Remove and dispose of used bag. Fit new bag
and replace front cover.
5. Storage
Always unplug and wipe down and dry the machine
after use. The machine should normally be stored
with the handle in the fully upright position.
Wrap supply cord around the handlebar and cable
winder ensuring that the plug is not trailing on the
floor. Store the machine in a dry indoor area only.
Never store the machine with a pad fitted as this
causes distortion, and results in instability during
operation.
6. Maintenance
WARNING - Before undertaking maintenance
operations or adjustments switch off machine
and unplug from the electricity supply.
The machine requires minimum maintenance apart
from the following checks by the operator.
• Supply cord - Regularly inspect sheath, plug and
cord anchorage for damage or loose connection.
• Solution tank - Check water flow, if restricted
inspect hoses and tubes for blockage or kinks.
Dismantle control valve to clean if necessary.
Check switch interlock for correct operation.
• Vacuum unit - All dust bags must be changed
regularly and hoses and connectors checked for
blockage to avoid unsatisfactory results.
• Motor overload cut-out - All machines are fitted
with an automatic reset motor overload cut-out.
The cut-out will operate to protect the motor from
overheating by switching the machine off when
there is excessive friction/resistance to the
cleaning head on the floor. This is usually caused
by the stickiness of the pad or floor. Turn the
cleaning pad over or if both sides are dirty
replace with a clean pad. It is not possible to
obtain a good finish on the floor using a dirty pad.
Should the cut-out operate it will reset
automatically when the motor has cooled
sufficiently, usually after 15 - 30 mins.
IMPORTANT - Should the machine fail to operate
contact the supplier from whom you purchased the
machine.
7 After sales service
Should you require after sales service please contact
the supplier from whom you purchased the
machine,who will arrange service. Repairs and
servicing of Truvox products should only be
performed by trained staff. Improper repairs can
cause considerable dangers to the user.
8 Guarantee
Your product is guaranteed for two years from the
date of purchase, or hire purchase, against defects in
materials or workmanship during manufacture. Within
the guarantee period we undertake to repair or
replace free of charge to the purchaser, any part
found to be defective, excluding brushes, drive discs
and vacuum skirts.
No liability is accepted for damage caused by
accident, misuse or neglect, or the fitting of other than
genuine Truvox parts. Truvox International Limited
cannot accept reponsibility for repairs performed by
persons other than a Truvox serivce engineer or an
authorised service agent.
This guarantee is in addition to your statutory rights
and does not affect your rights under the Supply of
Goods (Implied Terms) Act 1973, or in general.
Truvox International Limited policy is one of continual
product development and we reserve the right to alter
specifications without prior notice.

8
9 Technical specification
All models : 230-240V ∼ 50Hz, Class I construction. Enclosure to IPX4. Fitted with 15m supply cord type and 13A
fused plug.
Model
45cm
200
45cm
400
45cm
2/400
Pad diameter cm 43 43 43
Pad pressure gm/cm² 22 22 27,5
Speed rpm 190 380 190/380
Motor rating W 1100 1100 1100
Max. start current A 12 25 12/25
Average running current A 3 5 3/5
Weight kg 32 32 40
Weight with vacuum unit and skirt kg 38 38 46
Noise level (see note 1) dB(A) 53 53 53
Noise level with vacuum unit dB(A) 69 69 69
Handle vibration (see note 2) m/s² < 2.5 < 2.5 < 2.5
1 - Noise levels measured at a distance of 1 metre from machine and 1,6 metres above floor,
when scrubbing a hard floor. Measurements recorded using a hand held meter.
2 - Handle vibration does not exceed 2,5 m/s², when operating on any surface with brush or pads.
Measurements recorded by an independent test laboratory.
CE Mark
This equipment is manufactured in accordance with European Safety Standards BS EN 60335-1 and BS EN
60335-2-67 and conforms with Directives 98/37/EC, 73/23/EEC and subsequent amendments.

9
10 Accessories
Item Part No.
Usage
Polypropylene scrubbing brush 5-3431 wet scrubbing
Tynex scrubbing brush 5-3432 heavy duty wet scrubbing
Shampoo brush 5-3433 carpet cleaning
Bassine polishing brush 5-3434 polishing and spray cleaning
Gumati polishing brush 5-3435 polishing and spray cleaning
Standard drive disc (see note 1)
5-3436 retains cleaning pads
Flexi-drive disc 5-3437 retains cleaning pads
Solution tank 5-3438 scrubbing/shampooing
Anti-splash water skirt 5-3439 prevents splashing when wet scrubbing
Vacuum unit and hose 5-3440 dust extraction
Vacuum skirt 5-3441 dust extraction
Paper filter bags (10 pack) 2-3526 dust collection
1 - Suitable for 45cm 200 machine only.
IMPORTANT : Genuine accessories are only available from authorised Service Agents or Truvox Customer
Services Dept.

10
11 Fault diagnosis
The following simple checks may be performed by the operator.
Trouble Reason Remedy
Machine not working, neon indicator
not lit. Lack of voltage/electrical supply. Check fuse *, supply cord, plug
and socket outlet.
Machine not working, neon indicator
lit. Switch interlock incorrectly
operated.
Motor overload cut-out operated.
Check operating procedure in
instructions.
Check brush/pad for good
condition.
Check correct liquid type &
quantity.
Check liquid dilution.
Allow motor to cool.
Vacuum unit not working, neon
indicator lit. Motor overload cut-out operated. Replace filter bag.
Clear blocked hoses /
connectors.
Machine wobbles or vibrates
excessively. Brush/pad worn or damaged.
Pad not centered on drive disc.
Pad dirty.
Renew brush/pad.
Place pad in correct position.
Clean the pad.
* If the fuse blows several times, the machine should be checked by an authorised Service Agent.

11
EC Declaration of conformity
We, Truvox International Ltd.
of Third Avenue
Millbrook Trading Estate
Southampton SO15 0LE
England
declare that the machinery
Make : floor cleaning machines
Type : Orbis
Model : OB45200, OB45400, OB452/400
Serial Number :
Year of Construction : 2000
has been manufactured using the following transposed harmonized European Standards and technical specifications.
BS EN 50081-1, BS EN 55014-1 & 2, BS EN 60335-1 and
BS EN 60335-2-67, and is in conformity with:
the Machinery Directive 98/37/EC and subsequent amendments,
the Low Voltage Directive 73/23/EEC and subsequent amendments,
and the EMC Directive 89/336/EEC and subsequent amendments.
Signed in : SOUTHAMPTON, England
on the 5th day of June 2000
Signature :
Name : R S Papp
Position : Operations Director

/