Page is loading ...

Owner's Manual
@
Charcoal/Liquid Propane
Gas Dual Fuel Grill
Model 141.16226
A WARNING:
Read this Owner's Manual carefully and be sure
your charcoal/gas grill is properly assembled,
installed and maintained. Failure to follow these
instructions could result in serious bodily injury
and/or property damage. This charcoal/gas grill is
intended for outdoor use only and is not intended to
be installed in oron recreational vehiclesor boats.
Note to Installer: Leave this Owner's Manual
withthe consumer after delivery and/or installation.
Note to Consumer: Leave this Owner's Manual
in a convenient place for future reference.
Sears, Roebuck and Co.,
Hoffman Estates, IL 60179 U.S.A.
P80135002A- Rev: 02/19/2004

Warranty ..................................................... 2
Safety Instructions ................................... 2
Hardware .................................................... 5
Parts Diagram and Lists ........................ 6
Assembly Instructions ............................... 9
Lighting Instructions ..................................... 15
Use of Different Fuels ............................... 17
Cleaning and Maintenance Instructions ....... 20
Frequently Asked Questions ...................... 22
Cooking Instructions ...................................... 23
Full 1-Year Warranty on Grill
For one year from the date of purchase Sears will
repair or replace, at our option, any grill part
(except for paint loss and rusting) that is defective
in material or workmanship.
Limited Warranty on Selected Grill Parts
From one year after the date of purchase for the
designated time periods listed below, Sears will
replace the following grill parts if they are defective
in material or workmanship. You will be charged
for labor.
• Lifetime of Grill: Stainless Steel
• 1 Year: Cast Iron Burners
• 2 Years: All Other Grill Parts (except charcoal tray
and cooking grids)
Warranty Service
Warranty service is available by contacting the _
nearest Sears Service Center at 1-800-4-MY-HOME
Warranty Restrictions
• This warranty is void if grill is used for commer-
cial or rental purposes.
• This grill is for use with Liquid Propane (LP)
gas only. Any attempt to convert this grill to
natural gas is dangerous and will void your
product warranty.
• This warranty applies only when the grill is
used in the United States.
• This warranty gives you specific legal rights,
and you may also have other rights which vary
from state to state.
Sears, Roebuck and Co., Dept. 817WA,
Hoffman Estates, IL 60179
FOR YOUR SAFETY
1. Do not store or use gasoline or other flam-
mable vapors and liquids in the vicinity of this
or any other appliance.
2. An LP gas tank not connected for use shall
not be stored in the vicinity of this or any other
appliance.
Z_ WARNING
Combustion by products produced when
using this product contain chemicals known
to the State of California to cause cancer,
birth defects, or other reproductive harm.
/_ WARNING
Failure to comply with these instructions
could result in a fire or explosion that
could cause serious bodily injury, death, or
property damage.
Z_ WARNING
2
Your grill will get very hot. Never lean over
the cooking area while using your grill. Do not
touch cooking surfaces, grill housing, grill lid or
any other grill parts while the grill is in opera-
tion, or until the grill has cooled after use.
Failure to comply with these instructions
may result in serious bodily injury.
Z_ WARNING
(a) Do not store a spare LP-gas cylinder under
or near this appliance;
(b) Never fill the cylinder beyond 80 percent
full and
(c) If the information in "(a)" and "(b)" is not
followed exactly, a fire causing death or
serious injury may occur.
Grill Installation Codes
The installation must conform with local codes or
in the absence of local codes, with either the
National Fuel Gas Code, ANSI Z223.1/NFPA 54, or
CAN/CGA-B149.1, Natural Gas and Propane Instal-
lation Code.
Correct LP Gas Tank Use
LP gas grill models are designed for use with a
standard 20 lb. Liquid Propane Gas (LP gas) tank,
not included with grill box. Never connect your
gas grill to an LP gas tank that exceeds this
capacity. A tank of approximately 12 inches in
diameter by 18-1/2 inches high is the maximum
size LP gas tank to use. You must use an
"OPD" gas tank which offers a listed Preven-
tion Device. This safety feature prevents the tank
from being overfilled which can cause malfunction
of the LP gas tank, Regulator and/or grill.

TheLPgastankmustbe constructedandmarked
in accordancewithspecificationsof theU.S.Dept.
ofTransportation(DOT).In Canada,theLPgastank
mustmeettheCanadianTransportationandCommu-
nications(CTC)specifications.Alsobe sureto read
andfollowall LPinstructionsbelow.
1. TheLPgastankhasa shutoffvalve,termi-
natingin an LPgassupplytankvalveoutlet,
thatis compatiblewitha Type1 tankcon-
nectiondevice.TheLPgastankmustalso
havea safetyreliefdevicethathasa direct
connectionwiththevaporspaceof thetank.
2. Thetanksupplysystemmustbearranged
forvaporwithdrawal.
3. TheLPgastankusedmusthavea collar
to protectthetankvalve.
Proper Placement and Clearance of Grill
Never use your charcoal/gas grill in a garage, porch,
shed, breezeway or any other enclosed area. Your
charcoal/gas grill is to be used outdoors only, at least
24 inchesfrom the back and side of any combus-
tible surface. Your charcoal/gasgrill should not be
placed under any surface that will burn. Do not
obstruct the flow of ventilation air around the char-
coal/gas grill housing.
This outdoor charcoal/gas grill is not intended to be
installed in or on recreational vehicles and/or boats.
• Never connect an unregulated LP gas tank to
your gas grill. The gas regulator assembly
supplied with your gas grill is adjusted to have
an outlet pressure of 11" water column (W.C.)
for connection to an LP gas tank.
• Only use the regulator and hose assembly
supplied with your gas grill. Replacement
regulators and hose assemblies must be those
specified by Sears.
• Have your LP gas tank filled by a reputable
propane gas dealer and visually inspected and
re-qualified at each filling.
• Never fill the gas tank beyond 80% full.
Have your propane gas dealer check the
release valve after every filling to ensure that it
remains free of defects.
• Always keep LP gas tanks in an upright
position.
• Donotstore(oruse)gasotineorother flammable
vapors and liquids in the vicinity of this gas grill.
• An LP gas tank that is not connected for use must
NOT be stored on bottom shelf or in the vicinity of
this or any other gas grill.
• Do not subject the LP gas tank to excessive heat.
• Never store an LP gas tank indoors. If you
store your gas grill in the garage or other indoor
location, always disconnect the LP gas tank
first and store it safely outside.
• LP gas tanks must be stored outdoors in a
well-ventilated area and out of the reach of
children. Disconnected LP gas tanks must not
be stored in a building, garage or any other
enclosed area.
• When your gas grill is not in use the gas
must be turned off at the LP gas tank.
• The regulator and hose assembly can be seen
after opening the doors (if applicable), and
must be inspected before each use of the
grill. If there is excessive abrasion or wear or
if the hose is cut, it must be replaced prior
to the grill being used again.
• Keep the gas regulator hose away from hot
grill surfaces and dripping grease. Avoid
unnecessary twisting of hose. Visually inspect
hose prior to each use for cuts, cracks,
excessive wear or other damage. If the hose
appears damaged do not use the gas grill.
Call Sears at 1-800-4-MY-HOME®(1-800-469 -
4663) for a Sears authorized replacement
hose.
• Never light your gas grill with the lid closed
or before checking to insure the burner tubes
are fully seated over the gas valve orifices.
• Never allow children to operate your grill. Do
not allow children to play near your grill.
Z WARNING
If
you smell gas:
Shut off gas supply to the gas grill.
Turn the Control Knobs to OFF position.
Extinguish any open flame such as candle,
cigarette, lighter, etc., that could cause gas
to ignite.
Open Grill Lid.
Get away from the LP gas tank.
Do not try to fix the problem yourself.
If odor continues or you have a fire you cannot
extinguish, call your firedepartment. Do not call
near the LP gas tank because your telephone is
an electrical device and could create a spark
resulting in fire and/or explosion.
NOTE: The normal flow of gas through the
Regulator and Hose Assembly can create a
humming sound. A low volume of sound is
perfectly normal and will not interfere with
operation of the grill. If humming sound is
loud and excessive you may need to purge
air from the gas line or reset the Regulator
excess gas flow device. This purging proce-
dure should be done every time a new LP
gas tank is connected to your grill. For help
call the Grill Information Center.
3

CAUTION: Spiders and small insects occasion-
ally spin webs or make nests in the grill
burner tubes during transit and warehousing.
These webs can lead to a gas flow obstruction
which could result in a fire in and around the
Burner Tubes. This type of fire is known as a
"FLASHBACK" and can cause serious damage
to your grill and create an unsafe operating
condition for the user.
Although an obstructed Burner Tube is not the
only cause of "FLASHBACK", it is the most
common cause.
To reduce the chance of "FLASHBACK", you
must clean the Burner Tubes before assembling
your grill, and at least once a month in late
summer or early fall when spiders are most
active. Also perform this Burner Tube cleaning
)rocedure if your grill has not been used for an
extended period of time.
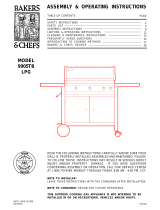
To reduce the chance of "FLASHBACK" (see
CAUTION at left) clean the Burner Tubes and
Burners before fully assembling your grill. Re-
move the Cotter Pin from the rear underside of
each Burner using a pair of long nose pliers.
Carefully lift each Burner up and away from the
Gas Valve Orifice, then refer to Figure 1 and
perform one of these three cleaning methods:
.
Bend a stiff wire, (a lightweight coat hanger
works well) into a small hook as shown
below. Run the hook through the Burner
Tube and inside the Burner several times to
remove any debris.
{ J
.
Use a Burner Cleaning Brush, or a bottle
brush with a flexible handle. Run the brush
through the Burner Tube and inside the
Burner several times, removing any debris.
.
Use an air hose to force air through each
Burner Tube. The forced air should pass
debris or obstructions through the Burner
and out the ports.
• Long nose pliers can be used to remove
Cotter Pin when cleaning the Burners
• Use work gloves to protect your hands
• Wear eye protection
• When you have finished assembling your
grill we strongly urge that all Pattern
Head Thumb Screws be tightened, either
with the supplied Tightening Tool or a
#2 Phillips Head Screwdriver
Tightening Tool
Ref. # P05515102K
Z WARNING
The location of the Burner Tube with re-
spect to the Orifice is vital for safe opera-
tion. Check to ensure the Orifice is inside
of the Burner Tube before using your gas
grill. See Figure 2. If the Orifice is not
inside the Burner Tube, lighting the Burner
may cause explosion and/or fire.
Figure 2
CONTROL_
KNOB \
SPARKELECTRODE
CROSS
SECT_N
OF MANIFOLD GAS VALVE ORIFICE
Figure 1
GAS COLLECTOR BOX
\
SPARK ELECTRODE AS- \\ BURNER BURNER PORT
\
SEMBLY
..........................!..........
tNSERT HOOK HERRE _ /
/
FOOT
BURNER TUBE
4

Thefollowingtableillustratesa breakdownof the hardwarepack.It highlightswhatcomponentsareused
in thevariousstagesof assembly.
Ref.
$135G04332
$135G04332
$132G04122
$132G04122
$132G04082
$132G04082
$132G04082
S132G04082
$211G06352
$372G06112
$431G06102
$132M04082
P05515101L
P05313023B
P05515102K
Component Qty
Pattern Head Screw 1/4"x2-3/4" 8
Pattern Head Screw 1/4"x2-3/4" 4
Pattern Head Screw 1/4"x3/4" 4
Pattern Head Screw 1/4"x3/4" 4
Pattern Head Screw 1/4"xl/2" 4
Pattern Head Screw 1/4"xl/2" 1
Pattern Head Screw 1/4"xl/2" 2
Pattern Head Screw 1/4"xl/2" 4
Wheel Bolt 3/8"x3-3/8" 2
Nut 3/8" 2
Spring Washer 3/8" 2
Pattern Head Screw M4x8mm 1
Customized Wrench 1
Lighting Stick 1
Tightening Tool 1
Size and Quantity of
PurposeofComponents
Attaches Cart Legs To Cart Bottom Shelf
Attaches Cart Front Bracket To Cart Legs
Attaches Left Side Shelf to Grill Bowl
Attaches Right Side Shelf to Grill Bowl
Secures Grill Bowl to Cart
Attaches Tank Hook to Grill Bowl
Attaches Tank Holder to Bottom Shelf
Attaches Grease Tray Brackets to Grease Tray
Attaches Wheel to Cart Leg
Secures Wheel to Cart Leg
Secures Wheel to Cart Leg
Attaches Lighting Stick to Grill Bowl
Tightens Caster
Attaches To Left Outside Bowl Panel
Used to tighten Pattern Head Thumb Screws after
assembly
each Hardware Piece:
Pattern Head Screw 1/4"x2-3/4"
Qty. 12
Ref.#S135G04332
Pattern Head Screw 1/4"x3/4" Nut 3/8"
Qty. 8 Qty. 2
Ref .#S 132G04122 Ref.#S372G 06112
Pattern Head Screw 1/4"xl/2"
Qty. 11
Ref .#S 132G04082
Wheel BoR 318"x3-3/8"
Qty. 2
Ref.#S211G06352
Scale:l/2
Pattern Head Screw M4x8mm
Qty. 1
Ref.#S 132M04082
Tightening Tool
Qty. 1
Ref,#P05515102K
Scale:l/2
Spring Washer 3/8"
Qty. 2
Ref.#S431G06102
Customized Wrench
Qty. 1
Ref.#P05515101 L
Scale:l/2
J
Lighting Stick
Qty. 1
Ref.#P05313023B
Scale:l/2
5

3 \ /1
\
.33
/
21
21-1
\\\
27
29
16
15
/
_6
z25
38
/
39
4O
41
43
44

REP#
1.
2.
3.
4.
5.
6.
7.
8.
9.
10.
11.
12.
13.
14.
15.
16.
17.
18.
19.
20.
21.
21-1
22.
23.
24.
25.
26.
27.
28.
29.
30.
31.
32.
33.
34.
35.
36.
37.
38.
39.
40.
41.
42.
43.
44.
45.
46.
47.
DESCRIPTION
Lid
Temperature Gauge
Name Plate
Lid Handle
Protective Pad
Cooking Rack/Secondary
Cooking Grid
Charcoal Tray
Charcoal Tray Handle
Bowl Panel, Left
Bowl Panel, Front
Charcoal Tray Access Door Stop/2 pcs
Bowl Panel, Right
Bowl Panel, Rear
Burner Bracket
Burner/Main
Charcoal Tray Support Bracket, Upper
Charcoal Tray Support Bracket, Lower
Charcoal Tray Support Hinge, Lower
Charcoal Tray Support
Charcoal Tray Adjusting Arm Shaft
Charcoal Tray Adjusting Arm
Charcoal Tray Adjusting Arm Handle
Bowl Side Panel, Outside Left
Charcoal Tray Support Bracket Axis, Upper
Bowl Side Panel, Outside Right
Tank Hook
Gas Collector Box with Electrode
Electric Wire Set
Gas Valve/Manifold Assembly
Control Panel
Control Knob
Charcoal Tray Access Door Assembly
Side Shelf, Left/Right
Grease Tray Heat Shield
Grease Tray Bracket
Grease Tray
Cart Legs, Left
Caster Seat
Caster, 3 in., with Brake
Cart Bottom Shelf
Cart Bracket, Front
Cart Legs, Right
Tank Holder
Wheel
Wheel Hub Cap
Regulator with Hose(LPG)
Lighting Stick
Hardware Pack
OwneCs Manual
PART#
P00118169B
P00607093A
P00410037C
P00205012B
P055180011
P01505002E
P01615014C
P01705004E
P00212001K
P00720074A
P00738139A
P05510004H
P00721074A
P00725129A
P02203091B
P02001002E
P04101001A
P04105001A
P03311002D
P01714001E
P04104001A
P04102001B
P00202003A
P00742015B
P04104002A
P00746015B
P04001003C
P02609002B
P02615008F
Y0060106
P02907111U
P03426073C
Y0410003
P01102005D
P06903014B
P05333001G
P02705035B
P00901002C
P04513001A
P05106001A
P01003004D
P03302005D
P00902002C
P04002003C
P05103011A
P05108004A
P03601002A
P05313023B
P06001017A
P80135002A
QTY.
1
1
1
1
2
1
2
1
1
1
1
2
1
1
1
3
1
1
1
1
1
1
1
1
1
1
1
3
1
1
1
3
1
2
1
2
1
1
2
2
1
1
1
1
2
2
1
1
1
1

CSA label located here
For the repair or replacement parts you need: Call anytime
1-800-4-MY-HOME ® (1-800-469-4663)
To make sure you obtain the correct replacement part(s) for your charcoal/gas grill please refer to the
parts list on this page. The following information is required to assure you receive the correct parts:
1. Model and Serial Number (see CSA label on grill)
2. Part Number
3. Description
4. Quantity of parts needed
IMPORTANT: Keep this Owner's Manual for convenient referral and for part replacement.
IMPORTANT: Use only factory authorized parts. The use of any part that is not factory authorized can
be dangerous. This will also void your warranty.

CAUTION:Whileitispossibleforonepersontoas-
Figure 1
semble this grill, obtain assistance from another person
when handling some of the larger, heavier pieces, espe-
cially the grill head.
1. During unpacking and assembly always wear work
gloves and eye protection.
2. Open Lid of shipping carton and remove top sheet of
cardboard. Lay cardboard sheet on floor and use as a
work surface to protect floor and grill parts from
scratches.
3. Remove packing materials and cart parts from
shipping carton.
4. You may slice the carton front corners with a utility
knife to lay open the carton front panel. This will
allow you to raise the grill head Lid and remove the
components packed inside the head, making it
easier to lift.
5. With an assistant, lift the grill head out of the ship-
ping carton and place it on the cardboard work sur-
face.
6. Use the parts list to check that all parts have been
included.
7. Inspect the grill for damage asyou assemble it. Do
not assemble or operate the grill if it appears
damaged. If there are damaged or missing parts
when you unpack the shipping box, or you have
questions during the assembly process, call:
1-888-317-7642 8am-8pm CST, Mon.-Fri.
Assembling The Grill Cart
1. Screw the 2 Casters into the Caster Seats
(see bottom of Left Cart Leg). Turn the
threaded Caster Stem by hand, clockwise until
it stops. Tighten securely by using the Custom-
ized Wrench provided. See Figure 1.
2. Attach Wheels to Cart Legs using 3/8"x3-3/8"
Wheel Bolts, 3/8" Nuts and Washers. Tighten
securely using Tightening Tool and Customized
Wrench. Install a Wheel Hub to each wheel.
See Figure 2.
Wheel Bolt 3/8"x3-3/8"
Ref.#S211G06352
Scale:l/2
Nut 3/8"
Ref.#S372G06112
Scale:l/2
Spring Washer 3/8"
Ref.#S431G06102
Scale:l/2
f
J
CASTER
Figure 2
WHEEL WHEEL
\
HUB
Figure 3
LEFT CART LEG
RIGHT CART LEG
J
LEFT CART LEG
/
BOTTOM
;HELF
HOLES FOR
TANK HOLDER
RIGHT CART LEG
/
3. Install the Bottom Shelf between the Cart Legs.
Align the holes on the Cart Legs with the
threaded holes at the corners of Bottom Shelf.
Make sure the holes for Tank Holder are on
the right side of Bottom Shelf. Tighten securely
using 8 of the 1/4"x2-3/4" Pattern Head Screws
provided. See Figure 3.
Pattern Head Screw 1/4"x2-3/4"
Ref.#S135G04332
Scale:l/2
9

4. Attach the Tank Holder on the Bottom Shelf.
Secure firmly by using two 1/4"xl/2" Pattern
Head Screws provided. Align the holes on the
Cart Front Bracket to the Cart Legs. Secure
firmly by using four 1/4"x2-3/4" Pattern Head
Screws provided. See Figure 4.
Figure 4
Pattern Head Screw 1/4"xl/2"
Ref .#S 132G04082
CART FRONT
BRACKET
\
Pattern Head Screw 1/4"x2-3/4"
Ref.#S135G04332
Installing The Grill Head
1. With an assistant, lift and position the Grill
Head onto the grill cart. Align the 4 holes of
the Bowl Side Panel to the threaded holes
on the Cart Leg Bracket. Make sure the
slot for the Tank Hook is located on the
Tank Holder side. Secure firmly by using 4
of the 1/4"xl/2" Pattern Head Screws
provided.See Figure 5.
WARNING: Do not pinch regulator hose on
top of Cart Front Bracket.
2. Attach the LP gas Tank Hook to the right
side of Grill Head as shown in Figure 5.
Align the threaded hole of the Tank Hook
with the hole on the right Bowl Side Panel.
Secure firmly using 1 of the 1/4"xl/2" Pattern
Head screws provided. See Figure 5.
Pattern Head Screw 1/4"xl/2"
Ref.#S132G04082
Figure 5
GRILL
HEAD
ADJUSTING
ARM HANDLE
\
\
\
LEFT CART LE
BRACKET
\
TANK HOLDER
BOWL SIDE
PANEL
TANK HOOK
PRE-ASSEMBLED
REGULATOR
_HT CART LEG
BRACKET
3. Screw Adjusting Arm Handle into Adjusting
Arm.
Figure 6
Installing Side Shelves
Enlisting the aid of an assistant, attach Side
Shelves to both sides of Grill as shown in
Figure 6. Align the 4 holes on the Side
Shelf with the threaded holes on the Grill
Head. Tighten securely using 4 of the 1/4"x
3/4" Pattern Head Screws provided. Repeat
Same steps on the other side.
Pattern Head Screw 1/4"x3/4"
Ref.#S132G04122
LEFT SiDE
SHELF
GRILL
HEAD
RIGHT BOWL
;IDE PANEL
J
\\
RIGHT SIDE
SHELF
10

Installing Lighting Stick
Attach the Lighting Stick to the Left Bowl
Support Bracket as shown in Figure 7.
Align the hole at the end of Lighting Stick
Wire with the threaded hole on the Left Bowl
Support Bracket. Tighten securely using the
M4x8mm Pattern Head Screw packed with the
Liqhtinq Stick.
Installing Grease Tray
1. Attach the Grease Tray Bracket on the
Grease Tray. Secure firmly using two 1/4"xl/2"
Pattern Head Screws. See Figure 8. Repeat
this step on the other side.
Pattern Head Screw 1/4"xl/2"
Ref.#S132G04082
Figure 7
Pattern Head Screw M4x8mm
Ref.#S 132M04082
Figure 8
GREASE TRAY
GREASE TRAY BRACKET
LEFT OUTSIDE
BOWL PANEL
M4xSmm PATTERN
HEAD SCREW _\
LIGHTING STICK
GREASETRAYBRACKET
_GREASETRAY
2. From the back side of Grill Head, install the
Grease Tray. See Figure 9.
Figure 9
GRILL BOWL _
• When you have finished assembling your
Grill be sure all Pattern Head Thumb Screws
are tightened. You may use the supplied
Tightening Tool as needed.
J
J
GREASE TRAY
11

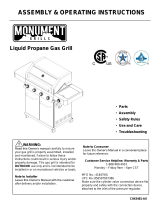
Electrode Check - Requires an Assistant
Before placing the cooking components into your
grill, ensure that the Spark Electrode Tip is properly
positioned within each Gas Collector Box (a 4"
wide stainless mechanism found at the front be-
tween each set of Burners.) The easiest way to
ensure this is to perform this Electrode Check:
1. Be sure all Control Knobs are set to "OFF"
and open the Grill Lid.
2. Have an assistant stand behind to the right of
the grill and look down at each Gas Collector
Box. NEVER put your face inside Grill Head.
. Push and turn each Control Knob to High.
You should hear a "spark" sound and your
assistant should see a small blue spark within
each Gas Collector Box. If a spark is present,
the Electrode Tips are properly positioned.
4. If no spark is seen, the Spark Gap shown in
Figure 10 needs to be adjusted as follows:
5.
Using an adjustable wrench, loosen the Inside Nut
just until the Gas Collector Box can be maneuvered
and turned upward.
The gap between the Spark Electrode Tip and
Spark receiver should be approximately 3/16".
If the gap is wider than 3/16" use a pair of long nose
pliers and gently squeeze the Gas Collector Box
until the gap is correct.
Return the Gas Collector Box to its original horizon-
tal position, secure the Inside Nut and try the
Electrode Check again.
If no "spark" sound is heard, call our
Grill Information Center
at 1-888-317-7642.
Figure 10 - Side View
GAS COLLECTOR BOX
INSIDE NUT
/
SPARKGAP
SPARKELECTRODE TIP
\
SPARK RECEWER
12

Installing Cooking Components
Important: Before cooking on your grill the first
time, wash the Cooking Grids and Cooking Rack
with warm, soapy water. Rinse and dry thoroughly.
Season with cooking oil regularly. After cooking is
completed, turn grill to the HIGH setting for about
five minutes to burn off excess grease or food
residue.
1. Evenly space the Cooking Grids on the ledge
above the Charcoal Tray.
2. Place the Secondary Cooking Rack into the
slots on the upper left and upper right of the
Grill Bowl Side Panels. See Figure 11.
Connecting A Liquid Propane Gas (LP gas)
Tank To Your Grill
1. Hang your filled gas tank on the top of the
Tank Hook. The ring foot of the gas tank will
rest on the Tank Holder. See Figure 12.
Make sure the LP gas tank valve is in the
full OFF position. (Turn clockwise to close.)
2. Check the tank valve to insure it has proper
external mating threads to fit the hose &
regulator assembly provided. (Type 1 connec-
tion per ANSI Z21.58b-2002)
3. Make sure all Burner Valves are in the OFF
position.
4. Inspect the valve connection port and regulator
assembly. Look for damage or debris. Remove
any debris. Inspect hose for damage. Never
use damaged or plugged equipment.
5. When connecting the regulator assembly to
the tank valve, hand tighten nut clockwise to
a full stop. DO NOT use a wrench to tighten
because it could damage the Quick Coupling
Nut and result in a hazardous condition.
See Figure 13.
6. Open the tank valve fully (counter clockwise).
Use a soapy water solution to check all
connections for leaks before attempting to light
your grill. See "Checking for LP Gas Leaks"
on page 14. If a leak is found, turn the tank
valve off and do not use your grill until the
leak is repaired.
Disconnecting A Liquid Propane Gas (LP gas)
Tank From Your Grill
1. Turn the Burner Valves and LP gas tank valve
to the full OFF position. (Turn clockwise to
close.)
2. Detach the hose and regulator assembly from
the LP gas tank valve by turning the Quick
Coupling Nut counterclockwise.
Figure 11
SECONDARY
COOKING RACK_
COOKING GRID_
SLOTSFOR
RACK
Figure 12
TANKHOOK
/
ALREADY
CONNECTED
OF GAS
MANIFOLD
LPG TANK
Figure 13
\
TANK HOLDER
ALREADY CONNECTED
TO THE INLET OF GAS
MANIFOLD
QUICK
_ COUPLING
NUT
CAUTION: When the appliance is not in use, the
gas must be turned off at the supply tank.
Congratulations
Your Kenmore LP charcoal/gas grill is now
ready for use. Before the first use and at the
beginning of each season (and whenever the
LP gas tank has been changed):
1. Read all safety, lighting and operating
instructions.
2. Check Gas Valve Orifices, Burner Tubes
and Burner Ports for any obstructions.
3. Perform gas leak check according to
instructions found on page 14 of this
manual.
13

WARNING
If you smell gas:
Shut off gas supply to the gas grill.
Turn the Control Knobs to OFF position.
Extinguish any open flame such as candle,
cigarette, lighter, etc., that could cause gas
to ignite.
Open the Grill Lid.
Get away from the LP gas tank.
Do not try to fix the problem yourself.
If odor continues or you have a fire you
cannot extinguish, call your fire depart-
ment. Do not call near the LP gas tank
because your telephone is an electrical
device and could create a spark resulting
in fire and/or explosion.
NOTE: The normal flow of gas through the
regulator and hose assembly can create a
humming noise. A low volume of noise is
perfectly normal and will not interfere with
operation of the grill. If humming noise is
loud and excessive you may need to purge
air from the gas line or reset the regulator
excess gas flow device. This purging proce-
dure should be done every time a new LP
gas tank is connected to your grill. For help
call the Grill Information Center.
Never test for leaks with a flame. Prior to first
use, at the beginning of each season, or every
time your LP gas tank is changed, you must
check for gas leaks. Follow these four steps:
1. Make a soap solution by mixing one part
liquid detergent and one part water.
2. Turn the grill Control Knobs to the full OFF
position, then turn the gas ON at source.
LP Tank Exchange
• Many retailers that sell grills offer you the op-
tion of replacing your empty LP tank through an
exchange service. Use only those reputable
exchange companies that inspect, precision
fill, test and certify their cylinders. Exchange
your tank only for an OPD safety feature-equipped
tank as described in the LP Tank section of
this manual.
• Always keep new and exchanged LP tanks in
upright position during use, transit or storage.
• Leak test new and exchange LP tanks BEFORE
connecting to grill.
LP Tank Leak Test
For your safety
• Leak test must be repeated each time LP tank is
exchanged of refilled.
• Do not smoke during leak test.
• Do not use an open flame to check for gas leaks.
Grill must be leak tested outdoors in a well-ven-
tilated area, away from ignition sources such as
gas fired or electrical appliances. During leak test,
keep grill away from open flames or sparks.
Use a clean paintbrush and a 50/50 mild soap
and water solution. Brush soapy solution onto
areas indicated by arrows in figure below.
WARNING
If growing bubbles appear do not use or move
the LP tank. Contact an LP gas Supplier or your
fire department!
• Do not use household cleaning agents. Damage
to gas assembly components can result.
3. Apply the soap solution to all gas connec-
tions. If bubbles appear in the soap solution
the connections are not properly sealed.
Check each fitting and tighten or repair as
necessary.
4. If you have a gas leak that cannot be
repaired by tightening, turn off the gas at the
source, disconnect fuel line from your grill and
call 1-800-4-MY-HOME ® or your gas supplier
for repair assistance.
J
14

Basic Lighting Procedures
1. Familiarize yourself with the safety guidelines at
the front of this manual. Do not smoke while
lighting grill or checking gas supply connections.
2. Be sure the LP gas tank is filled.
3. Check that the end of each Burner Tube is properly
located overeach Valve Orifice.
4. Make sure all gas connections are securely
tightened.
5. Open the Grill Lid.
WARNING
To prevent injury and damage ensure that:
• When using propane gas to light charcoal,
do not use propane for more than 10
minutes.
• Ensure the charcoal basket is clean of old
ashes before operating the gas burners.
• Never use propane and charcoal at the
same time to cook.
WARNING
Failure to open Grill Lid during the
lighting procedures could result in a fire
or explosion that could cause serious
bodily injury, death or property damage.
6. Set Control Knobs to OFF and open the LP gas
tank valve slowly until 1/4 to 1/2 open.
I Open LP
OFF
gas tank
7. Push and turn left Control Knob to HIGH. The built-
in spark ignitor will light the burner automatically.
I
HIGH
OFF i
J
8. If the burner does not light, turn the Control Knob
to OFF, wait 5 minutes for gas to clear, then retry.
9. Once the left grill burner is ignited, the adjacent
burner can be lit by simply turning its Control Knob
toHIGH.
10.Adjust the Control Knobs to your desired cooking
temperature.
15

Lighting Your Grill by Match
To light your gas grill by match, follow steps 1 through
6 of the Basic Lighting Procedures. Then, insert a lit
match through the Lighting Hole on the left side of the
grill. See Figure 14. Turn the nearest Control Knob to
the HIGH setting to release gas. The Burner should
light immediately.
Figure 14
LIGHTING
HOLE \
\
\
\
®
Z WARNING
Never lean over the grill cooking area while
lighting your gas grill. Keep your face and
body a safe distance (at least 18 inches)
from the Lighting Hole or Burners, when
lighting your grill by match.
If the grill fails to light :
1. Turn gas off at source and turn the Control Knob to
OFF. Wait at least five minutes for gas to clear,
then retry.
2. If your grill still fails to light, check gas supply
and connections.
3. Repeat lighting procedure. If your grill still fails
to operate, turn the gas off at source, turn the
Control Knobs to OFF, then check the following:
• Misalignment of BurnerTubesover Orifices
Correction: Reposition BurnerTubesoverOri-
rices.
• Obstruction in gas line
Correction: Remove fuel line from grill. Do not
smoke! Open gas supply for one second to clear
any obstruction from fuel line. Close off gas supply
at source and reconnect fuel line to grill.
• PluggedOririce
Correction: Remove Burners from grill by
loosening screw using screw driver. Carefully lift
each Burner up and away from gas valve Orifice.
Remove the Orifice from gas valve and gently
clear any obstruction with a fine wire. Then
reinstall all Orifices, Burners, Cotter Pins and
cooking components.
If an obstruction is suspected in gas valves or
gas valve bracket, please call for repair service at
1-800-4-MY-HOME _.
4.
.
• Obstruction in BurnerTubes
Correction: Followthe Burner Tube cteaning
procedure on page 21 of this Owner's Manual
• Misalignment of Spark on Burner
Correction: Check for proper position of the
Electrode Tip as shown in Figure 10. The gap
between the Spark Electrode Tip and Spark
Receiver should be approximately 3/16". Adjust
if necessary. With the gas supply closed, push
and turn each Control Knobs to High, check for
the presence of a spark at the Electrode.
If the grill still does not light you may need to
purge air from the gas line or reset the regula-
tor excess gas flow device. Note: This proce-
dure should be done every time a new LP gas
tank is connected to your grill.
To purge air from your gas line and/or
reset the regulator excess gas flow device:
• Turn the Control Knobs to the OFF position.
• Turn off the gas at the tank valve.
• Disconnect regulator from LP gas tank.
• Let unit stand for 5 minutes to allow air to
purge.
• Reconnect regulator to the LP gas tank.
• Turn the tank valve on slowly until 1/4 to
1/2 open.
• Open the Grill Lid.
• Push and turn the LEFT Control Knob to
HIGH.
If all checks or corrections have been made and
you still have questions about operating your gas
grill, calltheGrill Information Center
8am - 8pm CST, Monday through Friday at
1-888-317-7642.
Z WARNING
Should a FLASHBACK fire occur in/or
around the Burner Tubes, follow the
instructions below. Failure to comply with
these instructions could result in a fire or
explosion that could cause serious bodily
injury, death, or property damage.
• Shut off gas supply to the gas grill.
• Turn the Control Knobs to OFF position.
• Open the Grill Lid.
• Put out any flame with a Class B fire
extinguisher.
• Once the grill has cooled down, clean the
Burner Tubes and Burners according to
the cleaning instructions found on page 21
in this manual.
16

NOTE: See page 13, 14, 15 and 16 for instructions
on how to connectLP tank to grill, how to light grill
and how to check for Gas leaks.
1. Adjust the Adjusting Arm Handle to High
position. See Figure 1.
2. Close all of the Air Vents on the Rear of the
Grill Bowl. See Figure 2.
3. Before igniting burners, inspect for charcoal
ashes. Remove and empty Charcoal Tray. With
a small hand-broom, sweep ashes away from
burners and into Grease Tray below.
4. Important: Before operating LP gas function,
you must slide the Charcoal Tray back into the
Tray Support in the Grill Bowl. See Figure 3.
The clean Charcoal Tray sitting above the
burners now functions as a gas Flame Tamer
and heat distributor.
Figure 3
Figure 1
ADJUSTING ARM
HANDLE
Figure 2
ADJUSTING
ARM HANDLE
k_
CHARCOAL TRAY
SUPPORT
\
CHARCOAL TRAY
AIR VENT
17

Youdonotneedtouseanystarterfluidtolightcharcoal
inthisgrill.
1.OpentheAccessDoor.AdjusttheHandletoHigh
position.SeeFigure1.
2.SlidetheCharcoalTrayoutfromCharcoalTray
Support.PutCharcoalintheCharcoalTray(Maxi-
mumloadis5Ibs).SeeFigure2. Never fill
charcoal above the upper level of the Tray!
NOTE: To remove Charcoal Tray, lift and pull it
from front.
3. Slide the Charcoal Tray back into Charcoal Tray
Support.
4. Open the UpperAir Vents on Rear of Grill Bowl.
See Figure 5.
Figure 1
Figure 2
Charcoal Ignition
1. Adjustthe Handleto LOW position.
2. OpentheGrilt Lid.
3. Turn all Control Knobs to "HIGH" position and
ignite. (See page 15 for LPGas Grill Lighting
Instructions.)
4. Open the Access Door to be sure the Burners are
lit. See Figure 3. Then close the Grill Lid.
5. After 3-5 minutes, turn all Control Knobs to "OFF"
and close the Access Door. See Figure 4.
6. Turn off gas at the LP tank.
Figure 3
/ WARNING
You must not use LP Gas and Charcoal at
the same time for more than 10 minutes.
Overheating can result. Failure to comply
with these instructions could result in a fire
or explosion that could cause serious bodily
injury, death, or property damage.
Figure 4
18

Temperature Control
You can adjust both of the Air Vents to control the
rate of burning. See Figure 5. You can use the
handle to adjust different levels of the Charcoal Tray
to control grilling temperatures.
Add charcoal during cooking
You can easily add charcoal to the Grill during
cooking. We recommend you wear flame retardant
BBQ mitts to avoid hot surfaces.
1. Adjust the Handle to LOW position.
Open Access Door.
2. Add charcoal to Charcoal Tray.
3. Close the Access Door.
4. Readjust Charcoal Tray height.
Figure 5
WARNING
You must not use LP Gas and Charcoal at
the same time for more than 10 minutes.
Overheating can result. Failure to comply
with these instructions could result in a fire
or explosion that could cause serious bodily
injury, death, or property damage.
WARNING
Carbon Monoxide Hazard
Burning charcoal inside will kill you. It gives
off carbon monoxide, which is odorless and
colorless. Never burn charcoal inside homes,
tents and vehicles.
Z WARNING
For Safe Use Of Your Grill And To Avoid
Serious Injury:
Do not let children operate or play near grill.
Keep grill area clear and free from materials that
bum.
Check burner flames regularly.
Use grill at least 24 in. from any wall or surface.
Maintain 10 ft. clearance to object that can
catch fire or sources of ignition such as pilot
lights on water heaters, live electrical appli-
ances, etc.
Make sure ashes are cold and there are no hot
embers prior to cleaning or storing your grill.
Never use kerosene, gasoline, alcohol or lighter
fluid as they are extremely dangerous and will
impart a distasteful flavor to your food.
Use Charcoal Only. DO NOT USE Wood
Chunks.
19

As with all appliances, proper care and maintenance
will keep your grill in top operating condition and
prolong its life. By following these cleaning procedures
on a timely basis, your grill will stay clean and work
properly with minimum effort.
CAUTION:
Be sure your grill is OFF and cool before cleaning.
Take care not to chip or scratch the painted surfaces
because it will cause rusting.
Cleaning The Cooking Grids
Before initial use and periodically, we suggest you
wash your Cooking Grids with a mild soap and warm
water solution. You can use a wash cloth or vegetable
brush to clean your Cooking Grids.
CAUTION:
Never try to clean your cooking grids unless you
are sure the grids are cool to the touch.
Cleaning The Charcoal Tray/Flame Tamer
Periodically you should wash the Charcoal Tray with a
soap and warm water solution. Use a vegetable brush
to remove stubborn burnt-on cooking residue. Dry the
Charcoal Tray thoroughly before you reinstall it into the
Charcoal Tray Support
Cleaning The Grease Tray
To reduce the chance of fire, the Grease Tray should
be visually inspected before each grill use. Remove
grease and wash Grease Tray with a mild soap and
warm water solution.
Annual Cleaning of The Grill Interior
Burning-off (See page 23for instructions)the grill after
every cookout will keep it ready for instant use.
However, once a year you should give the entire grill a
thorough cleaning to keep it intop operating condition.
Follow these steps:
1. Turn all Burner Valves to the full OFF position.
2. Turn the LP gas tank valve to the full OFF position.
3. Detach the LP gas hose and regulator assembly from
your gasgritl. Use a 7/8"open end wrenchturning the
fitting counter-clockwise. Inspect for any damage and
replace as neccessary with Sears replacement part
numbers found on the Parts List.
4. Remove and clean the Cooking Grids, Secondary
Cooking Rack, Charcoal Tray and grill Burners.
5. Cover each GasValve Orifice with aluminum foil.
.
7.
8.
g.
10.
11.
Brush the inside and bottom of the grill with a fiber
pad or nylon brush, and wash with mild soap and a
warm water solution. Rinse thoroughly and let dry.
Remove aluminum foil from Orifices and check
each Orifice for obstruction.
Check each Spark Electrode, adjusting as needed.
The space between the Spark Electrode Tip and
Spark Receiver should be approximately 3/16".
Replace the Burners and adjust the Gas Collector
Box. The edge of the collector box should be
overlapping the Burner Port.
Replace Charcoal Tray, Secondary Cooking Rack
and the Cooking Grids.
Reconnect the gas source and observe the Burner
flame for correct operation.
Cleaning Exterior Surfaces:
Before initial use, and periodically thereafter, we
suggest you wash your grill using mild soap and a
warm water solution. You can use a wash cloth or
sponge for this process. Do not use a stiff wire or
brass brush that might remove paint during the clean-
ing process.
Cleaning Exterior Stainless Steel Surfaces:
Weathering and extreme heat can cause exterior
stainless steel surfaces to turn tan in color. Machine
oils used in the manufacturing process of stainless
steel can also cause this tanning color. Use a Stain-
less Steel Cleaner to polish the stainless steel sur-
faces of your grill. Never use abrasive cleaners or
scrubbers because they will scratch and damage your
grill. Follow these steps for the best results.
1.
Turn the LP gas tank valve (clockwise) tothe full OFF
position. Disconnect the regulator and hose assem-
bly from LP gas tank. Cover exposed gas fitting with
aluminum foil.
2. Remove dirt or grease using a soft cloth and polish
stainless surfaces. Wipe with a soft cloth.
3. Remove aluminum foil from exposed gasfitting and
allow grill to air dry before attaching the regulator
and hose to your LP gas tank.
Keep outdoor cooking gas appliance area clear and free
from combustible materials, gasoline and other flam-
mable vaporsand liquids.
2O
/