Cuckoo CR-0631F Owner's manual
- Category
- Multi cookers
- Type
- Owner's manual
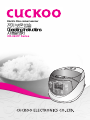
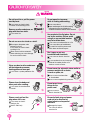
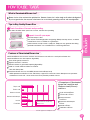
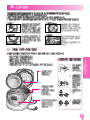
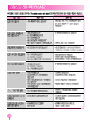
Cuckoo CR-0631F is a versatile electric rice cooker and warmer with various functions for cooking different types of rice, steaming, slow cooking, and even making GABA rice. It features a user-friendly control panel, a detachable power cord, and a nonstick-coated inner pot for easy cleaning. With its preset timer, you can delay the cooking process and have fresh, warm rice ready whenever you need it.
Cuckoo CR-0631F is a versatile electric rice cooker and warmer with various functions for cooking different types of rice, steaming, slow cooking, and even making GABA rice. It features a user-friendly control panel, a detachable power cord, and a nonstick-coated inner pot for easy cleaning. With its preset timer, you can delay the cooking process and have fresh, warm rice ready whenever you need it.


-
 1
1
-
 2
2
-
 3
3
-
 4
4
-
 5
5
-
 6
6
-
 7
7
-
 8
8
-
 9
9
-
 10
10
-
 11
11
-
 12
12
-
 13
13
-
 14
14
-
 15
15
-
 16
16
-
 17
17
-
 18
18
-
 19
19
-
 20
20
-
 21
21
-
 22
22
-
 23
23
-
 24
24
-
 25
25
-
 26
26
-
 27
27
-
 28
28
-
 29
29
-
 30
30
-
 31
31
-
 32
32
-
 33
33
-
 34
34
-
 35
35
-
 36
36
-
 37
37
-
 38
38
-
 39
39
-
 40
40
-
 41
41
-
 42
42
-
 43
43
-
 44
44
-
 45
45
-
 46
46
-
 47
47
-
 48
48
-
 49
49
-
 50
50
-
 51
51
-
 52
52
-
 53
53
-
 54
54
-
 55
55
-
 56
56


Cuckoo CR-0631F Owner's manual
- Category
- Multi cookers
- Type
- Owner's manual
Cuckoo CR-0631F is a versatile electric rice cooker and warmer with various functions for cooking different types of rice, steaming, slow cooking, and even making GABA rice. It features a user-friendly control panel, a detachable power cord, and a nonstick-coated inner pot for easy cleaning. With its preset timer, you can delay the cooking process and have fresh, warm rice ready whenever you need it.
Ask a question and I''ll find the answer in the document
Finding information in a document is now easier with AI
Related papers
-
Cuckoo CR-0655F User manual
-
-
-
-
-
-
-
-
-
Cuckoo CRP-HZ0683F Owner's manual
Other documents
-
Tiger JAJ-A55S Operating Instructions Manual
-
-
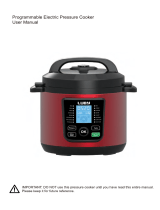 LUBY GT606 User manual
-
Hasbro Aliens Lt. Ripley Operating instructions
-
Tiger Corporation JAX-T18U User manual
-
-
-
-
SALAV STM-402-GOLD Operating instructions
-
Hitachi RZ-W3000YH Operating Instruction And Cook Book
