Page is loading ...

Owner’s Manual

Page | 2
CASCADE CMXPro
CMXProCMXPro
CMXPro™
CASCADE HEALTH AND FITNESS LLC
PO BOX 1318
WOODINVILLE WA 98072
PHONE: (425) 402-4062
FAX: (425) 402-4063
EMAIL: info@cascadehealthandfitness.com
www.cascadehealthandfitness.com
PLEASE KEEP THIS BOOKLET FOR IMPORTANT WARRANTY
INFORMATION & FUTURE REFERENCE. PLEASE FILL IN BELOW
CHART WITH REQUESTED INFORMATION FOR FUTURE USE:
MODEL NUMBER
37130
DATE OF PURCHASE
SERIAL NUMBER
DEALER NAME
DEALER PHONE NUMBER

Page | 3
CONGRATULATIONS
CONGRATULATIONSCONGRATULATIONS
CONGRATULATIONS
You have just become a valued Cascade customer. Our team is
committed to making your cycling
experience fun and rewarding
— offering you detailed product information, expert fitness
advice, and
direct customer support you can depend on. We want
to thank you for purchasing the Cascade CMX Pro indoor group
cycle.
This CMX Pro
CMX Pro CMX Pro
CMX Pro Owner’s Manual will help you get the most
enjoyment from your new indoor group
cycle. It not only
explains all the important features and safety considerations of
the CMX Pro
CMX ProCMX Pro
CMX Pro, it
also includes great workout tips and exercise
principles. If at any time you have questions about this
information, please call us at
(425) 402-4062 and we will be happy to help you. To help us
answer your
questions quickly, we recommend that you have the
serial number of your bike ready when you call us.
The serial
number of your bike is located on bike frame.
The
CMX Pro
CMX Pro CMX Pro
CMX Pro has been built to deliver
an incredible workout,
every component of the CMX Pro
CMX Pro CMX Pro
CMX Pro has been designed to be more
durable,
more user friendly and more comfortable than any
other indoor group cycle you have ridden. Whether
you are a
beginning fitness enthusiast or a highly conditioned athlete, you
will immediately feel the difference.
G
GG
Gr
rr
re
ee
eat
atat
ater
er er
er C
CC
Com
omom
omf
ff
fo
oo
or
rr
rt
tt
t
4-way handlebar & seat adjustability allows you to
properly fit your bike ranging from the upright
position to
a low, stretched out setup ideal for triathletes.
Narrower crank design replicates the geometry of a road
bike for greater comfort.
Comfortable ergonomic seat.
Finally, its attractiveness and small footprint allows you to
position the CMX Pro
CMX Pro CMX Pro
CMX Pro anywhere in your
home/facility for
maximum enjoyment; and you’ll also enjoy how quiet a CMX Pro
CMX Pro CMX Pro
CMX Pro
workout is. You will quickly discover that the CMX Pro
CMX Pro CMX Pro
CMX Pro gives you
a better cycling experience than any other
indoor group cycle.

Page | 4
FEATURES
FEATURESFEATURES
FEATURES
Smooth, quiet magnetic resistance
Smooth, quiet magnetic resistanceSmooth, quiet magnetic resistance
Smooth, quiet magnetic resistance reduces maintenance
and service
Durable
DurableDurable
Durable
f
ff
fr
rr
rame
ameame
ame
desi
desidesi
desig
gg
gn
nn
n — Excellent stability, and 350 lb. user
load
Extra strong
Extra strongExtra strong
Extra strong
bot
botbot
bott
tt
tom
omom
om
b
bb
br
rr
racket
acketacket
acket
design
designdesign
design — Fast, simple
assembly and service
Sweat guard and fender
Sweat guard and fenderSweat guard and fender
Sweat guard and fender to keep sweat off flywheel
and brake assembly
Wide
WideWide
Wide
adjustme
adjustmeadjustme
adjustmen
nn
nt
tt
t
r
rr
range
angeange
ange — Better fit for tall and short users for
improved comfort
Complete bike designed for maximum c
cc
cor
oror
orr
rr
rosion
osionosion
osion
r
rr
resistan
esistanesistan
esistanc
cc
ce
ee
e
Pop pin post
Pop pin postPop pin post
Pop pin post
clamps
clampsclamps
clamps — Quick and secure locking for
easy vertical adjustment of the seat and handlebar
S
SS
Standa
tandatanda
tandar
rr
rd
dd
d
pedal
pedalpedal
pedal
th
thth
thr
rr
read
eadead
ead — Accepts most standard cycling
pedals
F
FF
Fas
asas
ast
tt
ter
erer
er
assembly
assemblyassembly
assembly — Most components are pre-assembled
No
NoNo
No
calib
calibcalib
calibr
rr
ra
aa
ation
tiontion
tion
r
rr
requi
equiequi
equir
rr
red
eded
ed — Just hop on & ride
4
44
4-
--
-w
ww
wa
aa
ay
yy
y
mic
micmic
micr
rr
ro
oo
o
adjustabili
adjustabiliadjustabili
adjustabilit
tt
ty
yy
y for both seat & handlebars
allows you to find the perfect fit.
Left and right stretch pads
Left and right stretch pads Left and right stretch pads
Left and right stretch pads –
––
–
for post rider stretching.
Wide cross legs
Wide cross legs Wide cross legs
Wide cross legs –
––
– for maximum stability
Large in
Large inLarge in
Large in-
--
-line wheels
line wheelsline wheels
line wheels- easy and quick to move bike
Two
Two Two
Two water bottle
water bottlewater bottle
water bottle
holders
holders holders
holders – provides for plenty of
water during long rides
Large diameter leveler feet
Large diameter leveler feet Large diameter leveler feet
Large diameter leveler feet – allows you to make the
bike stable on uneven surfaces
The CMX Pro
CMX Pro CMX Pro
CMX Pro is so smooth and comfortable you can
work out much longer than you ever
imagined.

Page | 5
OVERVIEW
OVERVIEWOVERVIEW
OVERVIEW
Please review the rest of this Owner’s Manual carefully before you
start using your new CMX Pro
CMX ProCMX Pro
CMX Pro.
The information enclosed here
will help you get the most enjoyment out of your workout and
includes
valuable operating, service, safety, and trouble-
shooting information, as well as guidelines for an effective
exercise program.
We are confident that you will love your new CMX Pro
CMX ProCMX Pro
CMX Pro.
Enjoy your riding.

Page | 6
INDEX
INDEXINDEX
INDEX
WARRANTY PAGE 7
SAFETY INSTRUCTIONS/INFORMATION PAGE 8
DELIVERY PAGE 11
DIAGRAM PAGE 12
UNPACKING INSTRUCTIONS PAGE 13
ASSEMBLY INSTRUCTIONS PAGE 15
OPERATING INSTRUCTIONS PAGE 17
GUIDELINES FOR SAFE OPERATION PAGE 18
BASIC OPERATION PAGE 22
GENERAL EXERCISE GUIDELINES PAGE 23
MAINTENANCE INSTRUCTIONS PAGE 25
TROUBLESHOOTING PAGE 27
SPECIFICATIONS PAGE 29
EXERCISE LOG PAGE 31

Page | 7
WARRANTY
WARRANTYWARRANTY
WARRANTY
PARTS
PARTSPARTS
PARTS
LABOR
LABORLABOR
LABOR
FRAME LIFETIME 1 YEAR FOLLOWING
CUSTOMER INSTALLATION
NON WEARABLE PARTS 5 YEARS
PEDALS 2 YEAR
WEARABLES 2 YEAR
NEED ASSISTANCE? Customer Service: (425) 402
NEED ASSISTANCE? Customer Service: (425) 402NEED ASSISTANCE? Customer Service: (425) 402
NEED ASSISTANCE? Customer Service: (425) 402-
--
-4062
40624062
4062
Prior to contacting our Customer Service Department, please have the
Prior to contacting our Customer Service Department, please have the Prior to contacting our Customer Service Department, please have the
Prior to contacting our Customer Service Department, please have the
following information
following informationfollowing information
following information:
Your name, Customer Number, Shipping Address & Telephone
Number
Serial Number(s) of the inoperable bike(s)
Date(s) of Purchase for the inoperable bike(s)
Your Billing Address
The above information will ensure that you are the only one ordering
parts under your warranty protection. If warranty replacement parts
are shipped to you, you may be required to return the inoperable
part(s). To facilitate this process, the following policy has been
established:
Contact our Customer Service Department
Customer Service DepartmentCustomer Service Department
Customer Service Department to receive a
Return Authorization #
Return Authorization #Return Authorization #
Return Authorization # prior to shipment
Cascade will incur all UPS Ground freight charges for
Warranty Parts ordered for a machine that is less than 90 days
old. You are responsible for freight charges on warranty parts
for machines that are more than 90 days old. You will not be
responsible for freight charges for any returned inoperable
parts.
If an inoperable warranty part(s) must be returned to our
Customer Service Department, we will pay the shipping cost
and provide detailed return shipping instructions. These
instructions will be sent along with your warranty replacement
part(s)

Page | 8
SAFETY I
SAFETY ISAFETY I
SAFETY INSTRUCTIONS/INFORMATION
NSTRUCTIONS/INFORMATIONNSTRUCTIONS/INFORMATION
NSTRUCTIONS/INFORMATION
PRIOR TO BEGINNING AN EXERCISE PROGRAM, READ ALL
PRIOR TO BEGINNING AN EXERCISE PROGRAM, READ ALL PRIOR TO BEGINNING AN EXERCISE PROGRAM, READ ALL
PRIOR TO BEGINNING AN EXERCISE PROGRAM, READ ALL
INSTRUCTIONS CONTAINED WITHIN THIS DOCUMENT
INSTRUCTIONS CONTAINED WITHIN THIS DOCUMENTINSTRUCTIONS CONTAINED WITHIN THIS DOCUMENT
INSTRUCTIONS CONTAINED WITHIN THIS DOCUMENT
1. The CMX Pro Indoor Group Cycle is intended for
cardiovascular fitness training and may be used
in group or
individual settings.
a. Use this equipment only for its intended use as
described in this
manual
b. Do not attempt to ride this bike at high pedal speeds or
in a standing position until you
have practiced and are
comfortable riding at slower pedal speeds.
2. This unit is NOT equipped with a freewheel system. If the
flywheel is in motion, the pedals will be in
motion.
a. Do not attempt to stop the unit by applying reverse
pressure to the pedals as knee injury
may occur.
3. Do not attempt to remove your feet from the pedals while
they are in motion as serious
injury may occur from the
spinning pedals.
4. Wait for the flywheel to coast to a stop.
a.
If you want to quickly stop the flywheel, apply firm down-
ward pressure to the brake knob. Do not attempt to
dismount the CMX Pro unless the pedals and
the flywheel
are at a complete stop.
WARNING
WARNINGWARNING
WARNING
When present,
this statement is an
indication that there are potential
hazards that could result in injury or
death.
When present, this symbol is an
indicator that you should proceed
cautiously and be alert as your safety
is dependent on your attention to the
instructions.

Page | 9
SAFETY INSTRUCTIONS/INFORMATION
SAFETY INSTRUCTIONS/INFORMATIONSAFETY INSTRUCTIONS/INFORMATION
SAFETY INSTRUCTIONS/INFORMATION
5. Injury or death may occur from improper use or over-
training. Consult a medical doctor or qualified
fitness
instructor to determine an exercise program appropriate to
your level of fitness.
6. Never attempt to turn the pedal crank arms by hand.
a. Do not expose ANY part of your body or clothing to the
drive mechanism as possible injury could occur.
7. In commercial settings, the CMX Pro should always be
used in a supervised environment with
qualified
instructors.
8. In a home setting, keep unsupervised children away from
the unit when not in use.
a. Keep children
and pets away from the unit while in use.
9. Do not perform push-up type movements on the
handlebars.
10. Never drop or insert any object into any opening on the
exercise equipment.
11. Only use the unit on a stable, level floor.
12. Follow the instructions for safe use of the equipment
including proper seat position, handlebar
position, and
use of the foot positioning system of the pedals. Never
adjust the handlebar height higher then maximum height
which is marked with the word “MAX”.
13. For safe operation, allow for at least 1foot (30cm) of free
space to either side of the unit and 2 feet
(60cm) of free
space to the rear and front of the unit.
14. DO NOT attempt to make any handlebar or seat
adjustments while sitting or standing on the
bike.
15. Users, agents, and anyone directing the use of this
equipment shall be responsible for determining the
suitability of the product for its intended use as outlined
in this manual, including regular
maintenance tasks.
Said parties are put on notice that they assume all risk
and liability in connection herewith.

Page | 10
SAFETY INSTRUCTIONS/INFORMATION
SAFETY INSTRUCTIONS/INFORMATIONSAFETY INSTRUCTIONS/INFORMATION
SAFETY INSTRUCTIONS/INFORMATION
16. Rider capacity of the CMX Pro is 350lb (159 kg).
The safety level of this equipment can only be maintained by
following the guidelines in this manual and
examining the
equipment regularly for damage and wear.
Damaged or inoperable components should
be replaced
immediately and the equipment should not be used until it is
repaired.
Failure to follow all guidelines above may compromise your
exercise experience, expose you and others
to injury, and reduce
the longevity of the equipment.

Page | 11
D
DD
DELIVERY
ELIVERYELIVERY
ELIVERY
Upon delivery of your Cascade CMX Pro, take a moment to check
the exterior of the box for any damage and make a note of it on
the delivery receipt before signing. Make sure your delivery agent
has been made aware of any concerns you have and that they
have been denoted on the delivery receipt. Please contact our
Customer Service department (425) 402-4062 if there are any
issues.
Your Cascade CMX Pro will arrive in (1) carton and will require
some assembly.
What’s Inside the Box:
Bike Frame with Flywheel Pedal, Left Pedal, Right
Seat/seat slider Seat Post Water bottle holders(2)
Handlebar Handlebar Post Adjustment handle
Square washer Front Cross leg Rear Cross leg
Screw, washer(M5) (4) Screw, nut, washer (4)(M8)
Tools for assembly – two hex wrenches and multi tool

Page | 12
DIAGRAM
DIAGRAMDIAGRAM
DIAGRAM

Page | 13
UNPACKING
UNPACKINGUNPACKING
UNPACKING
INSTRUCTIONS
INSTRUCTIONSINSTRUCTIONS
INSTRUCTIONS
Before leaving the manufacturing facility, your Cascade CMX Pro
exercise bike was thoroughly
inspected and tested for proper
operation. To minimize shipping damage, careful attention was
given to
making your bike ready for shipment.
Prior to opening the box, place it in the room of use where there
is a large, clear area in order to facilitate an easy assembly.
1) With the box in upright position, remove the strapping
material. Next remove the staples on the top of the carton.
2) Open the carton from the top of the carton.
3) Remove the seat assembly and the foam piece in the center of
the carton.
4) Remove the handlebars.
5) Carefully lay the carton on its side and pull out the bike frame
and foam supports from inside the carton.

Page | 14
UNPACKING INSTRUCTIONS
UNPACKING INSTRUCTIONSUNPACKING INSTRUCTIONS
UNPACKING INSTRUCTIONS
6) Stand up the frame and foam supports, then remove the foam
pieces from each end of the bike frame.
7) Remove all the parts/pieces from the foam supports. You
should have:
a. An Owner’s Manual
b. All the parts required to assembly the CMX Pro
c. All the necessary tools to assemble the CMX Pro

Page | 15
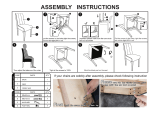
ASSEMBLY INSTRUCTIONS
ASSEMBLY INSTRUCTIONSASSEMBLY INSTRUCTIONS
ASSEMBLY INSTRUCTIONS
STABILIZERS
STABILIZERSSTABILIZERS
STABILIZERS/
//
/
HANDLEBAR
HANDLEBARHANDLEBAR
HANDLEBAR
POST AND
POST AND POST AND
POST AND
HANDLEBAR ASSEMBLY
HANDLEBAR ASSEMBLYHANDLEBAR ASSEMBLY
HANDLEBAR ASSEMBLY
1) Align the front stabilizer (the one with the
transport wheels) with the holes in the
main frame, below the flywheel.
2) Attach the stabilizer with (2) M8x60mm
screws and (4) Washers(two on top of
frame and two on bottom of stabilizer).
3) Tighten with the provided Hex key and multi tool.
4) Attach the handlebar to the handlebar post using the included
adjustment handle and square washer. The simplest way to
do this is put the handlebar on the ground
upside down and then place the handlebar
post over the handlebar and attach using the
adjustment handle and square washer(make
sure the square washer is on the adjustment
handle with the smaller side facing the
handlebars) and tighten.
5) Loosen and then pull the T handle on the frame while inserting the
handlebar post and handlebar into the front frame opening.
Tighten the T handle.
6) Standing in front of the bike, grab the handlebars and tip the bike
forward and rest the handlebars on the ground. Be careful not to
let the frame fall over to either side.
7) Align the rear stabilizer (the one with the stretch pads) with
holes in the main frame as shown
8)
Attach the stabilizer with (2) M8x60mm screws and (4)
Washers(two on top of frame and two on bottom of stabilizer)

Page | 16
ASSEMBLY INSTRUCTIONS
ASSEMBLY INSTRUCTIONSASSEMBLY INSTRUCTIONS
ASSEMBLY INSTRUCTIONS
9) Tighten with the provided Hex key and multi tool.
SEAT
SEAT SEAT
SEAT POST
POSTPOST
POST
AND SEAT ASSEMBLY
AND SEAT ASSEMBLYAND SEAT ASSEMBLY
AND SEAT ASSEMBLY
1) Loosen and then pull the T handle on the frame while
inserting the seat post as shown. Tighten the T handle.
2) Loosen and then pull down the T handle on the seat post
while inserting the seat slider assembly as shown.
Tighten the T handle.
PEDALS
PEDALSPEDALS
PEDALS
1) The pedals are marked as if you are seated
on the bike, “R” for right, and “L” for left
2) Carefully thread
the right pedal into the
crank arm with your fingers - do
dodo
do
not
notnot
not
c
cc
cr
rr
ross
ossoss
oss
th
thth
thr
rr
read
eadead
ead
the
thethe
the
pedal
pedalpedal
pedal
in
inin
in
the
thethe
the
c
cc
cr
rr
rank
ankank
ank
arm!
arm!arm!
arm!
3)
Use the wrench tool to strongly tighten the
pedal. Torque pedals to 47 Nm (35 ft-lb)
4)
4)4)
4) Repeat this step for the left pedal -
NOTE: The LEFT PEDAL
NOTE: The LEFT PEDAL NOTE: The LEFT PEDAL
NOTE: The LEFT PEDAL
is
is is
is REVERSE
REVERSEREVERSE
REVERSE
THREADED
THREADEDTHREADED
THREADED
WATER BOTTLE HOLDER
WATER BOTTLE HOLDERWATER BOTTLE HOLDER
WATER BOTTLE HOLDERS
SS
S
1) To install the water bottle holders to the side of the frame
near the flywheel, insert the two screws with washers as
shown.
2) Tighten the screws with a Hex key to secure the holders to the
frame.

Page | 17
OPERATING INSTRUCTIONS
OPERATING INSTRUCTIONSOPERATING INSTRUCTIONS
OPERATING INSTRUCTIONS
1) Obtain a complete physical examination from your medical
doctor and enlist a health/fitness professional’s aid in
developing an exercise program suitable for your current health
status.
2) When working out for the first time, start out slowly for a
minimum of five minutes. After your
muscles are warmed up,
gradually increase the pedaling rate and/or resistance to a
speed that
allows you to attain your target heart rate zone.
3) The speed and duration of your exercise program should
always be subject to how you feel. Never
permit peer pressure
to exceed your personal judgment while exercising.
4) Overweight or severely unconditioned individuals should be
particularly cautious when using the
equipment for the first
time. Even though such individuals may not have histories of
serious physical problems, they may perceive the exercise to be
far less intense than it really is, resulting in the
possibility of
overexertion or injury.
5) Although all equipment manufactured by Cascade Health and
Fitness has been thoroughly inspected
by the manufacturing
facility prior to shipment, proper installation and regular
maintenance are
required to ensure safety. Maintenance is the
sole responsibility of the owner.
WARNING
WARNINGWARNING
WARNING
THESE GUIDELINES ARE DIRECTED TO YOU,
AS THE OWNER OF THIS EXERCISE
EQUIPMENT. YOU SHOULD INSIST THAT ALL
USERS FOLLOW THE SAME GUIDELINES.
YOU SHOULD MAKE THIS MANUAL
AVAILABLE TO ALL USERS.

Page | 18
GUIDELINES FOR SAFE
GUIDELINES FOR SAFE GUIDELINES FOR SAFE
GUIDELINES FOR SAFE OPERATI
OPERATIOPERATI
OPERATIO
OO
ON
NN
N
ADJUSTING THE FIT
ADJUSTING THE FITADJUSTING THE FIT
ADJUSTING THE FIT
Take a moment to learn how to properly fit your CMX Pro to your
body; it will make your workouts a
more pleasant and safer
experience.
The CMX Pro provides more seat and handlebar adjustability than
other indoor group cycles, and each adjustment is numbered so
you can quickly return the adjustments to your specific settings.
Making full use of these features will give you the most comfortable
ride
possible and allow you to exercise efficiently. Using the bike
when it is incorrectly adjusted can result in
unnecessary discomfort
and increase your risk of injury.
WARNING
WARNINGWARNING
WARNING
DO NOT ATTEMPT TO MAKE ANY
ADJUSTMENTS TO THIS EQUIPMENT
WHILE SITTING OR STANDING ON THE
BIKE. DISMOUNT THE BIKE PRIOR TO
MAKING ALL ADJUSTMENTS.

Page | 19
GUIDELINES FOR SAFE OPERATION
GUIDELINES FOR SAFE OPERATIONGUIDELINES FOR SAFE OPERATION
GUIDELINES FOR SAFE OPERATION
SEAT ADJUSTMENT
SEAT ADJUSTMENTSEAT ADJUSTMENT
SEAT ADJUSTMENT
Adjusting the Seat Height
1) Stand next to the Seat Post and adjust the seat to Hip height
2) Rotate the crank so that the pedals are
in the vertical position (12 & 6 o’clock)
3) Place your foot in the toe cage of the
pedal closest to the floor and mount the
bike
4) With one pedal at the 6 o’clock position you should just be
able to scrape the bottom of your heel on the top of the pedal
– this will allow for a slight bent to your knee when pedaling.
a) If your leg is too straight or your foot
cannot touch the pedal, you will need to lower the seat
b) If your leg is too bent, you will need to raise the seat
6) Dismount the bike and pull out the pop pin on the seat post
7) Slide the seat post
up or down as necessary
8) When the seat is in the desired position, insert the pin into
the desired hole to
secure the seat post and tighten the T
handle
9) Make note of the final position mark on the seat post for
future reference

Page | 20
GUIDELINES FOR SAFE OPERATION
GUIDELINES FOR SAFE OPERATIONGUIDELINES FOR SAFE OPERATION
GUIDELINES FOR SAFE OPERATION
ADJUSTING THE SEAT’S
ADJUSTING THE SEAT’S ADJUSTING THE SEAT’S
ADJUSTING THE SEAT’S FORE/AFT POSITION
FORE/AFT POSITIONFORE/AFT POSITION
FORE/AFT POSITION
1) Sit on your bike with the cranks in the 3 & 9 o’clock
positions. A proper fore/aft position of the seat is achieved
when the small bump at the top of the shin on your forward
leg, directly below the knee cap (tibial tuberosity), is above
the pedal axle
2) Dismount to adjust the seat fore or aft for a better fit
3) Loosen the seat adjustment lever and slide the seat forward
or backward as desired; then tighten.
4) Note the final position mark under the seat for future
reference. (Repeat steps for seat height if necessary)
HANDLEBAR ADJUSTMENT
HANDLEBAR ADJUSTMENTHANDLEBAR ADJUSTMENT
HANDLEBAR ADJUSTMENT
Adjusting the Handlebar height
1) Handlebar height is matter of preference. Start with the
handlebars at the same height as the seat.
2) Adjusting the handlebars higher will give the rider a more
upright position; lowering them will result in a more prone
position.
3) Dismount the bike and pull out the pop pin on the handlebar
post.
4) Raise or lower the handlebar by pulling up on the handlebar
and sliding the handlebar post up or down as desired. When
the handlebar is in the desired position, insert the pin into
the desired hole to
secure the seat post and tighten the T
handle
5) Note the final position mark on the handlebar post for future
reference.
/