Page is loading ...

/SHARP
tVIEWCAM
Rtease[ead i_sope:[ation manuat
Ca_efu y before us r_g:the vI EWCAI
Important
For assls[ance Inreporting [ne inert or loss or
tRLSOrOCiLIC[[ecorc[ OR_le Re -elow [ne
_-oLJel nuFrlDer al/LJ S_llal nuFrlDeF w[/iCl
_re ioca[ed on [lie bottom O[ the Ul/l[
D_ease[e[a q this inro_ma[i
Model No.
Serial No.:
See page 54for use of Oemo mode;

Thank you for purchasing this VIEWCAM from SHARP.
The VIEWCAM will enhance your home video enjoyment and allow you to capture those
special moments. Please read this operation manual to familiarize yourself with the
VIEWCAM's features, so that you will get the most out or it. The video techniques section will
help you fully enjoy the many features this VIEWCAM offers, and expand your video world.
Important Information for Consumers in the U.S.
I
WARNING: TO REDUCETHE RISK OF FIRE OR ELECTRIC SHOCK,
DO NOT EXPOSE THIS APPLIANCE TO RAIN OR
MOISTURE.
CAUTION:
TO REDUCE THE RISK OF ELEC-
TRIC SHOCK, DO NOT REMOVE
COVER. NO USER-SERVICEABLE
PARTS INSIDE. REFER SERVICING
TO QUALIFIED SERVICE PERSON-
NEL.
This symbol warns the user or uninsulated voltage within the
unit that can cause dangerous electric shocks.
This symbol alerts the user that there are important operating
and maintenance instructions in the literature accompanying
this unit,
I
CAUTION
(applies to the suppliedAC adapter)
TO PREVENT ELECTRIC SHOCK,
MATCH WIDE BLADE OF PLUG TO
WIDE SLOT, FULLY INSERT,
CAUTION
Irthe AC adapter is misplaced or
needs to be replaced, obtain the
same type or adapter from a SHARP
service center or your dealer.
PRODUCT DISPOSAL
This Product utilizes tin-lead solder, and a fluorescent lamp containing a small
amount or mercury. Disposal or these materials may be regulated due to environ-
mental considerations. For disposal or recycling information, please contact your
local authorities or the Electronics Industries Alliance: www, eiae,org,
BATTERY DISPOSAL
CONTAINS NICKEL-METAL HYDRIDE RECHARGEABLE BATTERY. MUST BE
RECYCLED OR DISPOSED OF PROPERLY, CONTACT LOCAL AGENCIES FOR
INFORMATION ON RECYCLING AND DISPOSAL PLANS IN YOUR AREA.
WARNINGiFcc Regulations state that any unauthorized changes or
modifications to this equipment not expressly approved by the manufacturer could
void the user's authority to operate this equipment.
This device complies with Part 15 or the FCC Rules. Operation is subject to the
following two conditions: (1) This device may not cause harmful interference, and (2)
this device must accept any interference received, including interference that may
cause undesired operation,
INFORMATION
This equipment has been tested and found to comply with the limits for a Class B
digital device, pursuant to Part 15 or the FCC Rules, These limits are designed to
provide reasonable protection against harmful interference in a residential
installation, This equipment generates, uses, and can radiate radio frequency
energy and, if not installed and used in accordance with the instructions, may cause
harmful interference to radio communications, However, there is no guarantee that
interference will not occur in a particular installation. If this equipment does cause
harmful interference to radio or television reception, which can be determined by
turning the equipment off and on, the user is encouraged to try to correct the
interference by one or more or the following measures:
iReorient or relocate the receiving antenna,
ilncrease the separation between the equipment and receiver,
iConnect the equipment into an outlet on a circuit different from that to which the
receiver is connected.
iConsult the dealer or an experienced radio/TV technician for help.
CAUTION ON LITHIUM BATTERY (MEMORY BACKUP BATTERY)
Ira battery is reversed (positive end where the negative end belongs and vice
versa), it can overheat and rupture. This has happened when young children install
batteries backwards. Warn children notto take out batteries or install them, Pnrents
should instnll the lithium battery in the VIEWCAM,
Your VIEWCAM is designed to record in SP mode only, It will not perform normal
playback for programs prerecorded in LP mode,
This VIEWCAM does not have a PCM recording or playback function, PCM recordings made using
other VCRs or audio dubbing cannot be played back or] this unit,
If you record on a tape or] which PCM sound has already beer] recorded, the audio track of the
new VIEWCAM recording may not corne out if the tape is played back or] a PCM capable VCR, If
this occurs, set the VCR's aHdio monitor select switch to the "STANDARD" position,
COPYRIGHT WARNING: It is the intent of SHARP that this unit be used in full compliance with the
copyright laws of the United States and that prior permission be
obtained from copyright owners whenever necessary,
NOTE
The VIEWCAM's LCD panel is a very high technology product with close to 90,000 thin film
transistors*, giving you fine picture detail, Occasionally, a pixel may appear on the screen as a
fixed point of blue, green, red, or black, Please note that this cloes not affect your VIEWCAM's
performance,
%pecirications are subject to change without notice.
IMPORTANT SAFEGUARDS
iii
1.
2,
3.
4,
5,
6.
7.
8.
9.
10.
Read Instructions--All the safety and
operating instructions should be read
before the product is operated.
Retain Instructions--The safety and
operating instructions should be
retained for future reference.
Heed Warnings--All warnings on the
product and in the operating instruc-
tions should be adhered to.
Follow Instructions--All operating and
use instructions should be followed.
Cleaning--Unplug this product from the
wall outlet before cleaning. Do not use
liquid cleaners or aerosol cleaners, Use
a damp cloth for cleaning.
Attachments--Do not use attachments
not recommended by the product
manufacturer as they may cause
hazards.
Water and Moisture--Do not use this
product near water--for example, near
a bath tub, wash bowl, kitchen sink, or
laundry tub; in a wet basement; or near
a swimming pool; and the like,
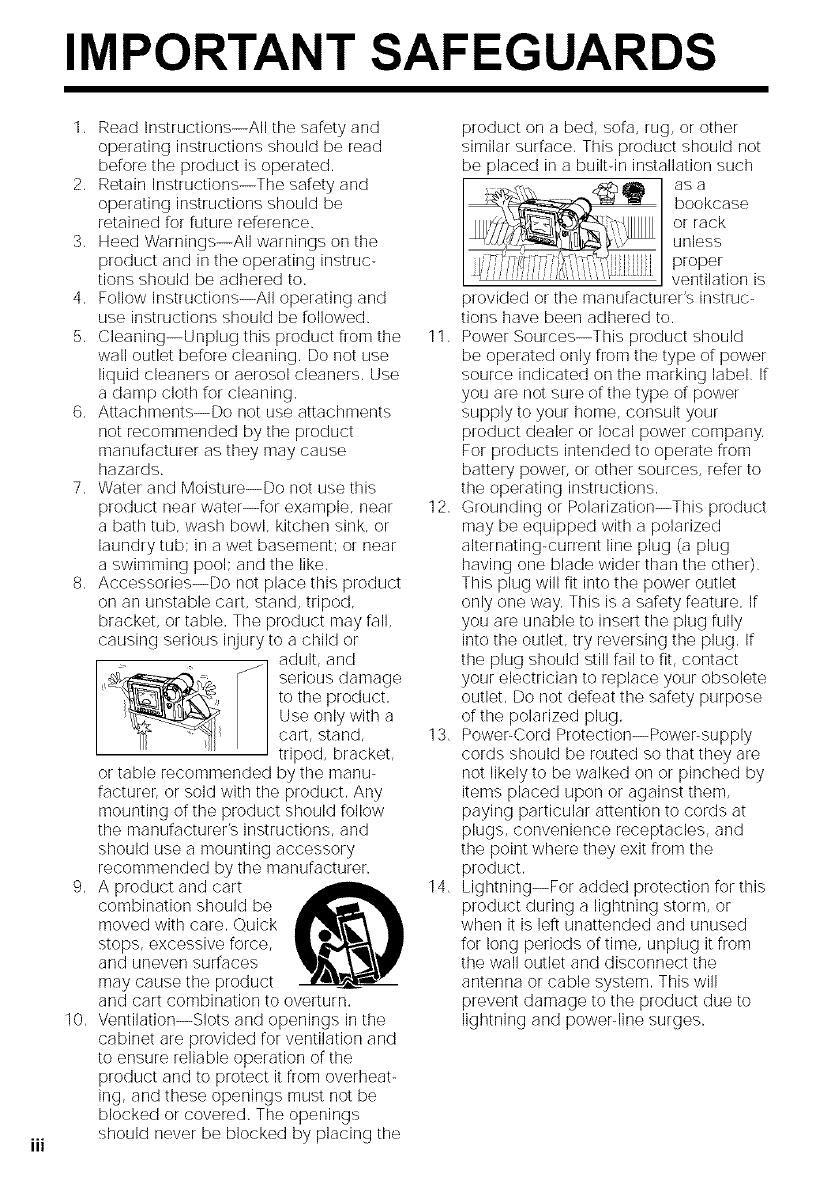
Accessories--Do not place this product
on an unstable cart, stand, tripod,
bracket, or table. The product may tall,
causing serious injury to a child or
adult, and
serious damage
to the product.
Use only with a
cart, stand,
tripod, bracket,
or table recommended by the manu-
facturer, or sold with the product. Any
mounting or the product should follow
the manufacturer's instructions, and
should use a mounting accessory
recommended by the manufacturer.
A product and cart
combination should be
moved with care. Quick
stops, excessive force,
and uneven surfaces
may cause the product
and cart combination to overturn.
Ventilation--Slots and openings in the
cabinet are provided for ventilation and
to ensure reliable operation of the
product and to protect it from overheat-
ing, and these openings must not be
blocked or covered. The openings
should never be blocked by placing the
11.
12.
13.
14.
product on a bed, sofa, rug, or other
similar surface, This product should not
be placed in a builtqn installation such
asa
bookcase
or rack
unless
proper
ventilation is
)rovided or the manufacturer's instruc-
tions have been adhered to.
Power Sources--This product should
be operated only from the type of power
source indicated on the marking label, I[
you are not sure o[the type of power
supply to your home, consult your
product dealer or local power company,
For products intended to operate from
battery power, or other sources, refer to
the operating instructions,
Grounding or Polarization--This product
may be equipped with a polarized
alternating-current line plug (a plug
having one blade wider than the other),
This plug will fit into the power outlet
only one way. This is a safety feature. If
you are unable to insert the plug fully
into the outlet, try reversing the plug. If
the plug should still rail to fit, contact
your electrician to replace your obsolete
outlet. Do not defeat the safety purpose
of the polarized plug.
Power-Cord Protection--Power-supply
cords should be routed so that they are
not likely to be walked on or pinched by
items placed upon or against them,
paying particular attention to cords at
plugs, convenience receptacles, and
the point where they exit from the
product.
Lightning--For added protection for this
product during a lightning storm, or
when it is left unattended and unused
for long periods ortime, unplug it from
the wall outlet and disconnect the
antenna or cable system. This will
prevent damage to the product due to
lightning and powerqine surges.
15.PowerLines--Anoutsideantenna
systemshouldnotbelocatedinthe
vicinityofoverheadpowerlinesorother
electriclightorpowercircuits,orwhere
itcanfallintosuchpowerlinesor
circuits.Wheninstallinganoutside
antennasystem,extremecareshould
betakentokeepfromtouchingsuch
powerlinesorcircuitsascontactwith
themmightbefatal.
16.Overloading--Donotoverloadwall
outlets,extensioncords,orintegral
conveniencereceptaclesasthiscan
resultinariskoffireorelectricshock,
17.ObjectandLiquidEntry--Neverpush
objectsofanykindintothisproduct
I__ hrough openings
as they may touch
dangerous
voltage points or
short-out parts
that could result in
a fire or electric shock. Never spill liquid
of any kind on the product.
18, Servicing--Do not attempt to service
this product yourself as opening or
removing covers may expose you to
dangerous voltage or other hazards,
Refer all servicing to qualified service
personnel,
19. Damage Requiring Service--Unplug
this product from the wall outlet and
refer servicing to qualified service
personnel under the following condi-
tions:
a, When the power-supply cord or plug
is damaged,
b. Ir liquid has been spilled, or objects
have fallen into the product,
c, If the product has been exposed to
rain or water,
d. If the product does not operate
normally by following the operating
instructions. Adjust only those
controls that are covered by the
operating instructions as an im-
proper adjustment of other controls
may result in damage and will often
require extensive work by a qualified
technician to restore the product to
its normal operation,
e. If the product has been dropped or
damaged in any way, and
f, When the product exhibits a distinct
change in performance--this
indicates a need for service.
20, Replacement Parts--When replacement
parts are required, be sure the service
technician has used replacement parts
specified by the manufacturer or have
the same characteristics as the original
part. Unauthorized substitutions may
result in fire, electric shock, or other
hazards.
21. Safety Check--Upon completion or any
service or repairs to this product, ask
the service technician to perform safety
checks to determine that the product is
in proper operating condition.
22. Wall or Ceiling Mounting--The product
should be mounted to a wall or ceiling
only as recommended by the manurac-
ttJrer,
23, Heat--The product should be situated
away from heat sources such as
radiators, heat registers, stoves, or
other products (including amplifiers)
that produce heat.
iv
Precautions
• When the VIEWCAM is not in use,
remember to remove the cassette tape,
turn off the power, and disconnect the
VIEWCAM from the power source.
• Do not aim the lens at the sun.
Do not allow direct sunlight te strike tile
VIEWCAM lens or LCD monitor screen,
whether or not recording is in progress, as it
may damage tile CCD sensor or LCD screen
surface, Be particularly careful when
recording outside.
• When shooting in clark places, avoid sudden
brightly lit objects or light sources, such as
the sun. Otherwise, the image may white out,
Should this happen, point the lens in a
different direction until the pict_re returns to
normal.
• Avoid magnetic
sources.
Using tile VIEW('AM
near strong fluorescent
lights, motors,
televisions, or other
magnetic sources may adversely affect
recorded images.
• Using the VIEWCAM near a broadcasting
station or other powerful transmission
source may cause buzzing or picture
deterioration.
• Avoid shocks and
dropping,
Do not drop or otherwise
subject the VIEWCAM to hard
shocks or strong vibrations.
Bumping or striking the unit
during recording will
generate noise in tile
recorded image.
• Avoid placing the
VIEWCAM in close
proximity to lighting
equipment.
The heat from
incandescent lights
may deform tile
VIEWCAM, or cause it
to malfunction.
• Always respect prohibitions or restrictions
on the use of electronic equipment on
commercial flights or in other sensitive
areas.
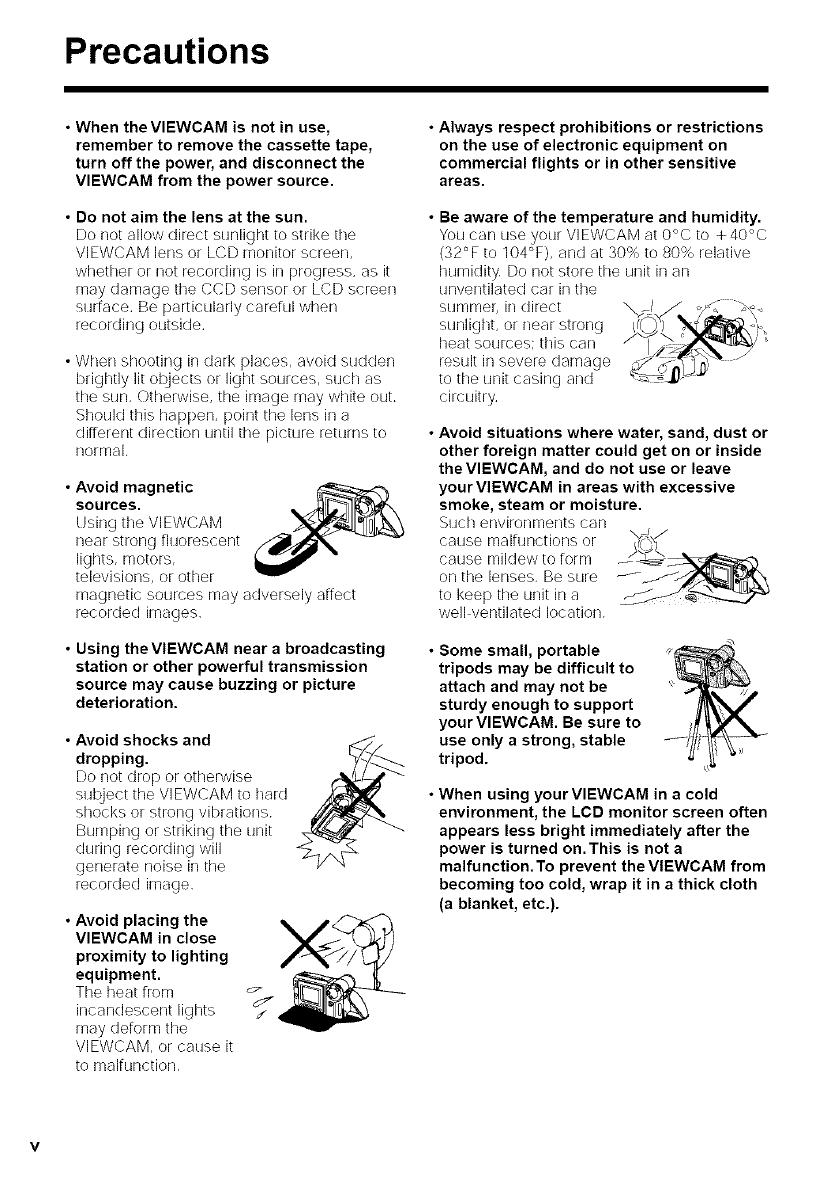
• Be aware of the temperature and humidity.
You can use your VIEWCAM at 0°C to +40°0
(32°F to 104°F), and at 30% to 80% relative
humidity. Do not store the unit in an
unventilated car in tile
summer, in direct
heat sources; this can
result in severe d_lmage., I.-_F._x_ ._'..
to the unit casing and _"_;
circuitry.
• Avoid situations where water, sand, dust or
other foreign matter could get on or inside
the VIEWCAM, and do not use or leave
yourVIEWCAM in areas with excessive
smoke, steam or moisture.
Sllch environments can
cal_se maJ[l_nctJor/s or \TJ:,J
F\#MS;)
cause mildew to term --_:_i_',
on the lenses. Be sure J_ts,_.lr_._,.',,
to keep tile unit in a
well ventilated location.
• Some small, portable
tripods may be difficult to
attach and may not be
sturdy enough to support
your VIEWCAM. Be sure to
use only a strong, stable
tripod.
• When using your VIEWCAM in a cold
environment, the LCD monitor screen often
appears less bright immediately after the
power is turned on.This is not a
malfunction. To prevent the VIEWCAM from
becoming too cold, wrap it in a thick cloth
(a blanket, etc.).

AC Adapter
• The AC adapter may interfere with reception if
used near a radio,
• Prevent flammables, liquids, and metal
objects from entering the adapter,
• The adapter is a sealed unit. Do not attempt
to open or modify it,
• Do not damage, drop, or sut_ject the adapter
to vibration.
• Do not leave the adapter in direct sunlight.
• Avoid using the adapter in humid or
extremely hot [)laces,
Cleaning
• Many plastic parts are used in tile VIEWCAM
casing. Do not use thinner, benzene or other
strong chemical cleaners. These may cause
discoloration and damage to tile casing,
• Clean tile casing with a soft, dry cloth, if the
casing is particularly dirty wipe the casing
with a tightly wrung cloth dampened with a
diluted, neutral detergent, Then wipe it again
with a soft, dry cloth,
• Use a soft cloth to wipe finger marks and
other soiling off the LCD screen,
• Use a soft cloth, or compressed air and lens
paper designed for photographic lenses to
clean the lens,
LCD Monitor Screen
The VIEWCAM is equipped with a large LCD
monitor screen that allows you to record
scenes while comfortably holding the
camcorder, Tile LCD monitor screen carl be
rotated for easy recording at high or low
angles. It also functions as a handy playback
monitor so you can enjoy what you have just
recorded,
Cautions:
• Do not apply pressure to the screen.
• Do not expose the screen to shocks, as it may
break.
• Do not place the VlEWCAM with the screen
facing down
Note:
• Use a soft cloth to clean the screen,
vi

Supplied Accessories
Battery pack
_B%H22rO]
CR2025 type
lithium battery
AC adapter
_UA[)P 0312TAZZ
Shoulcler strap
UBN DS0010TASA
s_5
Infrared remote control
RRMCG0085TASA
Lenscap
GCOVH1225TASA
Audio/video cable
QCNW 1448TAZZ
or ©CNW 1295TAZZ
AA battery for
remote control × 2
* Note: The part numbers for the AC adapter and battery pack supplied with this VlEWCAM are valid
only in the U.S, and Latin America, If this VIEWCAM was purchased outside of these areas, the part
numbers may be different, Please refer to the part numbers printed on the labels of the supplied AC
adapter and battery pack,
vii

Optional Accessories
Standard type
battery pack
B%H22[]
Tdpod adapter
for 180 ° recording
VR 33FAN
Extended type
battery pack
Sun hood
B%H32[] VR 60BFN
Accessory
shoe adapter
VR 30ADN
Note: The listed model names are for U,S, accessories,
For optional and additional accessories, contact your local dealer, call the Sharp
Accessories and Supply Center at 1-800-642-2122, or visit SHARP's website
(http://www.sharp-usa.com).
viii
Contents
Operation Summary Part Names .......................................................... 3 I
Quick Reference Index ........................................
Warning Indicators ...............................................
f
Preparation Inserting and Removing the Battery Pack ........... 7
Charging the Battery Pack ................................... 8
Powering the VIEWCAM [rom an AC Outlet ........... 9
Inserting and Removing a Cassette .................. 10
Installing the Lithium Memory Battery ................ 11
Selecting the Language for the On-screen
Display ............................................................. 12
Setting the Date and Time ................................. 16
Using the Hand Strap and the Lens Cap ........... 17
Attaching the Shoulder Strap ............................. 17
J
Basic Operations Camera Recording
Easy Camera Recording with Full Auto Mode =,=18
Zooming ............................................................. 19
Tips on Recording Positions .............................. 19
Remaining Recording Time Display .................. 20
Remaining Battery Power Display ..................... 20
Playback
Playback ............................................................ 21
Volume Control ................................................... 21
Watching the Playback on a TV ......................... 22
Video Search ...................................................... 23
Still ...................................................................... 23
Y
Useful Features
Operations or the On-screen Controls
Using the Control Buttons ............................... 24
Selecting the Mode/Menu Screens ................ 24
Adjusting the Menu Settings ........................... 25
Recording the [)ate and Time ............................ 26
Fade In and Fade Out ........................................ 27
Quick Review ..................................................... 28
Quick Return ...................................................... 29
Edit Search ......................................................... 29
Gamma Brightness Compensation .................... 30
Gain-up (Cat's Eye) ............................................ 31
Wide Screen (16:9) ........................................... 32
Macro Shots ....................................................... 32
Removing the Lens Hood .................................. 32
Self Recording ................................................... 33
Setting the VIEWCAM to Full Auto Mode ........... 35
Program Search ................................................. 36
Tape Counter Feature ........................................ 37
Using the Remote Control .................................. 39
y
f
Advanced Features
Digital Picture Effects ......................................... 40
Scene Menu (Program AE) ................................ 41
Superimposing a Title ........................................ 42
Changing the Preset Titles ................................. 43
Auto/Manual Focus ............................................ 44
White Balance Lock ........................................... 45
Manual Exposure ............................................... 46
Picture/Backlight Adjustments ........................... 47
Gamma Playback ............................................... 48
Turning OFFthe LCD Monitor Backlight .............. 48
Editing ................................................................ 49
J
Re_rences UseFul InFormation ..............................................
Demonstration Mode ..........................................
Before Requesting Service ................................
Specifications .....................................................
54
55
5
• Guia de operacion rapida en espanol .......................................................... 58
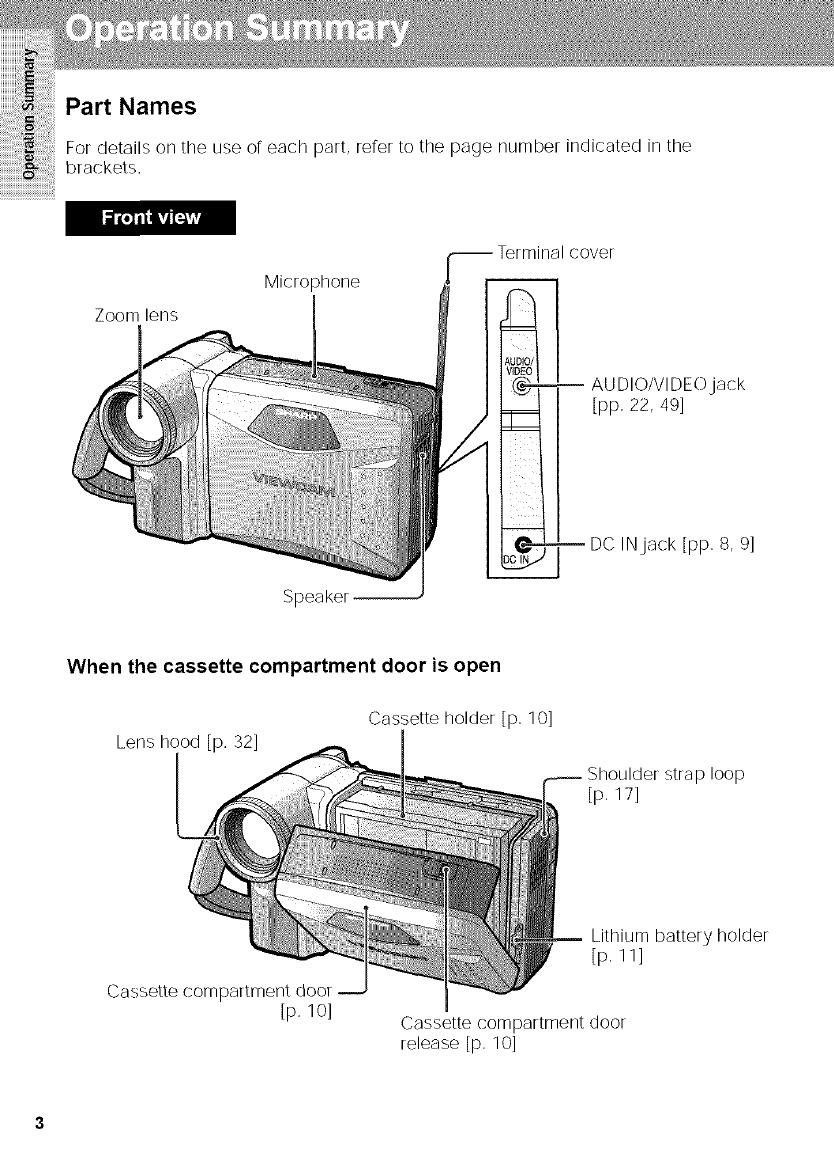
Part Names
For details on the use or each part, rerer to the page number indicated in the
brackets,
Zoom lens
Microphone
cover
AU DIO/VI DEOjack
[pp. 22, 49]
Speakel
DC INjack [pp. 8, 9]
When the cassette compartment door is open
Cassette holder [p, lO]
Lens hood [p, 32]
Shoulder strap loop
[p, 17]
Cassette compartment door
[p, 10]
Lithium battery holder
[p. 11]
Cassette compartment door
release [p. 10]
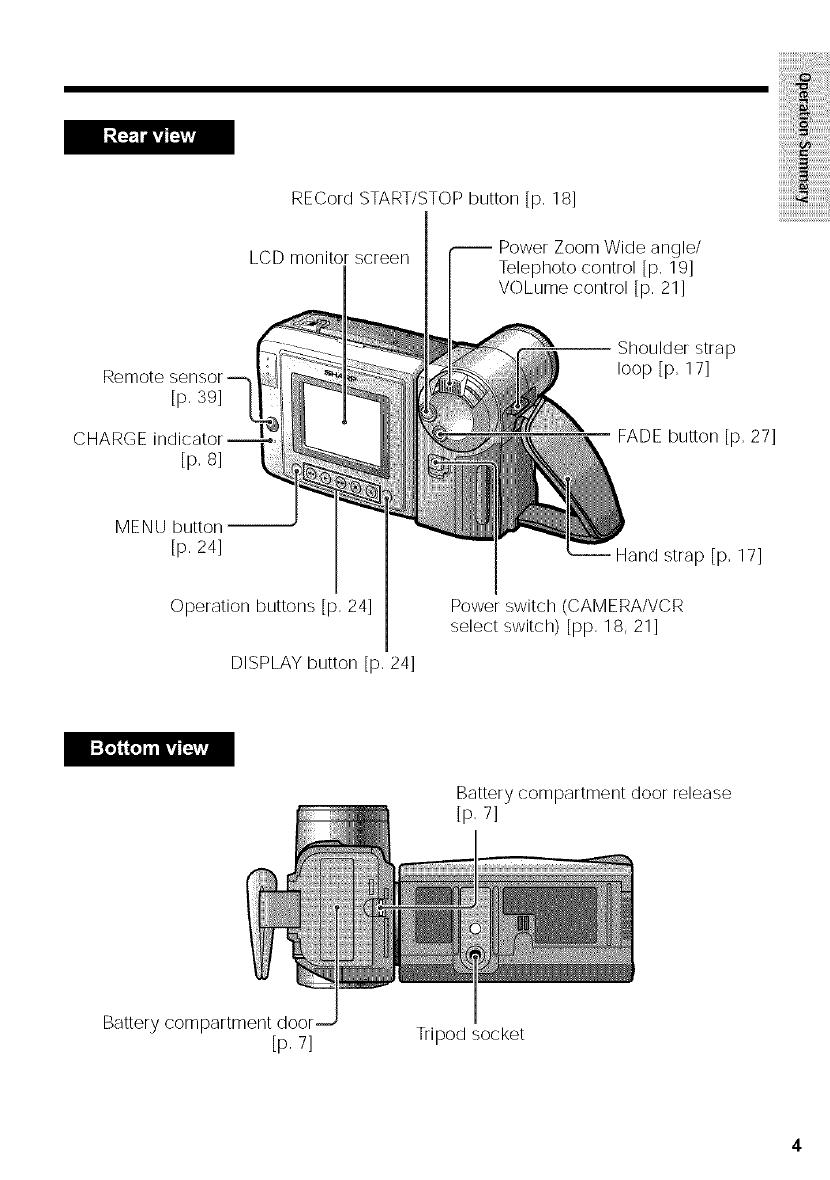
CHARGE
RECordSTART/STOPbutton[p,18]
[p. 39]
[p, s]
LCD monitor screen
F ower Zoom Wide angle/
Telephoto control [p, 19]
VOLume control [p, 21]
Shoulder strap
loop [p, 17]
FADE button [p, 27]
!{i!!i!i!i@iiiiii !{ii!iiii¸
iiiiiiii!i! ilililililililil
2 iiiiiiiiii
_22222222222222_
MENU button-
[p, 24]
Operation buttons [p. 24]
DISPLAY button [p, 24]
-- Hand strap [p, 17]
Power switch (CAM ERA/VC R
select switch) [pp, 18, 21]
Batterycompartment door release
[p, 7]
Battery compartment door
[p. 7]
Tripod socket
Operation Summary
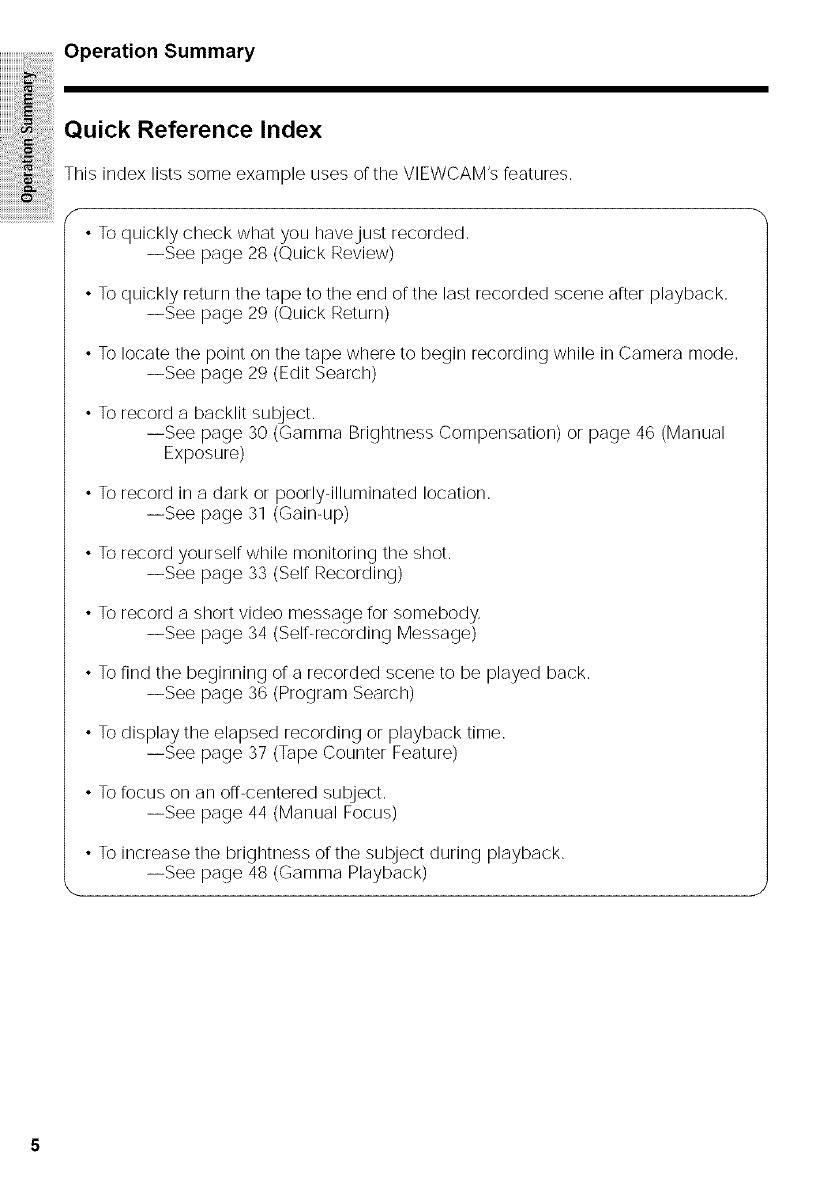
Quick Reference Index
This index lists some example uses or the VIEWCAM's features.
f
• Toquickly check what you havejust recorded.
--See page 28 (Quick Review)
• Toquickly return the tape to the end orthe last recorded scene after playback.
--See page 29 (Quick Return)
• To locate the point on the tape where to begin recording while in Camera mode,
--See page 29 (Edit Search)
• Torecord a backlit subject.
--See page 30 (Gamma Brightness Compensation) or page 46 (Manual
Exposure)
Torecord in a dark or poorly-illuminated location.
--See page 31 (Gain-up)
Torecord yourself while monitoring the shot.
--See page 33 (Self Recording)
Torecord a short video message Forsomebody.
--See page 34 (Self-recording Message)
Tofind the beginning or a recorded scene to be played back.
--See page 36 (Program Search)
Todisplay the elapsed recording or playback time.
--See page 37 (Tape Counter Feature)
Tofocus on an off-centered subject.
--See page 44 (Manual Focus)
To increase the brightness or the subject during playback.
--See page 48 (Gamma Playback)
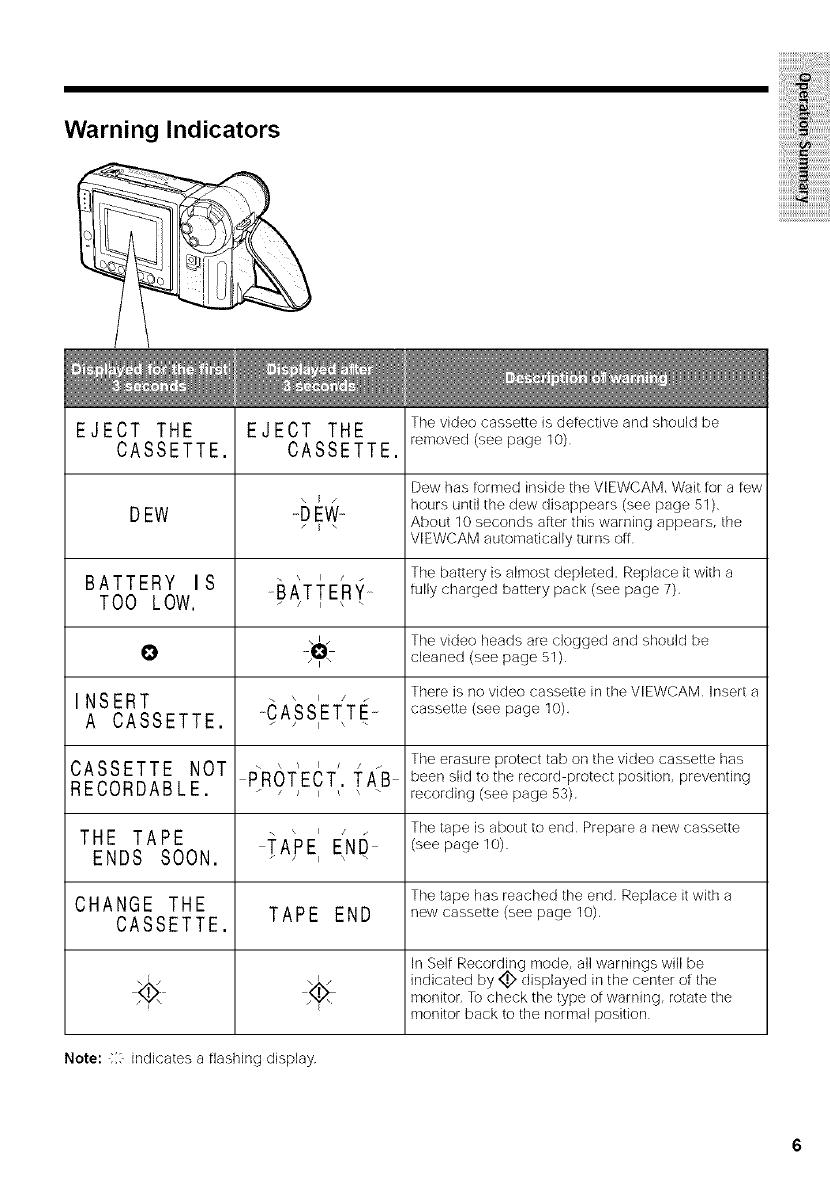
Warning Indicators
!( !i i!!i!i!i!ii iiiiii !i!iiii!iiii¸
ii ! i!iiiiiiiii!i! ilililililililil
EJECT THE
CASSETTE.
EJECT THE
CASSETTE.
The video cassette is defective and should be
removed (see page 10)
Dew has formed inside the VIEWCAM Wait for a few
_ _ hours until the dew disappears (see page 51).
DEW -DEW-- About 10 seconds after this warning appears, the
/ I \
VIEWCAM automatically turns off
The battery is almost depleted, Replace itwith a
BATTERYiS i34TfE fu,,ychargedbatterypack seepage .
TOO LOW. _ -
The video heads are clogged and should be
O _ cleaned (see page 51)
There is no video cassette in the VlEWCAM Insert a
INSERTACASSETTE. CA_SIETITE_.. cassette(seepage10),
CASSETTE NOT . _ _ i _ _ • The eraaure protect tab on the video caasette haa
RECORDABLE. PROTECT. TAB beenslidtotherecordprotectposition,preventing
_ _ _ _ _ " recording (see page 53)
The tape is about to end Prepare a new cassette
THE TAPE i_A_PEIEINI_ (seepagelO)
ENDS SOON. _ "
CHANGE THE The tape has reached the end Replace itwith a
CASSETTE. TAPE END newcassette(seepage10),
In Self Recording mode, all warnings will be
\ __ indicated by _) displayed in the center of the
"'¢" monitor, To check the type of warning, rotate the
monitor back to the normal position
Note: ::: indicates a flashing display

Inserting and Removing the
Battery Pack
iiiiiiiiiiii ii ii!ii!!i i!i!ii!ii!!i!!i!!!!iiii!iiiiiiii ii
iiiiiiiii ii iii ii,li ii!i !! ii i!!i!ii!ii!ii!ii !i!i i!i!i
Inserting the Battery Pack
1 Make sure that the Power switch is set
to OFR
4 Close the door, pressing it firmly in the
center until it clicks,
2
Power switch
Slide the battery compartment door
release on the bottom of the VIEWCAM
in the direction of the arrow to open the
battery compartment door.
ttery
I _il I compartment
door release
}nsert the battery pack into the com-
partment as shown, and push it in com-
pletely until it locks into place.
Caution:
• Do not force the battery pack into the
battery compartment if it does not go in
easily.
Removing the Battery Pack
1 Perform steps 1 and 2 above.
2 Press the battery release as shown to
remove the battery pack.
,_ Battery
release
Cautions:
• BEFORE REMOVING THE BATTERY PACK,
ALWAYS STOP THE TAPE AND TURN THE
POWER OFF. If you remove the battery pack
during recording or playback, the tape will
remain wound around the video head drum,
potentially causing damage to the tape.
• Make sure the battery compartment door is
closed firmly during operation. If it is not, the
battery pack may fall out or VlEWCAM operation
may fail because of the poor contact pressure.
• Remove the battery pack from the VIEWCAM if
the VlEWCAM will not be used for a long period
of time.
• When removing the battery pack, do not tilt
the VlEWCAM so that the battery compart-
ment faces down.The battery pack may fall
out.
• Do not expose the battery compartment door to
strong force, as it may come off.
• Use only SHARP model BT-H22 or BT-H32
battery packs with this VIEWCAM. Use of other
batteries may present a risk of fire or explosion.
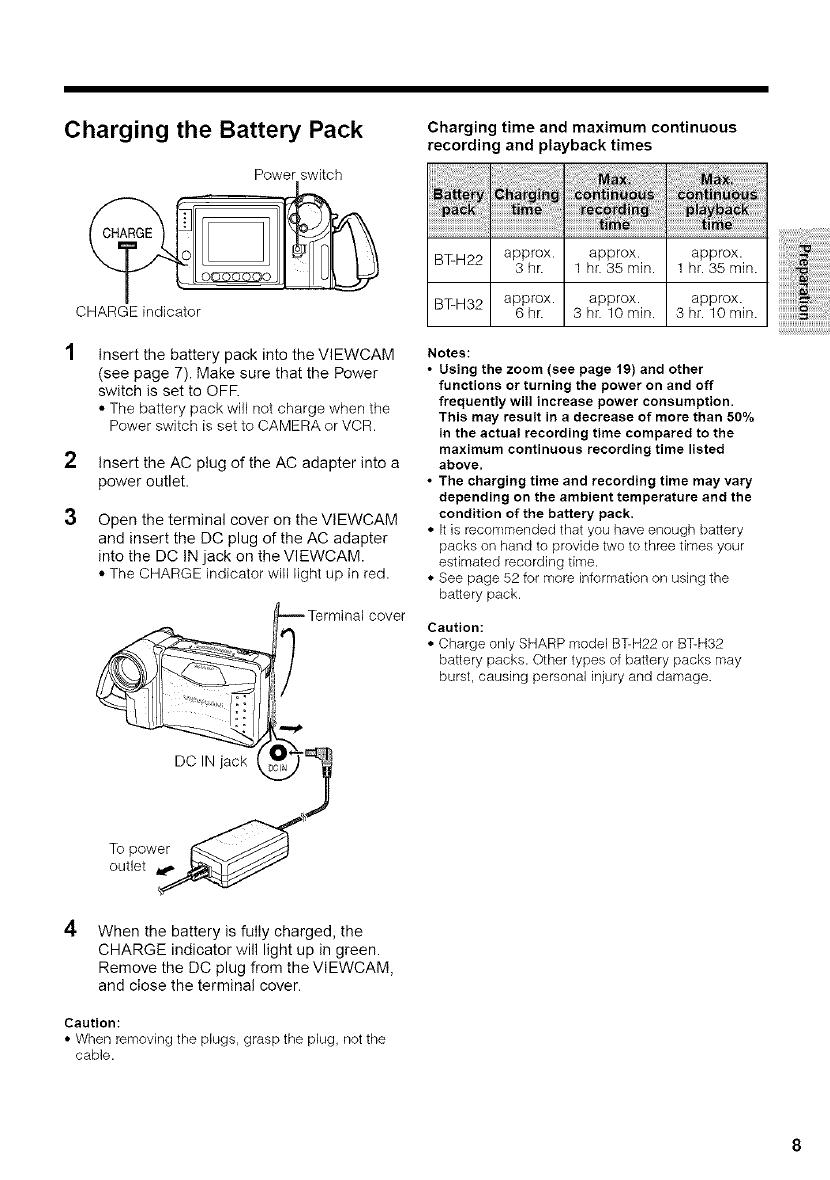
Charging the Battery Pack
Power switch
CHARGE indicator
2
3
Insert the battery pack into the VIEWCAM
(see page 7). Make sure that the Power
switch is set to OFR
• The battery pack will not charge when the
Power switch is set to CAMERA or VCR.
Insert the AC plug of the AC adapter into a
power outlet.
Open the terminal cover on the VlEWCAM
and insert the DC plug of the AC adapter
into the DC IN jack on the VIEWCAM.
• The CHARGE indicator will light up in red.
,__ Terminal cover
OC,Hjac
TOtPe_W_ _'_
4
When the battery is fully charged, the
CHARGE indicator will light up in green.
Remove the DC plug from the VlEWCAM,
and close the terminal cover.
Caution:
• When removk_g the plugs, grasp the plug, not the
cable.
Charging time and maximum continuous
recording and playback times
BT-H22 approx, approx, approx.
3 hr. 1 hr. 35 min. 1 hr. 35 min.
BT-H32 approx, approx, approx.
6hr. 3 hr. 10 min. 3 hr. 10 min.
Notes:
• Using the zoom (see page 19) and other
functions or turning the power on and off
frequently will increase power consumption.
This may result in a decrease of more than 50%
in the actual recording time compared to the
maximum continuous recording time listed
above,
• The charging time and recording time may vary
depending on the ambient temperature and the
condition of the battery pack,
• It is recommended that you have enough battery
packs on hand to provide two to three times your
estimated recording time.
• See page 52 for more information on using the
battery pack.
Caution:
• Charge only SHARP model BT-H22 or B%H32
battery packs. Other types of battery packs may
burst, causing personal injury and damage.
::i'ii_iiii!ii!ii!ii!ii!ii!ii!ii!ii!ii!ii!ii!i!i!iil
iiiiiiii!ii!ii_!i!i!i!i!i!i!i!i!i!i!i!i!i!i!i
Preparation
iiiiiiiiiii ii ii!ii!!i i!i!ii!ii!!i!!i!!!!iiii!iiiiiiii ii
iiiiii ii iii ii,li ii!i !! ii i!!i!ii!ii!ii!ii !i!i i!i!i
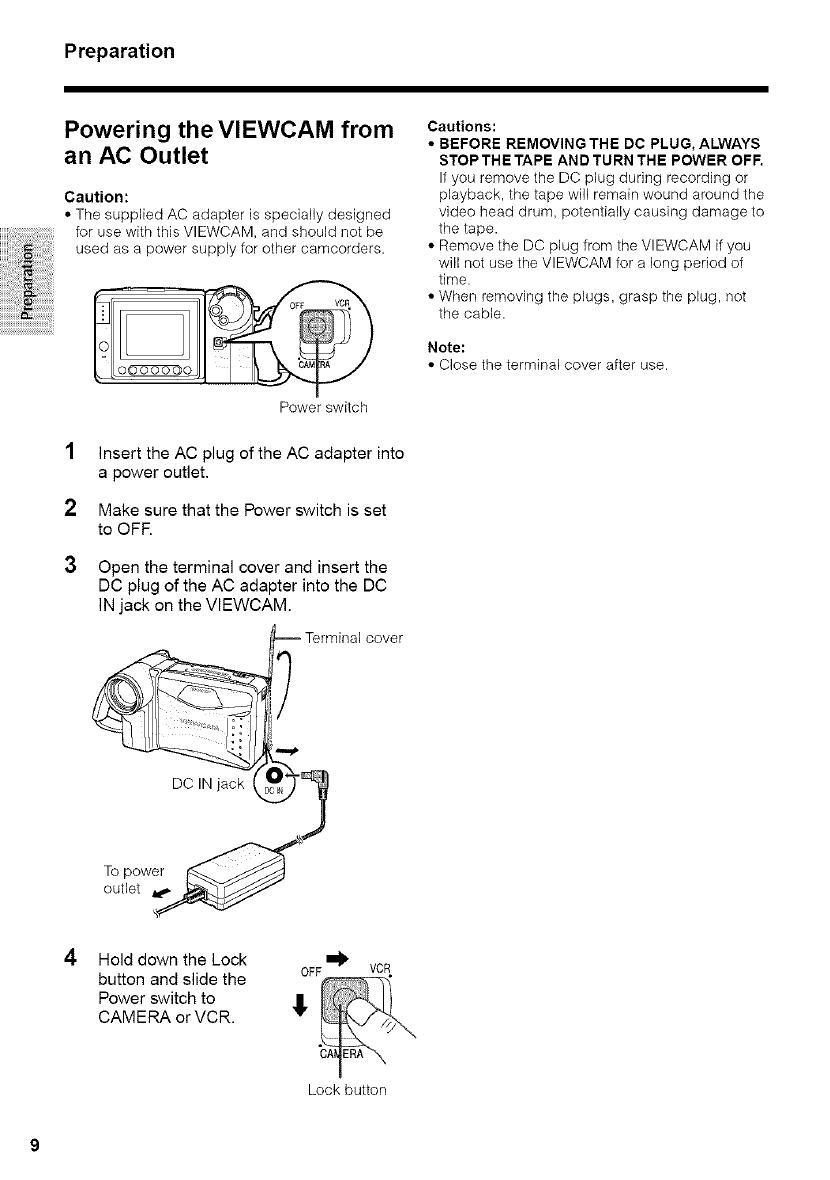
Powering the VIEWCAM from
an AC Outlet
Caution:
• The supplied AC adapter is specially designed
for use with this VIEWCAM, and should not be
used as a power supply for other camcorders.
1
2
3
Power switch
Insert the AC plug of the AC adapter into
a power outlet.
Make sure that the Power switch is set
to OFF.
Open the terminal cover and insert the
DC plug of the AC adapter into the DC
IN jack on the VlEWCAM.
DC IN jack
To power
outlet
cover
Cautions:
• BEFORE REMOVING THE DC PLUG, ALWAYS
STOP THE TAPE AND TURN THE POWER OFF.
If you remove the DO plug during recording or
playback, the tape will remain wound around the
video head drum, potentially causing damage to
the tape.
• Remove the DC plug from the VIEWCAM if you
will not use the VlEWCAM for a long period of
time.
• When removing the plugs, grasp the plug, not
the cable.
Note:
• Close the terminal cover after use.
4
Hold down the Lock m_.
button and slide the OFF
Power switch to _!'
CAMERA or VCR.
VCR
Lock button

Inserting and Removing a
Cassette
Inserting a Cassette
Supply power to the VlEWCAM, then
slide the release and open the cassette
compartment door.
• The cassette holder extends and opens
automatically.
2 Insert the cassette fully with the window
facing outwards, and with the erasure
protect tab facing upwards.
Erasure protect tab
\
Press the PUSH mark gently until the
cassette holder clicks into place.
• The cassette holder retracts
automatically.
4
Wait for the cassette holder to fully
retract. Close the compartment door by
pressing the center until it clicks into
place.
Removing a Cassette
Perform step 1 above, then take out the
cassette.
Cautions:
• Do not try to close the cassette compartment
door while the cassette holder is extending or
retracting.
• Be careful not to get your fingers caught in the
cassette holder.
• Do not apply force to the cassette holder except
when pressing the PUSH mark to close it.
• Do not tilt the VlEWCAM or hold it upside down
when you are inserting or removing a cassette. It
may damage the tape.
• Remove the cassette if you will not use the
VIEWCAM for a long period of time.
• If you do not correctly close the cassette holder
in step 3, the VlEWCAM's cassette protection
mechanism might eject the cassette. If this
happens, repeat the insertion procedure.
• Do not attempt to pick up the VIEWCAM by the
cassette compartment door.
Notes:
• If the battery power is too low, you may not be
able to eject the cassette. Replace the battery
pack with a fully charged one.
• See page 53 for more information on the video
cassette tapes for use with this VIEWCAM.
10
Preparation
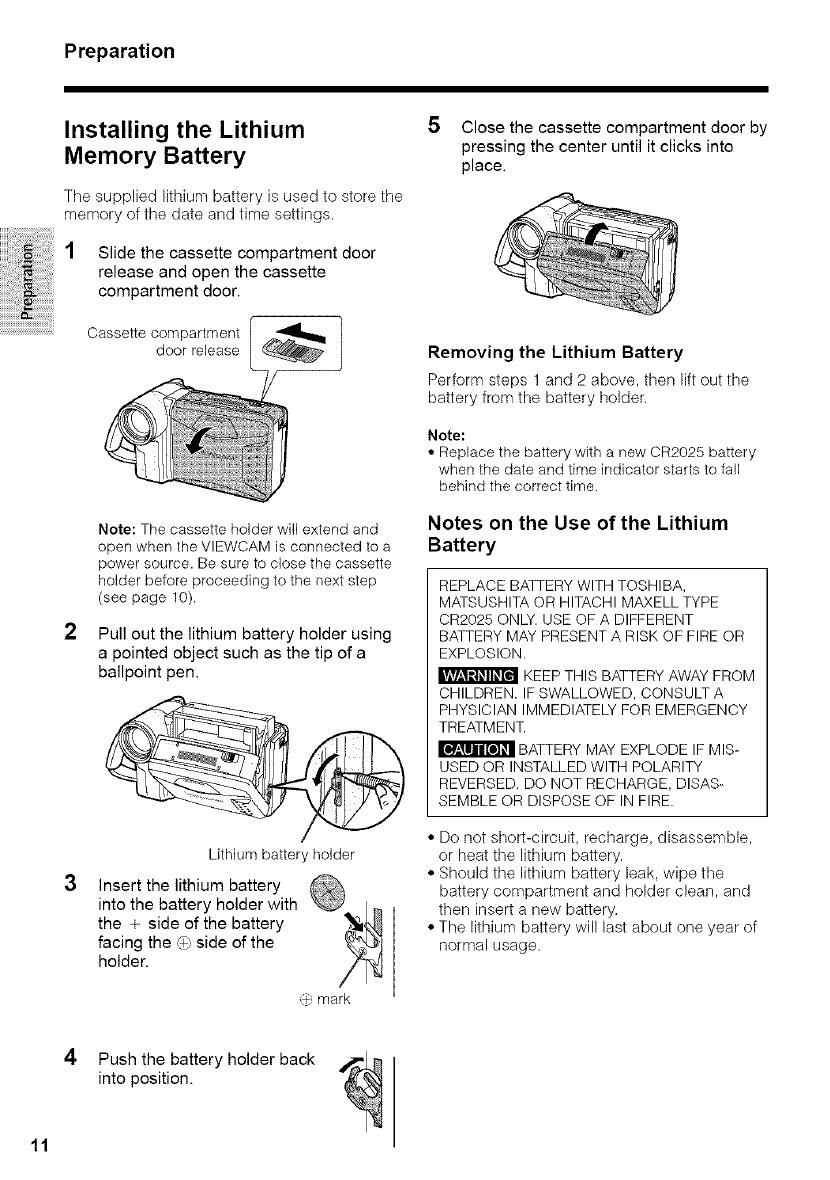
Installing the Lithium
Memory Battery
The supplied lithium battery is used to store the
memory of the date and time settings.
Slide the cassette compartment door
release and open the cassette
compartment door.
2
Note: The cassette holder will extend and
open when the VlEWCAM is connected to a
power source. Be sure to close the cassette
holder before proceeding to the next step
(see page 10).
Pull out the lithium battery holder using
a pointed object such as the tip of a
ballpoint pen.
Lithium battery holder
Insert the lithium battery
into the battery holder with . _
the + side of the battery
facing the _) side of the
holder.
_, mark
5 Close the cassette compartment door by
pressing the center until it clicks into
place.
Removing the Lithium Battery
Perform steps 1 and 2 above, then lift out the
battery from the battery holder.
Note:
• Replace the battery with a new CR2025 battery
when the date and time indicator starts to fall
behind the correct time.
Notes on the Use of the Lithium
Battery
REPLACE BATTERY WITH TOSHIBA,
MATSUSHITA OR HITACHI MAXELL TYPE
CR2025 ONLY. USE OF A DIFFERENT
BATTERY MAY PRESENT A RISK OF FIRE OR
EXPLOSION.
KEEPTHIS BATTERYAWAY FROM
CHILDREN. IF SWALLOWED, CONSULT A
PHYSICIAN IMMEDIATELY FOR EMERGENCY
TREATMENT.
I_F_[_IT_I BATTERYMAY EXPLODE IF MIS-
USED OR INSTALLED WITH POLARITY
REVERSED. DO NOT RECHARGE, DISAS-
SEMBLE OR DISPOSE OF IN FIRE.
• Do not short-circuit, recharge, disassemble,
or heat the lithium battery.
• Should the lithium battery leak, wipe the
battery compartment and holder clean, and
then insert a new battery.
• The lithium battery will last about one year of
normal usage.
11
4 Push the battery holder back
into position.
/