Page is loading ...

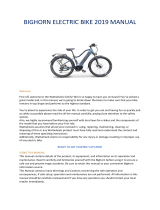
Instruction Manual for L7
!

1. Instruction manual
Please read this instruction manual carefully before operating your e-bike.
This manual will include installation information, setting information, and
instructions for normal use.
2. Appearance and measurement
2.1 Main material and color
The display adopts black ABS material and the support is made of nylon.
Please maintain the equipment in temperatures ranging from -20℃ to 60℃ or
else the display may become damaged.
Dimension figure (unit: mm)
!
1

3. The Buttons
There are three buttons on the display, including “M”, “+” and “-”.
“M” presents MODE/ON/OFF.
“+” presents UP.
“—” presents DOWN.
!
2

4. Function Display
4.1 FUNCTION SUMMARY
The indicated functions are as below.
1. Switch
!
3

4.2 FULL VIEW AREA
!
4.3 NORMAL VIEW AREA
The normal view area of the L7 is shown below.
!
5. Normal operation
5.1 ON/OFF
Press M to activate the display. To turn the display off, press M for 2 seconds
and the screen will go dark. If the display is powered off it will not consume
any of the battery life. The leakage current is no more than 2µA.
※The panel will automatically power-off when speed is 0 km/h for 5 minutes.
4

5.2 CURRENT DISPLAY
This is the power indicator. It displays how much energy is being consumed
by the system.
5.3 SPEED DISPLAY
This displays the current riding speed of e-bike.
The speed display is as
below.
!
5.4 BACKLIGHT INDICATOR
With the power on, press “+” for 1 second to turn on the backlight. Press it
for 1 second again to turn off the backlight.
5.5 WALK MODE
Hold “-” for 2 seconds to enter into the walk mode. When the icon is lit, the e-
bike is traveling at 4.5 mph. This is shown below.
!
5.6 ASSIST LEVEL SELECTION
Click UP or DOWN to change the level of pedal assist you wish to receive.
The levels range from 0-6, with 0 being the lowest and 6 being the highest.
When the bike is powered on, the bike will automatically enter level 1. Please
be aware that the levels loop: when you are at level 6 and press UP you will
return to the lowest level and when you are on the lowest level and press
DOWN you will enter the highest level.
5

!
5.7 ERROR CODE DISPLAY
When the display comes up error, the icon and error code will flash together
with 1Hz. Each error code is corresponding with the fault definition.
!
※
Only get rid of the error will clear the error code display.
The error code display is as below.
Error Code
Definition
0
normal
1
Current error or MOS damaged
2
Throttle error(detection after turning on)
3
motor without phase position
4
Hall error
5
Brake error(detection after turning on)
6
Under voltage
7
Motor stalling
8
communication controller receiving error
9
communication display receiving error
6

5.8 DISTANCE INDICATOR
With the display on, press M to switch the display information. This is
organized into four categories: ODO, trip distance, riding time and max speed.
! ! trip distance ! riding time ! max speed
5.8.1 ODO
The ODO records the driving mileage from use.
!
5.8.2 Trip distance
Trip distance records the driving mileage. As shown below.
Hold “+” for 5 seconds and the trip distance will be reset and skip to the trip
dis-tance interface.
!
5.8.3 Trip time indicator
The trip time records the riding time, as shown below.
5.8.4 Max speed#
7

The max speed records the riding speed, as shown below.
※Click
to start in turn show automatically.
5.11 BATTERY INDICATOR
When the battery capacity is high, the six battery segments are all lit. When
the battery is low, the battery frame will flash. Flashing indicates that the
battery is severely low and needs to be recharged immediately.
! ! ! ! !
! !
Low battery flash
8
/