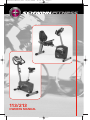
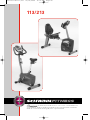
Schwinn Home Gym 213 User manual
- Category
- Spin bikes
- Type
- User manual
This manual is also suitable for

113/213
OWNERS MANUAL
®
Nautilus OM 113/213 08/17/2004 11:59 PM Page 1

SAFEGUARDS
FITNESS SAFEGUARDS AND
WARNINGS
Before starting any exercise program, consult with your physician or health
professional. He or she can help establish the correct exercise frequency, intensity
(target heart rate zone) and time appropriate for your particular age and condition.
The following 3 warnings listed below are also located on the computer console
mast of the exercise bike. Failure to follow any of these safeguards may result in
injury or serious health problems.
• Read and understand the Owner’s Manual and operation instructions prior
to use. If you do not have an Owner’s Manual, call 1-800-864-1270 to
obtain one.
• If you feel any unusual pain or tightness in your chest, shortness of breath
or dizziness, feel faint or have any discomfort while you exercise, STOP!
Consult your physician.
• Keep children and pets away.
OTHER IMPORTANT SAFEGUARDS
AND WARNINGS
• Do not exceed maximum user weight of 136 kg (300 lb.)
• It is the responsibility of the owner to ensure that all users of this equipment
are adequately informed of all precautions.
• Use this equipment only on a solid level surface. Cover the floor or carpet
beneath this equipment for protection.
• Read the Warning Label located on the computer console mast.
• Do not place fingers or any other objects into moving parts of the exercise
equipment.
• This equipment is designed for use by persons aged 13 years and older.
Teenagers should be supervised.
• Always wear athletic shoes for foot protection. Avoid wearing loose clothing
that may become entangled in the drive mechanism.
•Warn bystanders to keep a safe distance, especially from the moving pedals.
Do not allow anyone to touch the bike while it is in operation.
• This equipment is for home use only. Do not use in a commercial, institutional,
or rental setting.
• Care should be taken when mounting or dismounting the exercise bicycle.
• Do not operate in damp or wet conditions.
• Follow proper set-up and guidance as outlined in the Owner’s Manual and
Assembly Instructions. Only use the bike as outlined in usage instructions
of the Owner’s Manual.
• Prior to each use inspect the bike for loose, broken, or worn parts. Do not
use if found in this condition. The safety of the equipment can only be
ensured if it is regularly examined and maintained. (See Maintenance section of
the Owner’s Manual)
• Refer to the Maintenance section in the Owner’s Manual and disconnect
power supply before servicing the bike.
• Replace Warning Label if damaged, illegible, or removed.
•We recommend that a minimum distance of 1 meter (39 inches) surrounding
the bike is kept clear of all obstructions, including children, bystanders, and
pets. This is to ensure adequate clearance for easy access to the bike and
to avoid any possible contact with the moving pedals.
3
Nautilus OM 113/213 08/18/2004 12:00 AM Page 2

4
Nautilus OM 113/213 08/18/2004 12:00 AM Page 3

SCHWINN BIO-FIT
™
COMFORT SYSTEM
THE REVOLUTIONARY SCHWINN BIO-FIT
™
COMFORT SYSTEM
The unique and revolutionary Schwinn Bio-Fit
™
Comfort System is designed
specifically to ensure that each point of contact and user-interface with the
bike provides the user with proper ergonomic and bio-mechanical positioning,
superior comfort, the ultimate in functionality, and is fully customizable to fit
each user’s unique and specific needs.
5
Nautilus OM 113/213 08/18/2004 12:00 AM Page 4

FEATURES
Other features:
Schwinn Bio-Fit
™
handlebars adjust for a variety of
multiple comfortable hand positions (Offered on upright
models)
Schwinn Bio-Fit
™
wide seats offer stability, comfort, and
support
Schwinn Bio-Fit
™
pedals provide proper alignment for
efficient pedaling
Console slider mechanism contributes to an ideal user
interface position
Seat slider mechanism ensures optimum seat height
and fore/aft adjustment (Offered on upright models)
Lumbar support can be adjusted for improved lower
back support (Offered on recumbent models)
Multi-program and feature-packed computer with 16
levels of resistance will keep you motivated and help
you achieve your fitness goals
Grip heart rate for monitoring your workouts
High-quality, chrome-plated seat tube looks good in
any room in the house
Oversized rear stabilizer tube for rock-solid steadiness
Drive train features a strong and durable 3 piece crank, super
quiet 6 groove drive belt and oversized, perimeter weighted,
9kg flywheel provide the ultimate in true “road” feel
Transport wheels give you the versatility to move your
workouts to the family room while watching the kids or
the den while enjoying your favorite tv program
6
Convenient storage for your favorite workout reading
materials (Offered on recumbent models)
Nautilus OM 113/213 08/18/2004 12:00 AM Page 5

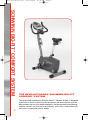
CONGRATULATIONS!
CONGRATULATIONS!
Thank you for making the Schwinn bike a part of your exercise and fitness
activities. For years to come, you’ll be able to rely on Schwinn craftsmanship
and durability as you pursue your personal fitness goals.
The Schwinn bike should enable you to shape and monitor your workouts to:
▲ Increase your energy level
▲ Increase cardiovascular and aerobic fitness
▲ Increase lower body muscle strength
▼ Decrease your overall percentage of body fat
Whether you are just getting started in an exercise program or are already
in good shape, the Schwinn bike is designed to be an efficient, easy and
fun way to achieve an enhanced level of fitness. You can pedal your way to
a slimmer and healthier body. The on-board digital computer enables you
to accurately monitor your progress by tracking time, speed, distance and
approximate Calories burned. This Owner’s Manual contains all the
information you need to operate and enjoy your Schwinn exercise bike.
Also included are general fitness guidelines. Please read this Owner’s
Manual in its entirety before getting onto the bike and working out. So let’s
get started.
Take your time and have fun!
7
Nautilus OM 113/213 08/18/2004 12:00 AM Page 6

TABLE OF CONTENTS
TABLE OF CONTENTS
Operation........................................................................................... 9
How to use the Schwinn exercise bike........................ 9
How to use the Schwinn exercise bike computer ....... 11
Maintenance...................................................................................... 29
Moving your Schwinn exercise bike............................ 29
Leveling your Schwinn exercise bike .......................... 29
Maintenance ................................................................ 29
Fitness Guidelines…………………………………………………........ 30
Exercise and Health...................................................... 30
Your New Home Fitness Program................................ 30
Steps to Getting Started............................................... 31
Components of Fitness................................................. 32
Cardiovascular Fitness.................................................. 32
Muscular Strength......................................................... 32
Flexibility........................................................................ 33
Nutrition......................................................................... 34
Understand Caloric Balance......................................... 34
Eat a Variety of Foods................................................... 34
Drink Water.................................................................... 34
Eat More Often / Portions............................................. 34
Monitoring Your Intensity.............................................. 35
Training Zones.............................................................. 35
Beating the Dropout Odds........................................... 37
Suggested Readings.................................................... 38
Schwinn
®
Fitness Limited Warranty............................................... 39
Workout Log……………………………………………………………… 40
8
Nautilus OM 113/213 08/18/2004 12:00 AM Page 7

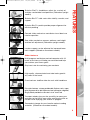
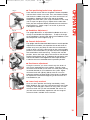
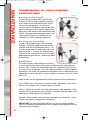
OPERATION
■ Seat adjustment
Proper seat adjustment helps ensure maximum exercise
efficiency and comfort, while reducing the risk of injury.
1. Place one pedal in the forward position and center the
ball of your foot over the center of the pedal. Your leg
should be slightly bent at Fig 2. the knee (Figs. 1 and 2).
2. If your leg is too straight or your foot cannot touch the
pedal, you will need to move the seat down on the
upright bike or forward on the recumbent bike. If your leg
is bent too much, you will need to move the seat up on
the upright bike or backward on the recumbent bike.
3. Adjust the upright seat height by first dismounting the
bike, then pulling out the adjustment knob on the seat
tube and releasing the locking pin (Fig. 3). Lower or raise
the seat to the desired height. Release the seat knob,
engaging the locking pin. Be sure that the pin is fully
secured in a seat post hole. To adjust the recumbent
seat, pull the seat knob up to release the seat. Slide the
seat forward or backward to the desired position. The
knob will “pop” up into the next hole; turn the knob to
ensure a tight fit. (Fig.4)
4. The upright bike also features a combination fore / aft
and micro seat height adjustment slider. To move the seat
closer to, or away from the console, loosen the knob,
slide the seat forward or rearward to the desired position
and re-tighten (Fig. 5). Because of the unique angled
design of the slider it also functions as a micro seat
height adjustment. Using this feature in combination with
the pop-pin adjustment on the seat tube enables you to
fine tune the proper seat height for optimum comfort and
performance.
9
Fig. 1
Fig. 2
Fig. 3
Fig. 4
HOW TO USE THE SCHWINN EXERCISE BIKE
Nautilus OM 113/213 08/18/2004 12:00 AM Page 8

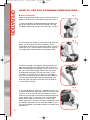
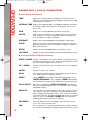
OPERATION
■ Foot positioning/pedal strap adjustment
Place the ball of each foot on the pedals. Rotate the pedals
until one foot is within arms reach. Then, reach down carefully
and fasten the rubber strap over your shoe and secure it to
the pedal by slipping the nub at the end of the pedal
through one of the slots in the strap. Pull down on the strap
until it snaps into place (Fig. 6). Repeat for the other foot.
Point your toes and knees directly forward to ensure maximum
pedal efficiency. Pedal straps can be left in place for
subsequent workouts.
■
Handlebar Adjustment
The upright bike offers an adjustable handlebar to ensure a
variety of comfortable hand positions. To adjust the angle
of the handlebars, loosen knob, adjust the handlebars to the
desired position and re-tighten (Fig. 7).
■
Console Adjustment
The upright and recumbent bike both feature a console position
adjustment that enables you to position the console closer or
farther away from your body to make the console buttons
easier to reach, the LCD screen easier to view, and your body
position more comfortable so you don’t feel too cramped or
too stretched out while exercising. To adjust the console
position, loosen the knob, adjust the console to the desired
position and re-tighten (Fig. 8). Experiment by moving the seat
and console sliders closer together or farther apart to totally
customize the most comfortable exercise position possible.
■
Resistance adjustment
Using the console, you have control over the levels of
resistance integrated into your workout. Typically, lower
resistance levels enable you to move at a faster pace, placing
increased demand on your cardiovascular system. Higher
resistance levels will typically deliver more of a muscle /
endurance workout at lower RPMs. But everyone is different!
So experiment and find the beginning of resistance that is
comfortable for you.
■
Lower body workout
Once you are in position and sitting comfortably, slowly
begin pedaling, with your arms relaxed and with your hands
resting on the hand grips. Pedal at an easy pace, at a low
resistance level until you feel comfortable and secure. As
you feel more comfortable, experiment with the range of
resistance levels available via the console.
10
Fig. 5
Fig. 6
Fig. 7
Fig. 8
Nautilus OM 113/213 08/18/2004 12:00 AM Page 9

OPERATION
USING THE COMPUTER
Using the Computer
Your Schwinn bike is equipped with a versatile computer console which
includes:
•Quick Start
•1 Manual program
• 10 profile programs
•3 Heart Rate Control programs
•2 Custom user-defined programs
• Time Trial program
• Fitness Test
• Calorie Goal
• BMI (Body Mass Index)
• Recovery Mode
• Results Mode
This console provides you with important information about your workout
as well as controls the resistance levels. The following sections will
describe how to utilize the many functions provided by this computer. Keep
this manual accessible for future reference, as you will want to experiment
with the various functions while you become familiar with the bike.
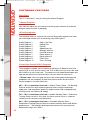
Computer Console Design
Before we discuss using the specific functions of the computer, let’s get
familiar with the display, the different features, and various buttons located
on the console.
Computer Features
11
Nautilus OM 113/213 08/18/2004 12:00 AM Page 10

OPERATION
■ LCD Display
The large LCD (Liquid Crystal Display) screen located in the center of the
console is your information center. This display is divided into sections that
provide information about your workout and any preset information you
may have input into the computer. The display provides a large main window
that indicates the PROGRAM selection and RESISTANCE LEVEL. The
smaller windows across the bottom show INTERVAL TIME and TIME, RPM
and WATTS, DISTANCE, and HEART (PULSE) RATE. The next larger window
on the right side of the display shows SPEED and CALORIES, ENGLISH or
METRIC operating mode, and the CYCLIST ICON with spinning wheels
relative to your SPEED. The icon also indicates that the program is running.
The large main area of the display shows the program profile you are using.
Within this profile are “bricks”, or rectangles, that are stacked vertically and
indicate the relative resistance level and course profile. The computer is
capable of offering 16 different levels of resistance. One “brick” represents
the lowest level and eight “bricks” represent the highest level. You can view
the level you are exercising in by referencing the Level numbers displayed
on the left and right side of the “brick” display. Levels 1, 3, 5, 7, 9, 11, 13,
and 15 display on the left side and Levels 2, 4, 6, 8, 10, 12, 14, and 16 dis-
play on the right. The highest value displayed is the resistance level you
are working out in.
In addition, you will notice that there are 12 columns of these “bricks” lined
up horizontally across the bottom of the center of the display. Each Profile
Program is 50 columns or “intervals” long so each of these columns or
“intervals” represents one fiftieth of your workout time. For example, if you
enter a workout time of 25 minutes, each column or “interval” time will last
a duration of 30 seconds. Since the display shows the first 12 columns of
your workout program, as you progress through the workout, the program
will scroll to the left. The flashing “bricks” on the leftmost column let you
know where you are in your workout and other columns to the right show
the upcoming course profile.
The Manual, Heart Rate Control, Custom and Time Trial programs will dis-
play in the 12 interval columns as viewed on the LCD screen and do not
scroll as you advance through the workout.
■ Alphanumeric Display
Within the LCD display the computer features a “message center” that
prompts you to input specific data and values to make the bike easy to
operate and gets you to your workout quickly.
12
Nautilus OM 113/213 08/18/2004 12:00 AM Page 11

OPERATION
USING THE 113/213 COMPUTER
■ LCD Display Descriptions
TIME
Displays the workout TIME. The TIME will count down from the
TIME you entered when beginning the program and shows the TIME
remaining for your workout.
INTERVAL TIME Displays the INTERVAL TIME. The INTERVAL TIME will count down
showing the TIME remaining before the program moves to the
next column.
RPM Displays the current pedal RPM (revolutions per minute).
WATTS Displays the current power you are producing at a given resistance
level. A WATT is a measure of workload similar to horsepower (in
fact 1 horsepower is equal to 746 Watts).
DISTANCE Displays the estimated DISTANCE traveled (Miles or Kilometers).
PULSE Displays your current heart rate BPM (beats per minute). You must
grip each Heart Rate contact sensor pod to enable the computer to
detect your heart rate.
SPEED Displays the estimated SPEED (Miles or Kilometers / hour).
CALORIES Displays the estimated CALORIES you have burned during the exercise.
■ Console Buttons and Button Functions
START / PAUSE
Used to start and pause the workout. When in a program pressing
this button will pause the workout. Press this button again to restart
the clock and the program where you left off.
UP / DOWN Used to change resistance level or to adjust values such as program
time etc.
ENTER Confirms or enters your selection.
SCAN These 3 buttons enable the user to alternately view Interval Time or
Time, RPM or Watts, and Speed or Calories.
RESET Pressing RESET in the program mode will bring you back to the
“ENTER PROGRAM” screen. Holding the RESET button down
for 2 seconds will reset the console and perform the “Power Up” step.
QUICK START When the screen displays “ENTER PROGRAM”, pressing this
will start the Manual Program. This is a “one-touch” way of starting
the Manual Program.
RESULTS Press this button to end the program and see the summary results of
your workout: Total Time, Total Distance, Average Speed, Average
Watts, Average Pulse and Total Calories. Once you press this button
your workout will end. You cannot go back and resume your workout
where you left off. See START / PAUSE above for information
regarding pausing then resuming your workout.
RECOVERY Press this button to measure and obtain your heart rate recovery
score. See section “Recovery Test”.
FAN The console features a fan with adjustable louvers to direct airflow to
cool you off while working out. Pressing this button turns the fan on or off.
13
Nautilus OM 113/213 08/18/2004 12:00 AM Page 12

OPERATION
USING THE 113/213 COMPUTER
■ Auto Shut-Off (Sleep Mode)
The console will automatically shut off in approximately 2 minutes without
use or input. There is no on/off switch.
■ Information Mode
The computer enables you to switch between English or Metric units by
pressing and holding the UP and DOWN buttons simultaneously for 3
seconds. Use the UP or DOWN button to select “ENGLISH” or “METRIC”
and press ENTER to confirm. The computer will enter the Information
Mode. In the Information Mode, by following the displayed menu and
prompts, you will be able to:
Select ENGLISH measurement units which sets the computer for:
• Miles
• Miles/hour
• Pounds
• Inches
Or select METRIC measurement units which sets the computer for:
• Kilometers
• Kilometers/hour
• Kilograms
• Centimeters
See Total Distance
See Total Hours
Press “ENTER” and then the software version will display. Press “ENTER”
again to exit the Information Mode and the computer will bring you to the
“ENTER PROGRAM” mode.
■ Grip Heart Rate
This Schwinn bike is equipped with grip heart rate sensors located on the
handlebars. You must contact these sensors with both hands so the com-
puter can detect your pulse. The computer uses information detected by
the grip heart rate sensors for many of the software features. Make sure
you are griping the pods and look for the flashing “heart” icon and pulse
rate located on the lower right portion of the LCD display (to the left of the
CYCLIST icon) indicating that a pulse signal is being received. This is
extremely important for the Heart Rate Control and Fitness Test programs.
The computer must receive a steady, consistent signal for the duration of
these programs to operate correctly. If there is no display please see the
section titled “IMPORTANT Things You Should Know Before Exercising”
for more information.
14
Nautilus OM 113/213 08/18/2004 12:00 AM Page 13

OPERATION
15
SOFTWARE FEATURES
Quick Start:
This is a “one-touch” way of starting the Manual Program.
1 Manual Pr
ogram:
You manually adjust the resistance level during your workout to make the
program easier or more challenging.
10 Pr
ofile programs:
The computer offers a variety of fun and exciting profile programs to keep
you motivated and on track to achieving your fitness goals:
Profile Program 1 Ride in the Park
Profile Program 2 Rolling Hills
Profile Program 3 Plateau
Profile Program 4 Speed Intervals
Profile Program 5 Strength Intervals
Profile Program 6 Pyramid Intervals
Profile Program 7 Ramp Interval 1
Profile Program 8 Ramp Interval 2
Profile Program 9 Pikes Peak
Profile Program 10 Cross-Training
3 Heart Rate Contr
ol (H.R.C) Programs
These programs enable you to choose to workout in 3 different heart rate
zones; 60% to 70% of max. heart rate, 70% to 80% of max. heart rate, and
80% to 90% of max. heart rate. The zones are calculated based upon your
age and the percent of maximum heart rate you select to exercise in.
***Please note: You must grip the heart rate sensor pods located on the
handlebars for the computer to read your pulse and for the Heart Rate
Control programs to work effectively.
60% - 70% of maximum heart rate – General Fitness Zone – Fat Burning
Exercise within this zone improves general fitness, begins to develop
endurance, and contributes greatly to weight control and management by
utilizing mostly fat Calories for energy.
70% - 80% of maximum heart rate – Aerobic Workout Zone – Endurance
Training Exercise within this zone increases overall fitness, improves
cardiovascular efficiency and endurance.
80% - 90% of maximum heart rate – Anaerobic Workout Zone –
Performance Training Exercise within this zone maximizes fitness and athletic
performance. ***We strongly recommend you consult with your physician
before exercising in this zone***
Nautilus OM 113/213 08/18/2004 12:00 AM Page 14

OPERATION
2 Custom User-defined Programs
These programs enable you to set up, store into memory and then workout
in 2 different course profiles that you customize.
Time Trial
This program enables you to workout against a “pacer” to determine how
long it takes you to cover a preset distance. You preset the speed of the
“pacer” as the baseline of your workout and race to the end of the preset
distance. At the end of the Time Trial the computer displays the watts,
distance, speed, etc. that you have achieved.
Fitness T
est
The Fitness Test is one of the best ways to measure improvements in your
physical fitness level. The test measures your fitness by comparing your
power output (in Watts) to your Heart Rate. In general, as you become
“more fit,” you will produce more power (Watts) at a given Heart Rate.
As the test starts, the power (Watts) slowly increases. This means that you
will work harder, and as a result, your heart rate increases. The Watts
continue to increase automatically until your heart rate reaches the “Test
Zone.” This zone is individually computed to be near 75% of your maxi-
mum Heart Rate. When you reach the “Test Zone” the bike holds the
Watts steady for three minutes. This is to allow you to reach a steady state
(where your Heart Rate has become basically steady).
At the end of the three minutes, the computer measures your Heart Rate,
and the power (Watts.) These numbers, (along with information about your
age and weight,) are put into a formula and produce a “Fitness Score.”
Note: The Fitness Test is an excellent way to measure changes in your own
fitness level. It is not designed to be used to compare one person’s score
to another person’s score. This is because the test protocol only “estimates”
your “Maximum Heart Rate.”
Calorie Goal:
The Calorie Goal feature lets you select an amount of Calories you would
like to burn during your workout.
When selecting “CALORIE GOAL”, use the UP and DOWN buttons to
select the amount of Calories you wish to “burn” from 10 to 990. Each
increment will change the Calories by 10. Confirm your selected value by
pressing the ENTER button.
The console will prompt you to choose a profile program. Use the UP or
DOWN buttons to select a profile program and press the ENTER button to
confirm your selection. During the program the Calorie display will count
down from the number of Calories you entered to 0.
16
Nautilus OM 113/213 08/18/2004 12:00 AM Page 15

OPERATION
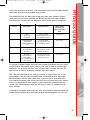
BMI (Body Mass Index) Measurement
BMI is a useful tool that shows the relationship between weight and height
that is associated with body fat and health risk. The table below gives a
general rating and BMI score:
BMI
Underweight Below 18.5
Normal 18.5 – 24.9
Overweight 25.0 – 29.9
Obesity 30.0 and above
There are limitations however. It may overestimate body fat in athletes and
others who have a muscular build. It may also underestimate body fat in
older persons and others who have lost muscle mass.
When choosing the BMI program you will be prompted to enter your height
and weight and the computer will calculate and display your Body Mass
Index. The console will display “IDEAL BMI RANGE”. The ideal or normal
range is 18.5 – 24.9. The console will also display your ideal weight range
for your height.
SOURCE: Centers for Disease Control and Prevention (CDC), Atlanta,
GA. The CDC is an agency of the federal Department of Health and
Human Services.
CONSULT YOUR PHYSICIAN FOR MORE INFORMATION ABOUT BMI
AND THE WEIGHT THAT IS APPROPRIATE FOR YOU.
Recovery T
est
Recovery Test shows how quickly your heart recovers from an exercise state
to a more restful state. Improved recovery is an indicator of increasing fitness.
For the console to perform the Recovery Test two things must happen. You
must press the RECOVERY button, AND, the console must be displaying
your heart rate. When both of these situations occur, then the console will
perform the Recovery Test.
The console will show “01:00 STOP” and the time will begin to count
down. Stop exercising but continue to grip the heart rate sensors. After 5
seconds, the display will show “00:55 RELAX” and will continue to count
down to 00:00. For the entire minute the console will also show your heart
rate. You must grip the heart rate sensors for the duration of the test.
The display will continue to show “RELAX” and your heart rate until the clock
counts down to 00:00. The console will then calculate your recovery score.
Recovery Score = Your heart rate at 1:00 (the beginning of the test) minus
your heart rate at 00:00 (the end of the test)
17
Nautilus OM 113/213 08/18/2004 12:00 AM Page 16

OPERATION
The display will show “SCORE (Recovery Score)”. This will remain on the
display for 5 seconds, then you can press RESULTS to view a summary of
your workout and end the program you are working out in or press START
to resume working out where you left off.
The higher the Recovery Test score value, the quicker your heart rate is returning
to a more restful state and is an indication of improving fitness. By recording
these values over time you can see the trend toward better health!
When you press the RECOVERY button and there is no heart rate signal or
display, the console will show “NEED HR” and the HEART RATE ICON on
the display will blink. This message will show for 5 seconds, then the
Program will resume. You must see your heart rate on the display and then
you must push the RECOVERY button again to perform the test.
Helpful Tip: For a more relevant score, try to obtain a steady heart rate for
3 minutes before pressing the RECOVERY button. This will be easier to
achieve, and obtain the best result, in the Quick Start or Manual program
so you can control level of resistance.
***Please note: The RECOVERY button does not function when you are in
the BMI program.
Results Mode
When you complete a program the Results Mode will automatically display
and show your basic workout statistics. Manually pressing this button during
your workout will also end the program and then give you your basic workout
statistics. You cannot return to your workout after pressing this button.
To have the option of either ending your workout and seeing your workout
results, or pausing your workout so you can return to where you left off,
perform the following steps:
To STOP or PAUSE the program: Press the START / PAUSE button to
pause your workout. The display will show “PRESS RESULT OR PRESS
START”. Then if you press the RESULTS button the computer will show
your workout results and end the program, or if you press START / PAUSE
the computer will resume the program where you left off.
In Results Mode the console will display:
“GREAT JOB” This will hold for approximately 3 seconds.
“YOUR RESULTS” This will hold for approximately 3 seconds
The display will show the following workout results:
SPEED: showing Average Speed
TIME: showing Total Time
DISTANCE: showing Total Distance
18
Nautilus OM 113/213 08/18/2004 12:00 AM Page 17

OPERATION
CALORIES: showing Total Calories
WATTS: showing Average Watts
HEART RATE: showing Average Heart Rate.
Pressing the RESET button will bring you back to the “ENTER PROGRAM”
mode. After 60 seconds the console will automatically return to the
“ENTER PROGRAM” mode.
• IMPORTANT Things You Should Know Before Exercising
A. The values calculated or measured by the computer are for
exercise reference purposes only, NOT FOR MEDICAL PURPOSES.
Please consult your physician before starting any exercise
program. He or she can help establish the exercise frequency,
intensity, (including determining your maximum and minimum
heart rate and target heart rate zones) and the exercise time
appropriate for your particular age and condition. If you have
any pain or tightness in your chest, an irregular heart beat,
shortness of breath, feel faint or have any discomfort while you
exercise, STOP! Consult your physician before continuing.
B. Pulse rate — The pulse rate will be displayed after the system has
detected 4 stable pulse signals. Pulse rate is then updated after
receiving every two signals.
***Please Note: If your heart rate goes above 199, the “1” will
flash. So a heart rate of 224 will be displayed as 124, and the 1
will be flashing***
C. Pulse rate readout — While the grip heart rate feature is a quick
and convenient way to check your heart rate, it is generally not as
accurate as a wireless transmitter belt and is subject to occasional
mis-readings and interference. You may, from time to time find
inconsistencies with the heart rate display on your display console.
There are many external factors that can affect the heart rate display.
Some factors that influence the reliability of the heart rate signal
include the environment where the equipment is used and even
the physiology of the users themselves. Electromagnetic interference
produced by such items as televisions, computers, microwave
ovens, cellular and cordless telephones and florescent lights can
also have an effect on the heart rate display on your equipment.
By moving the product away from such items, you may be able to
avoid many heart rate display problems.
D. Resistance Control — You can control the resistance of the bike
by using the UP or DOWN buttons. You increase the resistance by
pressing the UP button or decrease the resistance by pressing
19
Nautilus OM 113/213 08/18/2004 12:00 AM Page 18

OPERATION
20
DOWN button. You will notice a slight lag in time while the electronic
brake adjusts to your input, so make sure to allow for this and
don’t over-compensate.
E. Sleep Mode - The console will enter a “Sleep” mode and the system
will turn off automatically if there is no input for approximately 2
minutes. Press any button to return the computer to its pre-
“Sleep” state or press and hold the RESET button for 2 seconds
to clear the computer.
Nautilus OM 113/213 08/18/2004 12:00 AM Page 19

OPERATION
21
CONSOLE OPERATION
■ Console Operation – Quick Start
QUICK ST
ART: Press QUICK START to take you immediately to the
Manual program. Resistance level will be Level 1. Time will start from
00:00 and count up.
Changing Levels:
You can increase or decrease the resistance level by
pressing the UP or DOWN buttons at any time.
T
o STOP or PAUSE the program: Press the START / PAUSE button to
pause your workout. The display will show “PRESS RESULT OR PRESS
START”. Then if you press the RESULTS button the computer will show
your workout results and end the program, or if you press START / PAUSE
the computer will resume the program where you left off.
■ Console Operation – Manual program
Select Pr
ogram: Press any button to power up the console and “ENTER
PROGRAM” appears in the alphanumeric display. To access the Manual
program, scroll through the display by using the UP or DOWN buttons until
you reach “MANUAL”, then press ENTER.
Enter Level:
You will then be prompted in the alphanumeric display to
“ENTER LEVEL”, (1 – 16). Select the desired resistance level by using the
UP or DOWN buttons and then press ENTER to confirm your selection.
The default resistance level will be the last level a user entered (previous
workout).
Enter Time:
You will then be prompted in the alphanumeric display to
“ENTER TIME”. Select the desired Time by using the UP or DOWN buttons
and then press ENTER to confirm your selection. The default Time will be
the last Time a user entered (previous workout). The minimum time you
can enter is 2:00.
Enter W
eight: You will then be prompted in the alphanumeric display to
“ENTRWEIGHT (lbs. or kgs.)”. Select the appropriate weight by using the
UP or DOWN buttons and then press ENTER to confirm your selection.
Start:
You will then be prompted in the alphanumeric display to “PRESS
START”. “MANUAL” will display confirming you are about to start the
“MANUAL” program. You can now begin exercising!
Changing Levels:
You can increase or decrease the resistance level by
pressing the UP or DOWN buttons at any time.
T
o STOP or PAUSE the program:
Press the START / PAUSE button to
stop or pause your workout. The display will show “PRESS RESULT OR
Nautilus OM 113/213 08/18/2004 12:00 AM Page 20
Page is loading ...
Page is loading ...
Page is loading ...
Page is loading ...
Page is loading ...
Page is loading ...
Page is loading ...
Page is loading ...
Page is loading ...
Page is loading ...
Page is loading ...
Page is loading ...
Page is loading ...
Page is loading ...
Page is loading ...
Page is loading ...
Page is loading ...
Page is loading ...
Page is loading ...
Page is loading ...
-
 1
1
-
 2
2
-
 3
3
-
 4
4
-
 5
5
-
 6
6
-
 7
7
-
 8
8
-
 9
9
-
 10
10
-
 11
11
-
 12
12
-
 13
13
-
 14
14
-
 15
15
-
 16
16
-
 17
17
-
 18
18
-
 19
19
-
 20
20
-
 21
21
-
 22
22
-
 23
23
-
 24
24
-
 25
25
-
 26
26
-
 27
27
-
 28
28
-
 29
29
-
 30
30
-
 31
31
-
 32
32
-
 33
33
-
 34
34
-
 35
35
-
 36
36
-
 37
37
-
 38
38
-
 39
39
-
 40
40


Schwinn Home Gym 213 User manual
- Category
- Spin bikes
- Type
- User manual
- This manual is also suitable for
Ask a question and I''ll find the answer in the document
Finding information in a document is now easier with AI
Related papers
-
Schwinn 112 Upright Bike User manual
-
-
-
Cateye 213 Upright Bike Owner's manual
-
-
-
-
-
-
Other documents
-
Nautilus NB 1000 User manual
-
Health O Meter Scale HDM561 User manual
-
Fitness Quest Edge 284 User manual
-
 Body-Solid FB300B Assembly Manual
-
 Body-Solid B4UB Assembly Manual
-
Insportline SV7092-71 User manual
-
BodyCraft R18 Owner's manual
-
-
-
Horizon Fitness 507 User manual

