12
CQ-C5400/5300/5100W
E
N
G
L
I
S
H
CQ-C5400/5300/5100W
13
E
N
G
L
I
S
H
≥ This operating instruction manual applies to the following models. The differences among these models are
mentioned below.
≥ All illustrations represent model CQ-C5400W unless otherwise specifi ed.
Models
Features
MP3/WMA playback Yes Yes None
CD text display Yes Yes None
AUX-IN Yes Yes None
Pre-amp output voltage 5 V 2.5 V 2.5 V
Subwoofer output voltage 5 V 2.5 V 2.5 V
Direct track/fi le/folder/disc
operation on the remote
control unit
Yes Yes None
Remote control unit
Remote control unit with
ten numbers keys
Remote control unit with
ten numbers keys
Remote control unit
without ten numbers
keys
Face color/trim plate Silver Chrome black Chrome black
This can only be controlled through the
main unit.
This can only be controlled through the
remote control unit.
Operations with neither mark can be performed
either by the main unit or the remote control unit.
CQ-C5400W only.
CQ-C5400W
CQ-C5300W only.
CQ-C5300W
CQ-C5100W
CQ-C5100W only.
Indicates features applicable to
Features
MP3/WMA Playback from CD-R/RW
You can play your MP3/WMA (Windows Media
Audio) fi les as well as regular CDs.
With up to 10 to 12 times* the capacity of a
conventional CD, a single MP3/WMA-encoded disc
can keep you entertained throughout your entire
journey.
*Depending on bit rate.
SQ7 (7 bands Sound Quality)
SQ is a function that can call up various sound
types at the touch of button in accordance with your
listening music type.
At SQ7, SQ presets P2 to P6 can also be fi nely
adjusted as desired (page 38).
HPF (High Pass Filter)/LPF(Low Pass Filter)
Genuine subwoofer system achieved thanks to HPF
(High Pass Filter) and LPF (Low Pass Filter)
Electronic Switch Front Panel
The front panel opens and closes automatically by
pressing a button once.
CD Changer Control
You can connect the optional CD changer unit. For
details, refer to the operating instructions on the CD
changer unit.
Large-sized Volume Control
A large-sized rotary volume control that looks like
one belonging to a Hi-Fi audio system is featured.
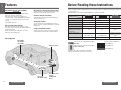
CQ-C5300W
CQ-C5400W
CQ-C5400W
CQ-C5300W
CQ-C5100W
CD changer
(CX-DP880, option)
Subwoofer (option)
Stereo/mono power
amplifi er
(CY-M7052EN,
option)
Before Reading these Instructions
CQ-C5400W CQ-C5300W CQ-C5100W
System Upgrade

14
CQ-C5400/5300/5100W
E
N
G
L
I
S
H
CQ-C5400/5300/5100W
15
E
N
G
L
I
S
H
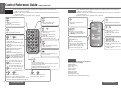
Control Reference Guide
(remote control unit)
CQ-C5400W CQ-C5100W
≥ This instruction manual explains operations for use with the buttons on the main unit
(different operation excluded).
≥ Buttons of the remote control function in the same way as the controls on the main unit of
the reference page.
≥ Point the remote control unit at the sensor (page 24).
≥ Switches on/off the power
(page 24).
≥ Selects a source (page 25).
≥ Mute/attenuation (page 25).
≥ Memorizes broadcast stations [1]
to [6] (page 29).
≥ Selects preset number [1] to [6]
(page 29).
≥ Selects SQ preset number [1] to [6]
(page 27).
≥ Direct track selection (page 31).
≥ Direct fi le/folder selection
(page 33).
≥ Direct disc selection (page 37).
≥ Random play (page 31, 33, 37).
≥ Folder random play (page 33).
≥ Disc random play (page 37).
≥ Scan play (page 31, 33, 37).
≥ Folder scan play (page 33).
≥ Disc scan play (page 37).
≥ Repeat play (page 31, 33, 37).
≥ Folder repeat play (page 33).
≥ Disc repeat play (page 37).
≥ Adjusts the clock (page 17).
≥ Selects or seeks the frequency (page 28).
≥ Selects or searches the track/fi le (page 31, 32, 36).
≥ Selects the frequency (SQ adjustment) (page 39).
≥ Selects the folder (page 32).
≥ Selects the disc (page 36).
≥ Enters the audio/function
settings (page 38, 42).
≥ Adjusts the sound volume
(page 25, 38).
≥ Adjusts the audio settings
(page 38).
≥ Adjusts the equalizer level
(SQ adjustment) (page 39).
≥ Enters the number input mode
(page 31, 33, 37).
≥ Changes the display (page 17,
28, 31, 32, 36).
≥ Selects a band (page 28).
≥ Sets a preset station (APM: Auto Preset Memory) (page 29).
≥ CD play pause (page 31, 32).
≥ Direct track/fi le/folder/disc selection (page 31, 33, 37).
≥ Adjusts the function settings (page 43).
64
97
5
Car Audio
SOURCE
MUTE
POWER
RAND
VOL
312
DISPBAND
REP
6
5
SET
SEL
#
SCAN
MENU
NUMBER
8
0
to
≥ This instruction manual explains operations for use with the buttons on the main unit
(different operation excluded).
≥ Buttons of the remote control function in the same way as the controls on the main unit of
the reference page.
≥ Point the remote control unit at the sensor (page 24).
PWR
MODE
PRG
TUNE
TRACK
Car Audio
BAND/DISC UP
VOL
MUTE
(ATT)
≥ Switches on/off the power
(page 24).
PWR
MODE
PRG
BAND/DISC UP
MUTE
(ATT)
VOL
TUNE
TRACK
≥ Selects a source (page 25).
(This has the same function as
[SOURCE] on the main unit.)
≥ Selects a band (page 28).
≥ Sets a preset station (APM: Auto
Preset Memory) (page 29).
≥ CD play pause (page 31, 32).
≥ Selects the disc (page 36).
≥ Mute/attenuation (page 25).
≥ Adjusts the sound volume
(page 25, 38).
≥ Adjusts the audio settings
(page 38).
≥ Adjusts the clock (page 17).
≥ Selects or seeks the frequency
(page 28).
≥ Selects or searches the track
(page 31, 36).
CQ-C5300W
CQ-C5100W
Operations below cannot be controlled by the
remote control unit (included).
≥ Random play
≥ Disc random play
≥ Scan play
≥ Disc scan play
≥ Repeat play
≥ Disc repeat play
≥ SQ adjustment
≥ Changes the display
≥ Enters/adjusts the audio/function settings

16
CQ-C5400/5300/5100W
E
N
G
L
I
S
H
CQ-C5400/5300/5100W
17
E
N
G
L
I
S
H
The 24-hour system is used for the clock.
≥ Turn your car’s ignition key to the ACC or ON
position.
≥ Press [SOURCE] (PWR).
≥ When the power is switched on for the fi rst time,
a demonstration appears on the display.
Press [DISP] (display) to change to regular
mode (page 24).
1 Press [DISP] (display).
2 Press and hold [DISP] (display) again for more
than 2 seconds.
Hours:
3 Press [%] or [$].
4 Press [DISP] (display).
Minutes:
5 Press [%] or [$].
6 Press [DISP] (display).
Note:
≥ “ADJUST” is displayed before adjusting the clock.
≥ Press and hold [%] or [$] to change numbers
rapidly.
Display Change
Press [DISP] (display).
When the power is off:
Hours blink
Hours set
Minutes blink
Minutes set
Complete
Clock display (default)
Display off
Clock display
Preparation
1
2
3
Battery Installation
1 Remove the battery holder.
Pull the holder out at position B while pushing
position A as indicated.
2 Install the battery on the battery holder.
3 Insert the battery holder back into its original
position.
Battery Notes
≥ Battery type: Panasonic lithium battery (CR2025)
(included)
≥ Battery life: Approximately 6 months under
normal use (at room temperature)
≥ Remove and dispose of an old battery
immediately.
≥ Do not disassemble or short the battery. Do not
throw a battery into a fi re.
≥ Keep the battery away from children to avoid the
risk of accidents.
≥ Follow local regulations when disposing of the
battery.
Back side
Lithium battery
(included)
Battery holder
Position A
Position B
Remote Control Unit
Caution:
≥ Improper use of the battery may cause
overheating, an explosion or ignition, resulting
in injury or a fi re.
Subwoofer
Preparation:
≥ Connect the subwoofer (option) (page 61).
Subwoofer level setting:
≥ You can change the subwoofer level (page 40).
Subwoofer low pass fi lter setting:
≥ You can select the upper limit frequency of the
sound from subwoofer (page 40).
Clock Setting
-
 1
1
-
 2
2
-
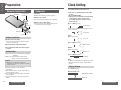 3
3


Panasonic CQC5400W Operating instructions
- Type
- Operating instructions
Ask a question and I''ll find the answer in the document
Finding information in a document is now easier with AI
Related papers
-
Panasonic CQC5100W Operating instructions
-
-
-
-
-
-
-
-
-