
GXT3 Configuration Program
User Manual
Version
V1.0
Revision date
September 24, 2009
BOM
31012253
Liebert provides customers with technical support. Users may contact the nearest Liebert
local sales office or service center.
Copyright © 2009 by Liebert
All rights reserved. The contents in this document are subject to change without notice.
Homepage: www.liebert.com
Monitoring
Email: liebert.monitoring@emerson.com
Tel: 800-222-5877, +800 1155 4499 (Outside North America)
Single-Phase & Three-Phase UPS
Email: liebert.upstech@emerson.com
Tel: 800-222-5877, +800 1155 4499(Outside North America)
Locations
United States: 1050 Dearborn Drive P.O. Box 29186 Columbus, OH 43229
Europe: Via Leonardo Da Vinci 8 Zona Industriale Tognana 35028 Piove Di Sacco (PD)
Italy
Tel: +39 049 9719 111, Fax: +39 049 5841 257
Asia: 29/F, The Orient Square Building F. Ortigas Jr. Road, Ortigas Center Pasig City
1605 Philippines
Tel: +63 2 687 6615, Fax: +63 2 730 9572


Contents
Chapter 1 Introduction............................................................................................................................................................................1
1.1 Features....................................................................................................................................................................................1
1.2 Requirements ..........................................................................................................................................................................1
Chapter 2 Communication .....................................................................................................................................................................2
2.1 Connecting The USB Cable ..................................................................................................................................................2
2.2 Starting The Program .............................................................................................................................................................2
2.3 Communicating With The UPS .............................................................................................................................................2
Chapter 3 Operation ...............................................................................................................................................................................3
3.1 Read/Config UPS Settings Only...........................................................................................................................................3
3.2 Changing UPS Settings .........................................................................................................................................................3
3.2.1 Canceling The Settings .............................................................................................................................................3
3.2.2 Restore The Settings .................................................................................................................................................3
3.2.3 Changing The Settings ..............................................................................................................................................3
Chapter 4 Tabs........................................................................................................................................................................................5
4.1 UPS Tab ...................................................................................................................................................................................5
4.2 Options Tab..............................................................................................................................................................................6
4.3 Battery Tab...............................................................................................................................................................................7
4.4 About Tab .................................................................................................................................................................................9


Chapter 1 Introduction 1
GXT3 Configuration Program User Manual
Chapter 1 Introduction
Welcome to the GXT3 configuration program (program for short). This program is used to modify the settings of the
UPS. This program is compatible with UPS models beginning with “GXT3” or “S4K2U”, as in “GXT3-3000RT120” or
“S4K2U1000C”.
This chapter details the features and requirements of this program.
1.1 Features
This program has the following features:
Select output voltage
Disable Auto-Restart
Disable the Line-Neutral-Reversed/Missing-Ground receptacle wiring alarm (120Vac models only)
Select frequency converter operation with a fixed output frequency of 50Hz or 60Hz
Enable or disable the audible alarm
Set the Low Battery Warning alarm time from 2 to 30 minutes
Enable or disable the Auto-Battery test
Enable or disable the Auto Restart function
Set the Auto-Battery test interval to 7, 14, 21, or 28 days
Select the number of external battery cabinets connected to the UPS to provide additional runtime
Modifying the shutdown setting of pin 1 & 2 (Any Mode Shutdown)
1.2 Requirements
This program requires the following elements:
A UPS with its model beginning with “GXT3” or “S4K2U”, as in “GXT3-3000RT120” or “S4K2U1000C”
A configuration program CD (or installation file)
A USB cable included in the UPS accessory package
A host computer with the Windows 2000® -or-later based operating system

2 Chapter 2 Communication
GXT3 Configuration Program User Manual
Chapter 2 Communication
This chapter details how to establish communication link with the UPS, including connecting the USB cable, starting
the program and communicating with the UPS.
2.1 Connecting The USB Cable
A USB cable is included in the UPS accessory package.
To connect the USB cable:
1. Connect one end of the USB cable to the USB port on the UPS.
2. Connect the other end of the USB cable to the USB port on the host computer.
Note
If an optional communication card has been installed in the UPS Intelislot port, the card must be removed while using the
program.
2.2 Starting The Program
To start the program:
1. Place the configuration program CD into the CD driver of the host computer.
2. Click the „Emerson UPS GXT3 Tool.exe‟ file in the CD driver to start the program.
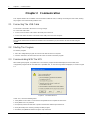
2.3 Communicating With The UPS
After starting this program, if a qualified UPS is found, the program window will display the UPS model; if the
configuration program fails to read data from a qualified UPS, an error message will be displayed, as shown in Figure
2-1.
Figure 2-1 Communication error
In this case, check the following items:
1. Verify that the USB cable is connected securely between the computer and the UPS..
2. Verify that the UPS is powered.
3. Temporarily remove the webcard or option card from the Intelislot port of the UPS.
4. Verify the USB port is not being used by another program.
5. If installed, stop Multilink software using the stop command.

Chapter 3 Operation 3
GXT3 Configuration Program User Manual
Chapter 3 Operation
This chapter details how to operate the program, including read/config UPS settings only and changing UPS settings.
3.1 Read/Config UPS Settings Only
This program can monitor the UPS settings while the UPS is operating in any mode. If this program is only used to
read/config the present UPS settings, you do not need to use any buttons except the Cancel button to close the
program.
3.2 Changing UPS Settings
To change the UPS settings, there are three conditions: canceling the settings, restore the settings and changing the
settings.
3.2.1 Canceling The Settings
If you decide not to change the UPS settings after modifying the displayed settings, close the program using the
Cancel button, and the settings are canceled.
3.2.2 Restore The Settings
If you decide to restore the UPS settings after modifying the displayed settings and prior to select OK or Apply button,
select the Refresh button to restore the UPS settings to the existing values stored in the UPS.
3.2.3 Changing The Settings
Requirements on the UPS
All UPS settings can be changed when the UPS is in Standby mode (with AC input power available). Pay attention to
the following two conditions:
Settings on the UPS Tab and Options Tab can only be changed with the UPS in Standby mode.
Settings on the Battery Tab can be changed with the UPS in Normal or Standby mode.
If the UPS is in Normal Mode operation, press the OFF button once to put the UPS into Bypass Mode. Once the UPS
is in Bypass Mode operation, press and release the OFF button two distinct times (for about a second each time) to
place the UPS in Standby mode. This will disconnect all power to the load.
Saving the changes
Changing any value or selecting/deselecting any setting in the configuration window will not immediately change the
settings in the UPS. You may modify the displayed settings until you are satisfied with the new proposed changes.
After that, you can save the values by selecting either the Apply or OK button.
The Apply button sends the new settings to the UPS without closing the program.
The OK button sends the new settings to the UPS and closes the program.
Whenever the value is successfully saved, the message will be displayed, as shown in Figure 3-1.
Figure 3-1 The changes are saved

4 Chapter 3 Operation
GXT3 Configuration Program User Manual
Note
At this time, if the UPS is already ON, you do not need to restart it.
Changes rejected
When the Apply or OK button is selected to transmit new settings on the UPS Tab or Options Tab, the UPS must be
put in the Standby mode, or the changes will be rejected, and the error message will be displayed, as shown in
Figure 3-2.
Figure 3-2 The changes are rejected
At this point, you should put the UPS to the Standby mode. If the UPS is in Normal Mode operation, press the OFF
button once to put the UPS into Bypass Mode. Once the UPS is in Bypass Mode operation, press and release the
OFF button two distinct times (for about a second each time) to place the UPS in Standby mode.
Partial save
If the UPS is not in the Standby mode, and changes from both the Battery Tab and the UPS Tab or Options Tab are
selected, the UPS will only save the changes on the Battery Tab. The Partial Save message will be displayed, as
shown in Figure 3-3.
Figure 3-3 Partial save

Chapter 4 Tabs 5
GXT3 Configuration Program User Manual
Chapter 4 Tabs
This chapter details the four tabs of the program, including the UPS Tab, Options Tab, Battery Tab and About Tab.
4.1 UPS Tab
When the program starts, the UPS Tab will open, displaying the UPS model along with the current UPS settings, as
shown in Figure 4-1. The information can be refreshed at any time using the Refresh button.
Figure 4-1 UPS Tab
Note
In the UPS Tab, the UPS must be in Standby mode for the setting to take effect.
Output voltage selection
The output voltage displayed in the Output textbox is the nominal input/output voltage. This is the nominal output
setting not a measured value. The drop down box will show the alternate L-N voltages available. Select the voltage
that matches the application, as shown in Figure 4-2.
Figure 4-2 Selecting the output L-N voltage

6 Chapter 4 Tabs
GXT3 Configuration Program User Manual
Notes
1. For the GXT3 Dual-Inverter models, this sets the L1-N and the L2-N nominal voltage.
2. The L1-L2 voltage is dependent upon the phase angle of the input utility and is auto-detected when power is first applied.
3. For the GXT3 230 volt single inverter model, only those voltages supported by the UPS will be displayed.
L-N reverse detection
The L-N reverse detection is only for the 120V UPS. Proper wiring of the receptacle powering the UPS is critical for
safety, EMI suppression, and surge suppression. The UPS checks the outlet when first plugged in.
Enable L-N reverse detection is checked
When the box of Enable L-N Reverse Detection (120V UPS only) is checked, alarm of L-N reverse will be enabled.
If the Line-Neutral is reversed or the ground is missing, the UPS will not start.
If a problem is detected after the UPS is started, the UPS will continue to operate, but the AC INPUT LED will flash.
In this situation, the improperly wired receptacles should be immediately repaired before the UPS is put into service.
Enable L-N reverse detection is unchecked
When the box of Enable L-N Reverse Detection (120V UPS only) is unchecked, alarm of L-N reverse will be
disabled.
Frequence selection
The UPS is normally designed for 50Hz or 60Hz operation. The factory default corresponds to the model. All models
are capable of being used as 50Hz or 60Hz systems.
For typical applications
Auto Sensing – 50 or 60Hz – Bypass Enabled or Auto Sensing – 50 or 60Hz – Bypass Disabled should be
selected according to the application.
The UPS will auto-sense the utility frequency when first plugged in and set the nominal frequency to match.
For some special applications
For some special applications, the UPS is required to be used as a frequency converter. In this application the
following options are available:
Frequency Converter – 50Hz – Bypass Disabled or Frequency Converter – 60Hz – Bypass Disabled.
Frequency Converter – 50Hz – Bypass Disabled mode will provide 50Hz UPS output from any qualified
commercial power. Frequency Converter – 60Hz – Bypass Disabled mode will provide 60Hz UPS output from any
qualified commercial power.
Note
Frequency Converter – 50Hz – Bypass Disabled or Frequency Converter – 60Hz – Bypass Disabled mode disables the
Bypass. If, for any reason, the UPS inverter is unable to power the load, the alternate bypass to utility power will not be available
and power will be removed from any load.
Audible alarm control
Enable Audible Alarm Control, if checked the audible alarms are enabled.
Enable Audible Alarm Control, if unchecked the audible alarms are disabled.
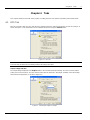
4.2 Options Tab
Select the Options Tab, as shown in Figure 4-3.

Chapter 4 Tabs 7
GXT3 Configuration Program User Manual
Figure 4-3 Options Tab
Note
In the Options Tab, the UPS must be in Standby mode for the setting to take effect.
Disable output - manual restart only
For particular industrial applications and special computer applications, the UPS may be monitored and controlled
using external voltages and relay contact signals.
An Any Mode Shutdown command can be activated on the terminal block of the UPS by operating Pin1 & Pin2.
If selected, the Disable Output – Manual Restart Only setting will require the UPS to be manually restarted by
pressing the Start button on the front panel of the UPS after the Any Mode Shutdown signal on the terminal block has
been removed.
Note
If the UPS is in a remote location with limited access then the setting should not be used.
Auto-enable output automatically
For particular industrial applications and special computer applications, the UPS may be monitored and controlled
using external voltages and relay contact signals.
An Any Mode Shutdown command can be activated on the terminal block of the UPS by operating Pin1 & Pin2.
If selected, the Auto-Enable Output Automatically setting will automatically restore the UPS output after Any Mode
Shutdown signal on the terminal block has been removed.
Default operation - normally open
The shutdown logic can be configured for normally open or normally closed. This setting defines the configuration of
the Any Mode Shutdown.
If selected, the Any Mode Shutdown will operate when Pin1 & Pin2 of the terminal block are connected
Inverted operation - normally closed
The shutdown logic can be configured for normally open or normally closed. This setting defines the configuration of
the Any Mode Shutdown.
If selected, the Any Mode Shutdown will operate when Pin1 & Pin2 of the terminal block are disconnected.
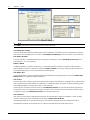
4.3 Battery Tab
Select the Battery Tab, as shown in Figure 4-4.

8 Chapter 4 Tabs
GXT3 Configuration Program User Manual
Figure 4-4 Battery Tab
Note
In the Battery Tab, the UPS can be in any mode for the setting to take effect.
Low battery time warning
The UPS will estimate remaining operating time when on batteries. A low battery alarm is activated if the estimated
time reaches the Low Battery Time. The value of Low Battery Time Warning can be selected from 2 to 30 minutes.
Auto battery test time
The UPS performs an automated battery test periodically. If enabled, the value of Auto Battery Test Time can be
selected from 7, 14, 21, and 28 days.
Battery cabinets
If additional batteries are attached to the UPS, accurate battery runtime estimates are possible if the number of
External Battery Cabinets is entered in the textbox of Battery Cabinets. The UPS is designed to operate with up to
four external battery packs or four long runtime (LRT) battery packs.
Auto battery test
In some applications it may be preferable to disable the automated, periodic battery test. Uncheck the Enable Auto
Battery Test box to disable the periodic battery test.
Auto restart
The UPS will provide computer grade power during power outages. If input power is unavailable for an extended time,
the UPS will shut down when batteries are depleted, or a shutdown signal is sent by the computer operating system
to limit battery depletion (communication data or contact closure).
If Auto Restart is enabled (checkmark in the box of Enable Auto Restart), the UPS will restart when input power is
restored. If the UPS turns off power to the load for any other reason, manual restart is required (See Options tab for
exceptions). Uncheck the Enable Auto Restart box to disable Auto Restart.
Auto shutdown
If the UPS has reached the Low Battery warning level, the UPS will either continue to shutdown or return to Utility
when the Utility power returns, dependent on the setting of Enable Auto Shutdown.
If Enable Auto Shutdown is checked, then the UPS will continue to shutdown even if the Utility power returns.
If Enable Auto Shutdown is unchecked, then UPS will return to Utility when the input power returns.

Chapter 4 Tabs 9
GXT3 Configuration Program User Manual
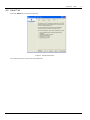
4.4 About Tab
Select the About Tab, as shown in Figure 4-5.
Figure 4-5 Window of About Tab
The contents of the CD can be seen in the About Tab.
-
 1
1
-
 2
2
-
 3
3
-
 4
4
-
 5
5
-
 6
6
-
 7
7
-
 8
8
-
 9
9
-
 10
10
-
 11
11
-
 12
12
-
 13
13


Emerson GXT3-3000RT120 User manual
- Type
- User manual
- This manual is also suitable for
Ask a question and I''ll find the answer in the document
Finding information in a document is now easier with AI
Related papers
-
Emerson GXT3 User manual
-
Emerson Liebert GXT3 2000VA User manual
-
-
Liebert GXT3-10000T230 User manual
-
-
Emerson Liebert GXT4 User manual
-
-
-
Liebert GXT3-5000RT208 User manual
-
Other documents
-
-
-
Avocent GXT3-3000RT120 Datasheet
-
-
-
-
-
SolaHD S4K2U-5C 230 Owner's manual
-
-