Page is loading ...

OWNER’S MANUAL
BBQ Pro Barrel Smoker
Product code: 47218 / 08432490-4
Item: 146. 47218610
UPC code: 182995001689
Date of purchase:
/ / _

DANGER: Indicates an imminently hazardous situation
which, if not avoided, will result in death or serious injury.
WARNING: Indicates an potentially hazardous situation
which, if not avoided, could result in death or serious injury.
CARBON MONOXIDE HAZARD
Burning Charcoal gives off carbon monoxide
which has no odor and cause death.
Do not burn charcoal inside homes, vehicles,
tents, garages or any enclosed areas.
Use outdoors only, where it is well ventilated.
Installation Safety Precautions
• Please read this User’s Manual in its entirety before using the
grill.
• Failure to follow the provided instruction can result in
seriously bodily injury and/or property damage.
• Some parts of this grill may have sharp edges. Please wear
suitable protective gloves.
• Never use the grill with its back and side closer than 36
inches to any combustible wall or surface.
• Place your grill outdoors on a firm, level surface. Do not use
this grill on a surface that will burn or melt, such as a plastic
or artificial surface or wood table. Keep grill away from
wooden fences, overhanging trees, or other flammable
objects before adding and lighting charcoal.
• DO NOT USE GASLINE, ALCOHOL OR KEROSENE IN THIS
GRILL. Use only commercial lighter fluid with charcoal
briquettes or pre-soaked charcoal briquettes. Prepare
charcoal according to the product’s instructions. Do not
exceed 5 lbs of charcoal briquettes in this grill per use.
• After lighting charcoal, do not leave grill unattended.
• Remember to keep children and pets away from lit grill at all
times.To avoid harm to people, pets, or property, do not
move the grill once the charcoal has been lit.
• Once coals are lit, the grill and surrounding surfaces become
very hot.
• To extinguish charcoal after cooking, dowse coals with sand
or spray with a fine mist of water.
• After your grill has cooled, remove ashes from the catcher
and cover, store the grill when not in use.
IMPORTANT: This grill is intended for outdoor use only and is not
intended to be installed in or on recreational vehicles or boats.
NOTE TO INSTALLER: Leave this User’s Manual with the
customer after delivery and/or installation.
NOTE TO CONSUMER: Leave this User’s Manual in a
convenient place for future reference.
WARNING
Read and follow all Safety, Assembly,
and Use and Care Instructions in this
Guide before assembling and cooking
with this grill.
Call Grill Service Center For Help And Parts
If you have questions or need assistance during assembly,
please call 1-888-287-0735. You will be speaking to a
representative of the grill manufacturer. To order new parts
call
at 1-800-4-MY-HOME
®
.
Safety Symbols
The symbols and boxes shown below explain what each heading
means. Read and follow all of the messages found throughout
the manual.
Product Record
IMPORTANT: Fill out the product record information below.
DANGE
R
Model Numbe
r
Serial Number
See ratin
g
label on
g
rill for serial number.
W
ARNING
Date Purchased
CAUTION
CAUTION
For residential use only. Do not use for commercial
cooking.
2 • 146.47218610
CAUTION: Indicates a potentially hazardous situation or
unsafe practice which, if not avoided, may result in minor
or moderate injury.

TABLE OF CONTENTS WARRANTY
For Your Safety . . .
. . 2
BBQ PRO GRILL WARRANTY
Grill Service Center. . .
. . 2
Product Record Information . . .
. 2
One Year Full Warranty on BBQ PRO Grill
If this grill fails due to a defect in material or workmanship
Installation Safety Precautions . . .
. . 2
within one year from the date of purchase, call 1-800-4-MY
HOME
®
to arrange for free repair (or replacement if repair
proves impossible).
Limited Warranty on Burners
For three year from the date of purchase, any burner that
rusts through will be replaced free of charge. After the third
year from the date of purchase, you pay for labor if you wish
to have it installed.
All warranty coverage excludes ignitor batteries and grill part
paint loss, discoloration or rusting, which are either
expendable parts that can wear out from normal use within
the warranty period, or are conditions that can be the result
of normal use, accident or improper maintenance.
All warranty coverage is void if this grill is ever used for
commercial or rental purposes.
All warranty coverage applies only if this grill is used in the
United States.
This warranty gives you specific legal rights, and you may
also have other rights which vary from state to state.
Kmart Corporation
Hoffman Estates, IL 60179
Safety Symbols . . .
. . 2
BBQ PRO Grill Warranty . . .
. 3
Parts List . . .
. . . 4
Parts Diagram. . .
. . . 5
Assembly . . .
. . . 6-23
146.47218610 • 3
Assembly Instructions. . .
. . . 24
BBQ PRO CHARCOAL GRILL WARRANTY
90 Days Full Warranty on BBQ Pro Grill
If this grill fails due to a defect in material
or workmanship within 90 days from the
date of purchase, call 1-800-4-MY-HOME®
to arrange for free parts replacement (if
repair proves impossible).
All warranty coverage excludes grill part
paint loss, discoloration or rusting, which
are either expendable parts that can wear
out from normal use within the warranty
period, or are conditions that can be the
result of normal use, accident or improper
maintenance.
All warranty coverage is void if this grill is
ever used for commercial or rental purposes.
All warranty coverage applies only if this
grill is used in the United States.
This warranty gives you specific legal rights,
and you may also have other rights which
vary from state to state.
Kmart Corporation
Hoffman Estates, IL 60179
Installation Service
For professional installation of home appliances, garage
door openers, water heaters, and other major home items,
in the U.S.A. call 1-800-4-MY-HOME
®
.
CALIFORNIA PROPOSITION 65
1. Combustion by-products produced when using
this product contain chemicals known to the State
of California to cause cancer, birth defects, and
other reproductive harm.
2. This product contains chemicals, including lead
and lead compounds, known to the State of
California to cause cancer, birth defects or other
reproductive harm.
Wash your hands after handling this product.
WARNING

NOTE: Some grill parts shown in the assembly steps may differ slightly in appearance from:
Those on your particular grill model. However, the method of assembly remains the same.:
4 • 146.47218610
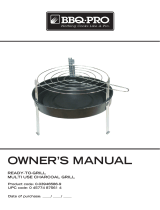
PARTS LIST
Key Description Qty Part Number
Key
Description Qty Part Number
01 Smoker Stack 1 01600017 17 Elbow Leg 2 01600067
02 M6 Cap Nut 2 01600091 18 Left Leg 2 01600068
03 Spring 1 01600021 19 Leg Bowl 2 01600072
04 Smoker Stack Cap 1 01600018 20
Bottom Rack 1 01600087
05 Thermometer 1 52200015 21 Wheel 2 01600073A
06 Brand 1 01600013 22
Right Leg 2 01600069
07 Handle 2 01600095 23
Axle Rod 1 01600074
08 Side Shelf 1 01600059 24
Leg Bracket 2 01600070
09 Side Shelf Bracket Short 2 01600057 25
Axle Cap 2 01600073B
10 Side Shelf Bracket Long 2 01600058 26
Cotter Pin 2 110050
11 Lid 1 01600004 27
Right Side Bottom Bowl 1 01600043
12 Cooking Gril 3 01600030 28
Air Vent 1 01600049
13 Charcoal Grid 1 01600031 29
Side Panel, Right Side Grill 1 01600050
14 Roasted Rod 2 01600014 30
Cooking Grid, Right Side Grill 2 01600047
15 Bottom Bowl 1 01600034 31 Charcoal Grid, Right Side Grill 1 01600048
16 Warming Rack 1 01600015 32
Right Side Grill Bracket 1 01600071
33
Right Side Grill Lid 1 01600035
Not Pictured
Hardware Pack 1 01600078
Manual 1 01600079
If you are missing hardware or have
damaged parts after unpacking grill,
call 1-888-287-0735 for replacement.
To order replacement parts after using grill,
call 1-800-4-MY-HOME
®

01 02 03 04 05 06 07 08 09 10
11
12
13
14
15
18
19
20
21
17
22
23
24
25
26
16
27
28 29
31
30
32
07
33
146.47218610 • 5
PARTS DIAGRAM

6 • 146.47218610
ASSEMBLY
PLEASE READ AND FOLLOW THE INSTRUCTIONS CAREFULLY STEP BY STEP
Tools Required:
Adjustable wrench (not provided)
Screwdriver (not provided)
7/16” Combination wrench (not provided)
The following hardware is provided in blister pack:
A.
M6x10 screw
Qty:17 pcs
E.
M6 Lock Nut
Qty:32 pcs
B.
M6x40 screw
Qty:12 pcs
F.
M5 Lock Nut
Qty:2 pcs
C.
M6x50 screw
Qty:2 pcs
G.
M6 Flat Washer
Qty:4 pcs
D.
Cotter Pin
Qty:2 pcs
H.
M5 Flat Washer
Qty:2 pcs
I.
M6x20 screw
Qty:2 pcs

1
146.47218610 • 7
Step 1:
□ Pay close attention to when assembling grill legs. Right leg (22) is shorter to
accommodate wheels.
□ Insert short leg (22) and long leg (18) into elbow leg (17) as shown.
□ Insert the leg bowl (19) to the bottom of legs (18).
Note: Please note to keep the holes on elbow legs (17) facing inward for
installing bottom bowls in later steps.
18
19
17
22
Step 2:
□ Attach leg bracket (24) to short leg (22) as shown using M6x40 screw (B)
and M6 Lock Nut (E).
Repeat Step 2 on opposite side.
Do not fully tighten screws at this time.
M6x40 screw, Qty: 2 pcs M6 Lock Nut, Qty: 2 pcs
24

Step 3:
□ Pay close attention to when assembling grill legs. Right leg is shorter to accommodate
wheels.
□ Insert Short Leg(22) and Long Leg(18) into Elbow Leg(17) as shown.
□ Insert the Leg Bowl(19) to the bottom of legs.
Note: Please note to keep the holes on Elbow Legs facing inward for installing
Bottom Bowls in later steps.
22
19
17
18
Step 4:
□ Helper is needed for this step.
□ Insert Bottom Rack(20) into holes of assembled grill as shown.
20
8 • 146.47218610

Step 5:
□ Attach leg bracket to short leg as shown using M6x40 screw (B) and M6
lock nut (E).
Repeat step 5 on opposite side. Do not fully tighten screws at this time.
M6x40 screw, Qty: 2 pcs M6 Lock Nut, Qty: 2 pcs
146.47218610 • 9

10 • 146.47218610
Step 6:
□ Insert Axle Rod(23) though holes on short legs.
□ Slide Wheel(21) onto Axle Rod and secure using cotter pin(D). Snap Axle Cap(25)
onto end of Wheel assembly as shown.
Repeat step 6 on opposite side for remaining wheel.
Note: Please make sure the side of the wheels with 3 holes is facing outwards.
Cotto
r Pin, Qty: 2 pcs
23
21 25

9
B
A
C
D
E
Valve
146.47218610 • 11
Step 7:
□ Place Bottom Bowl(15) onto assembled legs with smoker box opening on the same
side as the front short leg.
□ Tightly secure Bottom Bowl to Elbow Leg using 4 M6x40 screws(B) and 4 M6 lock
nuts(E). Do not fully tighten screws at this time.
M6x40 screw, Qty: 4 pcs M6 Lock Nut, Qty: 4 pcs
15

12 • 146.47218610
A B
C D
Step 8:
□ Helper is needed for this step.
□ Align holes on assembled Side Shelf(08) with holes on Bottom Bowl as shown.
□ Insert 2 M6x50 screws( C) through holes on bottom bowl and Side Shelf Bracket
Short(09) into Side Shelf. Secure using 2 M6 lock nuts(E) as shown.
M6x50 screw, Qty: 2 pcs M6 Lock Nut, Qty: 2 pcs
08 09

146.47218610 • 13
I
L
J
K
Step 9:
□
Attach Side Shelf Brackets Long(10) to below holes in Leg Brackets as shown in
illustration and using 4 M6x40 screws(B). Secure using 4 M6 Lock Nuts(E).
□ Attach Side Shelf Brackets Long to Side Shelf using 2 M6x10 screws(A).
M6x40 screw, Qty: 4 pcs M6 Lock Nut, Qty: 4 pcs
M6x10 screw, Qty: 2 pcs
10

Check Item
Prevention/Solution
Step 10:
□ Insert 2 M6x10 Screws(A) through holes on Right Side Grill Bracket(32).
Secure using 2 M6 Lock Nuts(E) as shown.
M6x10 Screw, Qty: 2 pc M6 Lock Nut, Qty: 2 pcs
32
14 • 146.47218610

NOTES
146.47218610 • 15
Step 11:
□ Helper is needed for this step.
□ Insert 6 M6x10 Screws(A) through holes on Right Side Lid(33) into Bottom
Bowl. Secure using 6 M6 Lock Nuts(E) as shown.
M6x10 Screw, Qty: 6 pc M6 Lock Nut, Qty: 6 pcs
33

NOTES
16 • 146.47218610
Step 12:
□ Helper is needed for this step.
□ Insert 4 M6x10 screws(A) through holes on Right Side Bottom Bowl into Right
Side Lid. Secure using 4 M6 lock nuts(E) as shown.
□ Insert 1 M6x10 screws(A) through holes on Right Side Bottom Bowl into Right
Side Bracket as shown.
M6x10 Screw, Qty: 5 pc M6 Lock Nut, Qty: 4 pcs

NOTES
146.47218610 • 17
Step 13:
□ Attach Handle(07) to Right Side Grill Lid using 2 M6 flat washers (G)
and 2 M6 Lock Nuts (E)
M6x10 Screw, Qty: 2 pc M6 Lock Nut, Qty: 2 pcs
07

13
146.47218610 • 43
18 • 146.47218610
Step 14:
□ Align Grill Lid(11) with Bottom Bowl as shown.
□ Secure Grill Lid to Bottom Bowl using 2 M6x20 screws(14).
M6x20 screw, Qty: 2 pcs
11
14

z
146.47218610 • 19
Step 15:
□ Attach Brand (06) to grill lid (11) by inserting 2 M5 lock nuts (F) and 2 M5 flat
washers (H).
M5 lock nut, Qty: 2 pcs M5 flat washer, Qty: 2 pcs
06

20 • 146.47218610
Step 16:
□ Attach Smoke Stack (01) to Grill Lid and secure with 2 M6x10 screws (A) and 2 M6
Lock Nuts (E) as shown.
□ Screw out Spring (03) and M6 Cap Nut (02) from Smoke Stack (01).
□ Secure Smoke Stack Cap (04) to Smoke Stack with Spring (03) and M6 Cap Nut
(02) as shown.
Note that the Smoke Stack is inserted from inside the grill lid.
M6x10 screw, Qty: 2 pc M6 Lock Nut, Qty: 2 pcs
01
04
02
03
/