Toastmaster TRST18 User manual
- Category
- Small kitchen appliances
- Type
- User manual

READ AND SAVE THESE INSTRUCTIONS
WARNING: A risk of fire and electrical shock exists in all electrical
appliances and may cause personal injury or death. Please follow all
safety instructions.
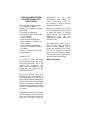
18-Quart Roaster Oven
Use and Care Guide - Model TRST18
•
REMOVABLE 2-LEVEL ROASTING RACK WITH HANDLES
• EVEN-HEAT TECHNOLOGY FOR CONSISTENT, MOIST COOKING
• REMOVABLE, IMMERSIBLE PORCELAIN ENAMEL LINER FOR SERVING
AND EASY CLEANING
• EXTRA TALL DOMED LID FOR SELF-BASTING AND MOISTER COOKING

2
IMPORTANT SAFEGUARDS
When using electrical appliances, basic safety precautions should always
be followed to reduce the risk of fire, electric shock and injury to persons,
including the following:
• Read all instructions before using appliance.
• Do not touch hot surfaces. Use handles or knobs.
• To protect against electric shock, do not immerse the oven body, cord or
plug in water or other liquid. See instructions for cleaning.
• Close supervision is necessary when any appliance is used near children.
• This appliance is not for use by children.
• Unplug from outlet when not in use and before cleaning. Allow to cool
before putting on or taking off parts, and before cleaning the appliance.
•
Do not operate any appliance with a damaged cord or plug or after the
appliance malfunctions, or has been dropped or damaged in any
manner. Return appliance to the nearest authorized service facility for
examination, repair or adjustment.
•
The use of accessory attachments not recommended by the appliance
manufacturer may cause injuries.
•
Do not let cord hang over edge of table or counter, or touch hot surfaces.
• Do not place on or near a hot gas or electric burner, or in a heated oven.
• Extreme caution must be used when moving an appliance containing hot
oil or other hot liquids.
• Always plug appliance cord into the wall outlet, then adjust temperature
control to the desired temperature. To disconnect, turn temperature
control to the OFF position, then remove plug from wall outlet.
• Do not use outdoors or while standing in a damp area.
• Do not use appliance for other than intended use.
• Do not use metal scouring pads on the exterior surface of the appliance.
Pieces can break off the pad and touch electrical parts creating a risk of
electric shock.
• Always operate the appliance on a non-flammable, heat-resistant
surface. Never place it on carpet, furniture or other combustible
materials. Always operate in a well-ventilated area away from walls and
other combustible materials.
•
Use caution when removing the cover of the appliance as the steam that
escapes is hot and can cause burns.
•
Use the roasting pan only with the oven body.
SAVE THESE INSTRUCTIONS
CAUTION: A short power supply cord is provided to reduce the risk of
personal injury resulting from becoming entangled in or tripping over a
longer cord. Extension cords are available from local hardware stores and

3
may be used if care is exercised in their use. If an extension cord is
required, special care and caution is necessary. Also the cord must be (1)
marked with an electrical rating of 125 V., and at least 13 A., 1625 W.,
and (2) the cord should be arranged so that it will not drape over the
countertop or tabletop where it can be pulled on by children or tripped over
accidentally.
ELECTRIC POWER: If the electric circuit is overloaded with other appliances,
your appliance may not operate properly. It should be operated on a
separate electrical circuit from other appliances.
POLARIZED PLUG: This appliance has a polarized plug, (one blade is wider
than the other). As a safety feature to reduce the risk of electrical shock, this
plug is intended to fit in a polarized outlet only one way. If the plug does
not fit fully in the outlet, reverse the plug. If it still does not fit, contact a
qualified electrician. Do not attempt to defeat this safety feature.
This product is for household use only.
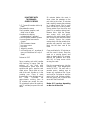
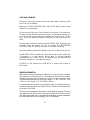
High-Dome Cover is designed to control heat and moisture efficiently.
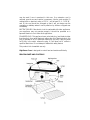
PRINCIPAL PARTS AND FUNCTIONS
3

4
NOTE: When removing the cover from the roaster during or after cooking,
use care to avoid contact with escaping steam.
Vents are located in the top of the cover. They are designed to allow
moisture and steam to escape during cooking. These vents should never be
blocked.
Lid Rests are located on each of the side handles of the oven body and
provide a convenient storage location for the cover when foods are being
added to the roaster.
Roasting Pan has an 18-quart capacity and is removable for easy cleaning
in the dishwasher or the sink. Food can be left in the roasting pan with the
cover and refrigerated for storage.
Oven Body holds the roasting pan for cooking. It has double-wall
construction with wrap-around heating elements for even cooking and
insulation to hold in heat and keep kitchen cool.
NOTE: NEVER place food directly inside the oven body without using the
roasting pan.
Roasting Rack With Handles - chrome-plated wire rack fits into roasting
pan for most cooking purposes. Handles are convenient for removing large
items from the roasting pan and fold down for compact storage.
Flat Rack can be used in combination with the roasting rack in the roasting
pan. The flat rack slides on top over the handles of the roasting rack for two
level cooking. If space allows, baked goods should be placed on the top
level rack in the center of the oven. For best results, do not cook two levels
of baked goods at the same time.
Temperature Control has adjustable temperatures from 150° to 450°.
The thermostat will automatically cycle on and off to maintain the selected
setting inside the Roaster Oven.
Ready Light - goes out when the oven has reached the selected temperature.
As the thermostat cycles on and off to maintain the selected temperature,
the light will go on and off.
Roasting Chart is printed directly on the oven body as a quick reference
for roasting a variety of foods. More detailed information on roasting is
provided in this manual.
Baking Chart is printed directly on the oven body as a quick reference for
baking a variety of foods. More detailed information on baking is provided
in this manual.

5
BEFORE YOUR FIRST USE
1. Read all instructions in this manual carefully. The information
included in this book will help you to use your Toastmaster 18-Quart
Roaster Oven to its fullest.
2. Carefully unpack the Roaster Oven and remove all packaging
materials.
3. Place your oven on a level surface such as a countertop or table. Be
sure the sides, back, and top of the oven are at least four inches
away from any walls, cabinets, or objects on the counter or table.
4. Remove all stickers from the oven except the rating label located on
the bottom.
5. Wipe the exterior surfaces with a clean, damp cloth or sponge, then
dry with another cloth. This will remove any dust that may have
settled during packaging.
6. Remove the ROASTING PAN, COVER, and RACKS and wash in hot
sudsy water or in the dishwasher. Rinse and dry thoroughly.
7. Place the Roaster Oven in a well ventilated area.
8. Plug the cord into a 120-volt AC outlet. Set the TEMPERATURE
CONTROL to 450° to eliminate any protective substance or oil that
may have been used for packing and shipping. Operate the Roaster
Oven empty for about 60 minutes until odor and smoke disappear.
Turn the TEMPERATURE CONTROL to OFF. Unplug the unit and allow
to cool.
9. This is a high-power appliance and should be the only appliance
operating on the circuit.
10. To avoid scratching, marring, discoloration, or fire hazard, do not
store anything on top of the oven, especially during operation.
USING YOUR ROASTER OVEN
1. Always preheat the roaster oven.
2. Place the ROASTING PAN in the ROASTER OVEN BODY. Place the
cover on the ROASTING PAN.
NOTE: Always place the food in the roasting pan. Never place food
or liquid directly in the OVEN BODY.
3. Be sure that the TEMPERATURE CONTROL is turned to the OFF
position.
4. Plug the cord into a 120-volt AC outlet.
5. Set the TEMPERATURE CONTROL to the desired temperature. The
oven is preheated when the ready light goes out.
6. Remove the cover and store it on the LID REST, using caution as the
cover will be hot. The cover will fit on the LID REST on either handle
of the ROASTER OVEN BODY in a horizontal or vertical position.
7. Add the food to the ROASTING PAN using potholders or oven mitts
as the surfaces will be hot. Always cook with the cover on the
ROASTING PAN.
8. The ROASTING RACK WITH HANDLES is used for fat free roasting.

6
Do not use ROASTING RACK to prepare soups and stews.
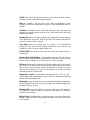
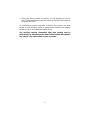
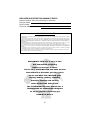
9. For two-level cooking, place food on the ROASTING RACK WITH
HANDLES. Place the FLAT RACK over handles of the ROASTING RACK
WITH HANDLES (Fig. 1) and place the additional food on the FLAT RACK.
Two-level cooking is not recommended for baked goods. If space allows,
baked goods such as pies, cakes, cookies, and casseroles should be
placed on the FLAT RACK.
10. Cook according to recipe instructions.
11. When food is done, turn the TEMPERATURE CONTROL to OFF and
unplug the cord from the outlet.
12. Carefully remove the food and allow the Roaster Oven to cool before
cleaning.
CAUTION: The ROASTER OVEN BODY, PAN, COVER, and RACKS will be
hot. Always lift the cover away from you to avoid steam and use pot
holders or oven mitts to remove food from the Roaster Oven.
TIPS FOR COOKING IN THE ROASTER OVEN
NOTE: Roaster Oven should always be preheated before using.
As a rule of thumb, the Toastmaster Roaster Oven roasts and bakes at
approximately the same temperature and time as a conventional oven. A
guide has been provided to assist you with roasting times. If there is nothing
similar, use the times and temperatures given in your recipe. Check 5 to
10 minutes before estimated finishing time to ensure desired results.
ROASTING
• Roasting meats in your Roaster Oven keeps them moist and tender. For
additional browning, add browning sauce to oil or butter and brush it
over the meat before cooking.
• For best results, roast dry. Do not add liquid until the last 30 minutes of
cooking. This will produce a darker roast and darker, crispier skin on
poultry.
• Simmering less tender cuts of meat will make them more tender. Adding
a gravy or sauce will provide extra flavor.
• To sear meat, preheat the roaster oven to 450°. Add oil or butter. Cover
and sear meat for 5 to 10 minutes per side until lightly browned.
• The use of a meat thermometer is recommended to achieve desired
degree of doneness.
Fig. 1

7
BAKING
• Always place baking pans or casseroles on one of the roasting racks.
Never place pans on the bottom of the ROASTING PAN.
• If space allows, baked goods such as pies, cakes, cookies, and
casseroles should be placed on the flat rack.
• Use the large capacity of the Roaster Oven efficiently. It is large enough
to bake two loaves of bread, or to cook meat and a vegetable at the
same time.
• The ROASTING PAN will easily accommodate three 1
1
⁄
2
-quart
casserole dishes. This is ideal for preparing a complete meal such as
meat, potatoes, and a vegetable at the same time.
• For easy clean-up, place foods that may boil over (such as fruit pies and
casseroles) on a cookie sheet before positioning on the rack.
• Convenience foods can be baked in the Roaster Oven. Place container
on the ROASTING RACK WITH HANDLES or the FLAT RACK. Follow
package directions.
• The Roaster Oven accommodates the following size baking pans:
1 - 12-cup muffin pan
1 - 6-cup jumbo muffin pan
2 - 12-cup mini muffin pan
1 - 8-, 9-, or 10-inch pie plate
1 - 14” x 8”x
1
⁄
2
” baking sheet
1 - 13” x 9” x 2” baking dish
1 - 8- or 9-inch square baking pan
1 - 10-inch bundt pan or angel food pan
• Metal pans reflect and transfer heat better than glass pans. Glass pans
can be used if desired, but the bottom crust will not be as brown.
STEAMING
• Steaming is an easy way to cook tasty, nutritious, and healthy foods
without added fats.
SLOW COOKING
• For slow cooking, preheat oven to 450°. Brown meat and vegetables,
add liquid, and lower the temperature to 250°.
• Slow cooking is done at a low temperature. Always keep food covered.
Stirring is not necessary.
• Cut meat and vegetables into uniform-size pieces for even cooking.
• Add liquid sparingly, as little moisture escapes from the Roaster Oven
during cooking.
• To convert a standard recipe to slow cooking, double the time and
decrease the oven temperature to 250°.
• It is not necessary to brown meat and vegetables in a separate fry pan.
This can be done directly in the ROASTING PAN. Use the instructions in
the recipe section entitled Food For a Crowd as your guide to browning
in the ROASTING PAN.

8
• When slow cooking meats and poultry, it is not necessary to use the
rack. The low temperature keeps the meat from sticking to the bottom of
the ROASTING PAN.
An assortment of recipes have been included in this booklet. Use these
recipes and the following charts as guides when adapting your favorite
recipes for use in the Toastmaster Roaster Oven.
Any servicing requiring disassembly other than cleaning must be
performed by an authorized service center. Failure to follow this instruction
may result in a fire, electric shock or injury to persons.

9
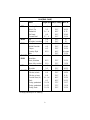
ROASTING CHART
Meat Weight (lbs.) Temp. Setting Min./lb.
BEEF Standing Rib 4-5 325° 20-25
Sirloin Tip 3-5 350° 20-25
Tenderloin 3
1
⁄
2
- 4 450° 8-12
Pot Roast 4-6 300° 30-40
Corned Beef 3
1
⁄
2
- 4 300° 15-20
LAMB Leg 5-8 350° 25
Shoulder, boneless 3-4 350° 25
PORK Loin Roast 3-5 350° 25-30
Rolled Shoulder 4-6 350° 35-40
Chops 4-5 325° 15-20
Country-Style 8-10 450° to brown
Ribs 250° 15-20
SMOKED Ham, bone in 10-15 325° 20-25
PORK shankless
Ham, boneless 8-12 325° 15-20
Ham, fully cooked 5-10 325° 13-28
VEAL Loin 4-6 325° 30-35
Shoulder 3-5 325° 30-35
POULTRY Chicken, whole 3
1
⁄
2 - 5 350° 15-17
Chicken, whole 6-8 350° 18-20
Chicken, pieces 6-8 350° 8-10
Cornish Hens (4) 3
1
⁄
2
- 4
1
⁄
2
400° 15-20
Duck 4-5 425° 20-25
Turkey, prebasted 10-14 375° 12-17
Turkey, prebasted 14-22 375° 13-18
Turkey, fresh 10-14 350° 15-20
*Always preheat prior to roasting

10
BAKING CHART
Food Temp. Setting Baking Time (min.)
Muffins 425° 15-20
Quick Bread 375° 65-75
Yeast Bread 400° 40-45
Yeast Rolls 400° 18-20
Cookies 350° 11-13
Brownies 350° 25-30
Cupcakes 350° 20-25
Sheet Cake 350° 40-45
Pound Cake 350° 50-60
Bundt Cake 350° 50-60
Cheesecake 325° 50-60
Fruit Pie 425° 45-50
Custard Pie 350° 50-60
Pastry Shell 425° 10-13
Pizza (9-inch) 425° 20-25
Baked Potatoes 350°-400° 50-60
Sweet Potatoes 350°-400° 55-65
Scalloped Potatoes 350° 75-90
Winter Squash 400° 45-60
Baked Apples 350° 35-45
*Always preheat prior to roasting

11
RECIPES
BLUEBERRY CORN MUFFINS
1 cup yellow corn meal
1 cup flour
1
⁄
2
cup sugar
1 TBL baking powder
1 tsp salt
1
⁄
3
cup melted butter or margarine
3
⁄
4
cup milk
1 egg
1
⁄
2
cup fresh or frozen
blueberries,unthawed
Preheat to 425°
Spray a 12-cup muffin pan with
cooking spray or line with cupcake
liners. In a large mixing bowl,
combine dry ingredients. In
another bowl combine butter, milk,
and egg. Slowly stir into the dry
ingredients until combined. Fold in
the blueberries. Fill the muffins
cups to within
1
⁄
2
inch of the top.
Bake 15-20 minutes or until a
toothpick inserted in the center
comes out clean.
Makes 12 muffins
PUMPKIN ‘N PEAR BREAD
1 can (15 ounces) pumpkin
1
⁄
2
cup oil
2 eggs
1 can (8.25 ounces) pears, with
liquid, mashed
1
1
⁄
4
cups brown sugar, firmly
packed
4 cups flour
1
⁄
2
teaspoon salt
2 TBL baking powder
1 tsp cinnamon
1
⁄
8
tsp allspice
1
⁄
4
tsp nutmeg
1
⁄
2
cup chopped walnuts
Preheat to 375°
Grease 2 (8
1
⁄
2
“ x 4
1
⁄
2
” x 2”) loaf
pans. In a large mixing bowl,
combine pumpkin, oil, eggs,
pears, and brown sugar.
In another mixing bowl, combine
the remaining ingredients. Stir the
dry ingredients into the pumpkin
mixture until all the flour is
incorporated. Spoon batter into
prepared pans. Bake 50-60
minutes or until a toothpick
inserted in the center comes out
clean.
Makes 2 loaves

12
OATMEAL RAISIN COOKIE BARS
1
⁄
2
cup butter or margarine
1
⁄
2
cup brown sugar
1
⁄
2
cup granulated sugar
1 egg
1 tsp vanilla
1
1
⁄
4
cups quick rolled oats
3
⁄
4
cup all purpose flour
1 tsp baking powder
1
⁄
2
tsp baking soda
1 tsp salt
1 tsp cinnamon
1
⁄
2
cup raisins
1
⁄
2
cup shredded coconut
Preheat to 350°
In a large mixing bowl, cream the
butter and sugars with an electric
mixer until light. Add the egg and
vanilla and beat until light. In
another bowl combine oats, flour,
baking powder, baking soda, salt,
and cinnamon. Blend flour mixture
into butter mixture. Stir in raisins
and coconut. Coat the bottom of a
small (14” x 8” x
1
⁄
2
”) cookie sheet
with cooking oil spray. Spoon the
batter on to the cookie sheet and
cover with plastic wrap. Press
down until the batter fills the pan
evenly. Remove plastic wrap. Bake
for 15 minutes or until a toothpick
inserted in the center comes out
clean. Allow to cool for about
30 minutes and cut into 3-inch
squares.
Makes 24 bars
BUTTER POUND CAKE
1 cup butter
2 cups sugar
2 tsp vanilla or 1 tsp almond or
lemon extract
4 eggs
3 cups flour
2 tsp baking powder
1
⁄
2
tsp salt
1 can (5 ounces) evaporated milk
plus
1
⁄
4
cup water
1 cup chocolate chips, raisins, or
chopped nuts
Preheat to 350°
Grease two 8-inch loaf pans, one
10-inch bundt, or angel food pan.
In a large mixing bowl, cream the
butter and sugar with an electric
mixer until light and fluffy. Add the
extract and one egg at a time
beating well after each addition.
Combine the flour, baking powder,
and salt. Add mixture to the bowl
alternately with milk, beginning
and ending with the flour. Mix until
all of the flour is incorporated. Stir
in the chips, raisins, or nuts. Spoon
the batter into the prepared
pans(s). Bake 50-60 minutes or
until a toothpick inserted in the
center comes out clean. Allow to
cool for 10 minutes. Turn the cake
on to a serving dish. Cool and
sprinkle with powdered sugar.
Makes 2 loaves or 1 bundt cake

13
SOUR CREAM CHOCOLATE CAKE
1 box (18.5 ounces) chocolate
cake mix with pudding in the
mix
1 cup sour cream
1
⁄
3
cup water
1
⁄
2
cup oil
4 eggs
1 cup semi-sweet chocolate
morsels
Preheat to 350°
Grease a 10-inch bundt pan. In a
large mixing bowl, combine all
ingredients, except chocolate
chips, using an electric mixer at
low speed. Continue to mix at
medium speed for about
3 minutes. Stir in the chips. Spoon
the batter into the prepared pan.
Bake for 50-60 minutes or until a
toothpick inserted in the center
comes out clean. Cool for
10 minutes. Turn the cake on to a
serving dish. Cool and sprinkle
with powdered sugar.
Makes 1 bundt cake
EASY BREAD MACHINE
DINNER ROLLS
1 cup plus 2 TBL water
1
⁄
3
cup butter, cut in pieces
1 egg
3 TBL mashed potato flakes
3 cups bread flour
3 TBL sugar
1 tsp salt
1 envelope (2
1
⁄
4
tsp) active dry
yeast
Place all the ingredients in the
order listed into the bread pan of
an automatic bread machine. Set
machine on the dough or manual
cycle and press start. When the
cycle is complete, remove the
dough and allow it to stand for
10 minutes.
Preheat roaster oven to 400°
Sprinkle a small amount of flour on
a cutting board. Cut the dough in
half and roll into two
12-inch ropes. Cut each rope into
8 equal-size pieces. If the dough
becomes sticky while shaping,
knead in additional flour. Shape
the dough into balls. Coat a small
(14” x 8” x 1
1
⁄
2
”) cookie sheet with
cooking oil spray. Place the rolls on
cookie sheet
1
⁄
2
inch apart. Cover
the rolls with a clean towel and
allow to stand in a draft-free place
for 30-40 minutes or until double
in bulk. Bake for 18-20 minutes.
Makes 16 rolls

14
CHOCOLATE SWIRLED
CHEESECAKE
36 cream-filled chocolate
sandwich cookies
1
⁄
2
cup melted butter or margarine
3 pkg (8 ounces) cream cheese, at
room temperature
4 eggs, at room temperature
1 cup sugar
2 tsp vanilla
1 cup sour cream
1 tsp lemon juice
2 TBL flour
1
⁄
4
cup chocolate syrup
Preheat to 325°
Crush cookies using a food
processor or a rolling pin. Stir
melted butter into the crumbs.
Spoon the crumb mixture on to the
bottom of a 13” x 9” x 2” baking
dish and cover with plastic wrap.
Press crumbs evenly into the pan.
Remove plastic wrap. In a large
mixing bowl, blend the
cream cheese and eggs with an
electric mixer at medium speed.
Mix until smooth. Add sugar,
vanilla, sour cream, lemon juice,
and flour. Mix until well combined.
Pour the mixture into the prepared
pan. Using a knife inserted
1
⁄
4
inch
into batter, swirl the chocolate
syrup into the cake batter to form
an “S”pattern. Bake 50-60 minutes
or until a knife inserted 1 inch from
the center comes out clean. Turn
temperature control to OFF and
allow the cake to cool in oven for
15 minutes. Refrigerate.
Makes 1 cake
STRAWBERRY APPLE PIE
1 pint strawberries, hulled and
sliced
3 tart cooking apples, peeled and
thinly sliced
1 cup sugar
1
⁄
4
cup flour
1
⁄
2
tsp cinnamon
Pastry for a 2-crust pie
Preheat to 425°
In a large mixing bowl, combine
the berries, apples, sugar, flour,
and cinnamon. Place one of the
pie crusts into a metal pie plate.
Spoon the fruit mixture into the
crust, mounding the fruit in the
center, and top with the second
crust. Fold the edges of the top
crust under the bottom crust, seal
and flute the edges. Make several
slits in the top of the pie to vent the
steam. Place the pie plate on a
cookie sheet to catch spills. Bake
45-55 minutes or until golden
brown.
Makes 1 pie

15
HOLIDAY TURKEY
1 (18-22 pound) turkey cooking
oil spray or oil Worcestershire
sauce
seasoned salt
2 teaspoons cornstarch
1
⁄
2
cup water
1 tsp browning and seasoning
sauce
1 can (14 ounces) chicken broth
Preheat to 350°
Spray Roasting Rack With Handles
with cooking oil spray. Remove
neck and giblet packet from the
turkey. Rinse well. Coat the turkey
with oil or cooking oil spray, rub a
small amount of Worcestershire
sauce into the skin, and sprinkle
with seasoning salt or your favorite
combination of herbs. Insert an
oven thermometer in the thickest
part of the breast near the leg.
Place the turkey, breast side up, on
the roasting rack with handles and
place in roasting pan. Calculate
the approximate cooking time at
11 minutes per pound.* Cover and
roast for 1-2 hours.
Baste the turkey with the pan
juices.
Continue to cook for 1-2 hours or
until the thermometer reads 170°.
Remove the turkey and the rack
from the roaster. Allow the turkey
to stand for about 15 minutes
before carving. The turkey will
continue to cook and the
thermometer should read 180°
before carving.
While turkey is standing, dissolve
cornstarch in the water. Combine
the water, browning sauce, and
chicken broth and add to the juices
in the pan. Check the temperature
on the meat thermometer and
replace the cover.
Turn temperature control to 450°.
Stir the gravy well with a wooden
spoon making sure to loosen any
cooked-on bits.* Cover and cook
5 minutes or until the gravy boils
and thickens slightly. Pour the
gravy into a pitcher and serve with
sliced turkey.
*If more gravy is desired, add an
envelope of turkey gravy mix dis-
solved in 1 cup of water or a can
of prepared gravy to the pan at
this time.
Makes 16-18 servings
Note: The amount of liquid varies
widely. Self-basting turkeys give off
more moisture during roasting.
This may cause the breast skin to
be lighter in color than the rest of
the turkey. If the breast skin is not
browned as desired, remove the
turkey from the roaster about
15 minutes short of the estimated
final cooking time or when the
meat thermometer reaches 165°F.
Remove the meat thermometer and
place the rack with the turkey on a
sheet of foil in a pan or on a large
cookie sheet. Place under a
preheated broiler for about
5 minutes to crisp and darken skin.

16
APPLE-AND-BREAD STUFFED
ROASTED CHICKEN WITH
NEW POTATOES
1 (6-8) pound roasting chicken
Oil or cooking oil spray
Paprika, onion powder, and garlic
salt to taste
2 TBL butter or margarine
1 tart cooking apple, peeled and
cut into chunks
1 onion, chopped
4 cups dry bread stuffing mix
1 cup applesauce or apple juice
2 tsp cornstarch
1 tsp browning and seasoning
sauce or Worcestershire sauce
1
⁄
2
cup water
1 can (14 ounces) chicken broth
8 new potatoes
Preheat to 350°
In a 10-inch fry pan, melt butter
and sauté the apple and onion
until nicely browned. Stir in the
stuffing mix, applesauce and
water. Allow the stuffing to cool
slightly and then spoon into the
cavity of the chicken.
Spray the roasting rack with
cooking oil spray. Coat the skin of
the chicken with oil or cooking oil
spray and sprinkle with seasonings.
Place the chicken on the rack, breast
side up, and place in roasting pan.
Calculate the approximate cooking
time to 25 minutes per pound. Roast
for 2 hours.
Dissolve the cornstarch in the water
and browning sauce, remove the
cover and add water and broth to
the juices in the pan. Check the
temperature on the meat
thermometer and replace the
cover. Continue to cook for
45 minutes to 1 hour or until the
thermometer reads 170°.
Remove the chicken and the rack
from the roaster. Allow the chicken
to stand for about 15 minutes
before carving. The chicken will
continue to cook and the
thermometer should read 180°
before carving.
Turn temperature control dial to
450°. Stir the gravy well with a
wooden spoon, making sure to
loosen any cooked-on bits. Cover
and cook 5 minutes or until the
gravy boils and thickens slightly.
Pour the gravy into a pitcher and
serve with the sliced chicken.
Makes 6 servings.

17
ROAST BEEF WITH
TWICE-BAKED
CHEESY POTATOES
1 (5-7 pound) boneless sirloin tip
roast
Worcestershire sauce
Garlic powder, paprika, and
dried onion to taste
8 medium-size baking
potatoes(about 3 pounds)
4 ounces grated cheddar cheese
4 ounces grated mozzarella
cheese
2 TBL Parmesan cheese
1
⁄
2
cup sour cream
1
⁄
4
cup milk
1 tsp garlic powder
1 can beef gravy or 1 envelope of
gravy mix dissolved in1 cup of
water
Preheat to 350°
Spray roasting rack with handles
with cooking oil spray. Rub the
surface of the beef with
Worcestershire sauce and then
sprinkle with garlic, paprika, and
dried onion. Place roast on one
side of the rack, fat side up, in the
roasting pan. Place a meat
thermometer in the thickest part of
the roast. Calculate the
approximate cooking time at
20 minutes per pound for rare,
22 minutes per pound for medium,
and 25 minutes per pound for well
done.
90 minutes before the roast is
done, place the potatoes on the
rack next to the roast. 30 minutes
later, carefully remove the potatoes
to a cutting board. Slice a small
piece off the top of each potato.
Scoop potato from the skins and
place it in a medium mixing bowl.
Reserve skins. Add the cheese,
sour cream, milk, and garlic
powder to the mixing bowl. Blend
with a hand mixer until the mixture
is smooth. Spoon the potato
mixture back into the potato skins,
sprinkle with paprika, and place
back into the oven next to the
roast.
Cover and bake for 30 minutes or
until the roast is done. Place the
roast on a carving board and
allow to stand about 10 minutes.
Remove the potatoes and cover
with foil to keep warm while
carving the roast.
Pour the prepared gravy into the
roasting pan. Turn temperature
control to 450°. Stir well with a
wooden spoon, making sure to
loosen any cooked-on bits. Cover
and cook for 5 minutes or until the
gravy boils and thickens slightly.
Pour the gravy into a pitcher and
serve with the sliced beef.
Makes 8-12 servings depending
on the size of the roast

18
CORN BREAD STUFFED
PORK LOIN
1 bag (6 ounces) corn bread
stuffing mix
1 can (14 ounce) chicken broth
1 cup orange juice
2 TBL melted butter
1 bag (6 ounces) dried mixed
fruit bits of assorted whole
dried fruits, chopped
1 (6-8 pound) whole boneless loin
of pork
1 envelope of pork gravy mix
dissolved in 1 cup of water
Preheat to 350°
Combine all ingredients except the
pork. Place the pork, fat side down,
on a cutting board. Cut the meat into
2 equal-size pieces. Make slits
1 inch apart in each piece of the
pork cutting down to within
1
⁄
2
inch
of the fat to form a pocket for the
stuffing. Be careful not to cut
through. Spoon about
1
⁄
2
cup of the
stuffing into each pocket. Spray
roasting rack with handles with
cooking oil spray. Place the roasts
next to each other on the rack. Place
a meat thermometer into the center
of one slice of pork. Calculate the
approximate cooking time at
15 minutes per pound. About
20 minutes before the roast is done,
pour the gravy mix into the roasting
pan. Remove the roast and rack
from the oven when the meat
thermometer reads 170°.
Turn temperature control to 450°.
Stir well with a wooden spoon,
making sure to loosen any
cooked-on bits. Cover and cook for
5 minutes or until the gravy boils
and thickens slightly. Pour the gravy
into a pitcher and serve with the
sliced pork.
Makes 10-14 servings depending
on the size of the roast
FRUITY SMOKED HAM
AND YAM DINNER
1 half (6-8 pounds) or whole
(12-16 pounds) smoked ham,
bone-in
1
⁄
2
cup sweet and sour sauce
1 TBL raspberry or strawberry jam
1
⁄
2
cup orange juice
1 cup ginger ale
2 TBL cornstarch
6 medium-size yams
(about 2 pounds)
Preheat to 325°
Combine the sauce, jam, juice,
ginger ale, cornstarch. Set aside.
Spay the roasting rack with
cooking oil spray. Place the ham
on the rack and place in roasting
pan. Calculate the approximate
cooking time at 15 minutes per
pound. One hour before
completion, place the yams on the
rack around the roasting pan and
brush ham with sauce. Pour the
remaining sauce into the roasting
pan. Cover and continue to cook
for the remaining hour or until the
meat thermometer reads 140°
(for fully cooked ham) or 160°
(for uncooked ham). Allow ham to
stand for 10 minutes before
carving. Wrap the yams in foil to
keep warm. Skim fat from sauce or
pour into a fat separator to
remove.

19
MOROCCAN-STYLE
LEG OF LAMB
WITH COUSCOUS
AND VEGETABLES
1
⁄
4
cup oil
1 medium onion, chopped
2 eggplants (2
1
⁄
2
to 3 pounds total),
peeled and cut into 1-inch
cubes
2 carrots, chopped
2 stalks celery, chopped
1 tsp dried basil
1 tsp salt
1
⁄
4
tsp pepper
1 can (15 ounces) chick peas with
liquid
1 can (14 ounces) beef broth
1 can (16 ounces) stewed tomatoes
1 (6-8 pound) leg of lamb
1 TBL Dijon mustard
1 TBL lemon juice
Paprika, garlic powder, and onion
powder to taste
2 cups couscous
1 can or 1 envelope brown gravy
mix prepared as directed
Preheat to 450°
Pour oil in the roasting pan, add
onions and stir. Cover and cook for
5 minutes. Stir in the eggplant.
Cover and cook for 5 minutes. Add
the carrots, celery, basil, salt, and
pepper.
Cover and cook for 5 minutes. Stir
in the chick peas, broth, and
tomatoes. Cover and reduce heat
to 350°.
Combine the mustard and lemon
juice and brush it on both sides of
the lamb. Sprinkle with garlic,
onion, and paprika. Spray the
roasting rack with cooking oil
spray. Place the lamb on the rack.
Insert a meat thermometer into the
center of the lamb, being careful
not to touch the bone. Calculate the
approximate cooking time at
25 minutes per pound. When the
lamb has reached desired
temperature (160° for rare, 170°
for medium, or 180° for well
done), remove the lamb from the
rack and place on a cutting board.
Stir the couscous into the
vegetables, adding 1 to 2 cups of
water. (The couscous will absorb
about 2 cups of liquid.) Stir well to
combine. Cook for 20 minutes.
Slice meat and serve with
vegetable couscous medley and
prepared gravy.
Makes 12 servings

20
OLD-FASHIONED
MEAT LOAF
1
1
⁄
2
pounds ground beef
1 egg
1
⁄
2
cup flavored bread crumbs
1 envelope (1.2 ounces) dried
onion soup mix
1
⁄
3
cup ketchup
1
⁄
4
cup water
Worcestershire sauce
3 slices American cheese
3 medium potatoes, cut in eighths
2 medium onions, cut in eighths
3 medium carrots, peeled and cut
in four pieces, then halved
Salt, pepper, herbs, and spices to
taste
Preheat to 350°
In a medium mixing bowl, combine
the meat, egg, bread crumbs,
onion soup mix, Worcestershire
sauce, ketchup, and water. Mix
well. Place half of the mixture on a
small cookie sheet (14” x 8
1
⁄
2
“).
Press the cheese in the center of the
meat and cover with the remaining
meat mixture. Form an oblong
loaf, making sure that the cheese is
sealed into the meat. Spread the
Worcestershire sauce over the
meat. Place the potatoes and
vegetables around the meat loaf
and sprinkle with salt, pepper, and
your favorite herbs or spices. Place
the cookie sheet on the roasting
rack with handles in the roasting
pan. Cover and bake for an hour
or until the meat loaf and potatoes
are nicely browned.
Makes 6-8 servings
MEXICAN TACO PIE
1 package (8 ounces) refrigerator
biscuits
1 pound lean ground beef, turkey
or chicken
1 envelope (
1
⁄4 ounce) taco
seasoning or sloppy Joe mix
1 can (6 ounces) tomato paste
3 ounces grated cheddar cheese
3 ounces Monterey jack cheese
1
1
⁄2 cups water
Chopped tomatoes, shredded
lettuce, chopped onion, sour
cream, and guacamole
Preheat to 350°
Fit the biscuits into a 9- or 10-inch
pie plate, pressing together to form
a crust. In a 10-inch fry pan,
brown the meat. Drain the fat. Add
the seasoning package, tomato
paste, and water. Stir well to
combine. Simmer for 10 minutes.
Spoon the meat mixture over the
biscuits in the pie plate. Top with
the grated cheeses. Place the plate
on the roasting rack with handles
in the roasting pan. Bake for
30 minutes or until the cheese is
melted and the edges of crust are
brown. Top the pie with chopped
tomatoes, shredded lettuce,
chopped onion, and dollops of
sour cream and guacamole before
serving, if desired.
Makes 6-8 servings
Page is loading ...
Page is loading ...
Page is loading ...
Page is loading ...
Page is loading ...
Page is loading ...
Page is loading ...
Page is loading ...
Page is loading ...
Page is loading ...
-
 1
1
-
 2
2
-
 3
3
-
 4
4
-
 5
5
-
 6
6
-
 7
7
-
 8
8
-
 9
9
-
 10
10
-
 11
11
-
 12
12
-
 13
13
-
 14
14
-
 15
15
-
 16
16
-
 17
17
-
 18
18
-
 19
19
-
 20
20
-
 21
21
-
 22
22
-
 23
23
-
 24
24
-
 25
25
-
 26
26
-
 27
27
-
 28
28
-
 29
29
-
 30
30


Toastmaster TRST18 User manual
- Category
- Small kitchen appliances
- Type
- User manual
Ask a question and I''ll find the answer in the document
Finding information in a document is now easier with AI
Related papers
-
Toastmaster The Bread Box User manual
-
-
-
-
-
-
-
-
-
Other documents
-
Nesco 4842-25PR User manual
-
 Mrs. Fields 145 Installation guide
-
Bravetti KR220B User manual
-
-
Rival Accu-Roast RO200 WB Owner's manual
-
Proctor-Silex Roaster Oven User manual
-
Hamilton Beach Roaster Oven User manual
-
-
 Sportsman 800654 User guide
-
Rival 4804-47-30 User manual

