Sony Cyber-shot DSC-W200 Owner's manual

Category
Bridge cameras
Type
Owner's manual
© 2007 Sony Corporation 3-208-400-12(1)
GB
Digital Still Camera
Cyber-shot Handbook
DSC-W200
Before operating the unit, please read this
Handbook thoroughly together with the
“Instruction Manual” and the “Cyber-shot
Step-up Guide”, and retain them for future
reference.
VCLICK!
Table of contents
Basic Operations
Using functions for
shooting
Using functions for
viewing
Customizing the settings
Viewing images on a TV
Using your computer
Printing still images
Troubleshooting
Others
Index
2
Notes on using your camera
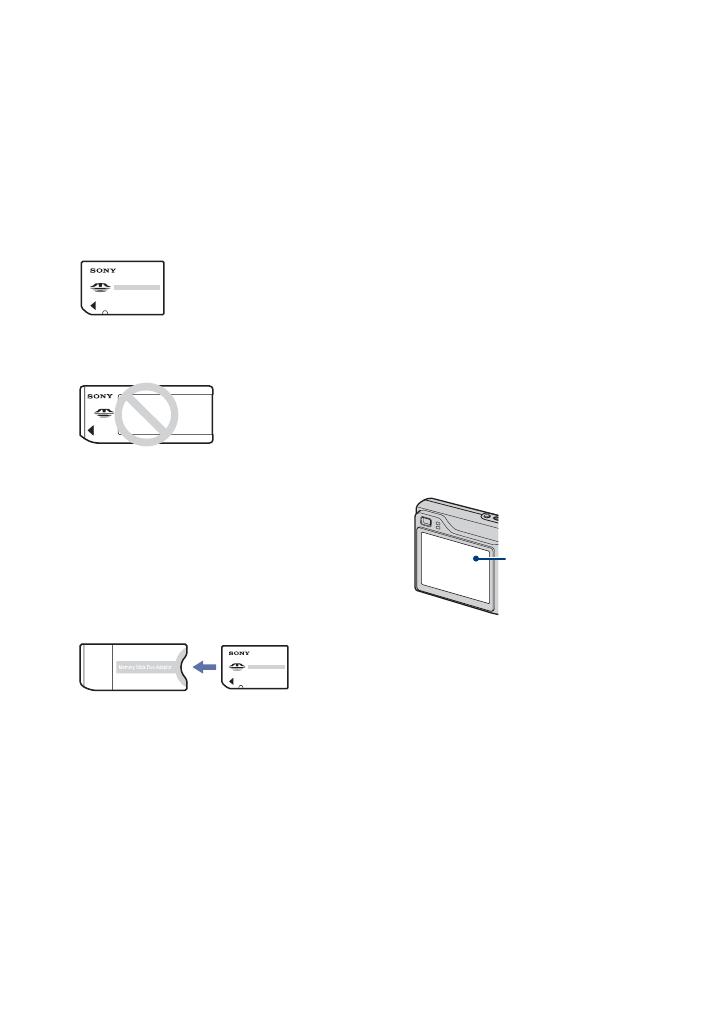
Types of “Memory Stick” that can be
used (not supplied)
The IC recording medium used by this
camera is a “Memory Stick Duo”. There are
two types of “Memory Stick”.
“Memory Stick Duo”: you can use a
“Memory Stick Duo” with your camera.
“Memory Stick”: you cannot use a
“Memory Stick” with your camera.
Other memory cards cannot be used.
For details on “Memory Stick Duo”, see
page 118.
When using a “Memory Stick Duo” with
“Memory Stick” compatible equipment
You can use the “Memory Stick Duo” by
inserting it into the Memory Stick Duo
Adaptor (not supplied).
Memory Stick Duo Adaptor
Notes on the battery pack
Charge the battery pack (supplied) before using
the camera for the first time.
The battery pack can be charged even if it is not
completely discharged. Also, even if the battery
pack is not fully charged, you can use the
partially charged capacity of the battery pack as
is.
If you do not intend to use the battery pack for a
long time, use up the existing charge and
remove it from your camera, then store it in a
cool, dry place. This is to maintain the battery
pack functions.
For details on the usable battery pack, see
page 120.
Carl Zeiss lens
This camera is equipped with a Carl Zeiss
lens which is capable of reproducing sharp
images with excellent contrast.
The lens for this camera has been produced
under a quality assurance system certified
by Carl Zeiss in accordance with the quality
standards of Carl Zeiss in Germany.
Notes on the LCD screen and lens
The LCD screen is manufactured using
extremely high-precision technology so over
99.99% of the pixels are operational for
effective use. However, there may be some tiny
black points and/or bright points (white, red,
blue or green in color) that constantly appear on
the LCD screen. These points are normal in the
manufacturing process and do not affect the
recording in any way.
Exposing the LCD screen or the lens to direct
sunlight for long periods may cause
malfunctions. Be careful when placing the
camera near a window or outdoors.
Do not press against the LCD screen. The screen
may be discolored and that may cause a
malfunction.
Images may trail across on the LCD screen in a
cold location. This is not a malfunction.
Be careful not to bump the movable lens, and be
careful not to apply force to it.
The pictures used in this Handbook
The photographs used as examples of pictures in
this Handbook are reproduced images, and are not
actual images shot using this camera.
Black, white, red, blue
or green points
3
Table of contents
Notes on using your camera .....................................................................2
Basic techniques for better images ...........................................................7
Focus – Focusing on a subject successfully..................................................... 7
Exposure – Adjusting the light intensity ............................................................ 9
Color – On the effects of lighting..................................................................... 10
Quality – On “image quality” and “image size” ............................................... 11
Flash – On using the flash ............................................................................... 13
Identifying parts .......................................................................................14
Indicators on the screen..........................................................................16
Changing the screen display...................................................................20
Using the internal memory ......................................................................22
Using the mode dial.................................................................................23
Shooting images easily (Auto Adjustment mode)....................................24
Shooting still images (Scene Selection) ..................................................28
Shooting with the manual exposure ........................................................31
Viewing images .......................................................................................32
Deleting images.......................................................................................34
Learning the various functions – HOME/Menu........................................36
Menu items..............................................................................................39
Shooting menu ........................................................................................40
Scene Selection: Selecting the scene selection
Image Size: Selecting the image size
Face Detection: Detecting the face of subject
REC Mode: Selecting the continuous shooting method
Color Mode: Changing the vividness of the image or adding special effects
ISO: Selecting a luminous sensitivity
EV: Adjusting the light intensity
Metering Mode: Selecting the metering mode
Focus: Changing the focus method
White Bal: Adjusting the color tones
Flash Level: Adjusting the amount of flash light
Red Eye Reduction: Reducing the red-eye phenomenon
Contrast: Adjusting the contrast
Sharpness: Adjusting the sharpness
Basic Operations
Using functions for shooting
4
Table of contents
SteadyShot: Selecting the anti-blur mode
SETUP: Selecting the shooting settings
Playing back images from the HOME screen............................. 52
(Single Image): Playing back a single image
(Index Display): Playing back a list of images
(Slide Show): Playing back a series of images
Viewing menu ..................................................................................... 55
(Delete): Deleting images
(Slide Show): Playing back a series of images
(Retouch): Retouching still images after shooting
(Protect): Preventing accidental erasure
: Adding a Print order mark
(Print): Printing images using a printer
(Rotate): Rotating a still image
(Select Folder): Selecting the folder for viewing images
Customizing the Manage Memory feature and the Settings
........ 60
Manage Memory.......................................................................... 62
Memory Tool — Memory Stick Tool ................................................. 62
Memory Tool — Internal Memory Tool............................................. 65
Format
Settings .......................................................................................... 66
Main settings — Main Settings 1...................................................... 66
Main settings — Main Settings 2...................................................... 67
Shooting Settings — Shooting Settings 1......................................... 69
Using functions for viewing
Customizing the settings
Format
Create REC. Folder
Change REC. Folder
Copy
Beep
Function Guide
Initialize
USB Connect
COMPONENT
Video Out
AF Illuminator
Grid Line
AF Mode
Digital Zoom
Conversion Lens
5
Table of contents
Shooting Settings — Shooting Settings 2.........................................72
Clock Settings...................................................................................73
Language Setting..............................................................................74
Viewing images on a TV..........................................................................75
Enjoying your Windows computer...........................................................78
Installing the software (supplied).............................................................80
Copying images to your computer...........................................................81
Viewing image files stored on a computer with your camera (using a
“Memory Stick Duo”) ...............................................................................87
Using the “Picture Motion Browser” (supplied)........................................88
Using the “Music Transfer” (supplied) .....................................................94
Using your Macintosh computer..............................................................95
How to print still images ..........................................................................97
Printing images directly using a PictBridge compliant printer..................98
Printing at a shop ..................................................................................101
Troubleshooting.....................................................................................103
Warning indicators and messages ........................................................114
To use your camera abroad — Power sources.....................................117
On the “Memory Stick” ..........................................................................118
On the battery pack...............................................................................120
On the battery charger ..........................................................................121
Viewing images on a TV
Using your computer
Printing still images
Troubleshooting
Others
Auto Orientation Auto Review
6
Table of contents
Index ..................................................................................................... 122
Index
7
Basic techniques for better images
When you press the shutter button halfway down, the camera adjusts the focus automatically
(Auto Focus). Remember to press the shutter button only halfway down.
To shoot a still image difficult to focus on
t [Focus] (page 46)
If the image looks blurred even after focusing, it may be because of camera shake.
t See
“Hints for preventing blur” (as follows).
Focus
Focusing on a subject successfully
Press the shutter
button fully down
suddenly.
Press the shutter
button halfway
down.
AE/AF lock indicator
flashing , lit/beeps
Then press the
shutter button
fully down.
Focus
Exposure
Color Quality
This section describes the basics so you can
enjoy your camera. It tells you how to use
various camera functions such as the mode
dial (page 23), the HOME screen (page 36),
the menus (page 38), and so on.
Flash
8
Basic techniques for better images
Hints for preventing blur
The camera moved accidentally when you took the picture. This is called “Camera shake.
On the other hand, if the subject moved when you took the picture, it is called “subject
blur.”
Camera shake
Cause
Your hands or body shake while you hold the
camera and press the shutter button, and the entire
screen is blurred.
What you can do to reduce the blurring
Use a tripod or place the camera on a flat, stable
surface to hold the camera steady.
Shoot with a 2-second delay self-timer and
stabilize your camera by holding your shooting
arm firmly at your side after pressing the shutter
button.
Subject blur
Cause
Even though the camera is steady, the subject
moves during the exposure so the subject looks
blurred when the shutter button is pressed.
What you can do to reduce the blurring
Select (High Sensitivity mode) or (Extra
High Sensitivity mode) in Scene Selection.
Select a higher ISO sensitivity to make the
shutter speed faster, and press the shutter button
before the subject moves.
Notes
The anti-blur function is enabled in the factory default settings so that the camera shake is reduced
automatically. However, this is not effective for subject blur.
Besides, camera shake and subject blur occur frequently under low-light or slow shutter speed
conditions, such as those encountered in Twilight or Twilight Portrait mode. In that case, shoot with
the above tips in mind.
9
Basic techniques for better images
You can create various images by adjusting the exposure and the ISO sensitivity. Exposure is
the amount of light that the camera will receive when you release the shutter.
Exposure
Adjusting the light intensity
Overexposure
= too much light
Whitish image
The exposure is automatically set to the
proper value in the auto adjustment mode.
However, you can adjust it manually using
the functions below.
Manual exposure:
Allows you to adjust the shutter speed and
aperture value manually (page 31).
Adjusting EV:
Allows you to adjust the exposure
determined by the camera (pages 21, 44).
Metering Mode:
Allows you to change the part of the
subject to be measured to determine the
exposure (page 45).
Correct exposure
Underexposure
= too little light
Darker image
Shutter speed = Length of time the camera receives
light
Aperture = Size of the opening allowing light to pass
through
ISO sensitivity (Recommended Exposure
Index)
=
Recording sensitivity
Exposure:
10
Basic techniques for better images
Adjusting ISO Sensitivity (Recommended Exposure Index)
ISO sensitivity is a speed rating for recording media that incorporates an image sensor that
receives light. Even when the exposure is the same, images differ depending on the ISO
sensitivity.
To adjust the ISO sensitivity, see page 44.
The apparent color of the subject is affected by the lighting conditions.
Example: The color of an image affected by light sources
The color tones are adjusted automatically in the auto adjustment mode.
However, you can adjust color tones manually with [White Bal] (page 48).
High ISO sensitivity
Records a bright image even when shooting in a dark location.
However, the image tends to become noisy.
Low ISO sensitivity
Records a smoother image.
However, when the exposure is insufficient, the image may become darker.
Color
On the effects of lighting
Weather/lighting
Daylight Cloudy Fluorescent Incandescent
Characteristics of
light
White (standard) Bluish Green-tinged Reddish
11
Basic techniques for better images
A digital image is made up of a collection of small dots called pixels.
If it contains a large number of pixels, the picture becomes large, it takes up more memory,
and the image is displayed in fine detail. “Image size” is shown by the number of pixels.
Although you cannot see the differences on the screen of the camera, the fine detail and data
processing time differ when the image is printed or displayed on a computer screen.
Description of the pixels and the image size
Selecting the image size for use (page 12)
Quality
On “image quality” and “image size”
1 Image size: 12M
4000 pixels × 3000 pixels = 12,000,000 pixels
2 Image size: VGA
640 pixels × 480 pixels = 307,200 pixels
Many pixels (Fine
image quality and
large file size)
Example: Printing in
up to A3+ size
Few pixels (Rough
image quality but
small file size)
Example: An attached
image to be sent by e-
mail
Pixels
Pixel
12
Basic techniques for better images
The default settings are marked with .
1) Images are recorded in 3:2 aspect ratio, same as photograph printing paper or postcards, etc.
2) Both edges of the image may be cut off when printing (page 111).
The larger the image size, the higher the image quality.
The more frames per second you played back, the smoother playback can be.
Image size Guidelines No. of images Printing
12M
(4000×3000)
For prints up to A3+ (13×19") Less
More
Fine
Rough
3:2
1)
(4000×2672)
Shoot in 3:2 aspect ratio
8M
(3264×2448)
For prints up to A3 (11×17")
5M
(2592×1944)
For prints up to A4 (8.5×11")
3M
(2048×1536)
For prints up to 10×15 cm
(4×6") or 13×18 cm (5×7")
VGA
(640×480)
Shoot at a small image size for
e-mail attachment
16:9
2)
(1920×1080)
Shoot in HDTV aspect ratio
Movie image size Frame/Second Usage guidelines
640(Fine) (640×480) Approx. 30 Shoot high quality movie for display on TV
640(Standard) (640×480) Approx. 17 Shoot standard quality movie for display on
TV
320 (320×240) Approx. 8 Shoot at a small size for email attachment
13
Basic techniques for better images
The eyes of the subject may come out red, or fuzzy white circular spots may appear when
using the flash. These phenomena can be reduced by taking the following steps.
The “Red-eye phenomenon”
This is caused by the reflection of flash light off the blood vessels of the retina of the subjects
eyes because the pupils of the subjects eyes are wide open in a dark place.
How can the “Red-eye phenomenon” be reduced?
Set [Red Eye Reduction] to [On] (page 49).
Select (High Sensitivity mode)* or (Extra High Sensitivity mode)* in Scene Selection (page 29).
(The flash is turned off automatically.)
When the eyes of the subject turns out red, correct the image with [Retouch] on the viewing menu
(page 55) or with the supplied software “Picture Motion Browser”.
The “White circular spots”
This is caused by particles (dust, pollen, etc.) in the air, which when they are close to the lens,
can be accentuated by the camera’s flash.
How can the “White circular spots” be reduced?
Light the room and shoot the subject without a flash.
Select (High Sensitivity mode)* or (Extra High Sensitivity mode)* in Scene Selection. (The flash
is turned off automatically.)
Flash
On using the flash
* Even though you selected (High Sensitivity mode) or (Extra High Sensitivity mode) in Scene
Selection, the shutter speed might be slower under low-light conditions, or in a dark place. In that case,
use a tripod or hold your shooting arm firmly at your side after pressing the shutter button.
Camera Eye
Retina
Camera
Subject
Particles (dust,
pollen, etc.) in
the air
14
Identifying parts
See the pages in parentheses for details of
operation.
A POWER button/POWER lamp
B Shutter button (24)
C Microphone
D Flash (26)
E AF illuminator (69)/Self-timer lamp
(27)
F Finder window
G Lens
A AE/AF lock lamp/Self-timer lamp
(green) (27)
B Flash charging lamp/Record lamp
(orange)
C Finder
D LCD screen (20)
E (Playback) button (32)
F MENU button (38)
G For shooting: Zoom (W/T) button (25)
For viewing: / (Playback zoom)
button/ (Index) button (32, 33)
H Hook for strap
I Battery/“Memory Stick Duo” cover
J Mode dial (23)
K Control button
Menu on: v/V/b/B/z (38)
Menu off: DISP/ / / (20, 26)
When the mode dial is set to M:
Shutter Speed/Aperture (31)
L HOME button (36)
2
3
4
5
6
7
15
Identifying parts
M “Memory Stick Duo” slot
N Battery insertion slot
O Access lamp
P Battery eject lever
Q Multi connector (bottom)
Used in the following situations:
Making a USB connection between the
camera and the computer.
Making a connection to audio/video input
jacks on a TV.
Making a connection to a PictBridge
compliant printer.
R Speaker (bottom)
S Tripod receptacle (bottom)
Use a tripod with a screw length of less than
5.5 mm (7/32 inch). You will be unable to
firmly secure the camera to tripods having
screws longer than 5.5 mm (7/32 inch), and
may damage the camera.
16
Indicators on the screen
Each time you press v (DISP) button, the
display changes (page 20).
See the pages in parentheses for details of
operation.
When shooting still images
When shooting movies
A
Display Indication
Battery remaining
E
Low battery warning (114)
Image size
(40)
Mode dial/Menu (Scene
Selection)
(28)
Mode dial (23)
White balance (48)
RETURN
RETURN
P
M
Recording mode (42)
Metering mode (45)
Face Detection (41)
SteadyShot
(51)
Vibration warning
Indicates vibration may
prevent you from shooting
clear images due to
insufficient lighting. Even if
the vibration warning
appears, you can still shoot
images. However, we
recommend that you turn on
the anti-blur function, using
the flash for better lighting
or using a tripod or other
means to stabilize the
camera (page 8).
Zoom scaling (
25, 70)
Color mode
(43)
Contrast (50)
Sharpness (50)
Display Indication
BRK
±1.0
17
Indicators on the screen
B
C
D
Display Indication
Manual exposure setting
mode (31)
z RETURN
z SET
Function guide for Manual
exposure (31)
1.0m Focus preset distance
(46)
z AE/AF lock (24)
Standby
REC
Standby a movie/Recording
a movie
ISO400 ISO number (44)
NR slow shutter
When the shutter speed
drops below a certain speed
in low light conditions, the
NR (Noise Reduction) slow
shutter function activates
automatically to reduce the
picture noise.
125 Shutter speed
F3.5 Aperture value
+2.0EV Exposure Value
(44)
00:00:12 Recording time
AF range finder frame
indicator
(46)
Macro (26)
Display Indication
Recording Media
Recording folder
(62)
This does not appear when
using internal memory.
96 Remaining number of
recordable images
00:00:00 Remaining recordable time
AF illuminator
(69)
Red-eye reduction (49)
Flash mode (26)
Flash charging
Conversion lens (71)
Display Indication
C:32:00 Self-diagnosis display
(114)
Self-timer (27)
Spot metering cross hair
(45)
AF range finder frame (46)
Histogram (20)
18
Indicators on the screen
When playing back still images
When playing back movies
A
B
Display Indication
Battery remaining
Image size
(40)
Protect (57)
VOL. Volume (32)
Print order (DPOF) mark
(101)
PictBridge connecting (99)
Zoom scaling (32)
PictBridge connecting
(100)
Do not disconnect the cable
for multi-use terminal while
the icon is displayed.
Display Indication
N Playback (32)
Playback bar
00:00:12 Counter
101-0012 Folder-file number
(59)
2007 1 1
9:30 AM
Recorded date/time of the
playback image
z STOP
z PLAY
Function guide for playing
image
BACK/
NEXT
Select images
V VOLUME Adjust volume
Histogram
(20)
appears when histogram
display is disabled.
19
Indicators on the screen
C
Display Indication
Playback Media
Playback folder
(59)
This does not appear when
using internal memory.
8/8 12/12 Image number/Number of
images recorded in selected
folder
Change folder
(59)
This does not appear when
using internal memory.
Metering mode (45)
Flash
White balance
(48)
C:32:00 Self-diagnosis display
(114)
ISO400 ISO number (44)
+2.0EV Exposure Value (44)
500 Shutter speed
F3.5 Aperture value
20
Changing the screen display
Each time you press the v (DISP) button,
the display changes as follows.
If you view images in bright outside light, adjust
the brightness of the LCD backlight up.
However, the battery power may decrease faster
under such condition.
The display becomes Histogram on
t
Indicators off
t Indicators on when connected
to a TV (page 75).
The histogram does not appear in the following
situations:
While shooting
When the menu is displayed.
When recording movies
During playback
When the menu is displayed.
In index mode
When you are using playback zoom.
When you are rotating still images.
During playback of movies
During image playback, you cannot turn the
LCD screen off.
A large difference in the histogram displayed
when shooting and during playback may occur
when:
The flash strobes.
The shutter speed is slow or fast.
The histogram may not appear for images
recorded using other cameras.
When you set the LCD screen to off, the digital
zoom does not function. When you select
(flash mode)/ (self-timer)/ (macro), the
image is displayed for about two seconds.
v (DISP) (Screen
display button) button
Brightness of LCD backlight up
Indicators off
Indicators on
Histogram display
(page 21)
Histogram on
During playback,
the image
information is
displayed.
LCD screen off
  • Page 1 1
  • Page 2 2
  • Page 3 3
  • Page 4 4
  • Page 5 5
  • Page 6 6
  • Page 7 7
  • Page 8 8
  • Page 9 9
  • Page 10 10
  • Page 11 11
  • Page 12 12
  • Page 13 13
  • Page 14 14
  • Page 15 15
  • Page 16 16
  • Page 17 17
  • Page 18 18
  • Page 19 19
  • Page 20 20
  • Page 21 21
  • Page 22 22
  • Page 23 23
  • Page 24 24
  • Page 25 25
  • Page 26 26
  • Page 27 27
  • Page 28 28
  • Page 29 29
  • Page 30 30
  • Page 31 31
  • Page 32 32
  • Page 33 33
  • Page 34 34
  • Page 35 35
  • Page 36 36
  • Page 37 37
  • Page 38 38
  • Page 39 39
  • Page 40 40
  • Page 41 41
  • Page 42 42
  • Page 43 43
  • Page 44 44
  • Page 45 45
  • Page 46 46
  • Page 47 47
  • Page 48 48
  • Page 49 49
  • Page 50 50
  • Page 51 51
  • Page 52 52
  • Page 53 53
  • Page 54 54
  • Page 55 55
  • Page 56 56
  • Page 57 57
  • Page 58 58
  • Page 59 59
  • Page 60 60
  • Page 61 61
  • Page 62 62
  • Page 63 63
  • Page 64 64
  • Page 65 65
  • Page 66 66
  • Page 67 67
  • Page 68 68
  • Page 69 69
  • Page 70 70
  • Page 71 71
  • Page 72 72
  • Page 73 73
  • Page 74 74
  • Page 75 75
  • Page 76 76
  • Page 77 77
  • Page 78 78
  • Page 79 79
  • Page 80 80
  • Page 81 81
  • Page 82 82
  • Page 83 83
  • Page 84 84
  • Page 85 85
  • Page 86 86
  • Page 87 87
  • Page 88 88
  • Page 89 89
  • Page 90 90
  • Page 91 91
  • Page 92 92
  • Page 93 93
  • Page 94 94
  • Page 95 95
  • Page 96 96
  • Page 97 97
  • Page 98 98
  • Page 99 99
  • Page 100 100
  • Page 101 101
  • Page 102 102
  • Page 103 103
  • Page 104 104
  • Page 105 105
  • Page 106 106
  • Page 107 107
  • Page 108 108
  • Page 109 109
  • Page 110 110
  • Page 111 111
  • Page 112 112
  • Page 113 113
  • Page 114 114
  • Page 115 115
  • Page 116 116
  • Page 117 117
  • Page 118 118
  • Page 119 119
  • Page 120 120
  • Page 121 121
  • Page 122 122
  • Page 123 123
  • Page 124 124
  • Page 125 125
  • Page 126 126

Sony Cyber-shot DSC-W200 Owner's manual

Category
Bridge cameras
Type
Owner's manual

Ask a question and I''ll find the answer in the document

Finding information in a document is now easier with AI