iHome IP87:
The iHome IP87 is a versatile and convenient device that combines a clock, radio, and charging station for your iPhone or iPod. With its sleek design and user-friendly features, the iHome IP87 is the perfect addition to any bedroom or office.
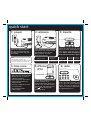
One of the standout features of the iHome IP87 is its dual alarm system. You can set two separate alarms to different wake-up times, sources, and frequencies, ensuring that you wake up on time every day. The iHome IP87 also includes a sleep timer, so you can drift off to sleep to your favorite music or radio station and have it automatically turn off after a set amount of time.
iHome IP87:
The iHome IP87 is a versatile and convenient device that combines a clock, radio, and charging station for your iPhone or iPod. With its sleek design and user-friendly features, the iHome IP87 is the perfect addition to any bedroom or office.
One of the standout features of the iHome IP87 is its dual alarm system. You can set two separate alarms to different wake-up times, sources, and frequencies, ensuring that you wake up on time every day. The iHome IP87 also includes a sleep timer, so you can drift off to sleep to your favorite music or radio station and have it automatically turn off after a set amount of time.


-
 1
1
-
 2
2
-
 3
3
-
 4
4
-
 5
5
-
 6
6
-
 7
7
-
 8
8
-
 9
9
-
 10
10
-
 11
11
-
 12
12
-
 13
13


iHome IP87:
The iHome IP87 is a versatile and convenient device that combines a clock, radio, and charging station for your iPhone or iPod. With its sleek design and user-friendly features, the iHome IP87 is the perfect addition to any bedroom or office.
One of the standout features of the iHome IP87 is its dual alarm system. You can set two separate alarms to different wake-up times, sources, and frequencies, ensuring that you wake up on time every day. The iHome IP87 also includes a sleep timer, so you can drift off to sleep to your favorite music or radio station and have it automatically turn off after a set amount of time.
Ask a question and I''ll find the answer in the document
Finding information in a document is now easier with AI