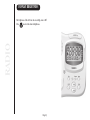
Uniden XSR917/918 User manual
- Category
- Telephone handsets
- Type
- User manual
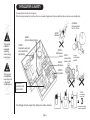
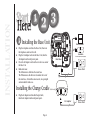
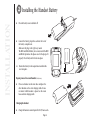
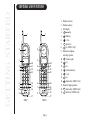
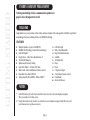
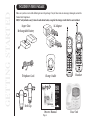
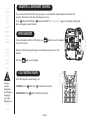
Uniden XSR917/918 is a feature-rich cordless phone system that offers a wide range of capabilities to enhance your communication experience. With its caller ID feature, you can easily identify incoming callers and decide whether to answer or not. The 10 number memory allows you to store frequently called numbers for quick and easy dialing, saving you time and effort. The Rocketdial feature provides one-touch dialing for your most important contacts, making it even easier to stay connected with the people who matter most.
Uniden XSR917/918 is a feature-rich cordless phone system that offers a wide range of capabilities to enhance your communication experience. With its caller ID feature, you can easily identify incoming callers and decide whether to answer or not. The 10 number memory allows you to store frequently called numbers for quick and easy dialing, saving you time and effort. The Rocketdial feature provides one-touch dialing for your most important contacts, making it even easier to stay connected with the people who matter most.


-
 1
1
-
 2
2
-
 3
3
-
 4
4
-
 5
5
-
 6
6
-
 7
7
-
 8
8
-
 9
9
-
 10
10
-
 11
11
-
 12
12
-
 13
13
-
 14
14
-
 15
15
-
 16
16
-
 17
17
-
 18
18
-
 19
19
-
 20
20
-
 21
21
-
 22
22
-
 23
23
-
 24
24
-
 25
25
-
 26
26
-
 27
27
-
 28
28
-
 29
29
-
 30
30
-
 31
31
-
 32
32
-
 33
33
-
 34
34
-
 35
35
-
 36
36


Uniden XSR917/918 User manual
- Category
- Telephone handsets
- Type
- User manual
Uniden XSR917/918 is a feature-rich cordless phone system that offers a wide range of capabilities to enhance your communication experience. With its caller ID feature, you can easily identify incoming callers and decide whether to answer or not. The 10 number memory allows you to store frequently called numbers for quick and easy dialing, saving you time and effort. The Rocketdial feature provides one-touch dialing for your most important contacts, making it even easier to stay connected with the people who matter most.
Ask a question and I''ll find the answer in the document
Finding information in a document is now easier with AI
Related papers
-
Uniden 986-2 User manual
-
-
-
-
-
-
-
-
-
Other documents
-
Aseptico Wake-up Battery Owner's manual
-
PyleHome Vintage PRT45 Owner's manual
-
GE 27980GE3 User manual
-
Panasonic KX-TCC902-W User manual
-
-
Sony SCT-ID10 User manual
-
-
-
Technicolor - Thomson 29297 User manual
-
 Conairphone CID400 Owner's manual
