Xerox ColorQube 9301 User manual

Category
Multifunctionals
Type
User manual

This manual is also suitable for

Xerox
®
ColorQube
®
9301 / 9302 / 9303 Xerox ConnectKey Controller
User Guide
Guide d'utilisation
Xerox ColorQube
9301 / 9302 / 9303
Multifunction Printer
Imprimante multifonction
Italiano Guida per l’utente
Deutsch Benutzerhandbuch
Español Guía del usuario
Português Guia do usuário
Nederlands Gebruikershandleiding
Svenska Användarhandbok
Dansk Betjeningsvejledning
Suomi Käyttöopas
Norsk Brukerhåndbok
Русский Руководство пользователя
Čeština Uživatelská příručka
Polski Przewodnik użytkownika
Magyar
Felhasználói útmutató
Türkçe
Kullanıcı Kılavuzu
Ελληνικά Εγχειρίδιο χρήστη
Română
Ghid de Utilizare
© 2013 Xerox Corporation. All rights reserved. Unpublished rights reserved under the copyright laws of the United States. Contents of
this publication may not be reproduced in any form without permission of Xerox Corporation.
Copyright protection claimed includes all forms of matters of copyrightable materials and information now allowed by statutory or
judicial law or hereinafter granted, including without limitation, material generated from the software programs are displayed on the
screen such as styles, templates, icons, screen displays, looks, and so on.
XEROX
®
and XEROX and Design
®
, Phaser
®
, PhaserSMART
®
, PhaserMatch
®
, PhaserCal
®
, PhaserMeter™, CentreWare
®
, PagePack
®
,
eClick
®
, PrintingScout
®
, Walk-Up
®
, WorkCentre
®
, FreeFlow
®
, SMARTsend
®
, Scan to PC Desktop
®
, MeterAssistant
®
,
SuppliesAssistant
®
, Xerox Secure Access Unified ID System
®
, Xerox Extensible Interface Platform
®
, ColorQube
®
, Global Print Driver
®
,
and Mobile Express Driver
®
are trademarks of Xerox Corporation in the United States and/or other countries.
Adobe
®
Reader
®
, Adobe
®
Type Manager
®
, ATM™, Flash
®
, Macromedia
®
, Photoshop
®
, and PostScript
®
are trademarks of Adobe
Systems Incorporated in the United States and/or other countries.
Apple
®
, AppleTalk
®
, Bonjour
®
, EtherTalk
®
, Macintosh
®
, Mac OS
®
, and TrueType
®
are trademarks of Apple Inc., registered in the U.S.
and other countries.
HP-GL
®
, HP-UX
®
, and PCL
®
are trademarks of Hewlett-Packard Corporation in the United States and/or other countries.
IBM
®
and AIX
®
are trademarks of International Business Machines Corporation in the United States and/or other countries.
Microsoft
®
, Windows Vista
®
, Windows
®
, and Windows Server
®
are trademarks of Microsoft Corporation in the United States and
other countries.
Novell
®
, NetWare
®
, NDPS
®
, NDS
®
, IPX™, and Novell Distributed Print Servicesô are trademarks of Novell, Inc. in the United States
and other countries.
SGI
®
and IRIX
®
are trademarks of Silicon Graphics International Corp. or its subsidiaries in the United States and/or other countries.
Sun, Sun Microsystems, and Solaris are trademarks or registered trademarks of Oracle and/or its affiliates in the United States and
other countries.
UNIX
®
is a trademark in the United States and other countries, licensed exclusively through X/ Open Company Limited.
Document Version 1.0: February 2013
ColorQube 9301/9302/9303 Multifunction Printer
User Guide
3
Contents
1Copy
Introduction . . . . . . . . . . . . . . . . . . . . . . . . . . . . . . . . . . . . . . . . . . . . . . . . . . . . . . . . . . . . . . . . . . . . . . . . . . . . . .8
Copy Options . . . . . . . . . . . . . . . . . . . . . . . . . . . . . . . . . . . . . . . . . . . . . . . . . . . . . . . . . . . . . . . . . . . . . . . . . . . . .9
Image Quality . . . . . . . . . . . . . . . . . . . . . . . . . . . . . . . . . . . . . . . . . . . . . . . . . . . . . . . . . . . . . . . . . . . . . . . . . . 15
Layout Adjustment . . . . . . . . . . . . . . . . . . . . . . . . . . . . . . . . . . . . . . . . . . . . . . . . . . . . . . . . . . . . . . . . . . . . . . 17
Output Format . . . . . . . . . . . . . . . . . . . . . . . . . . . . . . . . . . . . . . . . . . . . . . . . . . . . . . . . . . . . . . . . . . . . . . . . . . 20
Job Assembly . . . . . . . . . . . . . . . . . . . . . . . . . . . . . . . . . . . . . . . . . . . . . . . . . . . . . . . . . . . . . . . . . . . . . . . . . . . 28
Log In/Out . . . . . . . . . . . . . . . . . . . . . . . . . . . . . . . . . . . . . . . . . . . . . . . . . . . . . . . . . . . . . . . . . . . . . . . . . . . . . . 31
2 ID Card Copy
Introduction . . . . . . . . . . . . . . . . . . . . . . . . . . . . . . . . . . . . . . . . . . . . . . . . . . . . . . . . . . . . . . . . . . . . . . . . . . . . 34
ID Card Copy Options . . . . . . . . . . . . . . . . . . . . . . . . . . . . . . . . . . . . . . . . . . . . . . . . . . . . . . . . . . . . . . . . . . . 35
Image Quality . . . . . . . . . . . . . . . . . . . . . . . . . . . . . . . . . . . . . . . . . . . . . . . . . . . . . . . . . . . . . . . . . . . . . . . . . . 37
3 Print From
Introduction . . . . . . . . . . . . . . . . . . . . . . . . . . . . . . . . . . . . . . . . . . . . . . . . . . . . . . . . . . . . . . . . . . . . . . . . . . . . 40
Using Print From . . . . . . . . . . . . . . . . . . . . . . . . . . . . . . . . . . . . . . . . . . . . . . . . . . . . . . . . . . . . . . . . . . . . . . . . 41
Saving Jobs for use with Print From. . . . . . . . . . . . . . . . . . . . . . . . . . . . . . . . . . . . . . . . . . . . . . . . . . . . . . . 43
Log In/Out . . . . . . . . . . . . . . . . . . . . . . . . . . . . . . . . . . . . . . . . . . . . . . . . . . . . . . . . . . . . . . . . . . . . . . . . . . . . . . 46
4Scan To
Introduction . . . . . . . . . . . . . . . . . . . . . . . . . . . . . . . . . . . . . . . . . . . . . . . . . . . . . . . . . . . . . . . . . . . . . . . . . . . . 48
Scan To Using the Printer Address Book. . . . . . . . . . . . . . . . . . . . . . . . . . . . . . . . . . . . . . . . . . . . . . . . . . . 49
Scan To Using Favorites . . . . . . . . . . . . . . . . . . . . . . . . . . . . . . . . . . . . . . . . . . . . . . . . . . . . . . . . . . . . . . . . . 50
5Fax
Introduction . . . . . . . . . . . . . . . . . . . . . . . . . . . . . . . . . . . . . . . . . . . . . . . . . . . . . . . . . . . . . . . . . . . . . . . . . . . . 52
Dialing Options . . . . . . . . . . . . . . . . . . . . . . . . . . . . . . . . . . . . . . . . . . . . . . . . . . . . . . . . . . . . . . . . . . . . . . . . . 53
Fax . . . . . . . . . . . . . . . . . . . . . . . . . . . . . . . . . . . . . . . . . . . . . . . . . . . . . . . . . . . . . . . . . . . . . . . . . . . . . . . . . . . . . 56
Image Quality . . . . . . . . . . . . . . . . . . . . . . . . . . . . . . . . . . . . . . . . . . . . . . . . . . . . . . . . . . . . . . . . . . . . . . . . . . 58
Layout Adjustment . . . . . . . . . . . . . . . . . . . . . . . . . . . . . . . . . . . . . . . . . . . . . . . . . . . . . . . . . . . . . . . . . . . . . . 59
Fax Options . . . . . . . . . . . . . . . . . . . . . . . . . . . . . . . . . . . . . . . . . . . . . . . . . . . . . . . . . . . . . . . . . . . . . . . . . . . . . 61
Job Assembly . . . . . . . . . . . . . . . . . . . . . . . . . . . . . . . . . . . . . . . . . . . . . . . . . . . . . . . . . . . . . . . . . . . . . . . . . . . 67
Log In/Out . . . . . . . . . . . . . . . . . . . . . . . . . . . . . . . . . . . . . . . . . . . . . . . . . . . . . . . . . . . . . . . . . . . . . . . . . . . . . . 68
ColorQube 9301/9302/9303 Multifunction Printer
User Guide
4
6Fax from PC
Introduction . . . . . . . . . . . . . . . . . . . . . . . . . . . . . . . . . . . . . . . . . . . . . . . . . . . . . . . . . . . . . . . . . . . . . . . . . . . . 70
Faxing from a PC . . . . . . . . . . . . . . . . . . . . . . . . . . . . . . . . . . . . . . . . . . . . . . . . . . . . . . . . . . . . . . . . . . . . . . . . 71
Fax from PC Options. . . . . . . . . . . . . . . . . . . . . . . . . . . . . . . . . . . . . . . . . . . . . . . . . . . . . . . . . . . . . . . . . . . . . 72
7Email
Introduction . . . . . . . . . . . . . . . . . . . . . . . . . . . . . . . . . . . . . . . . . . . . . . . . . . . . . . . . . . . . . . . . . . . . . . . . . . . . 76
Email . . . . . . . . . . . . . . . . . . . . . . . . . . . . . . . . . . . . . . . . . . . . . . . . . . . . . . . . . . . . . . . . . . . . . . . . . . . . . . . . . . . 77
Advanced Settings . . . . . . . . . . . . . . . . . . . . . . . . . . . . . . . . . . . . . . . . . . . . . . . . . . . . . . . . . . . . . . . . . . . . . . 81
Layout Adjustment . . . . . . . . . . . . . . . . . . . . . . . . . . . . . . . . . . . . . . . . . . . . . . . . . . . . . . . . . . . . . . . . . . . . . . 84
Email Options . . . . . . . . . . . . . . . . . . . . . . . . . . . . . . . . . . . . . . . . . . . . . . . . . . . . . . . . . . . . . . . . . . . . . . . . . . . 86
Job Assembly . . . . . . . . . . . . . . . . . . . . . . . . . . . . . . . . . . . . . . . . . . . . . . . . . . . . . . . . . . . . . . . . . . . . . . . . . . . 88
Log In/Out . . . . . . . . . . . . . . . . . . . . . . . . . . . . . . . . . . . . . . . . . . . . . . . . . . . . . . . . . . . . . . . . . . . . . . . . . . . . . . 89
8Server Fax
Introduction . . . . . . . . . . . . . . . . . . . . . . . . . . . . . . . . . . . . . . . . . . . . . . . . . . . . . . . . . . . . . . . . . . . . . . . . . . . . 92
Dialing Options . . . . . . . . . . . . . . . . . . . . . . . . . . . . . . . . . . . . . . . . . . . . . . . . . . . . . . . . . . . . . . . . . . . . . . . . . 93
Server Fax Options . . . . . . . . . . . . . . . . . . . . . . . . . . . . . . . . . . . . . . . . . . . . . . . . . . . . . . . . . . . . . . . . . . . . . . 95
Image Quality . . . . . . . . . . . . . . . . . . . . . . . . . . . . . . . . . . . . . . . . . . . . . . . . . . . . . . . . . . . . . . . . . . . . . . . . . . 96
Layout Adjustment . . . . . . . . . . . . . . . . . . . . . . . . . . . . . . . . . . . . . . . . . . . . . . . . . . . . . . . . . . . . . . . . . . . . . . 97
Fax Options . . . . . . . . . . . . . . . . . . . . . . . . . . . . . . . . . . . . . . . . . . . . . . . . . . . . . . . . . . . . . . . . . . . . . . . . . . . . . 98
Job Assembly . . . . . . . . . . . . . . . . . . . . . . . . . . . . . . . . . . . . . . . . . . . . . . . . . . . . . . . . . . . . . . . . . . . . . . . . . . . 99
Log In/Out . . . . . . . . . . . . . . . . . . . . . . . . . . . . . . . . . . . . . . . . . . . . . . . . . . . . . . . . . . . . . . . . . . . . . . . . . . . . . 100
9 Workflow Scanning
Introduction . . . . . . . . . . . . . . . . . . . . . . . . . . . . . . . . . . . . . . . . . . . . . . . . . . . . . . . . . . . . . . . . . . . . . . . . . . . 102
Workflow Scanning Options. . . . . . . . . . . . . . . . . . . . . . . . . . . . . . . . . . . . . . . . . . . . . . . . . . . . . . . . . . . . . 104
Advanced Settings . . . . . . . . . . . . . . . . . . . . . . . . . . . . . . . . . . . . . . . . . . . . . . . . . . . . . . . . . . . . . . . . . . . . . 106
Layout Adjustment . . . . . . . . . . . . . . . . . . . . . . . . . . . . . . . . . . . . . . . . . . . . . . . . . . . . . . . . . . . . . . . . . . . . . 109
Filing Options . . . . . . . . . . . . . . . . . . . . . . . . . . . . . . . . . . . . . . . . . . . . . . . . . . . . . . . . . . . . . . . . . . . . . . . . . . 111
Job Assembly . . . . . . . . . . . . . . . . . . . . . . . . . . . . . . . . . . . . . . . . . . . . . . . . . . . . . . . . . . . . . . . . . . . . . . . . . . 113
Log In/Out . . . . . . . . . . . . . . . . . . . . . . . . . . . . . . . . . . . . . . . . . . . . . . . . . . . . . . . . . . . . . . . . . . . . . . . . . . . . . 122
10 USB Port
Introduction . . . . . . . . . . . . . . . . . . . . . . . . . . . . . . . . . . . . . . . . . . . . . . . . . . . . . . . . . . . . . . . . . . . . . . . . . . . 124
Scan to USB . . . . . . . . . . . . . . . . . . . . . . . . . . . . . . . . . . . . . . . . . . . . . . . . . . . . . . . . . . . . . . . . . . . . . . . . . . . 125
Print from USB . . . . . . . . . . . . . . . . . . . . . . . . . . . . . . . . . . . . . . . . . . . . . . . . . . . . . . . . . . . . . . . . . . . . . . . . . 126
Log In/Out . . . . . . . . . . . . . . . . . . . . . . . . . . . . . . . . . . . . . . . . . . . . . . . . . . . . . . . . . . . . . . . . . . . . . . . . . . . . . 127
ColorQube 9301/9302/9303 Multifunction Printer
User Guide
5
11 Internet Fax
Introduction . . . . . . . . . . . . . . . . . . . . . . . . . . . . . . . . . . . . . . . . . . . . . . . . . . . . . . . . . . . . . . . . . . . . . . . . . . . 130
Internet Fax . . . . . . . . . . . . . . . . . . . . . . . . . . . . . . . . . . . . . . . . . . . . . . . . . . . . . . . . . . . . . . . . . . . . . . . . . . . 131
Advanced Settings . . . . . . . . . . . . . . . . . . . . . . . . . . . . . . . . . . . . . . . . . . . . . . . . . . . . . . . . . . . . . . . . . . . . . 134
Layout Adjustment . . . . . . . . . . . . . . . . . . . . . . . . . . . . . . . . . . . . . . . . . . . . . . . . . . . . . . . . . . . . . . . . . . . . . 136
Internet Fax Options . . . . . . . . . . . . . . . . . . . . . . . . . . . . . . . . . . . . . . . . . . . . . . . . . . . . . . . . . . . . . . . . . . . 137
Job Assembly . . . . . . . . . . . . . . . . . . . . . . . . . . . . . . . . . . . . . . . . . . . . . . . . . . . . . . . . . . . . . . . . . . . . . . . . . . 139
Log In/Out . . . . . . . . . . . . . . . . . . . . . . . . . . . . . . . . . . . . . . . . . . . . . . . . . . . . . . . . . . . . . . . . . . . . . . . . . . . . . 140
12 Print
Introduction . . . . . . . . . . . . . . . . . . . . . . . . . . . . . . . . . . . . . . . . . . . . . . . . . . . . . . . . . . . . . . . . . . . . . . . . . . . 142
Wireless Configuration . . . . . . . . . . . . . . . . . . . . . . . . . . . . . . . . . . . . . . . . . . . . . . . . . . . . . . . . . . . . . . . . . 144
Printing Options. . . . . . . . . . . . . . . . . . . . . . . . . . . . . . . . . . . . . . . . . . . . . . . . . . . . . . . . . . . . . . . . . . . . . . . . 145
Image Options . . . . . . . . . . . . . . . . . . . . . . . . . . . . . . . . . . . . . . . . . . . . . . . . . . . . . . . . . . . . . . . . . . . . . . . . . 150
Document Options . . . . . . . . . . . . . . . . . . . . . . . . . . . . . . . . . . . . . . . . . . . . . . . . . . . . . . . . . . . . . . . . . . . . . 151
Advanced. . . . . . . . . . . . . . . . . . . . . . . . . . . . . . . . . . . . . . . . . . . . . . . . . . . . . . . . . . . . . . . . . . . . . . . . . . . . . . 155
13 CentreWare Internet Services
Introduction . . . . . . . . . . . . . . . . . . . . . . . . . . . . . . . . . . . . . . . . . . . . . . . . . . . . . . . . . . . . . . . . . . . . . . . . . . . 158
Accessing CentreWare Internet Services . . . . . . . . . . . . . . . . . . . . . . . . . . . . . . . . . . . . . . . . . . . . . . . . . 159
Status . . . . . . . . . . . . . . . . . . . . . . . . . . . . . . . . . . . . . . . . . . . . . . . . . . . . . . . . . . . . . . . . . . . . . . . . . . . . . . . . . 160
Jobs . . . . . . . . . . . . . . . . . . . . . . . . . . . . . . . . . . . . . . . . . . . . . . . . . . . . . . . . . . . . . . . . . . . . . . . . . . . . . . . . . . . 163
Print . . . . . . . . . . . . . . . . . . . . . . . . . . . . . . . . . . . . . . . . . . . . . . . . . . . . . . . . . . . . . . . . . . . . . . . . . . . . . . . . . . . 164
Scan. . . . . . . . . . . . . . . . . . . . . . . . . . . . . . . . . . . . . . . . . . . . . . . . . . . . . . . . . . . . . . . . . . . . . . . . . . . . . . . . . . . 165
Address Book . . . . . . . . . . . . . . . . . . . . . . . . . . . . . . . . . . . . . . . . . . . . . . . . . . . . . . . . . . . . . . . . . . . . . . . . . . 166
Properties. . . . . . . . . . . . . . . . . . . . . . . . . . . . . . . . . . . . . . . . . . . . . . . . . . . . . . . . . . . . . . . . . . . . . . . . . . . . . . 167
Support. . . . . . . . . . . . . . . . . . . . . . . . . . . . . . . . . . . . . . . . . . . . . . . . . . . . . . . . . . . . . . . . . . . . . . . . . . . . . . . . 168
Help . . . . . . . . . . . . . . . . . . . . . . . . . . . . . . . . . . . . . . . . . . . . . . . . . . . . . . . . . . . . . . . . . . . . . . . . . . . . . . . . . . . 169
14 Paper and Media
Introduction . . . . . . . . . . . . . . . . . . . . . . . . . . . . . . . . . . . . . . . . . . . . . . . . . . . . . . . . . . . . . . . . . . . . . . . . . . . 172
Trays 1 and 2 . . . . . . . . . . . . . . . . . . . . . . . . . . . . . . . . . . . . . . . . . . . . . . . . . . . . . . . . . . . . . . . . . . . . . . . . . . 173
Tray 3 . . . . . . . . . . . . . . . . . . . . . . . . . . . . . . . . . . . . . . . . . . . . . . . . . . . . . . . . . . . . . . . . . . . . . . . . . . . . . . . . . 175
Tray 4 . . . . . . . . . . . . . . . . . . . . . . . . . . . . . . . . . . . . . . . . . . . . . . . . . . . . . . . . . . . . . . . . . . . . . . . . . . . . . . . . . 176
Tray 5 . . . . . . . . . . . . . . . . . . . . . . . . . . . . . . . . . . . . . . . . . . . . . . . . . . . . . . . . . . . . . . . . . . . . . . . . . . . . . . . . . 178
Tray 6 . . . . . . . . . . . . . . . . . . . . . . . . . . . . . . . . . . . . . . . . . . . . . . . . . . . . . . . . . . . . . . . . . . . . . . . . . . . . . . . . . 179
Media Types . . . . . . . . . . . . . . . . . . . . . . . . . . . . . . . . . . . . . . . . . . . . . . . . . . . . . . . . . . . . . . . . . . . . . . . . . . . 181
Storage and Handling . . . . . . . . . . . . . . . . . . . . . . . . . . . . . . . . . . . . . . . . . . . . . . . . . . . . . . . . . . . . . . . . . . 185
ColorQube 9301/9302/9303 Multifunction Printer
User Guide
6
15 Machine and Job Status
Introduction . . . . . . . . . . . . . . . . . . . . . . . . . . . . . . . . . . . . . . . . . . . . . . . . . . . . . . . . . . . . . . . . . . . . . . . . . . . 188
Job Status . . . . . . . . . . . . . . . . . . . . . . . . . . . . . . . . . . . . . . . . . . . . . . . . . . . . . . . . . . . . . . . . . . . . . . . . . . . . . 189
Machine Status . . . . . . . . . . . . . . . . . . . . . . . . . . . . . . . . . . . . . . . . . . . . . . . . . . . . . . . . . . . . . . . . . . . . . . . . 193
16 Administration and Accounting
Tools . . . . . . . . . . . . . . . . . . . . . . . . . . . . . . . . . . . . . . . . . . . . . . . . . . . . . . . . . . . . . . . . . . . . . . . . . . . . . . . . . . 198
Device Settings. . . . . . . . . . . . . . . . . . . . . . . . . . . . . . . . . . . . . . . . . . . . . . . . . . . . . . . . . . . . . . . . . . . . . . . . . 199
Service Settings . . . . . . . . . . . . . . . . . . . . . . . . . . . . . . . . . . . . . . . . . . . . . . . . . . . . . . . . . . . . . . . . . . . . . . . . 209
Network Settings . . . . . . . . . . . . . . . . . . . . . . . . . . . . . . . . . . . . . . . . . . . . . . . . . . . . . . . . . . . . . . . . . . . . . . . 217
Accounting Settings . . . . . . . . . . . . . . . . . . . . . . . . . . . . . . . . . . . . . . . . . . . . . . . . . . . . . . . . . . . . . . . . . . . . 218
Security Settings . . . . . . . . . . . . . . . . . . . . . . . . . . . . . . . . . . . . . . . . . . . . . . . . . . . . . . . . . . . . . . . . . . . . . . . 220
Troubleshooting. . . . . . . . . . . . . . . . . . . . . . . . . . . . . . . . . . . . . . . . . . . . . . . . . . . . . . . . . . . . . . . . . . . . . . . . 222
17 Safety and Regulation
Notices and Safety . . . . . . . . . . . . . . . . . . . . . . . . . . . . . . . . . . . . . . . . . . . . . . . . . . . . . . . . . . . . . . . . . . . . . 226
Safety Labels and Symbols. . . . . . . . . . . . . . . . . . . . . . . . . . . . . . . . . . . . . . . . . . . . . . . . . . . . . . . . . . . . . . 227
Operational Safety Information . . . . . . . . . . . . . . . . . . . . . . . . . . . . . . . . . . . . . . . . . . . . . . . . . . . . . . . . . 228
Basic Regulations . . . . . . . . . . . . . . . . . . . . . . . . . . . . . . . . . . . . . . . . . . . . . . . . . . . . . . . . . . . . . . . . . . . . . . 232
Copy Regulations . . . . . . . . . . . . . . . . . . . . . . . . . . . . . . . . . . . . . . . . . . . . . . . . . . . . . . . . . . . . . . . . . . . . . . 234
Fax Regulations . . . . . . . . . . . . . . . . . . . . . . . . . . . . . . . . . . . . . . . . . . . . . . . . . . . . . . . . . . . . . . . . . . . . . . . . 237
Material Safety Data . . . . . . . . . . . . . . . . . . . . . . . . . . . . . . . . . . . . . . . . . . . . . . . . . . . . . . . . . . . . . . . . . . . 240
Product Recycling and Disposal . . . . . . . . . . . . . . . . . . . . . . . . . . . . . . . . . . . . . . . . . . . . . . . . . . . . . . . . . 241
Energy Program Compliance . . . . . . . . . . . . . . . . . . . . . . . . . . . . . . . . . . . . . . . . . . . . . . . . . . . . . . . . . . . . 243
Environmental Health and Safety Contact Information . . . . . . . . . . . . . . . . . . . . . . . . . . . . . . . . . . . 244
18 General Care and Troubleshooting
Power Options . . . . . . . . . . . . . . . . . . . . . . . . . . . . . . . . . . . . . . . . . . . . . . . . . . . . . . . . . . . . . . . . . . . . . . . . . 246
General Care . . . . . . . . . . . . . . . . . . . . . . . . . . . . . . . . . . . . . . . . . . . . . . . . . . . . . . . . . . . . . . . . . . . . . . . . . . . 248
Troubleshooting. . . . . . . . . . . . . . . . . . . . . . . . . . . . . . . . . . . . . . . . . . . . . . . . . . . . . . . . . . . . . . . . . . . . . . . . 253
Further Assistance. . . . . . . . . . . . . . . . . . . . . . . . . . . . . . . . . . . . . . . . . . . . . . . . . . . . . . . . . . . . . . . . . . . . . . 261
ColorQube 9301/9302/9303 Multifunction Printer
User Guide
7
1
Copy
This chapter includes:
Introduction on page 8
Copy Options on page 9
Image Quality on page 15
Layout Adjustment on page 17
Output Format on page 20
Job Assembly on page 28
Log In/Out on page 31
Introduction
ColorQube 9301/9302/9303 Multifunction Printer
User Guide
8
Introduction
This guide describes the copying features
of the printer, including options for Output
Color, Reduce/Enlarge, 2-Sided Copying,
Layout Adjustment, Image Quality, Output
Format, Job Assembly, and other copy
functions.
Copy is a standard feature and is selected
by pressing the Services Home button and
touching Copy.
When Co
py is selected, the printer scans
the originals and stores the images. It then prints the images, based on the selections made.
Most feature screens include these buttons to co
nfirm or cancel the choices.
Ca
ncel resets the screen and returns to the previous screen.
OK
saves the selections made and returns to the previous screen.
Close closes
the screen and returns to the previous screen.
Instructions for making a copy and using
the basic features are provided in
ColorQube 9301/9302/9303 Multifunction Printer How To Sheets. If Authentication or Accounting is
enabled
on the printer, you may have to type login details to access the features. Refer to Log In/Out
on page 31.
Copy Options
ColorQube 9301/9302/9303 Multifunction Printer
User Guide
9
Copy Options
The Copy tab includes basic copying
selections such as Output Color,
Reduce / Enlarge, Paper Supply,
2-Sided Copying, and Copy Output.
1
Output Color
The Output Color options include
selections to automatically detect and
match the color of your original or produce
monotone, full color, or a single color
output from your original automatically. Touch More to access the following options:
Au
to Detect selects output that matches your original.
Bl
ack & White selects monotone output regardless of the color of your original.
Co
lor selects color output from your original.
Si
ngle Color selects a single color output regardless of the color of your original.
Reduce / Enlarge
A variety of options are available on your printer to enable you to reduce or enlarge the output from
your original. These options include selecting a specific ratio, either proportionately or independently,
and choosing from a selection of predefined preset buttons. For convenience, easy access to ratio
selection can be found on the Copy tab in the Reduce / Enlarge area. Use More to access all the
options.
You can enlarge or reduce images placed on the
document glass by any ratio 25%–400%. Images
from originals fed through the automatic document feeder enlarge or reduce by any ratio 25%–200%.
•Use the - /
+ buttons on the Copy screen to select the required reduction or enlargement
percentage.
Alternatively, select the ra
tio button and use the numeric keypad to type the ratio required.
To have your output image be the same size as your original, set the ratio window to 100%.
Proportional %
Selections made on this screen reduce or enlarge the image by the same ratio in both directions so that
the image resizes, but the proportions remain the same.
Select
and use the numeric keypad or the arrow buttons to enter the ratio required.
•Use the P
resets (X-Y%) buttons to select 100%, Auto %, or commonly used ratios defined by your
administrator. The selected proportional ratios in percentages appear next to the button, together
with an example application.
When Au
to % is selected, the printer chooses the best ratio to reduce or enlarge the original onto
the selected paper size. Specify a paper tray before using this option.
Copy Options
ColorQube 9301/9302/9303 Multifunction Printer
User Guide
10
Independent %
This selection enables you to set different reduction or enlargement ratios for the X (width) and the
Y (height) of the image. This produces a distor
ted copy of the original.
Select the resize button
and use the numeric keypad or the arrow buttons to enter the
Width - X% and Le
ngth - Y% ratios required.
•Use the Pre
sets (X-Y%) buttons to select 100%/100%, Auto Independent X-Y% or commonly used
ratios set up by your administrator. The selected X and Y ratios in percentages are shown next to
the button, together with an example application.
Use 10
0%/100% to produce an image the same size as your original.
Auto Independent X-Y% automatic
ally fits the image of your original onto the paper you select.
The reduction or enlargement is not proportional, and the printer distorts the image to fit onto the
paper. Specify a paper tray before you use this option.
Auto Center
This option can be selected with either the Proportional or Independent options to position the image
in the center of the paper selected.
Paper Supply
On the Paper Supply section of the Copy tab, you can select a paper tray, the paper size required, or
Automatically Select. Use More to access all the options.
Au
tomatically Select automatically selects the appropriate paper size for each original, based on
the size of the original and any directly selected magnification ratios.
Alternatively, you can select a paper tray that contains
the size and type of paper you require. The
size and type of media loaded in each tray is displayed.
When Mor
e is selected, the Paper Supply screen is displayed showing all the trays and the confirmed
size and type of media loaded in each tray.
A user can select a tray to use from this list. The chosen tray is highlighted in blue.
If the Auto Tray Switching feature is enabled and the same size and type of media is loaded in
mo
re than one tray, the printer automatically switches from one tray to another when media in
the active tray runs out.
2-Sided Copying
The printer provides options to make 1-sided or 2-sided copies from 1-sided or 2-sided originals, using
either the automatic document feeder or the document glass. The options are:
1>
1-Sided Use this option if the originals are printed on one side and you want 1-sided copies.
1>
2-Sided: Use this option if the originals are printed on one side and you want 2-sided copies.
You can also press the Rotate Side 2 button to have the second page rotated 180
o
.
2>
2-Sided: Use this option if you want to make 2-sided copies from 2-sided originals. You can also
press the Rotate Side 2 button to have the second page rotated 180
o
.
2>
1-Sided: Use this option to make 1-sided copies from 2-sided originals.
Note: If using the document glass to scan originals, the printer displ
ays a message when ready to
scan side 2.
Copy Options
ColorQube 9301/9302/9303 Multifunction Printer
User Guide
11
Copy Output
The most commonly used Copy Output options are selected directly from the Copy tab. The options
available are dependent on the finishing device and kits installed. Refer to
Finishing Devices on
page 13.
Collated sorts the copies into sets 1,2,3 1,2,3 1,2,3.
1 Staple (Portrait) staples in one of the short edge corners, depending on how the originals are
loaded.
1 Staple (Landscape) staples in one of the long edge corners, depending on how the originals are
loaded.
Folding a new window opens providing access to the folding options. Refer to Folding on page 12.
•Use More to access the following additional output options:
Uncollated sorts the copies into stacks 1,1,1 2,2,2 3,3,3.
Staple: The stapling options available are dependent on the finishing device available and
the configuration setup. For information about the available finishing devices, refer to
Finishing Devices on page 13.
Off: When staples are not needed, use this option.
1 Staple: When this option is selected, a single staple is positioned in the top left corner
of the output.
2 Staples: When this option is selected, two staples are positioned parallel to the left or
top edge of the copies.
Multi-Staple: When this option is selected, depending on the size of the copy paper,
three or four staples will be positioned parallel to the left edge of the copies. For
example:
4 Staples = A4 LEF, A3, 8.5 x 11 in. LEF, 11 x 17 in., 8 x 10 in. LEF.
3 Staples = 8 x 10 in. SEF, 8.5 x 11 in. SEF, 8.5 x 5.5 in. LEF, A4 SEF, A5 LEF,
8.5
x 14 in. SEF, B5 SEF.
Note: SEF is Short Edge Feed, and LEF is Long Edge Feed.
Use the Original Orientation option to select the orientation of the originals being
scanned. Select Portrait Originals or Landscape Originals or Upright Images or
Sideways Images.
Hole Punching: If the printer is equipped with one of the optional Hole Punch kits, 2
Hole, 3 Hole, 4 Hole, Swedish 4 Hole, or 2 Hole Legal Punch is available.
Hole punching can be selected only for A4 LEF, Legal SEF, and A3 (8.5 x 11 in. LEF,
Legal SEF, and 11
x 17 in. SEF) paper; and it can be combined with a stapling
option, if required.
Each sheet is hole punched individually so there is no limit to the number of pages
in the set.
Use the Paper Supply option to select the output media required.
Copy Options
ColorQube 9301/9302/9303 Multifunction Printer
User Guide
12
To achieve some of the staple options, load the copy paper as shown:
Paper Size and
Orientation
Output Required Original Orientation
Output Tray
Orientation
A4, 8.5 x 11 in. LEF LEF A4, 8.5 x 11 in.
Single Staple
Top L eft
A4, 8.5 x 11 in. SEF SEF A4, 8.5 x 11 in.
Single Staple
Top L eft
A4, 8.5 x 11 in. SEF SEF A4, 8.5 x 11 in.
Single Staple
Bottom Left
Note: For some selections, the printer rotates the image. If you are unable to staple, ensure that
Image Rotation is On in Tools. Refer to Administration and Accounting on page 195 for more
information.
Folding
If the optional Tri-fold Module is installed on the printer, A4 or 8.5 x 11 in. media in a weight range of
60 to 105 g/m² (16 lb to 28 lb) can be folded in a Single Fold, C-Fold, or Z-fold. Load originals SEF, and
select the
orientation of the originals.
Off: Use this option when no f
olding is required.
Singl
e Fold folds the page in half. Select an option:
Individually
is used to fold each page individually.
T
ogether as a Set is used to fold all the pages together to create a single booklet.
B
ooklet Staple is selected to fold and staple the output. This option is only available with the
Together as a Set option.
Ad
vanced Settings are used to select additional layout options:
Originals op
tions allow you to select if the originals are standard or already formatted
as a booklet.
Side 1
Image options are used to select if the image on the first side is printed inside or
outside the fold.
C
ollation is used to select collated or uncollated output.
Use the Original Orientation option to select the orient
ation of the originals being scanned. Select
Upright Images or Sideways Images. The images are rotated, as required.
Copy Options
ColorQube 9301/9302/9303 Multifunction Printer
User Guide
13
Finishing Devices
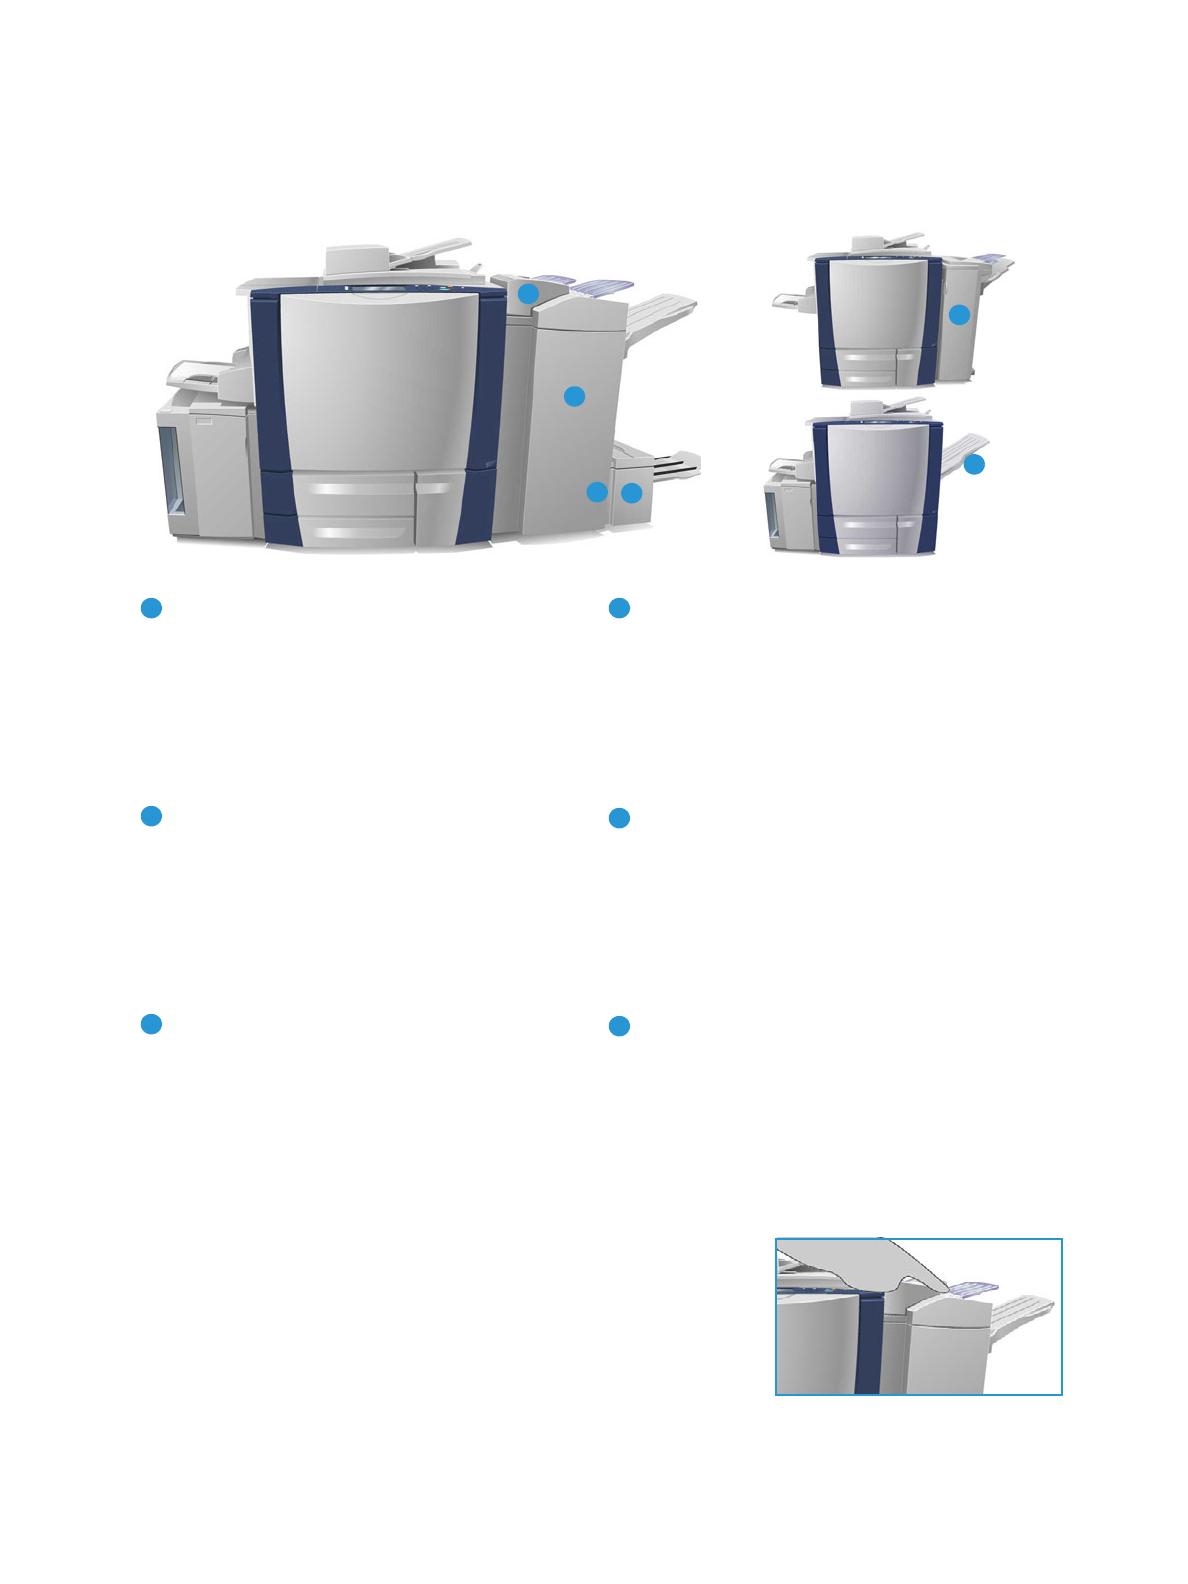
Your printer is equipped with one of the following finishing devices:
5
6
1
2
4
3
1
High Volume Finisher: The High Volume Finisher
has a comprehensive range of finishing options.
It collates, offsets, stacks, and staples your
output. The top tray can receive up to 250 sheets
of paper and the stacker tray up to 3000 sheets
of paper. This finisher can be fitted with the
optional 2, 3 or 4 Hole-Punch kit and the Tray 6
(Post Process Inserter) kit.
4
Tray 6 (Post Process Inserter): This optional
accessory is a feeder that sits on top of the
finisher unit. It enables pre-printed sheets
created by the printer to be inserted into sets.
The inserted sheets do not go through the copy
or print process in the printer. For more
information about using Tray 6 (Inserter), see
Tray 6 on page 177.
2
Booklet Maker: The High Volume Finisher is also
available with a Booklet Maker that enables
booklets to be folded and stapled. Folded sheets
and booklets are delivered to the booklet tray
that can hold 10–30 booklets, depending upon
the number of pages. If the flap on the right of
the tray is folded down, an unlimited number of
booklets can be collected in a suitable container.
5
Office Finisher: This finisher can receive up to
250 sheets of paper in the top tray and up to
2000 sheets of paper in the stacker tray. The
Office Finisher can be fitted with the optional 2,
3 or 4 Hole-Punch Kit.
3
Tri-fold Module: If you have a High Volume
Finisher with Booklet Maker, a Tri-fold module
can also be fitted. This enables your printer to
tri-fold booklets. With the Tri-fold module fitted,
the c
apacity of the finisher stacker tray is
reduced to 2000 sheets. Refer to Folding on
page 12 for information about the folding
options.
6
Offsetting Catch Tray (OCT): The offset catch
tray holds up to 500 sheets of 80 g/m² (20 lb)
pa
per and is on the right-hand side of the printer.
Note: Thick stacks of paper can be removed from your finisher
more easily by using the pause function. Press the button as
shown to lower the stacker tray to a more convenient height.
Then press the button again to return the stacker tray to normal
height. Alternatively, it automatically resets after 30 seconds.
Copy Options
ColorQube 9301/9302/9303 Multifunction Printer
User Guide
14
Convenience Stapler
This optional device is used to manually staple documents.
Docu
ments can be stapled straight or at an angle. The Convenience
Stapler can staple 2 sheets of 64 g/m² (18 lb) through 50 sheets of
80 g/m² (20 lb). The Staple Cartridge holds 5000 staples.
To use the Convenience Stapler, hold your documents face up
and slide the corner to staple into the stapler.
During stapling, the indicator light on the top of the stapler is lit.
The stapler automatically staples the documents.
Image Quality
ColorQube 9301/9302/9303 Multifunction Printer
User Guide
15
Image Quality
This section describes how to enhance the quality of the output and available options. Options enable
you to set the type of original; adjust the lightness, darkness, contrast, and sharpness of the image;
and customize the settings for color output.
Original Type
Use this option to define the type of the original being copied. Making the correct selection enhances
the quality of the output. The options are:
Content Type
Photo and Text is recommended for originals containing high-quality photographs and halftones.
Using this setting, the output will contain medium quality pictures though the sharpness of text
and line art is slightly reduced.
Text produces sharper edges and is recommended for text and line art.
Photo is used specifically for originals containing photos, magazine pictures, or continuous tones,
without any text or line art. Produces the best quality for photos but reduced quality text and line
art.
Map is used if the original is a map or contains intricate line art and text.
Newspaper / Magazine is used if the original is So a magazine or newspaper that contains
photographs or text.
How the Original was Produced
Printed is for originals that have come from a magazine, book, or newspaper, or that have been
printed on a large printing device.
Photocopied is for originals that are photocopies.
Photograph is for high-quality photo originals.
Inkjet is for originals that have been produced using an inkjet printer.
Solid Ink is for originals produced by a solid ink printing process, such as the output from this
printer.
Image Options
Use Image Options to change the appearance of the copy output. The options are:
Lighten / Darken provides manual control to adjust the lightness or darkness of the scanned
images. Move the indicator down to darken the image or up to lighten the image.
Sharpness provides manual control to adjust the sharpness of the scanned images. Move the
indicator up to sharpen the image. Move the indicator down to soften the scanned image.
Saturation controls the balance between vivid and pastel shades of the image. Move the
indicator toward Vivid for more saturated colors. Move the indicator toward Pastel for less
saturated colors.
Image Quality
ColorQube 9301/9302/9303 Multifunction Printer
User Guide
16
Image Enhancement
Image Enhancement provides options for improving the quality of the output by reducing the
background or adjusting the contrast. The options are:
Background Suppression enhances originals that have colored backgrounds by reducing or
eliminating the background on the output copy. This option is useful when the original is on
colored paper.
Select Auto Suppression to suppress the unwanted background automatically.
Select Off to turn off the Background Suppression feature, particularly when:
•The Darken adjustment does not produce a satisfactory output from light originals.
The original has a gray or colored border, such as a certificate.
You want to bring out the fine detail that was lost due to a dark edge when using bound
originals.
Contrast controls the image density on the output and compensates for an original that has too
much or too little contrast on the image.
Select Manual Contrast to set the level of contrast yourself. Move the indicator toward the
More setting to reproduce more vivid blacks and whites for sharper text and lines but less
detail in pictures. Move the indicator toward the Less setting to reproduce more detail in the
light and dark areas of the original.
Select Auto Contrast to set the contrast level automatically, depending on the original being
scanned.
Color Presets
Color Presets provide options for enhancing the quality of the color copies. Selecting a color preset
option optimizes all the image quality features. The options are:
Off removes any color presets.
Lively increases the depth of color of the copies.
Bright increases the lightness of the copies.
Warm brings out the red tones in the output.
Cool brings out the blue tones in the output.
Color Balance
Color Balance enables you to adjust the balance between individual colors and the overall amount of
color on the copies. The options are:
Normal leaves the color the same as the original.
Basic Color adjusts the individual density levels for each of the four process colors, yellow,
magenta, cyan, and black. Move the indicator up the scale for increased density and down the
scale for less density for each color.
Advanced Color adjusts the highlight, mid-tone, and shadow density levels in each of the four
process colors. Select a process color and move the indicator up the scale for increased density and
down the scale for less density for each of the three options.
Layout Adjustment
ColorQube 9301/9302/9303 Multifunction Printer
User Guide
17
Layout Adjustment
Using the Layout Adjustment features, you can change the appearance of the output image. This
includes shifting the image, producing a mirror image, deleting an area from any or all of the edges of
the original, and copying from book originals.
Original Orientation
Use to specify the orientation of the originals being scanned. The options are:
Portrait Originals refer to the image orientation on the original documents. Use this option to
select a Portrait image orientation. Originals can be fed in any direction.
Landscape Originals refers to the image orientation on the original documents. Use this option to
select a Landscape image orientation. Originals can be fed in any direction.
Upright Images refers to the direction the images are loaded in the automatic document feeder.
Use this option if the images are in the orientation, matching the image shown when loaded in
the automatic document feeder.
Sideways Images refers to the direction the images are loaded in the automatic document
feeder. Use this option if the images are in the orientation, matching the image shown when
loaded in the automatic document feeder.
Select OK to save the selections and exit.
Original Size
Original Size allows you to specify automatic size detection of the originals, mixed size originals, or the
specific size of the image scanned. The options are:
Auto Detect is the default setting and enables automatic size sensing. The size detected is
matched to standard-size paper.
Preset Scan Areas allows you to define the size of the original from a list of pre-set, standard
original sizes. You can view the list by using the scroll bar.
Custom Scan Area is used to mark a specific area for scanning. Measure the desired scan area on
the original and type the X- and Y-axes measurements in the fields provided. Only the area
specified is scanned.
Mixed Size Originals allows you to scan documents containing different size pages. The pages
must be the same width, like A4 LEF and A3 SEF (8.5
x 11 in. LEF and 11 x 17 in. SEF). Other
combinations are shown on the screen. The printer detects the size of the documents and can
produce the following output:
•If Auto Reduce/Enlarge and a specific Paper Supply is selected, all the images are reduced
or enlarged and copied onto the same size paper.
•If Auto Paper Supply is selected, the images are copied size for size, and a mix of paper sizes
is the output.
Layout Adjustment
ColorQube 9301/9302/9303 Multifunction Printer
User Guide
18
Book Copying
CAUTION: Do not close the automatic document feeder when scanning bound originals.
This feature enables you to specify page or pages of
a book are sca
nned. The book original is placed face
down on the document glass with the spine of the
book lined up with the marker on the rear edge of
the glass. Align the top of the bound original against
the rear edge of the document glass.
The printer identifies the size of the original during
scanning. If the pages have a black- or dark-colored
border, the printer assumes that the pages are
smaller than they really are. To overcome this, use
the Custom Scan Area feature in Original Size to
type the exact size of the page. Refer to Original Size on page 17.
Off is
used to clear any scan settings.
Both P
ages is used to scan both pages; the left page of the book scans first. Use the arrow
buttons to specify a value, 0–50 mm (0–2 in.), to be deleted from the center of the book in order
to delet
e the unwanted marks reproduced from the gutter of the book.
Left P
age Only is used to scan the left page only. Use the arrow buttons to specify a value,
0–25 mm (0–1 in.), to be deleted from the right side of the page in
order to delete the unwanted
marks reproduced from the gutter of the book.
Right P
age Only is used to scan the right page only. Use the arrow buttons to specify a value,
0–25 mm (0 –1 in.), to be deleted from the left side of the page in or
der to delete the unwanted
marks reproduced from the gutter of the book.
Select OK
to save the selections and exit.
Image Shift
Image Shift allows you to move the position of the image on the output page. The options are:
Au
to Center automatically centers the scanned image on the output paper. To work effectively,
the original should be smaller than the selected output media, or alternatively, the image should
be reduced.
Mar
gin Shift moves the image up / down or left / right on the page to give a bigger or smaller top
and left margin. Enter the shift required by selecting a field or use the arrow buttons.
This shift is entered in 1-mm (0.1 in.) increments up to 50 mm (2.0 in.).
When copying 2-sided, there are two options:
Adjust the margin of side two, independently of side one.
Create a mirror image of side one to provide a binding margin.
Pre
sets provide access to commonly used shift settings and are customized by the system
administrator by using Tools.
Layout Adjustment
ColorQube 9301/9302/9303 Multifunction Printer
User Guide
19
Edge Erase
Edge Erase enables you to specify how much of the image to erase around the edges of the document.
For example, you can remove the marks caused by punched holes or staples in the original.
Note: The printer applies an automatic edge deletion t
o all the printed output.
The options are:
All Edg
es is used to erase an equal amount from all the edges. Use the arrow buttons to adjust the
amount to be erased, 0–50 mm (0–2 in.). All marks or defects within the measurement set are
delet
ed.
Individual Edges ena
bles an individual value to be erased from each of the edges, on both the
first and second sides.
Use the arrow buttons to adjust the values for each edge, 0–50 mm (0–2 in.).
Mi
rror Side 1 can be selected to erase exactly the same amount on the Side 2 image, as selected
for Side 1.
Pre
sets provide access to commonly used erase settings and are customized by the system
administrator by using Tools.
Invert Image
Invert Image allows you to reverse the image or create a negative. This feature is useful for originals
that have a substantial amount of dark background or light text and images, saving on ink usage.
The options are:
Mir
ror Image reverses the original image, creating a mirror of the original.
Neg
ative Image converts the dark image areas to light and the light image areas to dark.
Output Format
ColorQube 9301/9302/9303 Multifunction Printer
User Guide
20
Output Format
The Output options allow you to manipulate the copied images and enhance the appearance and style
of the copy jobs. For example, you can add covers or annotations, create booklets, combine several
images onto one page, and interleave transparencies.
Booklet Creation
Booklet Creation enables the production of booklets from 1-sided or 2-sided originals. The printer scans
the originals and automatically reduces and arranges the images in the correct sequence on the
selected copy paper so that a booklet is created when the copy set is folded in half.
A cover can be inserted onto the booklet automatically
by
selecting the Special Pages option through the
Output Format tab.
If the printer is fitted with a High Volume Finisher with
Booklet Maker, you can use the Booklet Creation
feature to automatically produce folded and stapled
booklets. The following Booklet Maker specifications
apply:
Paper Sizes A3, 11 x 17 in., A4, 8.5 x 11 in.,
8.5 x 13 in. and 8.5 x 14 in.
All media must be SEF.
Booklet thickness:
For Folded and Stapled booklets, a maximum of 15 sheets of 80 g/m² (20 lb) or equivalent
thickness.
For example, you can have 13 sheets of 80 g/m² (20 lb) and a cover sheet of
16
0 g/m² (43 lb).
For Folded Only booklets, a maximum of 5 sheets of 80 g/m² (20 lb) or equivalent thickness.
F
or example, you can have 3 sheets of 80 g/m² (20 lb) and a cover sheet of 200 g/m² (53 lb).
To create a booklet:
1. Select Book
let Creation and On.
Note: Booklet Creation is not available if Au
to Paper is selected. Select an alternative Paper
Supply option.
2. Select the Pa
per Supply button and select the tray that contains the paper you want to use.
If using High Volume Finisher with Booklet Maker to
fold and staple the output, SEF Paper Supply
must be selected.
3. From the Original Input drop-down menu, select either 1
-Sided Originals or 2-Sided Originals,
according to the originals you are using.
4. If available, select either F
old Only or Fold and Staple, as required, and select OK to confirm the
selections.
5. Load the originals into the automatic
document feeder.
6. Use the Original Orien
tation option on the Layout Adjustment tab to select the correct feed and
image orientation for the originals. Refer to Original Orientation on page 17.
  • Page 1 1
  • Page 2 2
  • Page 3 3
  • Page 4 4
  • Page 5 5
  • Page 6 6
  • Page 7 7
  • Page 8 8
  • Page 9 9
  • Page 10 10
  • Page 11 11
  • Page 12 12
  • Page 13 13
  • Page 14 14
  • Page 15 15
  • Page 16 16
  • Page 17 17
  • Page 18 18
  • Page 19 19
  • Page 20 20
  • Page 21 21
  • Page 22 22
  • Page 23 23
  • Page 24 24
  • Page 25 25
  • Page 26 26
  • Page 27 27
  • Page 28 28
  • Page 29 29
  • Page 30 30
  • Page 31 31
  • Page 32 32
  • Page 33 33
  • Page 34 34
  • Page 35 35
  • Page 36 36
  • Page 37 37
  • Page 38 38
  • Page 39 39
  • Page 40 40
  • Page 41 41
  • Page 42 42
  • Page 43 43
  • Page 44 44
  • Page 45 45
  • Page 46 46
  • Page 47 47
  • Page 48 48
  • Page 49 49
  • Page 50 50
  • Page 51 51
  • Page 52 52
  • Page 53 53
  • Page 54 54
  • Page 55 55
  • Page 56 56
  • Page 57 57
  • Page 58 58
  • Page 59 59
  • Page 60 60
  • Page 61 61
  • Page 62 62
  • Page 63 63
  • Page 64 64
  • Page 65 65
  • Page 66 66
  • Page 67 67
  • Page 68 68
  • Page 69 69
  • Page 70 70
  • Page 71 71
  • Page 72 72
  • Page 73 73
  • Page 74 74
  • Page 75 75
  • Page 76 76
  • Page 77 77
  • Page 78 78
  • Page 79 79
  • Page 80 80
  • Page 81 81
  • Page 82 82
  • Page 83 83
  • Page 84 84
  • Page 85 85
  • Page 86 86
  • Page 87 87
  • Page 88 88
  • Page 89 89
  • Page 90 90
  • Page 91 91
  • Page 92 92
  • Page 93 93
  • Page 94 94
  • Page 95 95
  • Page 96 96
  • Page 97 97
  • Page 98 98
  • Page 99 99
  • Page 100 100
  • Page 101 101
  • Page 102 102
  • Page 103 103
  • Page 104 104
  • Page 105 105
  • Page 106 106
  • Page 107 107
  • Page 108 108
  • Page 109 109
  • Page 110 110
  • Page 111 111
  • Page 112 112
  • Page 113 113
  • Page 114 114
  • Page 115 115
  • Page 116 116
  • Page 117 117
  • Page 118 118
  • Page 119 119
  • Page 120 120
  • Page 121 121
  • Page 122 122
  • Page 123 123
  • Page 124 124
  • Page 125 125
  • Page 126 126
  • Page 127 127
  • Page 128 128
  • Page 129 129
  • Page 130 130
  • Page 131 131
  • Page 132 132
  • Page 133 133
  • Page 134 134
  • Page 135 135
  • Page 136 136
  • Page 137 137
  • Page 138 138
  • Page 139 139
  • Page 140 140
  • Page 141 141
  • Page 142 142
  • Page 143 143
  • Page 144 144
  • Page 145 145
  • Page 146 146
  • Page 147 147
  • Page 148 148
  • Page 149 149
  • Page 150 150
  • Page 151 151
  • Page 152 152
  • Page 153 153
  • Page 154 154
  • Page 155 155
  • Page 156 156
  • Page 157 157
  • Page 158 158
  • Page 159 159
  • Page 160 160
  • Page 161 161
  • Page 162 162
  • Page 163 163
  • Page 164 164
  • Page 165 165
  • Page 166 166
  • Page 167 167
  • Page 168 168
  • Page 169 169
  • Page 170 170
  • Page 171 171
  • Page 172 172
  • Page 173 173
  • Page 174 174
  • Page 175 175
  • Page 176 176
  • Page 177 177
  • Page 178 178
  • Page 179 179
  • Page 180 180
  • Page 181 181
  • Page 182 182
  • Page 183 183
  • Page 184 184
  • Page 185 185
  • Page 186 186
  • Page 187 187
  • Page 188 188
  • Page 189 189
  • Page 190 190
  • Page 191 191
  • Page 192 192
  • Page 193 193
  • Page 194 194
  • Page 195 195
  • Page 196 196
  • Page 197 197
  • Page 198 198
  • Page 199 199
  • Page 200 200
  • Page 201 201
  • Page 202 202
  • Page 203 203
  • Page 204 204
  • Page 205 205
  • Page 206 206
  • Page 207 207
  • Page 208 208
  • Page 209 209
  • Page 210 210
  • Page 211 211
  • Page 212 212
  • Page 213 213
  • Page 214 214
  • Page 215 215
  • Page 216 216
  • Page 217 217
  • Page 218 218
  • Page 219 219
  • Page 220 220
  • Page 221 221
  • Page 222 222
  • Page 223 223
  • Page 224 224
  • Page 225 225
  • Page 226 226
  • Page 227 227
  • Page 228 228
  • Page 229 229
  • Page 230 230
  • Page 231 231
  • Page 232 232
  • Page 233 233
  • Page 234 234
  • Page 235 235
  • Page 236 236
  • Page 237 237
  • Page 238 238
  • Page 239 239
  • Page 240 240
  • Page 241 241
  • Page 242 242
  • Page 243 243
  • Page 244 244
  • Page 245 245
  • Page 246 246
  • Page 247 247
  • Page 248 248
  • Page 249 249
  • Page 250 250
  • Page 251 251
  • Page 252 252
  • Page 253 253
  • Page 254 254
  • Page 255 255
  • Page 256 256
  • Page 257 257
  • Page 258 258
  • Page 259 259
  • Page 260 260

Xerox ColorQube 9301 User manual

Category
Multifunctionals
Type
User manual
This manual is also suitable for

Ask a question and I''ll find the answer in the document

Finding information in a document is now easier with AI