
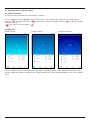
Fri.
11.29
with Heart Rate MonitorFitness Tracker
Fitness-Tracker mit Pulsmesser
F
RO
D
GB
Operating Instructions
Bedienungsanleitung
Mode d‘emploi
Instructiuni Utilizare
Betjeningsvejledning
DK
00178601


4
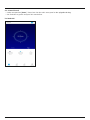
Fri.
11.29
Fit Track 3900
2
3
1
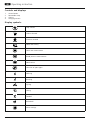
Fit Track 3900

G Operating instruction
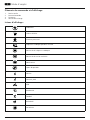
Controls and displays
1. Sensor button
2. Removable strap
3. Closure
4. Charging contact
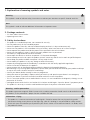
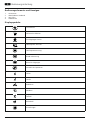
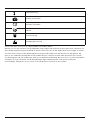
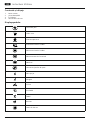
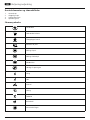
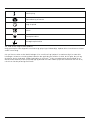
Display symbols:
Step counter
Calories burned
Distance covered
Heart rate activity
Heart rate measurement
Blood pressure measurement
Notications
Selection of sport types
Walking
Running
Cycling
Hiking
Football
Basketball
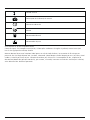
Alarm settings

Music Control
Camera remote trigger
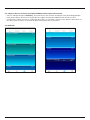
Selection of dial
Alarm
Drink reminder
Movement reminder
Thank you for choosing a Hama product.
Take your time and read the following instructions and information completely. Please keep these instructions in a
safe place for future reference.
Your new tness tracker is the ideal companion for a healthy lifestyle and will motivate you to be active throughout
the day. As well as displaying the time and date, it also collects data about the number of steps you have taken,
your heart rate and the calories you have burned. Wireless connection via
Bluetooth
®
to your smartphone enables
you to document the data on the associated app and therefore constantly keep track of your success. Check here
when you have reached your personal tness goal!

1. Explanation of warning symbols and notes
Warning
This symbol is used to indicate safety instructions or to draw your attention to specic hazards and risks.
Note
This symbol is used to indicate additional information or important notes.
2. Package contents
• "Fit Track 3900" tness tracker
• Operating Instructions
3. Safety instructions
• This product is intended for private, non-commercial use only.
• Use the product only for the intended purpose.
• Protect the product from dirt, moisture and overheating and use it in dry environments only.
• Do not use the product in the immediate vicinity of heaters, other heat sources or in direct sunlight.
• Do not operate the product outside the power limits specied in the technical data.
• Do not use the product in areas in which electronic products are not permitted.
• The battery is integrated and cannot be removed.
• Do not open the device or continue to operate it if it becomes damaged.
• Do not attempt to service or repair the product yourself. Leave any and all service work to qualied experts.
• Do not drop the product and do not expose it to any major shocks.
• Do not modify the product in any way. Doing so voids the warranty.
• Dispose of packaging material immediately in accordance with the locally applicable regulations.
• Do not incinerate the battery or the product.
• Do not tamper with or damage/heat/disassemble the batteries/rechargeable batteries.
• While driving a car or using sports equipment, do not allow yourself to be distracted by your product and keep
an eye on the trac situation and your surroundings.
• Consult your doctor before starting an exercise programme.
• Always be aware of your body’s response when you exercise, and speak to your doctor in an emergency.
• Consult your doctor if you have a medical condition and wish to use the product.
• This is a consumer product, not a medical device. Hence, it is not intended for the diagnosis, therapy, cure or
prevention of illnesses.
• Prolonged contact with the skin can lead to skin irritations and allergies. Consult a doctor if symptoms persist.
• This product is not a toy. It contains swallowable small parts that pose a suffocation hazard.
Warning - cardiac pacemakers
This product generates magnetic elds. Persons with a cardiac pacemaker should consult a doctor before using
this product, as the pacemaker's proper function could be affected.
Information - Flying
• This product is a constant transmitter of radio signals. Please be aware that carrying and using radio
transmitters during certain phases of the ight (e.g. take-off / landing) is not permitted for safety reasons.
• Check with your airline before you y whether your tness tracker can be taken on board. If in doubt, leave
the product at home.

Warning – rechargeable battery
•Only use suitable charging devices or USB connections to charge the product.
•Do not use defective chargers or USB ports and do not attempt to repair them.
•Do not overcharge the product or allow the battery to completely discharge.
•Avoid storing, charging and using in extreme temperatures and at extremely low atmospheric pressures (such
as at high altitudes).
4. First steps with the "Fit Track 3900" fitness tracker
4.1 Charging
• Charge your tness tracker fully before using it for the rst time.
• Connect the tness tracker's charging contact [4] to a free USB port on your computer or a USB charger.
• To do this, consult the operating instructions for the USB charger you are using.
Note
• The charging time for a full battery charge is around 120 minutes. As soon as the battery shown in the
display is fully charged, the charging process is complete and you can disconnect the tness tracker.
4.2 Putting and switching on
• Place the tness tracker around your wrist and fasten it using the closure.
• Hold the sensor button [1] down for 3 seconds to start the tness tracker.
Note
• The position on your wrist does not matter for the tness tracker's function.
• The tness tracker can be worn on either wrist. It is also possible to attach it both above and below the wrist.
4.3 Power Off
• To switch the tness tracker off, switch to menu item [Function] and then in the sub-menu go to the item
[Power Off]. Then press the sensor button [1] for 3 seconds.
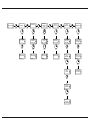
4.4 Operation - Menu structure
• Press the sensor button [1] to activate the start screen and to switch between the displays in the sequence
shown.
• The sub-menus are accessed by pressing and holding the sensor button [1] for 3 seconds (see illustration
below).
Note
• This graphic is a summary of all of the menu items that can be displayed on the tness tracker and the
sequence of displays when shipped.

Start screen
Step counter
Notifications
Heart rate
(pulse)
Alarm settings
Main menu
Detailed
display
(Calories,
distance)
Detailed display
of received
messages
Main menu Main menu Main menu
Activation of
heart rate
measurement
Activation of
blood pressure
measurement
Detailed
display of
sport types
Sub-menu
Settings
Selection of
sport types
Start
Activity
Selection
Detailed
display
End of
activity /
Main menu
Selection of
sub-menus
Selection of
sport types
1
sec. 1sec. 1 sec. 1 sec. 1sec. 1 sec.
3 sec.
3 sec.
3 sec. 3 sec. 3 sec. 3 sec. 3 sec.
3 sec. 3 sec.
3 sec.
3 sec.
Confirmation
of selection
1sec.
3 sec.
1sec.
1sec.
1sec.
Blood pressure

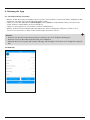
5. Setting up the fitness tracker
5.1 Downloading the Hama FIT app
Note
The following operating systems are supported:
• iOS 8.1 or higher
• Android 5.0 or higher
• Open the iTunes AppStore or Google Play Store on your smartphone.
• You can nd the app using the search function.
• Download the app as normal and install it on your smartphone. To do this, follow the instructions on your
smartphone.
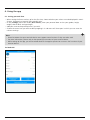
5.2 Pairing the fitness tracker with your smartphone
Note
In order for your tness tracker to display calls, text messages and WhatsApp messages, activate push mode for
messages in your smartphone settings.
Android / Apple mobile devices
• Ensure that the
Bluetooth
®
function is switched on on your smartphone and your tness tr
acker.
• Start the app on your smartphone and search for the "Fit Track 3900" tness tracker by pressing on the
Bluetooth symbol.
• Now select your "Fit3900" tness tracker to pair it with the app.
• Then make your personal settings.
• The tness tracker is now linked with the app and synchronisation begins.
Note
To start synchronisation of the tness tracker with the app, either press the circular arrow in the [Home] menu
item at the top right or drag the screen downwards.

6. Using the app
6.1 Setting personal data
• When setting the tness tracker up for the rst time, choose whether your values are to be displayed in metric
(metres, kilograms) or imperial (feet, pounds) units.
•
In the [Settings] menu item under [User Pr
ole], enter your personal data such as your gender
, height,
weight, date of birth and step length.
• Add your name and a prole picture if you wish.
• Choose the menu item you wish to edit by tapping it. A sub-menu will then open in which you can enter the
relevant settings.
Note
• Please be aware that your terminal device must support some functions if they are to be used.
• For more information, please refer to the operating instructions of your terminal device.
• While setting up the app, you will be asked whether the app has permission to access the functions of your
terminal device.
iOS/Android:

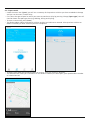
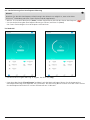
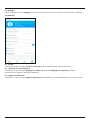
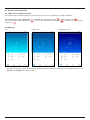
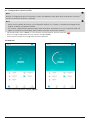
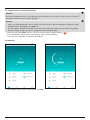
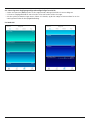
6.2 Displays in the main menu
6.2.1 Activity mode
The main menu shows you the following information:
Under menu item [Home] in the Activity tab, you will see the steps taken [ ], the distance covered [ ], the
last heart rate measured [ ], the last blood pressure measured
[ ] and the calories burned for the day in question. [ ].
iOS/Android:
Steps taken Calories burned Distance covered
The achieved proportion of your daily goal will be displayed in the relevant menu item. You can dene this in the
Activity goal (Android) / Goals (iOS) settings. (See Section 6.3.2)

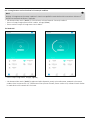
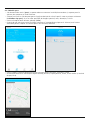
6.2.2 Recording a heart rate measurement
Note
Please be aware that heart rate recording in the history is only possible if an active
Bluetooth
®
connection is in
place between the tness tr
acker and the app.
• Under the menu item [Home] and the Activity tab, select the Heart rate button [ ].
• To start recording your heart rate, tap [Start].
The tness tracker starts to record your heart rate.
iOS/Android:
• To stop the recording, tap [Stop].
• Under the menu item [Settings] and the Device settings option, you can activate automatic heart rate
measurement (See Section 6.3.4.2). When this function is activated, the tness tracker measures your heart rate
continuously at 15-minute intervals.

6.2.3 Recording a blood pressure measurement
Note
Please be aware that blood pressure recording in the history is only possible if an active
Bluetooth
®
connection
is in place between the tness tr
acker and the app.
Note
• This is a consumer product, not a medical device. Hence, it is not intended for the diagnosis, therapy, cure
or prevention of illnesses.
• The values displayed therefore represent only approximate, guideline values and are not generally valid.
Please consult a doctor if you have any questions about your blood pressure.
• Under the menu item [Home] and the Activity tab, select the Blood pressure button [ ].
• To start recording your blood pressure, tap [Start].
The tness tracker starts to record your blood pressure.
iOS/Android:
• To stop the recording, tap [Stop].

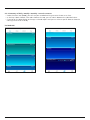
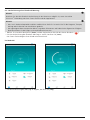
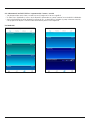
6.2.4 Sleep mode
• Under the menu item [Home] in the Sleep tab, you will see your sleep rhythm for the day in question.
• Here is where you will nd a graphical analysis of your sleep quality.
iOS/Android:

6.2.5 Sport mode
• Under the menu item [Sport], you will see a summary of the previous activities you have recorded via the app
and you can also start a new activity.
• First select the type of sport for which you want to record an activity by pressing Change [Sport type]. You will
then be shown the sport type Running, Walking, Hiking and Cycling.
• To start a new activity, press [Start].
• The display above shows the previous activities and the entire distance covered. Select previous activities to
obtain a summary of other activities you have completed.
• To obtain more detailed information about an activity, select the activity in question.
• The detailed view shows you information on the distance covered, the time spent, your speed and the number
of calories burned.

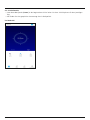
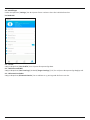
6.2.6 Summary of daily / weekly / monthly / annual successes
• Under the menu item [Data], you will see your recorded training successes shown as a chart.
• In the Day / Week / Month / Year tabs shown at the top, you can switch between the individual views.
• If you tap on the date display at the top, a calendar opens and you can select a specic date to show the
training successes for that day.
iOS/Android:

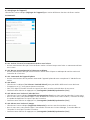
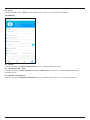
6.3 Settings
Under the menu item [Settings], you can adapt the tness tracker to your individual needs.
iOS/Android:
6.3.1 Profile
Select the sub-item [User Prole] to adapt your personal data.
6.3.2 Activity goal / Goals
Select the sub-item [Goal Settings] (Android) / [Target Settings] (iOS) to adapt your personal daily goals.
6.3.3 Bluetooth devices
Select the sub-item [Bluetooth Device] to establish a new pairing with the tness tracker.

6.3.4 Device settings
Select the sub-item [Device Settings] to activate various tness tracker functions.
iOS/Android:
6.3.4.1 Switch on display with raise
• Activate this function to enable the tness tracker's display to be activated when you move your arm upwards.
6.3.4.2 Automatic heart rate measurement
• Activate this function for the tness tracker to measure your heart rate continuously at 15-minute intervals.
6.3.4.3 Camera control
• Activate this function to be able to control the camera on your smartphone using the tness tracker.
6.3.4.4 Alarm
• Select the item [Alarm] to set different alarm times.
• You can add an alarm by tapping [+].
• To do this, select the required alarm time in the sub-menu and the day of the week.
• Conrm your selection by [Pressing Save (Android) / Synchronise (iOS)].
6.3.4.5 Drink reminder
• Select the sub-item [Water Drinking Reminder] and activate this function in the sub-menu.
• In the sub-menu, you can set the start time for the drink reminder, the interval, the number of repetitions and
the day of the week.
• Conrm your selection by [Pressing Save (Android) / Synchronise (iOS)].
6.3.4.6 Movement reminder
• Select the sub-item [Sedentary Reminder] and activate this function in the sub-menu.
• In the sub-menu, you can set the interval of the movement reminder, the start and end time, and the day of the week.
• Conrm your selection by [Pressing Save (Android) / Synchronise (iOS)].

6.3.4.7 Do not disturb
• Select the sub-item [Do not disturb] and activate this function in the sub-menu.
• In the sub-menu, you can set the start and end time for Do not disturb mode.
• Conrm your selection by [Pressing Save (Android) / Conrm (iOS)].
6.3.4.8 Restore factory settings
• In this sub-item, select [Reset] to reset the Hama FIT App to the factory settings.
• Conrm the subsequent prompt with [OK] in order to reset the Hama FIT app to the factory settings, or press
[Cance]l to close the selection.
6.3.5 Push notifications
• Select the item [Notication Alerts] to activate the notication function for various apps and services.
6.3.6 Google Fit / Apple Health
• Activate the connection to Google Fit by pressing the button on the right and connecting, when prompted, to
your Google account.
• Select the Apple Health item to obtain instructions for pairing with Apple Health.
6.3.7 Instructions & information
• Select the item [Instructions & information] to call up a link to a support page containing further information
about your tness tracker.
6.3.8 Contact
• Select the item [Feedback] if you have any questions about this app or your tness tracker, or wish to submit
feedback about the product.
6.3.9 Firmware
• Select the item [Firmware] to search for a newer version of this app and to update it if necessary.
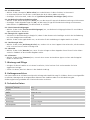
7. Care and Maintenance
• Only clean this product with a slightly damp, lint-free cloth and do not use aggressive cleaning agents.
• Ensure that no water is able to enter the product.
8. Warranty Disclaimer
Hama GmbH & Co KG assumes no liability and provides no warranty for damage resulting from improper
installation/mounting, improper use of the product or from failure to observe the operating instructions and/or
safety notes.
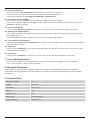
9. Technical data
Bluetooth
®
version 4.0
Display
0.96" LCD
Dimensions 250 x 18 x 12
Weight 22g
Protection class IP67
Battery type Lithium polymer
Battery capacity 90mAh / 3.7V

10. Recycling Information
Note on environmental protection:
Following the implementation of European Directive 2012/19/EU and 2006/66/EU into the national
legal systems, the following applies: electrical and electronic devices as well as batteries must not be
disposed of with household waste. Consumers are obliged by law to return electrical and electronic
devices as well as batteries to the designated public collection points or to the point of sale at the end
of their service lives. Detailed information on this topic is dened in the national laws of the respective
country. This presence of the above symbol on the product, operating instructions or package indicates that the
product is subject to these regulations. By recycling, reusing the materials or other forms of utilising old devices/
batteries, you are making an important contribution to protecting our environment.
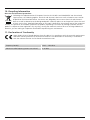
11. Declaration of Conformity
Hama GmbH & Co KG hereby declares that this device is in compliance with the essential requirements
and other relevant provisions of Directive 2014/53/EU. The declaration of conformity in accordance
with the relevant directive can be found at www.hama.com.
Frequency band(s) 2402 – 2480 MHz
Maximum radio-frequency power transmitted 0.26 dBm
Page is loading ...
Page is loading ...
Page is loading ...
Page is loading ...
Page is loading ...
Page is loading ...
Page is loading ...
Page is loading ...
Page is loading ...
Page is loading ...
Page is loading ...
Page is loading ...
Page is loading ...
Page is loading ...
Page is loading ...
Page is loading ...
Page is loading ...
Page is loading ...
Page is loading ...
Page is loading ...
Page is loading ...
Page is loading ...
Page is loading ...
Page is loading ...
Page is loading ...
Page is loading ...
Page is loading ...
Page is loading ...
Page is loading ...
Page is loading ...
Page is loading ...
Page is loading ...
Page is loading ...
Page is loading ...
Page is loading ...
Page is loading ...
Page is loading ...
Page is loading ...
Page is loading ...
Page is loading ...
Page is loading ...
Page is loading ...
Page is loading ...
Page is loading ...
Page is loading ...
Page is loading ...
Page is loading ...
Page is loading ...
Page is loading ...
Page is loading ...
Page is loading ...
Page is loading ...
Page is loading ...
Page is loading ...
Page is loading ...
Page is loading ...
Page is loading ...
Page is loading ...
Page is loading ...
Page is loading ...
Page is loading ...
Page is loading ...
Page is loading ...
Page is loading ...
Page is loading ...
Page is loading ...
Page is loading ...
Page is loading ...
Page is loading ...
Page is loading ...
Page is loading ...
Page is loading ...
-
 1
1
-
 2
2
-
 3
3
-
 4
4
-
 5
5
-
 6
6
-
 7
7
-
 8
8
-
 9
9
-
 10
10
-
 11
11
-
 12
12
-
 13
13
-
 14
14
-
 15
15
-
 16
16
-
 17
17
-
 18
18
-
 19
19
-
 20
20
-
 21
21
-
 22
22
-
 23
23
-
 24
24
-
 25
25
-
 26
26
-
 27
27
-
 28
28
-
 29
29
-
 30
30
-
 31
31
-
 32
32
-
 33
33
-
 34
34
-
 35
35
-
 36
36
-
 37
37
-
 38
38
-
 39
39
-
 40
40
-
 41
41
-
 42
42
-
 43
43
-
 44
44
-
 45
45
-
 46
46
-
 47
47
-
 48
48
-
 49
49
-
 50
50
-
 51
51
-
 52
52
-
 53
53
-
 54
54
-
 55
55
-
 56
56
-
 57
57
-
 58
58
-
 59
59
-
 60
60
-
 61
61
-
 62
62
-
 63
63
-
 64
64
-
 65
65
-
 66
66
-
 67
67
-
 68
68
-
 69
69
-
 70
70
-
 71
71
-
 72
72
-
 73
73
-
 74
74
-
 75
75
-
 76
76
-
 77
77
-
 78
78
-
 79
79
-
 80
80
-
 81
81
-
 82
82
-
 83
83
-
 84
84
-
 85
85
-
 86
86
-
 87
87
-
 88
88
-
 89
89
-
 90
90
-
 91
91
-
 92
92


Hama Fit Track 3900 Owner's manual
- Type
- Owner's manual
- This manual is also suitable for
Ask a question and I''ll find the answer in the document
Finding information in a document is now easier with AI
in other languages
Related papers
Other documents
-
 SMART KITCHEN 4008058 Delivery Tracker User manual
-
 MY KRONOZ MyKronoz® ZeFit4HR Owner's manual
-
AKASO H Band User manual
-
ADE Smart Activity Tracker AM 1800/1801 FITvigo User manual
-
Soehnle Fit Connect 300 HR User manual
-
Silvercrest SADP 4 A1 Operating Instructions Manual
-
 T'nB SPBELTLED Datasheet
-
AGPtek C30 Owner's manual
-
TomTom RUNNER User manual
-
Medisana ViFit Connect MX3 Owner's manual


