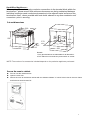
Bellini BPD270EC is a 60cm 9 Function Touch Oven with a 70-liter capacity, making it a great choice for families or those who love to cook. It features a sleek design with a black glass finish and a touch control panel for easy operation. With its 9 cooking functions, including defrost, grill, and convection, you can prepare a variety of dishes with ease. The oven also comes with a baking tray and grill rack for added convenience.
Bellini BPD270EC is a 60cm 9 Function Touch Oven with a 70-liter capacity, making it a great choice for families or those who love to cook. It features a sleek design with a black glass finish and a touch control panel for easy operation. With its 9 cooking functions, including defrost, grill, and convection, you can prepare a variety of dishes with ease. The oven also comes with a baking tray and grill rack for added convenience.


-
 1
1
-
 2
2
-
 3
3
-
 4
4
-
 5
5
-
 6
6
-
 7
7
-
 8
8
-
 9
9
-
 10
10
-
 11
11
-
 12
12
-
 13
13
-
 14
14
-
 15
15
-
 16
16
-
 17
17
-
 18
18


Bellini BPD270EC User guide
- Type
- User guide
- This manual is also suitable for
Bellini BPD270EC is a 60cm 9 Function Touch Oven with a 70-liter capacity, making it a great choice for families or those who love to cook. It features a sleek design with a black glass finish and a touch control panel for easy operation. With its 9 cooking functions, including defrost, grill, and convection, you can prepare a variety of dishes with ease. The oven also comes with a baking tray and grill rack for added convenience.
Ask a question and I''ll find the answer in the document
Finding information in a document is now easier with AI